Scratch 'I was a Sumo Act III"

The Rocketry Forum

Help Support The Rocketry Forum:

This site may earn a commission from merchant affiliate links, including eBay, Amazon, and others.

jFlds

Well-Known Member
TRF Supporter
Joined
Nov 12, 2010
Messages
609
Reaction score
325
This could have been in the AT Sumo gallery, anyways lol, to suffice the only component left of that lawn dart was the nosecone!

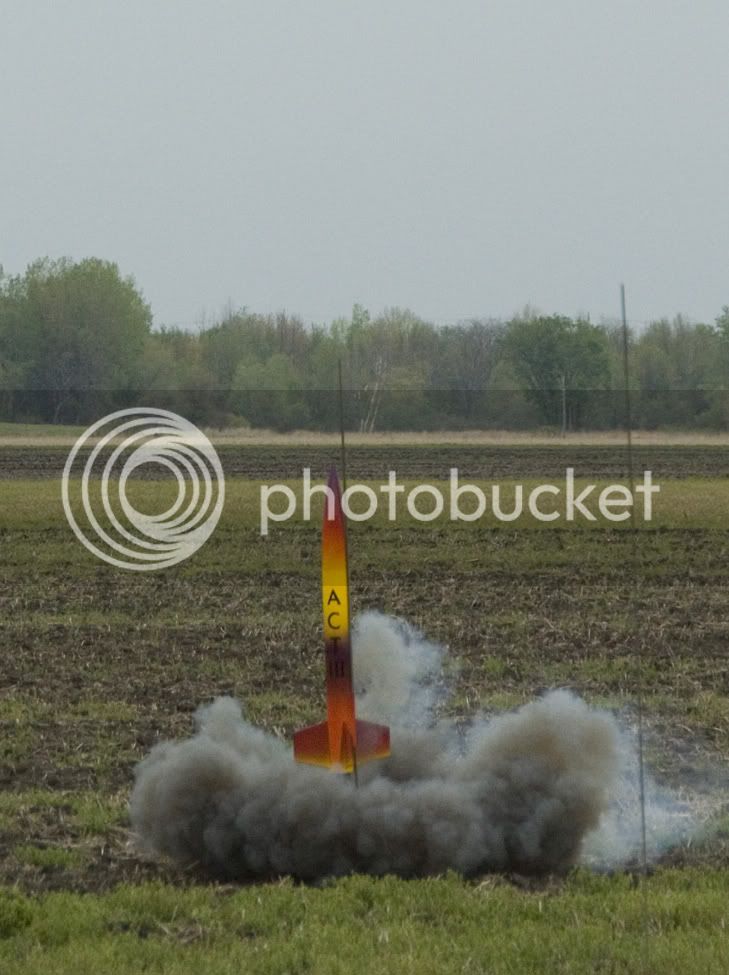
This was another rework scratch build of ours, the first rebuild was 'Act 2' and this is the current configuration as 'Act 3'

The original fincan from 'Act 2' was cannibalized for the 'Deep Purple' build and 'Act 3' was redesigned around a 'familiar' looking 4 FNC shape.

Again... Very little taping on this, the kids wanted to see a 'flowing' spectrum of color and we went from there.

She's another 4" airframe, 38mm MMT, 47" length, 5lbs barenaked.

Certed L2 with her back in May. Rip of a flight and a heck of a walk as she is a single deployment bird.

Enjoy the pics.

0425100659a.jpg

0425100700a.jpg

0426100508a.jpg

0426100609a.jpg

0426101133a.jpg
 
That's an awesome paint job! How did you get the colors to gradiate so smoothly? (Sorry, I made up that word, I think)
 
Thanks!

I basically use a ‘wet on wet’ technique as I change the colors on the piece.

The big thing to remember here is my setup is different than most. I use MAP paints on top of a tough polyester primer which of its own is almost the equivalent of fiberglass resin.
You can do the same thing with spray bombs or an airbrush as long as you are using products that intermix and are of the same solvent base.

On this particular rocket I shot the yellow base completely, 1 coat, then laid the two opposing colors on the fins and tip. I fan the color off making sure I ‘mist’ the area towards the other spectrums. I try to do this while the paint is still ‘flashing’ to allow the colors to blend better. After I had the basic scheme I let the paint finish its flash time and then went back in and gave the colors more definition and clarity and lightly misted the gradient areas as well. It’s never a cut in stone process achieving the result. When it looks about where I want it… I let it dry, lay out some graphics, cut some vinyl, weed and mask it, apply and walah! Get out the clear coat and start flowing it on there.

So basically, I do commercial painting and custom fabrication for a living so my voice of experience is what it is, from years in the trade. I do not want to come off as if I am talking down to anyone as I am far from being anything other than a normal Joe out there just with a few skills. I may have to do a picture representation of this to communicate it a little better… I will work on something to show this rather than just spit it out there like this was.

(Yah not everyone speaks your version of jibberish):y:

Shut up voice in my head! :D

:bangpan:

Oh and don't forget... I haven't a clue on what I am doing! That's my story and I'm sticking to it!

Just another blind squirrel out there finding a nut now and then, that's all!

0305101319a.jpg
 
Last edited:
No wonder it looks so professional. I doubt if I could come close, especially with access only to rattle cans.
 
You can get it.

Actually I can try to see if I can grab up some old spray bombs here and detail it on some scraps and post it over in techniques if that'll help you.

I'm not superswamped here at the shop and can probably squeeze it in over a pot of jo in the wee hours of the AM sometime soon and post it.

Sound good?

:cool:
 
That would be great! Thanks! I'd love to give it a try again. My first try without knowing what I was doing was a total disaster.
 
That would be great! Thanks! I'd love to give it a try again. My first try without knowing what I was doing was a total disaster.


What type of finishing are you looking to do?

Being restricted to spraybombs is a bummer. If you have a small compressor or know anyone that will lend it to you, you can pick up an el cheapo spray setup for about 30 bucks. If you have access to an auto parts store that mixes paint, you have now found a great source for decent material to work with.

Otherwise you could always go the small system route with an airbrush and aerosol propellants as well.

The big trick with spraycans is the lack of control over the flow and the fan of the paint itself. I was just playing around with trying to take pics with one hand while doing it with cans and that was kinda rough. What I can say about it is to keep your gradients simple if you are using cans, go from ends to center. The lack of control over the flow really limits what you can do but the effect is possible. Keep your distance and think backwards when you look at the color, I mean visually invert it in your mind. I will post some pics once I figure out who to do it by myself without having to engage one of my hourlys in the process. heck, this may come down to a kid recruitment project to help the old man at the shop! :D

You can always pm me or shoot me an email about this stuff as well.
 
With spray cans, I guess a finish like yours is out of the question. I tried the Estes Big Daddy gradient from dark red to dark grey, but it was a failure. I think the combination of inconsistent spray from the nozzle and holding the can too close was the primary cause. It seems like 12" is too close. Maybe I'll invest in an airbrush, but not until I can do a better job with a spray can.

Thanks for your time and advice. It's much appreciated!

12" is fine for the concentrated areas. Playing around with cans here blending colors when I get to the "gradients" I am as far as 24" away. This is where having a really tuned in trigger finger will help a lot and a high quality nozzle on that spraybomb. It is awfully tricky to cut that flow down enough especially on a small airframe. You identified the biggest culprit in spray painting, distance. Sometimes with my rigs I am as far as 3 or 4 feet to get the effects I want on a finish, or as close as 2 inches.


OBTW, thanks Dave.

Finally told the wife I would like a big box of components for the past 12 years of my devotions to her... Nothing more, well until it's time to stuff some hardware in it! :cheers:
 
For distances of 2 feet away and greater, you must have to do a lot of masking to protect the gradiated areas.

Now that winter is beginning to set in here in the northeast, I think I'm going to have to invest in a decent filter mask. The only place I'll be able to paint is in my unheated basement. I hope it's not too cold down there.


Nope, great thing about paint jobs like that, little to no masking. I do a lot of masking if I want to have that effect in small patterns on the airframe. Most of the time I do it after I have done my masking colors.

Scary, painting in a basement. Hope your furnace isn't down there!:y:

If it's spray cans, live a little..forget the mask!:D Deep breath and hold...deep breath and hold! :roll:

It's all too easy for me to forget about what I have to work with.
 
The basement is where my oil furnace is. Not a good idea, huh? Unfortunately, I have no other place to paint until springtime. Still, it may soon be too cold in the basement.
 
No, not with potential fumes.:y:

How big are your projects? And what are you looking to do?

I mean, if it is something that is communicable, not like a virus LOl, or way to crazy of a design I may be able to assist you somehow directly?

Never know.
 
So far, I'm building LPR from kits, so it doesn't take long to paint them. No special designs until I improve my building skills. I just started building again after a 50 year hiatus. This winter, I'll build some MPR kits, but I won't paint them until the springtime.
 
I got ya. :cool:

Doing a build thread on a model kit in the techniques area. I will probably stay with the whole build and post some finishing how to's there maybe a vid if I can find a way to protect my camera in the booth.

I uploaded soem of the pics from here to a site so you can get a better look at them.

Fields2A6x150.jpg


Fields2A_16x150.jpg


Fields2B6x150.jpg
 
I got ya. :cool:

Doing a build thread on a model kit in the techniques area. I will probably stay with the whole build and post some finishing how to's there maybe a vid if I can find a way to protect my camera in the booth.

I uploaded soem of the pics from here to a site so you can get a better look at them.

Nice Pics! Must be a joy to fly.

I meant to ask: do you paint with the rocket vertical and spray horizontally?
 
I paint them vertical. I have a tripod set up and use different size rods to go up and in to the mmt.

Most of my passes with my gun are vertical. When I add fill colors that are bands I may do some horizontal work and around the fin assy.

I constantly move around the stand as I paint, always hustling to keep things flowing properly. It's busy work, :D, shooting a 4 inch or above airframe.
 
I would've thought that you would have to spray horizontally for the gradients.

A question for you. I painted 2 rockets in my basement yesterday and both have the same problem along the fin fillets. Temperature was about 61 degrees. I used Rustoleum Painters' Touch. This is the 2nd coat. The first was very light; the grey primer still showed through. But the second ended up like this. I haven't had this problem before. Can you tell what the cause might be? I know I'll have to re-sand those areas and re-paint, but is there any other preparation I need to do before re-painting?.

DSCN0812_784.JPG
 
It's hard for me too tell exactly what I am looking at but it looks like it is 'crinkling' or has an 'onion peeling' going on? Is that correct?
 
First how long was the glue set and what type on the fillets?

If your glue was just skinning and not fully cured the shrinking of the paint pulled the looser dry surface upon the still not fully cured moist area of adhesive.

Second, the primer is compatible with the topcoat? When I use rustoleum primers, very rarely but it does happen, I tend to use the automotive variety as they are more acceptable to different topcoats. If this was a 'fast dry' product the solvents will cause each other to 'pop' if you are not within the realms of the time to recoat as stated on the cans. This is the most common thing that occurs with spraybombs.... Not really realizing that when it say recoat within 1 hour or wait 48 hours.... That is exactly what they mean!@ The solvents will react with each other as the skin starts to form after that first hour, an additional layer as light as it may be will react and cause a nasty mess of wrinkles and peeling effects.


I would almost bet if it wasn't something like these this it may have been just a solvent issue reacting between components and it just caused some 'solvent popping' or it 'vapor locked' trapped solvent trying to escape as your paint was flashing or going into its cure.


Sorry, I bet this sounds like complete buffoonish jibberish to some....

:eyepop:

Bernie, I sent you a PM. Check it.
 
Last edited:
Back
Top