You are using an out of date browser. It may not display this or other websites correctly.
You should upgrade or use an alternative browser.
You should upgrade or use an alternative browser.
Sci-fi fun: what to do with that spare SR-71 nose cone?
- Thread starter EchoVictor
- Start date


Help Support The Rocketry Forum:
This site may earn a commission from merchant affiliate
links, including eBay, Amazon, and others.
EchoVictor
Well-Known Member
- Joined
- Jan 30, 2009
- Messages
- 400
- Reaction score
- 0
Ever have that feeling like you can't figure out a certain problem on a design you've been working on? Kinda like you just aren't getting it, so you just kind of shelve it for a while? Well, I haven't done much on the Whitestar here lately due to this feeling. For sake of comparison, we'll just call it "Rocketeer's Block" instead of Writer's Block.
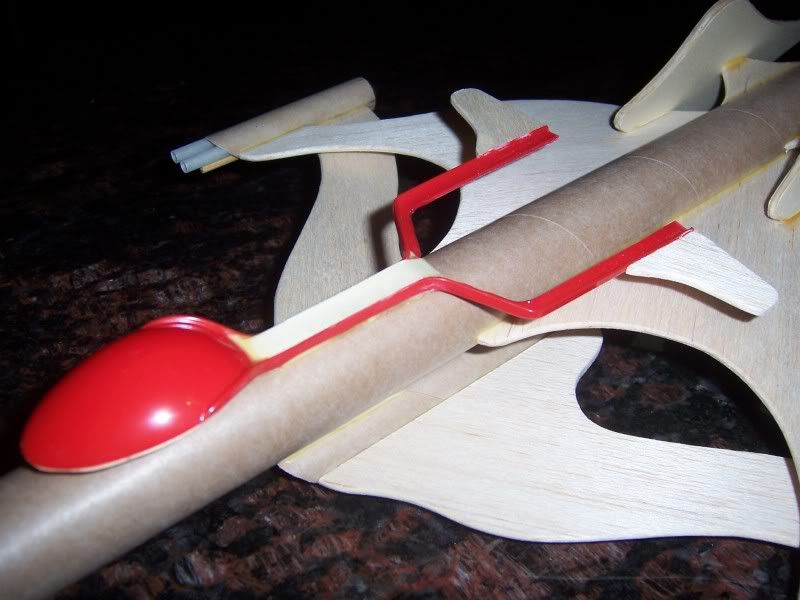
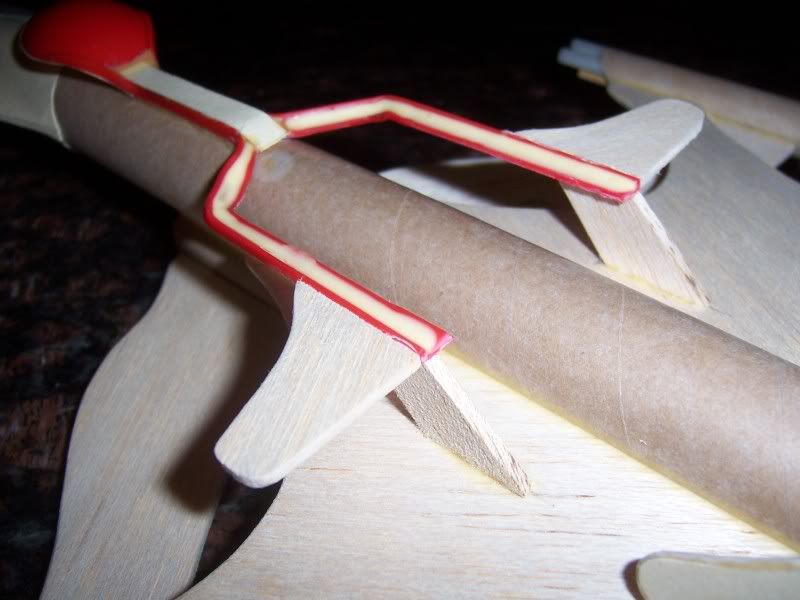
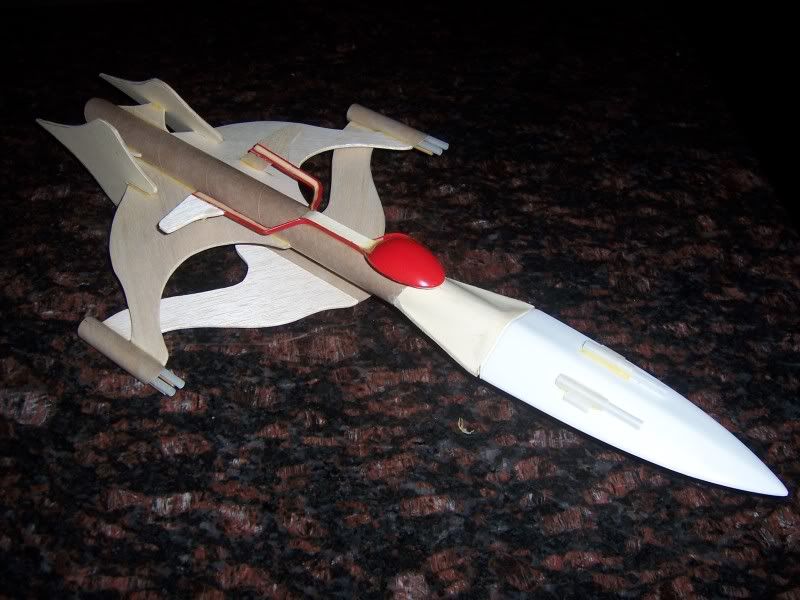
I've been struggling with how to do the bridge section of the Whitestar. It's the "wishbone" looking shape in the middle;
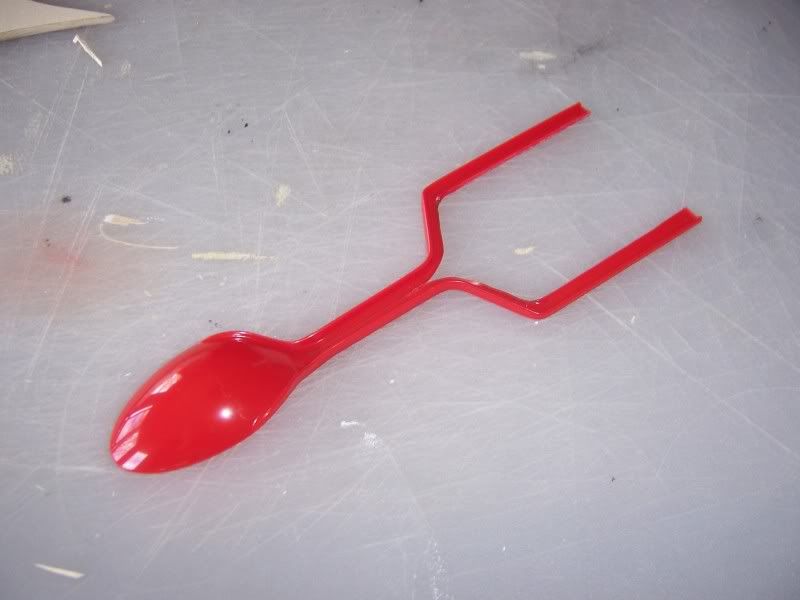
Sometimes, you just need that little inspiration that puts you over the edge. A visit to the local Dairy Queen this week gave me my answer;
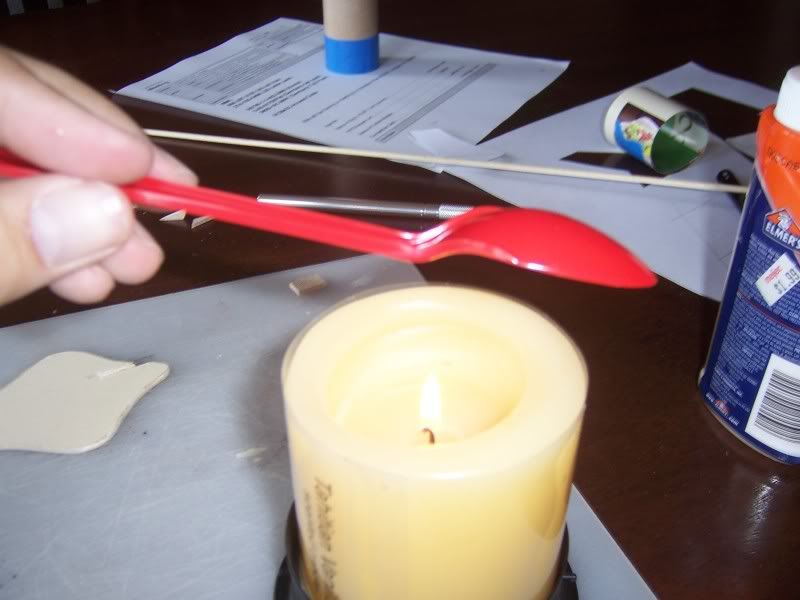
Yep, a plastic spoon. I used a little bit of heat from the candle flame to bend the plastic into the shape I wanted. A little split here, a little bending there, and I've got my bridge piece.
After solving this riddle, the other ideas started flowing. I was worried about the tails being susceptible to breaking, so I laminated them with cut-outs from a manila folder;
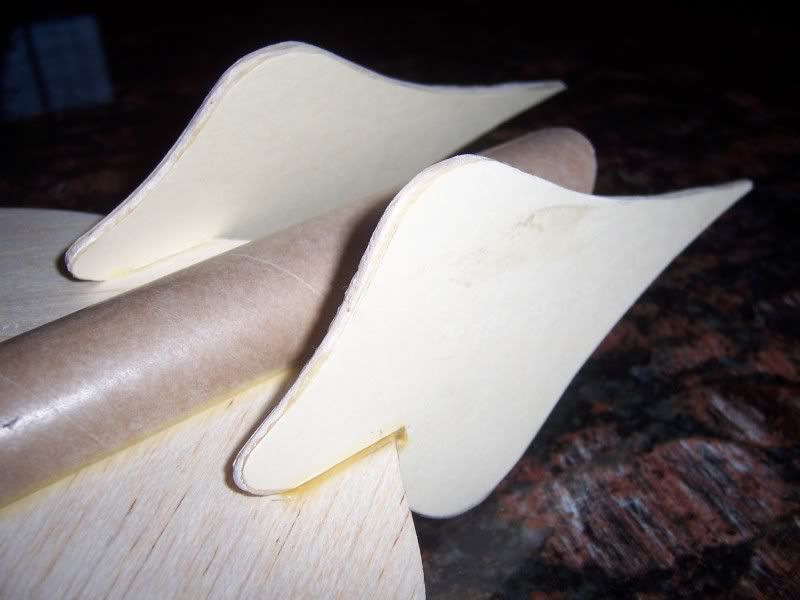
After mounting them, I was still worried, as they stick out pretty far with no support;
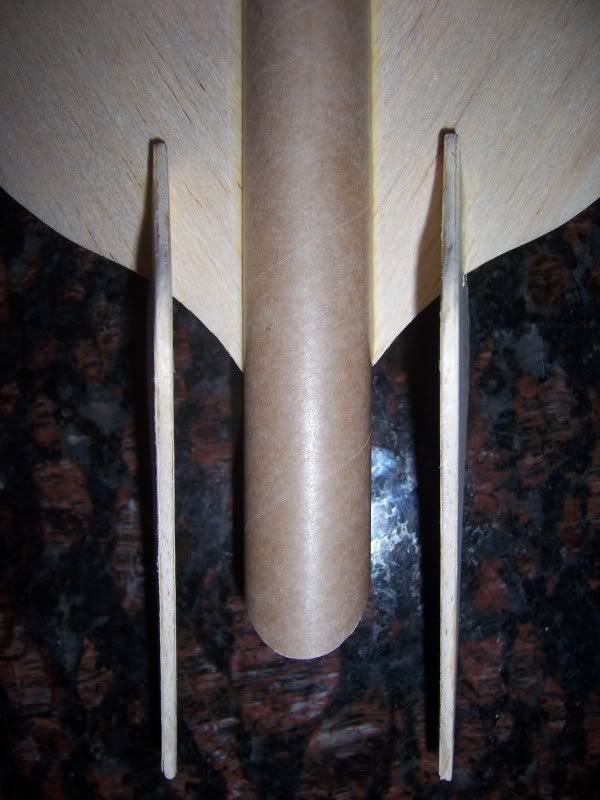
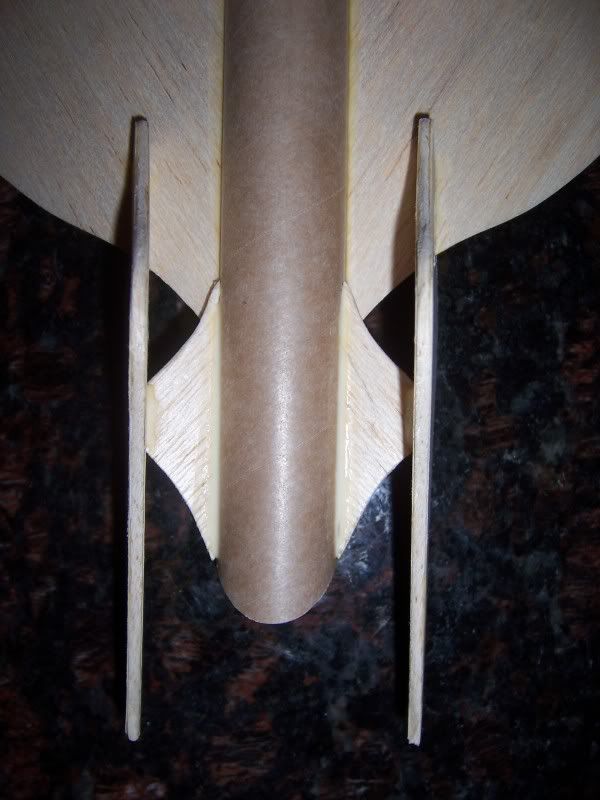
Well, a couple of scraps of balsa trimmed out and strategically placed, and the tails are set;
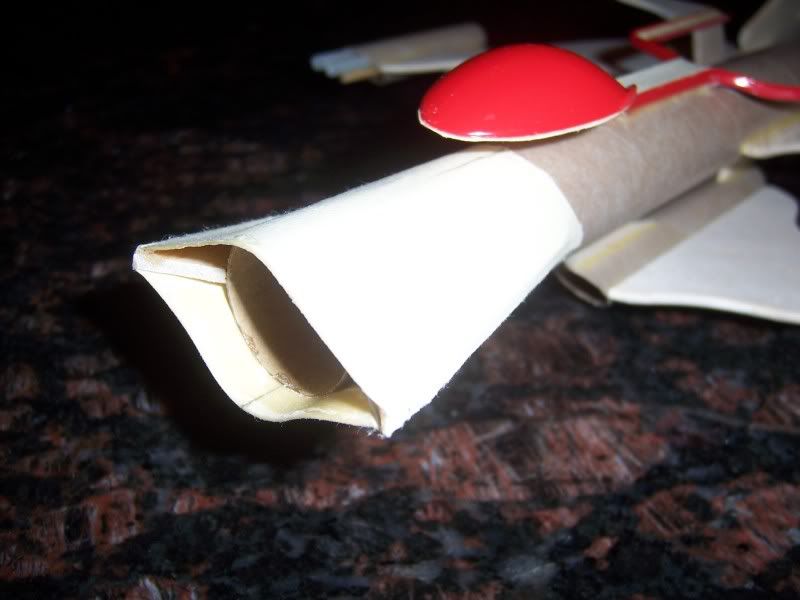
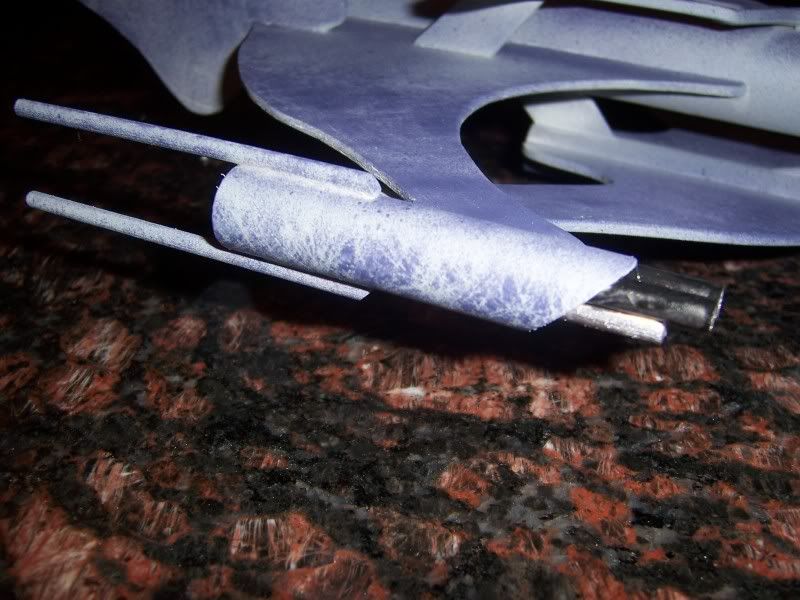
Up front, I used a Dremel to grind some grooves into the nose cone and added the main guns;
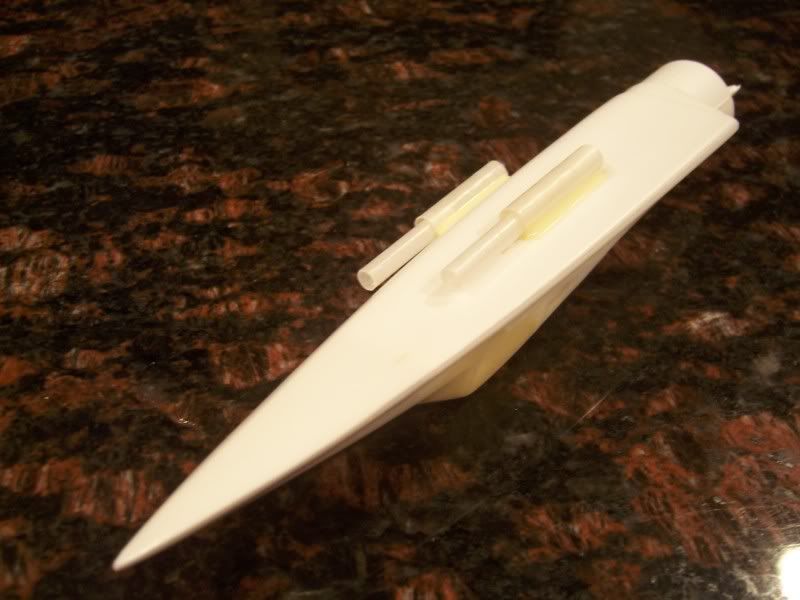
Here she is, mostly put together;
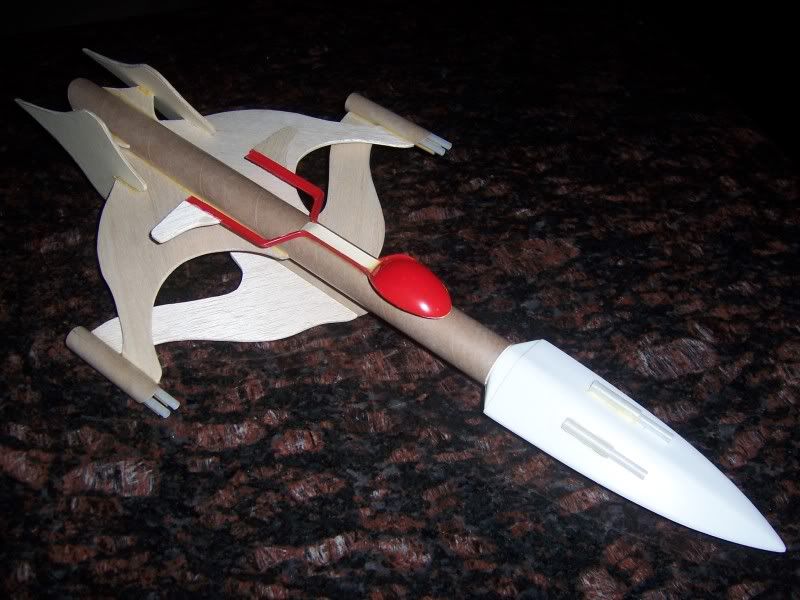
Close-up of the bridge section;
I still need to put supports underneath the ends of the "wishbone", but I'm getting pretty close to done. Now, the big question is.......
Am I stable?
Later,
EV
I've been struggling with how to do the bridge section of the Whitestar. It's the "wishbone" looking shape in the middle;
Sometimes, you just need that little inspiration that puts you over the edge. A visit to the local Dairy Queen this week gave me my answer;
Yep, a plastic spoon. I used a little bit of heat from the candle flame to bend the plastic into the shape I wanted. A little split here, a little bending there, and I've got my bridge piece.
After solving this riddle, the other ideas started flowing. I was worried about the tails being susceptible to breaking, so I laminated them with cut-outs from a manila folder;
After mounting them, I was still worried, as they stick out pretty far with no support;
Well, a couple of scraps of balsa trimmed out and strategically placed, and the tails are set;
Up front, I used a Dremel to grind some grooves into the nose cone and added the main guns;
Here she is, mostly put together;
Close-up of the bridge section;
I still need to put supports underneath the ends of the "wishbone", but I'm getting pretty close to done. Now, the big question is.......
Am I stable?
Later,
EV
dedleytedley
Well-Known Member
- Joined
- Apr 29, 2009
- Messages
- 292
- Reaction score
- 1
That's outstanding! You do beautiful work. Ted
MattieShoes
Well-Known Member
- Joined
- Mar 8, 2010
- Messages
- 224
- Reaction score
- 2
It's got quite a bit of fin area pretty far north... I'm betting it's going to take a little bit of nose weight to make it nice and stable.
Man, what a great project.
Man, what a great project.
- Joined
- Jan 17, 2009
- Messages
- 15,468
- Reaction score
- 232
Now, the big question is.......
Am I stable?
Later,
EV
The rocket? Likely...
You? Not so much... LOL
But, it's a good thing!
I just want to see what you use the fork and knife for.
You should build another and use a Spork (it would be the evil twin to this one, with a sinister looking bridge...)
Bottom line, that is one kewl looking rocket!
dragon_rider10
Well-Known Member
- Joined
- Dec 9, 2009
- Messages
- 699
- Reaction score
- 2
EV,
That spoon is a brilliant solution. I've seen some out of the box thinking before, but that is great!
You might want to review PemTech's thread on the challenges he had on the Vorlon paint job before you move forward on the finish.
That spoon is a brilliant solution. I've seen some out of the box thinking before, but that is great!
You might want to review PemTech's thread on the challenges he had on the Vorlon paint job before you move forward on the finish.
Last edited:
EchoVictor
Well-Known Member
- Joined
- Jan 30, 2009
- Messages
- 400
- Reaction score
- 0
Oh, believe me, how the heck I'm gonna paint this thing has been on my mind from the start. Once again, I loooooove the https://www.starshipmodeler.com/ site. There's a few folks on there that have built replica Whitestars, and I've been reading their commments about finishing.
Since I don't have an airbrush, and I'm not sure how I can achieve that look with rattle cans and masking, I may use a trick that a couple of folks over there have done......
Full body decals.
Later,
EV
Since I don't have an airbrush, and I'm not sure how I can achieve that look with rattle cans and masking, I may use a trick that a couple of folks over there have done......
Full body decals.
Later,
EV
I still need to put supports underneath the ends of the "wishbone", but I'm getting pretty close to done. Now, the big question is.......
Am I stable?
Who cares, that's going to be too pretty to fly anyway.
Nice work, I can't wait to see where this goes.
dragon_rider10
Well-Known Member
- Joined
- Dec 9, 2009
- Messages
- 699
- Reaction score
- 2
How feasible would it be to use paper shrouds like the original SR-71 to soften the angle between the nosecone and the body tube? Might improve the scale appearance, and is likely well within your skill level.
EchoVictor
Well-Known Member
- Joined
- Jan 30, 2009
- Messages
- 400
- Reaction score
- 0
I tried that already on the main wing/body joint, and I just couldn't get it to look right. I may still try around the nose cone, though....
Later,
EV
Later,
EV
dlazarus6660
Well-Known Member
- Joined
- Feb 9, 2010
- Messages
- 3,885
- Reaction score
- 12
EV,
I never would have thought of that, I mean going to Dariy Queen!:roll:
BTW...What did you order?
I usally get my best ideas in the home library aka bathroom!:blush:
The model airplane guys use the plastic spoons as air intakes for thier electric powered models. If your wondering how, they cut them in half.
Well done, Can't wait for the kit!
I never would have thought of that, I mean going to Dariy Queen!
:roll: BTW...What did you order?
I usally get my best ideas in the home library aka bathroom!:blush:
The model airplane guys use the plastic spoons as air intakes for thier electric powered models. If your wondering how, they cut them in half.
Well done, Can't wait for the kit!
Last edited:
EchoVictor
Well-Known Member
- Joined
- Jan 30, 2009
- Messages
- 400
- Reaction score
- 0
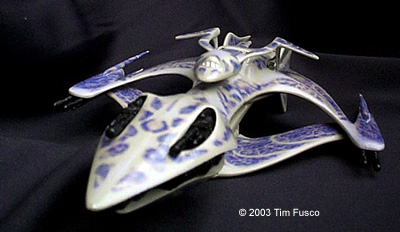
Decided to try and shroud the front of the BT, like the SR-71 kit, to match up with the nose...
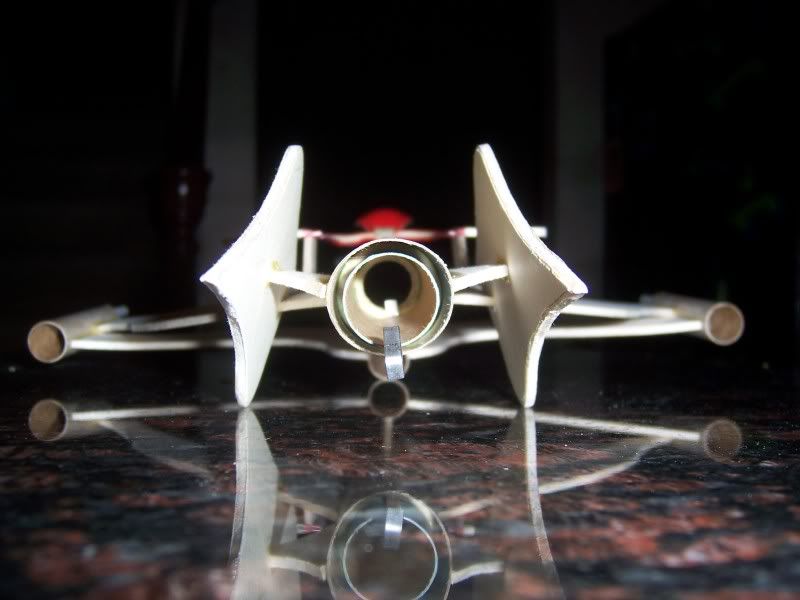
Also added the braces to the rear of the bridge section;
Here's the overall;
and a rear shot that someone requested;
Later,
EV
Also added the braces to the rear of the bridge section;
Here's the overall;
and a rear shot that someone requested;
Later,
EV
The shrouds look great! This is a great build, I've enjoyed following it. Can't wait to hear how it flies. :clap:
dlazarus6660
Well-Known Member
- Joined
- Feb 9, 2010
- Messages
- 3,885
- Reaction score
- 12
EV,
Take video if you do a swing test. Just make sure you wear a Lone Ranger mask so you can't be identified in public if it fails the swing test.lol
Really it looks awesome!
Take video if you do a swing test. Just make sure you wear a Lone Ranger mask so you can't be identified in public if it fails the swing test.lol
Really it looks awesome!
EchoVictor
Well-Known Member
- Joined
- Jan 30, 2009
- Messages
- 400
- Reaction score
- 0
Well, mixed results from swing testing.
First test last weekend with no nose weight reulted in typical sideways fluttering of instability. Since I didn't feel like meandering back into the house, I just grabbed a nice heavy washer off my garage workbench and taped it to the nose.
Ahhh, straight as an arrow in both orientations.
I went back inside and threw the washer on my scale and it measured 18g. Whoa, that's a chunk of mass. I figured I'd just add in 5g increments and see where I got. Went back to my rocket bits, and what's this? I'm out of clay!
I picked some up a couple of days ago, and started back testing with 5g. Not stable, but it's been really windy here lately. I went up to 10g in the nose and it seemed to be OK, but there were still gusts that made it stall out. Didn't look near as smooth as with the big washer.
I went back inside to add more mass, but luckily, I decided to do a quick spot check and put the whole rocket on the scale. Total mass with engine was 105g.
Yikes! I'm getting awfully close to the 113g max weight rating of Estes B and C motors. I'm going to hold off on final swing testing so that I have a bit of wiggle room on the mass for the final finishing. So the big question now is.....
How much do a couple coats of paint weigh?
Later,
EV
dlazarus6660
Well-Known Member
- Joined
- Feb 9, 2010
- Messages
- 3,885
- Reaction score
- 12
EV,
How much do a couple coats of paint weigh?
Same as a henaweigh!:roll:
How much do a couple coats of paint weigh?
Same as a henaweigh!
:roll:EchoVictor
Well-Known Member
- Joined
- Jan 30, 2009
- Messages
- 400
- Reaction score
- 0
Well, now I know (and "knowing is half the battle!" ).
I sprayed on a coat of primer on last night (Walmart 99 cent cheapo stuff), and the overall mass went from 105g to 109g.
So a coat of paint weighs about 4g! Sure glad I held off on the nose weight....
Later,
EV
).I sprayed on a coat of primer on last night (Walmart 99 cent cheapo stuff), and the overall mass went from 105g to 109g.
So a coat of paint weighs about 4g! Sure glad I held off on the nose weight....
Later,
EV
dlazarus6660
Well-Known Member
- Joined
- Feb 9, 2010
- Messages
- 3,885
- Reaction score
- 12
Well EV,
You had all weekend to finish the WhiteStar it's time to let us see it?
Did you launch it yet? Does it fly?
You had all weekend to finish the WhiteStar it's time to let us see it?
Did you launch it yet? Does it fly?
EchoVictor
Well-Known Member
- Joined
- Jan 30, 2009
- Messages
- 400
- Reaction score
- 0
Patience, grasshopper, patience.
When one is 400 miles out of town, one does not finish rocket projects.
Later,
EV
P.S.
Ancient Chinese Proverb
"Be patient, and achieve all things."
Modern equivalent
"Be impatient, and achieve all things faster!"
When one is 400 miles out of town, one does not finish rocket projects.
Later,
EV
P.S.
Ancient Chinese Proverb
"Be patient, and achieve all things."
Modern equivalent
"Be impatient, and achieve all things faster!"
EchoVictor
Well-Known Member
- Joined
- Jan 30, 2009
- Messages
- 400
- Reaction score
- 0
Sometimes there is no greater feeling than envisioning something in your mind's eye, and then having the immense satisfaction of striving and working until that vision becomes a reality. A reality better than you thought possible when you started, a reality you never thought you'd see when you hit those creative roadblocks that threatened to derail your idea for good.
Today has been one of those times. She's complete.
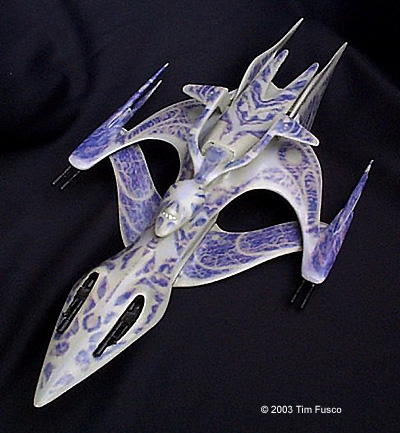
The Babylon 5 Minbari/Earth Alliance WhiteStar;
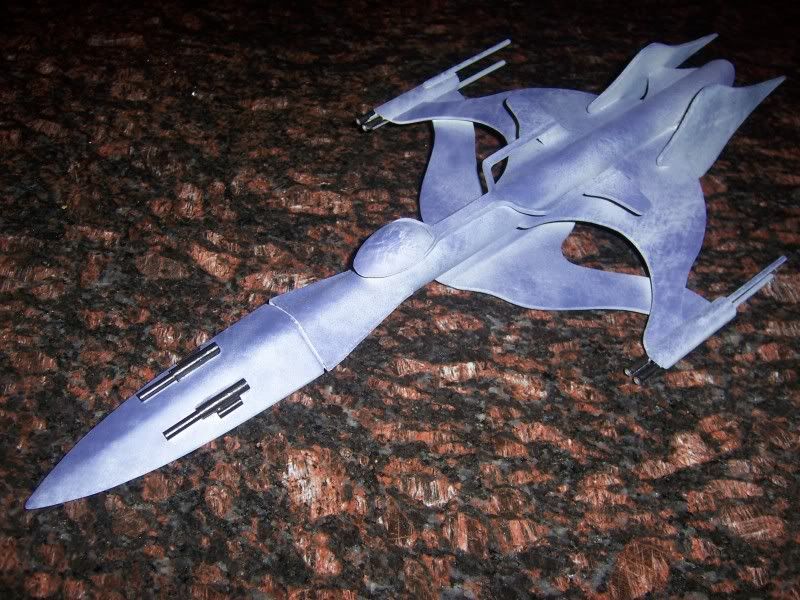
After much deliberation on how I was going to achieve the paint scheme, I came upon an inspiration......the $0.97 furnace filter. Split into two layers to make the fibers thinner, I simply laid it on top of the rocket and sprayed a medium purple over the top of the grey primer. I think it turned out fantastically.
Close-up of the main wing;
..and of the gun pod;
Adding a little bit more nose weight to get the final swing-test looking good, her total mass is 115g. Maiden flight will be next weekend at the WOOSH Bong Launch (https://www.wooshrocketry.org/)
Later,
EV
Today has been one of those times. She's complete.
The Babylon 5 Minbari/Earth Alliance WhiteStar;
After much deliberation on how I was going to achieve the paint scheme, I came upon an inspiration......the $0.97 furnace filter. Split into two layers to make the fibers thinner, I simply laid it on top of the rocket and sprayed a medium purple over the top of the grey primer. I think it turned out fantastically.
Close-up of the main wing;
..and of the gun pod;
Adding a little bit more nose weight to get the final swing-test looking good, her total mass is 115g. Maiden flight will be next weekend at the WOOSH Bong Launch (https://www.wooshrocketry.org/)
Later,
EV
- Joined
- Jan 17, 2009
- Messages
- 15,468
- Reaction score
- 232
Stunning, as expected
I would love to see pictures of that filter material and your paint application method, if you could...
I would love to see pictures of that filter material and your paint application method, if you could...
tonypv
And so it begins...
That looks great!!
Nice job EV.
Nice job EV.
dlazarus6660
Well-Known Member
- Joined
- Feb 9, 2010
- Messages
- 3,885
- Reaction score
- 12
EV,
One thing missing...
You need this as one of the decals!

One thing missing...
You need this as one of the decals!
EchoVictor
Well-Known Member
- Joined
- Jan 30, 2009
- Messages
- 400
- Reaction score
- 0
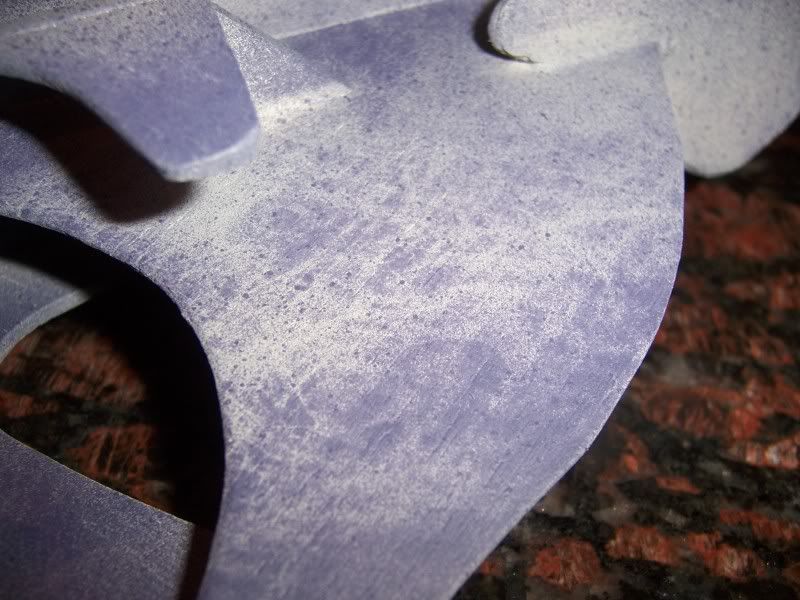
I would love to see pictures of that filter material and your paint application method, if you could...
As requested....
It's the uber-cheapo $0.97 14"x24" furnace filter at Lowe's. Here's the remains after I tore off the outer cardboard frame;
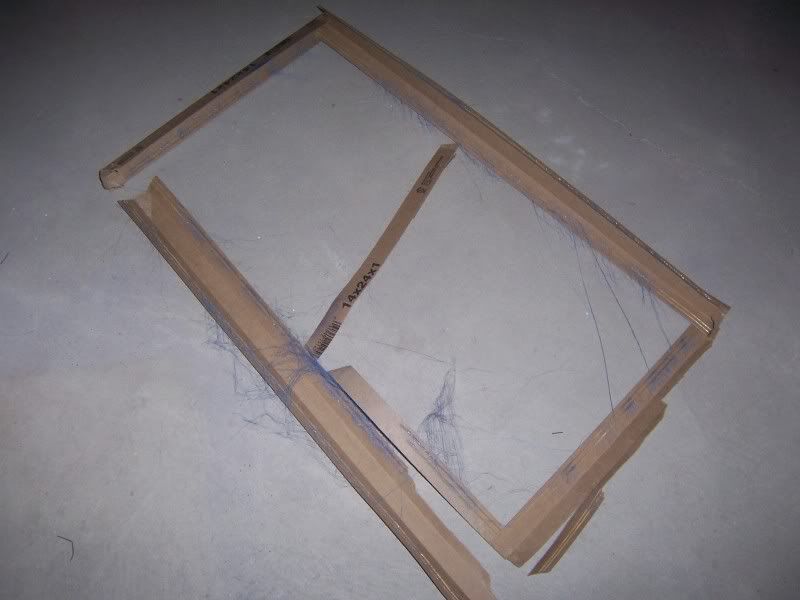
What's left over is the fiberglass blanket. I tried spraying thorugh the full blanket, but found that it was too thick and didn't let much paint through. It easily rips in half like two sheets of paper stuck together, so that you end up with two 14"x24" blankets with one smooth side and one rough side.
Here's one of the sheets laid across a Starlight F-32 Avenger I'm working on;
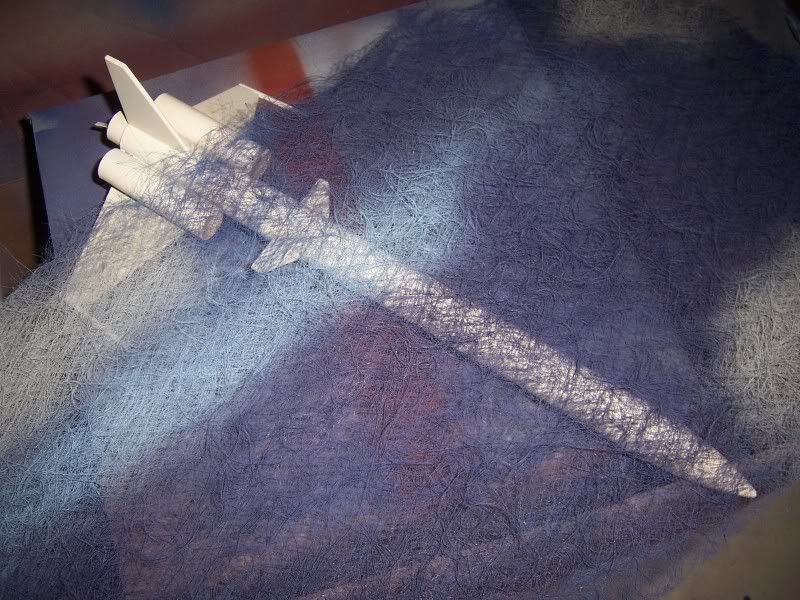
On the left you can see a streak of grey and a streak of light blue from earlier tests. Most of the rest is covered in purple from the Whitestar. I found that the closer you can have the blanket to the surface of the rocket, the more textured effect you get. Just nice light sprays about 12 to 18 inches away from the model do nicely.
Later,
EV
Similar threads
- Replies
- 4
- Views
- 352
- Replies
- 9
- Views
- 1K