


I've been doing HPR as part of a University team for several years. Been reading bits and pieces around here about as long, and it was amazingly helpful, if time consuming.
I helped some people build kits for Level 1 certs last year. Since I won't be able to help as much this year, I thought a reference document might useful. That's what this is. Worst case, I just get practice at documenting projects.
I picked up an SBR Fusion Kit. Worked on a lot of smaller rockets the past year, wanted something I could actually get my hands in. It also comes with almost everything but the motor.
What tipped me was the optional RRC3 altimeter, which came at a discount.
Since I'm still waiting on my epoxy to arrive, going to organize and overview the kit. Part lists generally go left to right, top to bottom. (I'm not normally this organized, I just had time.)
Tubes and Rings
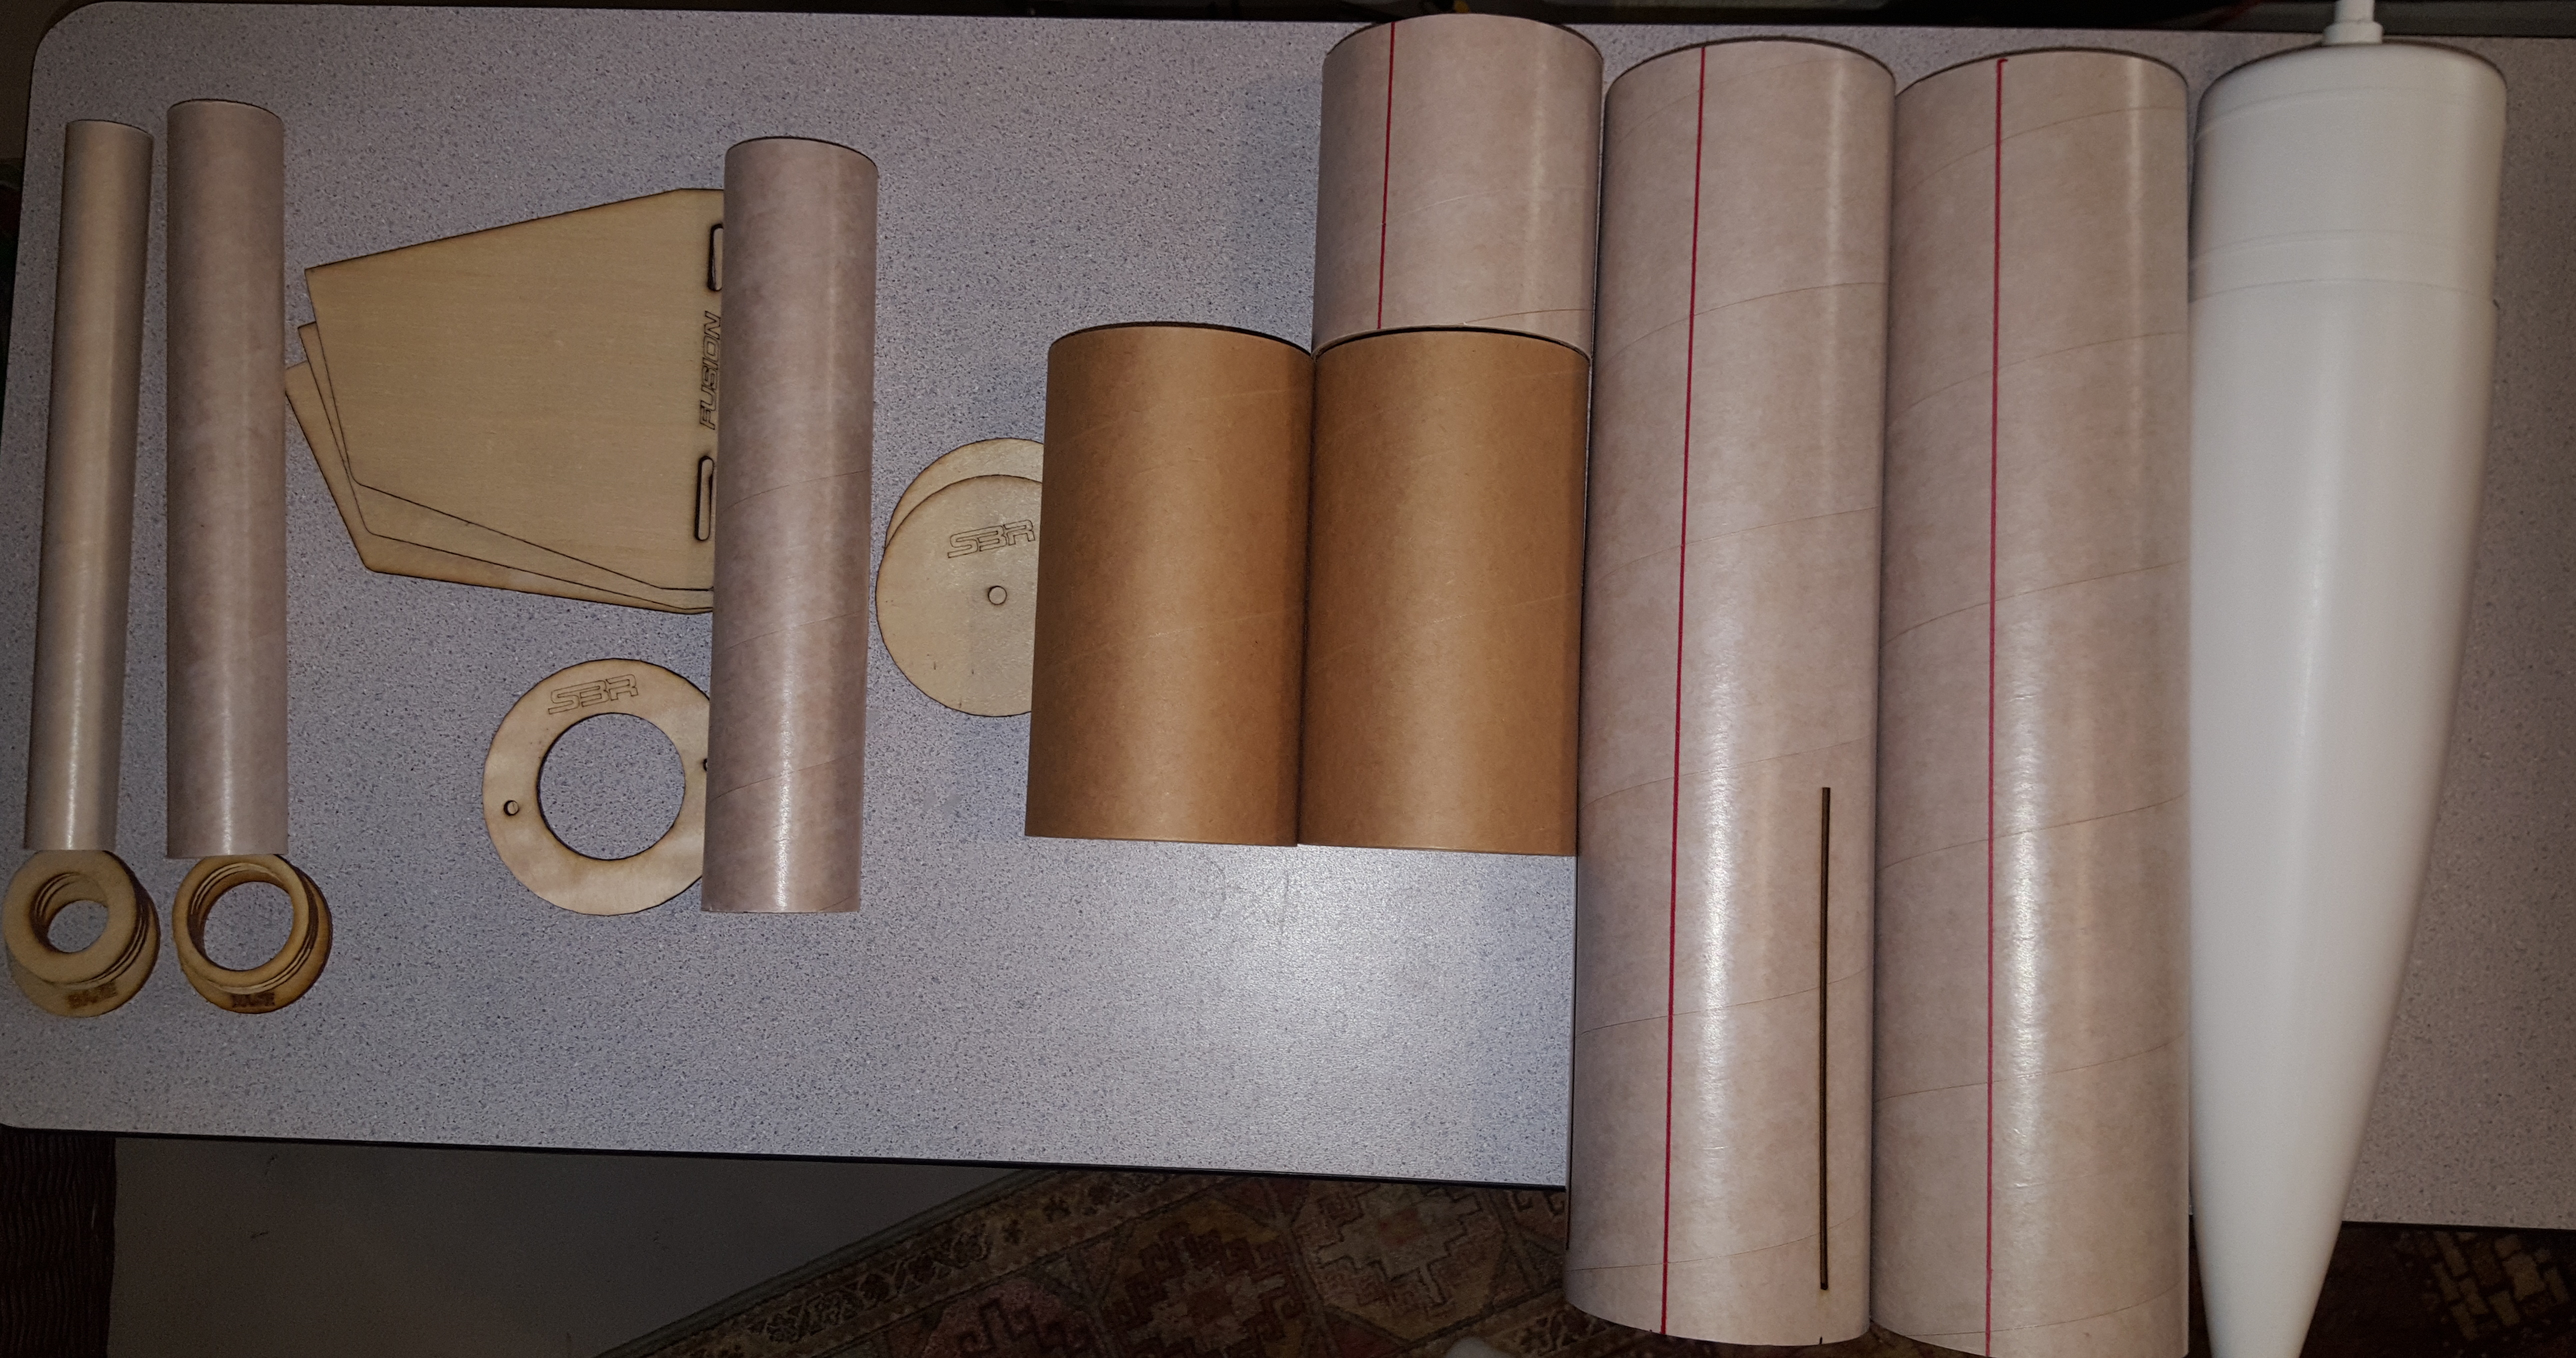
29mm Adapter
- 29mm Tube (11.3" long)
- 4x centering rings (3x 54 to 29, 1x Base)
38mm Adapter
- 38mm Tube (11.3" long)
- 4x centering rings (3x 54 to 38, 1x Base)
54mm Motor Mount
- 54mm Tube (11.3" long)
- 3x Fins (0.125" thick, 5 ply)
- Forward Centering Ring (one hole for eyebolt)
- Aft Centering Ring (two holes for T-nuts)
Payload Bay
- 2x Bulkplates
- 2x 3.9" Coupler (7" long)
- 3.9" Tube (4.25" long)
Airframe
- Slotted 3.9" Tube (17" long)
- 3.9" Tube (17" long)
- Plastic Nose Cone (16" exposed length, Ogive?)
All pretty standard. Tubes are cardboard, wood is 1/8" 5 ply (motor adapter pieces are 3 ply).
All body tubes have a vertical red line, for rail button alignment.
Also, the fins have a rear chamfer to allow for fillets.
Recovery and Hardware
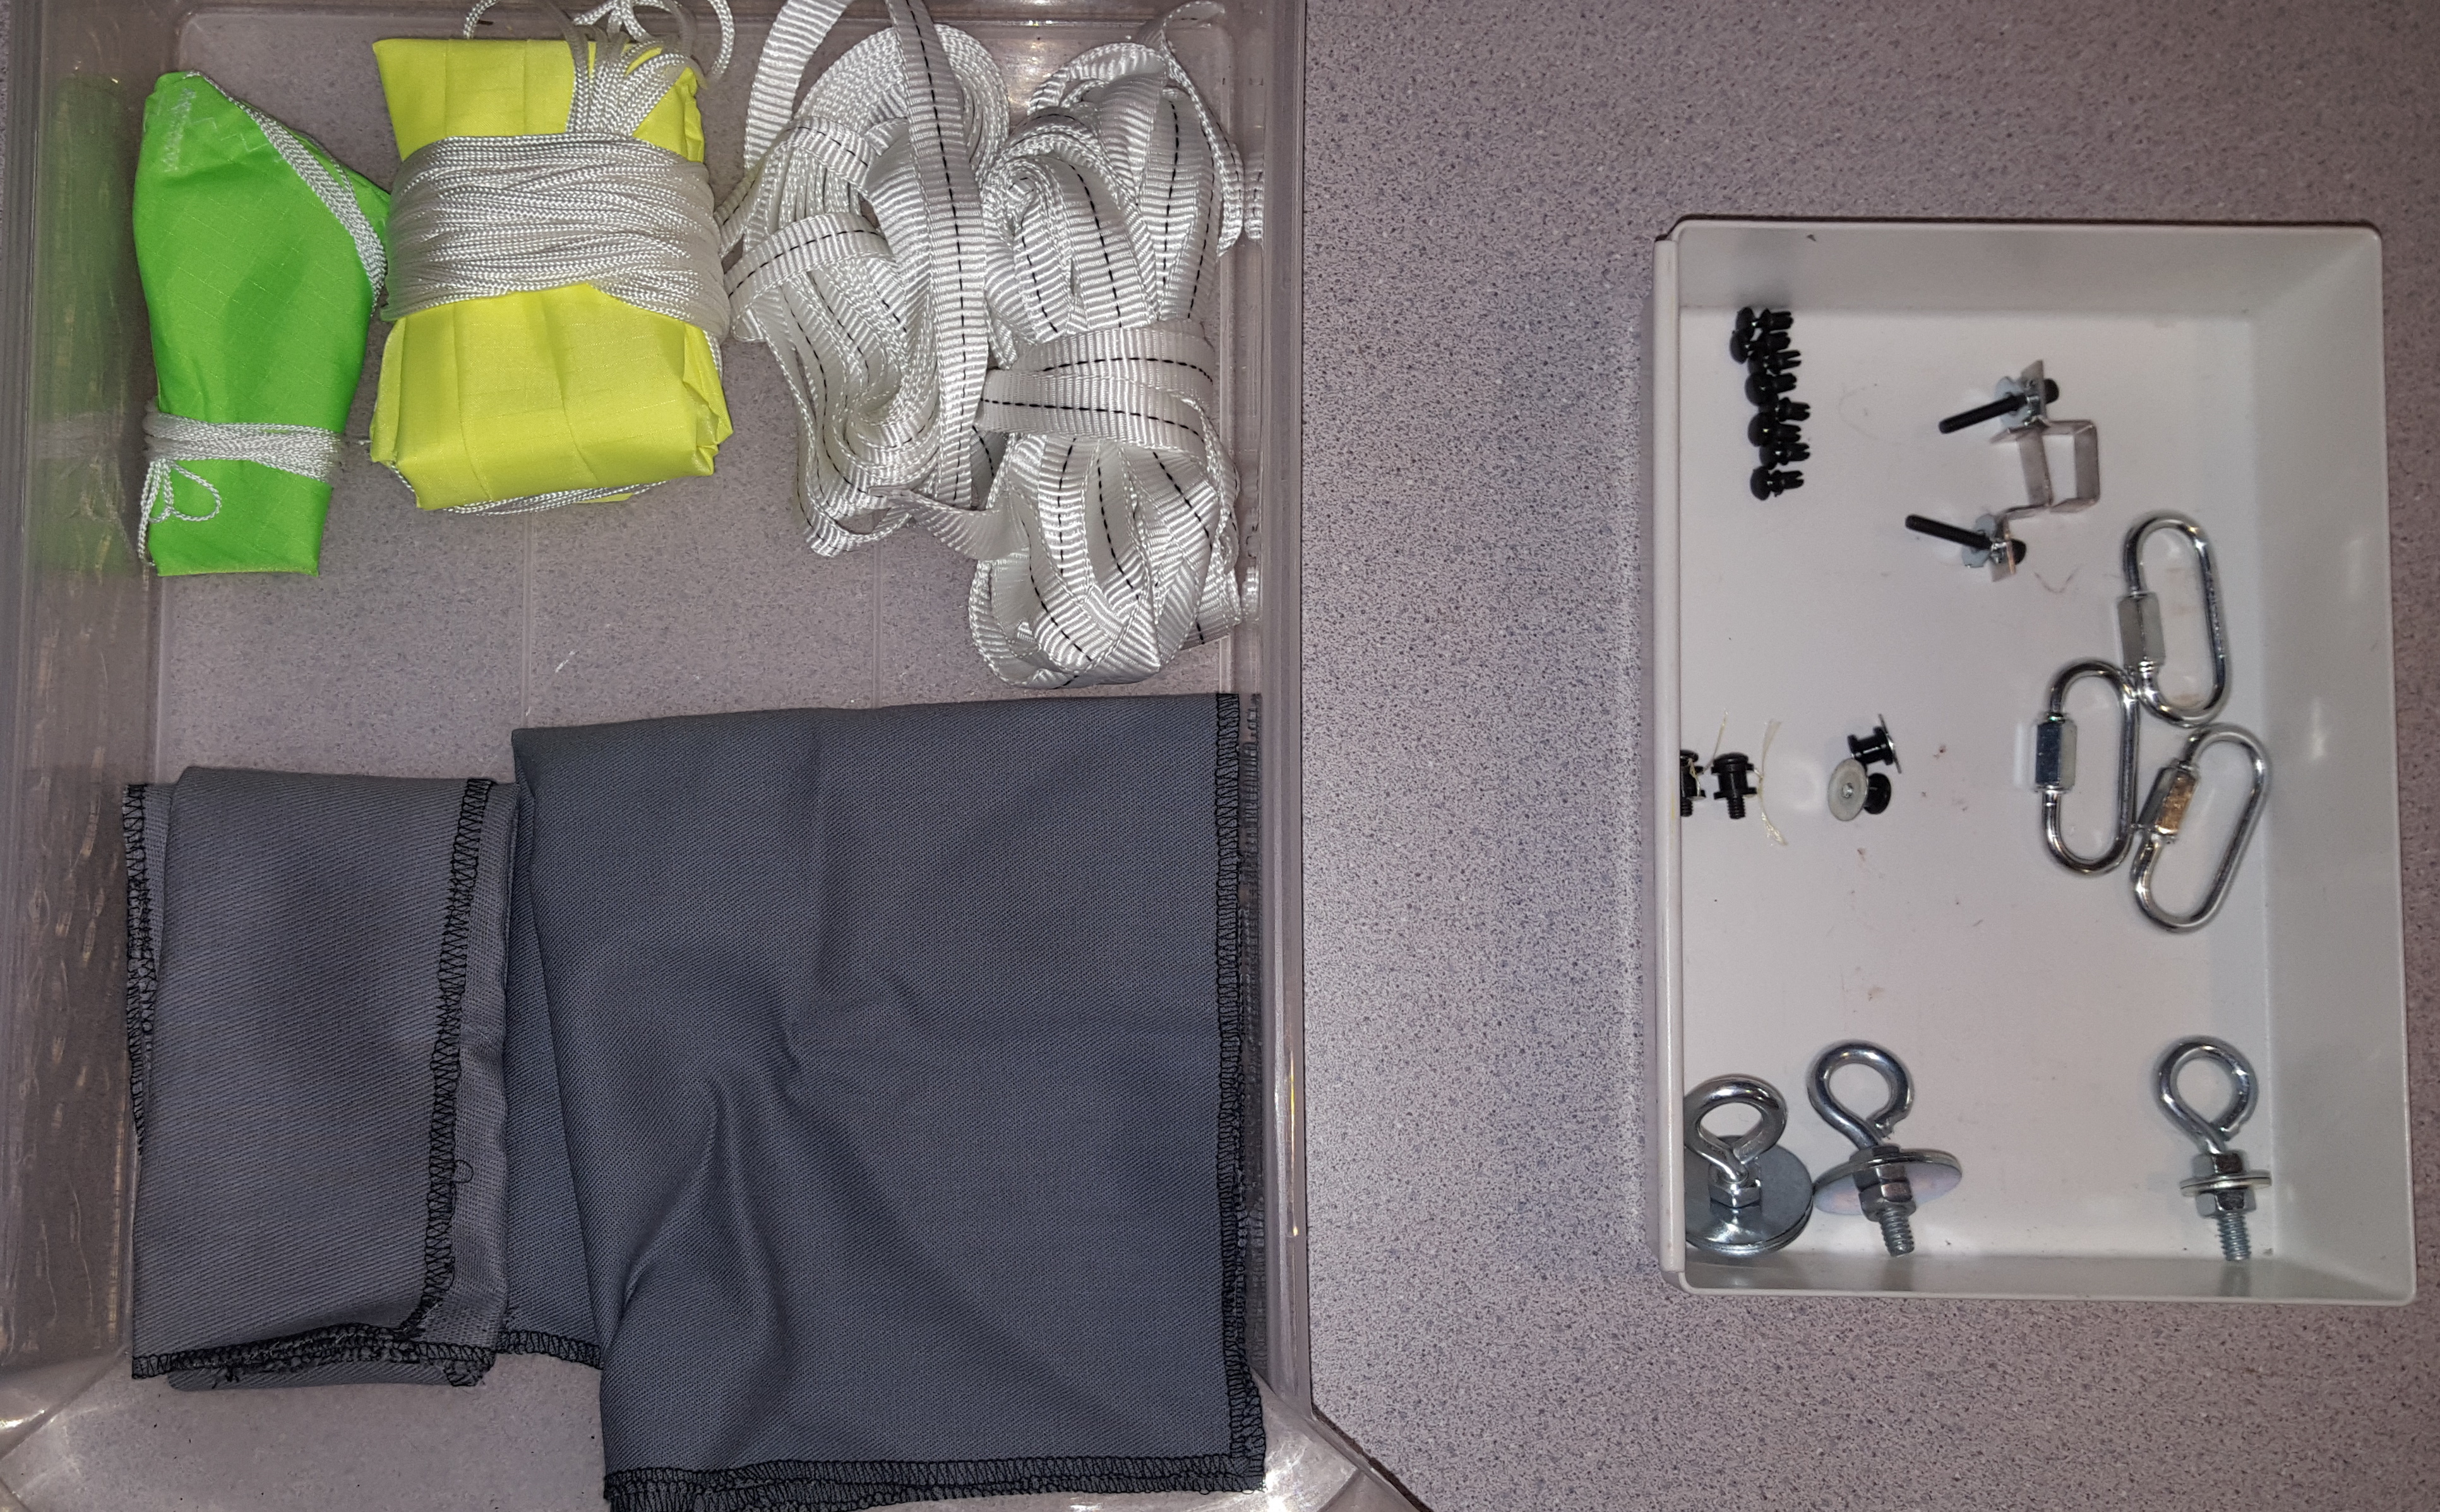
Recovery
- 15" Top Flight Chute
- 45" Top Flight Chute
- 2x 1/2" Tubular Nylon Shock Cord (10' and 20')
- 2x Nomex Shock Cord Protectors
- 2x Nomex Chute Protectors
Chute and Shock Cord protectors are a nice inclusion.
Drogue and Main are also different colors, easy to distinguish (read: know when to run).
Hardware
- 8x Plastic Rivets (Kit says 6)
- 2x Motor Retainer Clip Assemblies (T-Nut, Allen Head Bolt and Clip)
- 2x 3-piece 1010 Rail Buttons
- 2x 1-Piece Rail Buttons (from Apogee, not included with the kit)
- 3x Quick Links (3/16")
- 2x Bulkhead Eyebolt Assembly
- Motor Mount Eyebolt Assembly
Looking forward to those Clips for internal fillets, always break my tape pull tabs.
Quick Links are nice, make attaching/switching chutes a breeze.
Eye bolts aren't forged, but shouldn't be a problem. Not planning on popping laundry anywhere near Mach.
Didn't like the look of those 3-piece buttons, tied them to not lose anything.
Instructions and Aesthetics
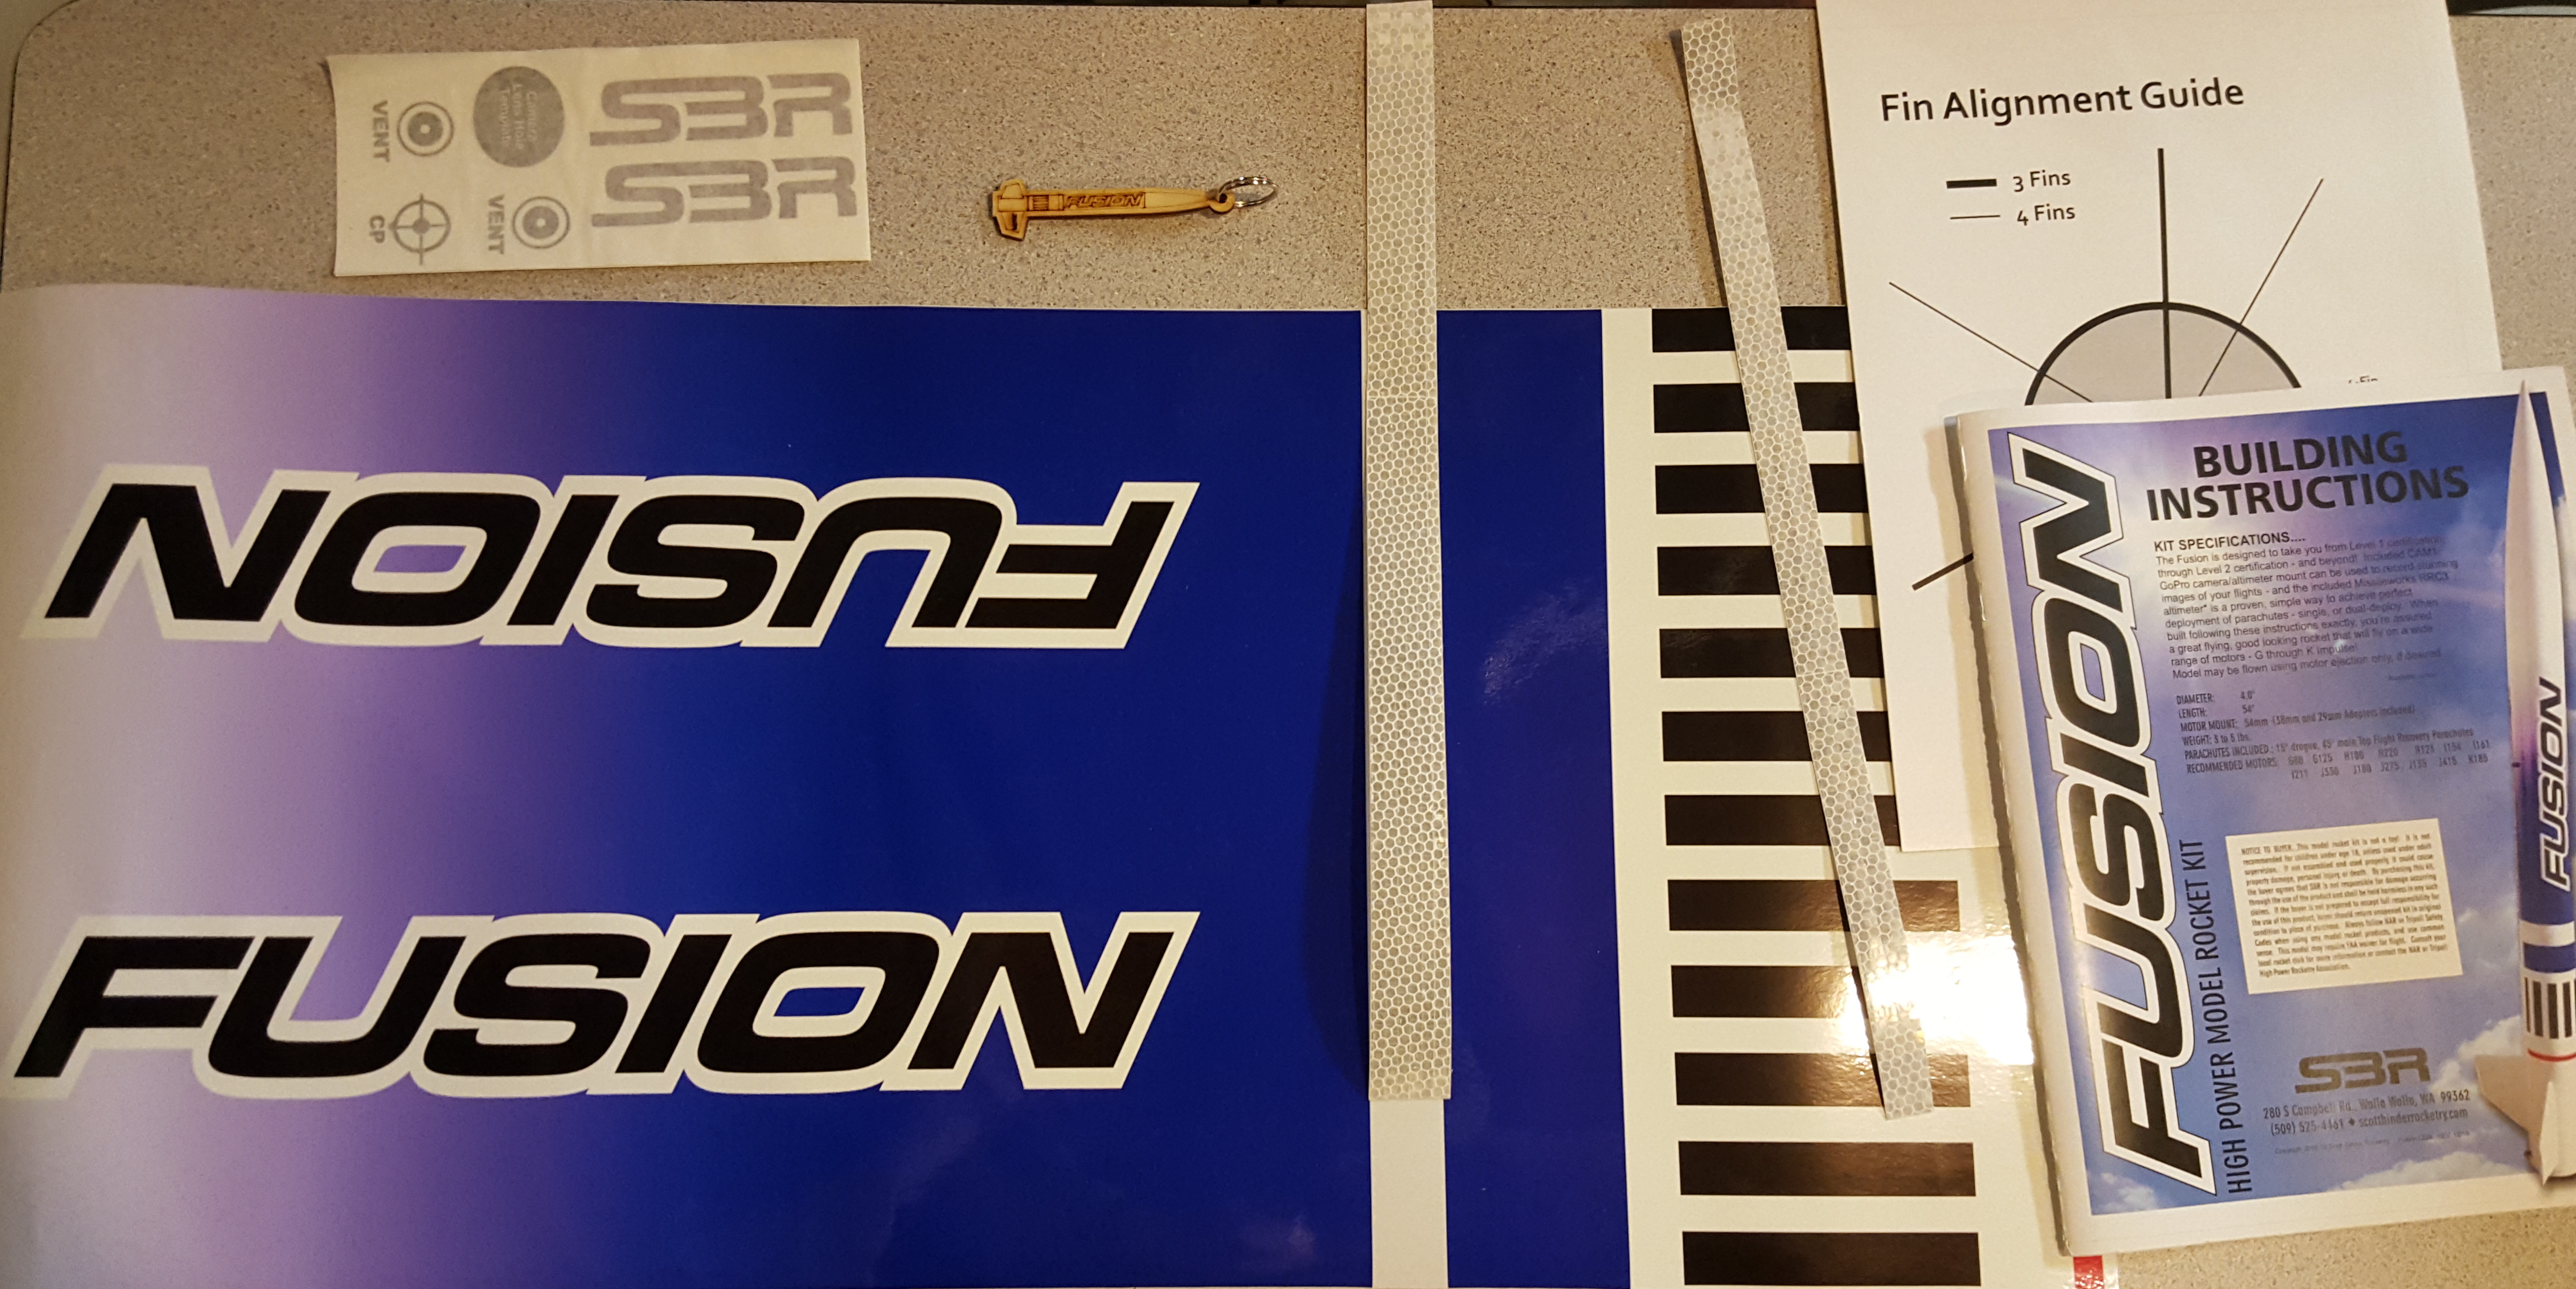
- Decal Sheet (CP, 2x Vent, Camera Hole Template, 2x SBR)
- Fusion Keychain
- Vinyl Body Wrap
- 2x Reflective Tape (1" and 0.5")
- Fin Alignment Guide
- Instruction Book (12 pages, full color)
As far as I'm concerned, these instructions are the gold standard.
The Body Wrap looks like an easy(ish) way to get a fantastic finish with minimal paint. I'm not going to use it, but it looks great.
Reflective Tape is a great idea, the stuff is BRIGHT (had to turn my camera flash off to not blow out the picture). Better odds of spotting it in the weeds/corn.
Payload and Altimeter
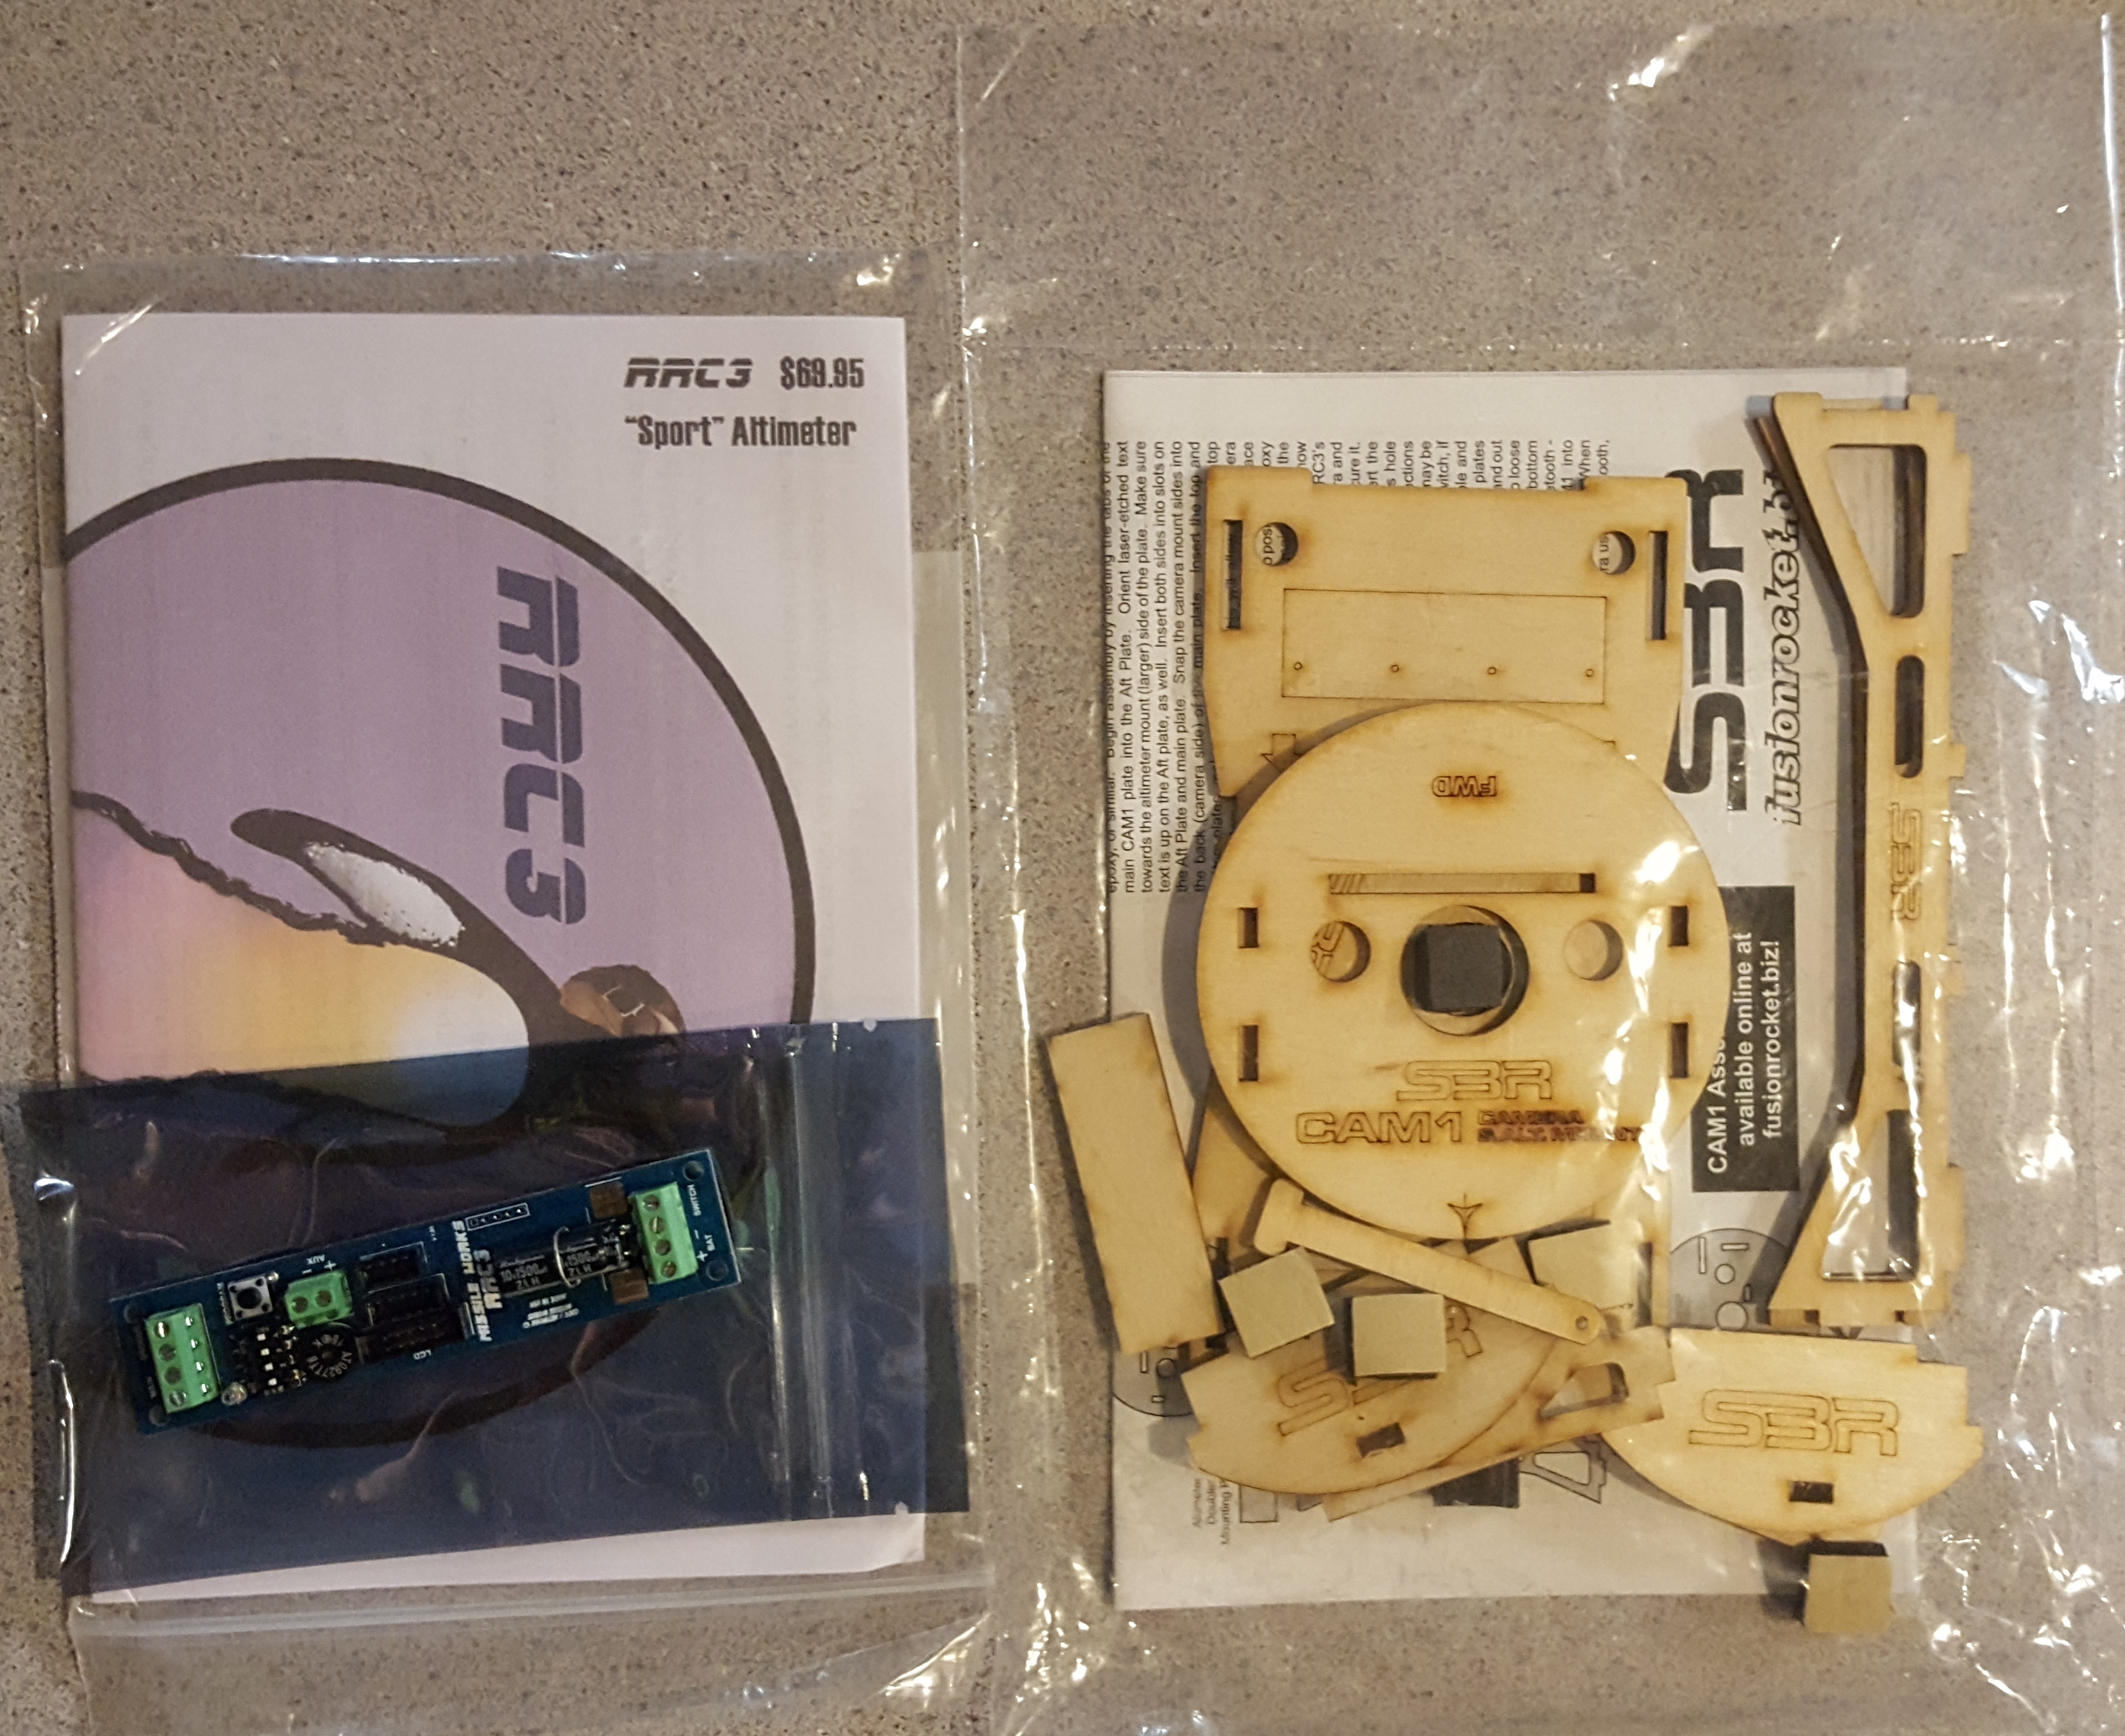
Altimeter (OPTIONAL)
- RRC3 Sport
Needs a battery connector and switch to fly as a logger. Neither included.
Payload
- CAM1 Mount (laser cut 3 ply)
Don't have any comments on this yet, will build it first.
Will hopefully get time to start building this weekend.
I helped some people build kits for Level 1 certs last year. Since I won't be able to help as much this year, I thought a reference document might useful. That's what this is. Worst case, I just get practice at documenting projects.
I picked up an SBR Fusion Kit. Worked on a lot of smaller rockets the past year, wanted something I could actually get my hands in. It also comes with almost everything but the motor.
What tipped me was the optional RRC3 altimeter, which came at a discount.
Since I'm still waiting on my epoxy to arrive, going to organize and overview the kit. Part lists generally go left to right, top to bottom. (I'm not normally this organized, I just had time.)
Tubes and Rings
29mm Adapter
- 29mm Tube (11.3" long)
- 4x centering rings (3x 54 to 29, 1x Base)
38mm Adapter
- 38mm Tube (11.3" long)
- 4x centering rings (3x 54 to 38, 1x Base)
54mm Motor Mount
- 54mm Tube (11.3" long)
- 3x Fins (0.125" thick, 5 ply)
- Forward Centering Ring (one hole for eyebolt)
- Aft Centering Ring (two holes for T-nuts)
Payload Bay
- 2x Bulkplates
- 2x 3.9" Coupler (7" long)
- 3.9" Tube (4.25" long)
Airframe
- Slotted 3.9" Tube (17" long)
- 3.9" Tube (17" long)
- Plastic Nose Cone (16" exposed length, Ogive?)
All pretty standard. Tubes are cardboard, wood is 1/8" 5 ply (motor adapter pieces are 3 ply).
All body tubes have a vertical red line, for rail button alignment.
Also, the fins have a rear chamfer to allow for fillets.
Recovery and Hardware
Recovery
- 15" Top Flight Chute
- 45" Top Flight Chute
- 2x 1/2" Tubular Nylon Shock Cord (10' and 20')
- 2x Nomex Shock Cord Protectors
- 2x Nomex Chute Protectors
Chute and Shock Cord protectors are a nice inclusion.
Drogue and Main are also different colors, easy to distinguish (read: know when to run).
Hardware
- 8x Plastic Rivets (Kit says 6)
- 2x Motor Retainer Clip Assemblies (T-Nut, Allen Head Bolt and Clip)
- 2x 3-piece 1010 Rail Buttons
- 2x 1-Piece Rail Buttons (from Apogee, not included with the kit)
- 3x Quick Links (3/16")
- 2x Bulkhead Eyebolt Assembly
- Motor Mount Eyebolt Assembly
Looking forward to those Clips for internal fillets, always break my tape pull tabs.
Quick Links are nice, make attaching/switching chutes a breeze.
Eye bolts aren't forged, but shouldn't be a problem. Not planning on popping laundry anywhere near Mach.
Didn't like the look of those 3-piece buttons, tied them to not lose anything.
Instructions and Aesthetics
- Decal Sheet (CP, 2x Vent, Camera Hole Template, 2x SBR)
- Fusion Keychain
- Vinyl Body Wrap
- 2x Reflective Tape (1" and 0.5")
- Fin Alignment Guide
- Instruction Book (12 pages, full color)
As far as I'm concerned, these instructions are the gold standard.
The Body Wrap looks like an easy(ish) way to get a fantastic finish with minimal paint. I'm not going to use it, but it looks great.
Reflective Tape is a great idea, the stuff is BRIGHT (had to turn my camera flash off to not blow out the picture). Better odds of spotting it in the weeds/corn.
Payload and Altimeter
Altimeter (OPTIONAL)
- RRC3 Sport
Needs a battery connector and switch to fly as a logger. Neither included.
Payload
- CAM1 Mount (laser cut 3 ply)
Don't have any comments on this yet, will build it first.
Will hopefully get time to start building this weekend.

