You are using an out of date browser. It may not display this or other websites correctly.
You should upgrade or use an alternative browser.
You should upgrade or use an alternative browser.
PR Intimidator 5
- Thread starter lmt56
- Start date


Help Support The Rocketry Forum:
This site may earn a commission from merchant affiliate
links, including eBay, Amazon, and others.
GaryT
Well-Known Member
Hey Gary T.
Whom did you have make your decal?
Letters are what about 3" tall?
Did you use one or two?
I was thinking about going with two.
I used https://www.custom-vinyl-lettering.net/vinyllettering.asp I think I did like 4.5" letters and only on the one side. I changed up the flight plan for my Intimidator 5 for LDRS as well, Its now going up on a KBA M1450W, Should put it to about 12,100'.
lmt56
Well-Known Member
- Joined
- Jan 26, 2009
- Messages
- 411
- Reaction score
- 0
I used https://www.custom-vinyl-lettering.net/vinyllettering.asp I think I did like 4.5" letters and only on the one side. I changed up the flight plan for my Intimidator 5 for LDRS as well, Its now going up on a KBA M1450W, Should put it to about 12,100'.
Thanks for the info.
Taking a road trip this weekend to have one of my TAP's look over what I have done so far.
Planning on doing the L3 attempt at Sweaty Ball in Argonia.
AeroTech M1297W.
Should hit about 8500'
Built weight should be about 27 lbs.
1.5 lbs of that will be an Ozark Aerospace GPS unit I am placing in the nose cone.
If that extra weight seems to make it to over stable I will fly without it.
Thoughts?
sandmantoy
Well-Known Member
- Joined
- Jan 27, 2009
- Messages
- 541
- Reaction score
- 1
How much of yours do you have built? Any pictures? I am getting more parts lined up to go at mine again pretty soon.
lmt56
Well-Known Member
- Joined
- Jan 26, 2009
- Messages
- 411
- Reaction score
- 0
I just poured my last internal fillet. Fin to BT.How much of yours do you have built? Any pictures? I am getting more parts lined up to go at mine again pretty soon.
So all I have left to do.
1. install aft cr
2. pour exterior fin fillits
3. do bp ground test for lower bt
Test for payload section is done & 5.7 grams did the job well!
4. prime
5. paint
Maybe a few other little odds and ends.
Picture if and when I get it painted.
sandmantoy
Well-Known Member
- Joined
- Jan 27, 2009
- Messages
- 541
- Reaction score
- 1
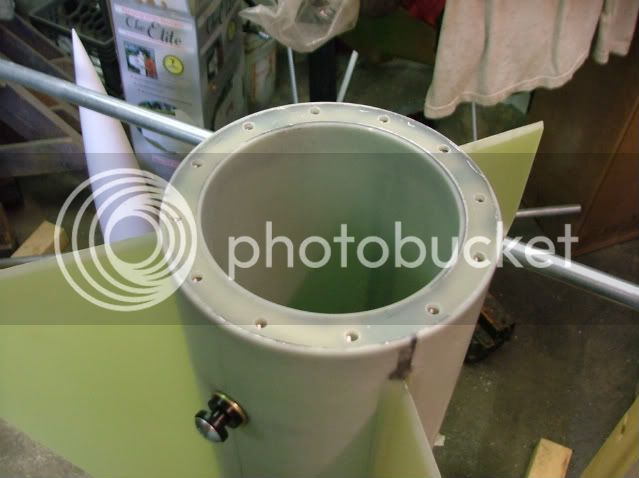
I have the booster section all done and installed the aft center ring. I don't think I am going to make it zipperless. I cut the center ring for the NC and roughed in an aluminum bulk head for it. I still have to get the inserts and drill the holes for mounting it and epoxy the CR in place. I have just started to work on the payload section as well.
Last edited:


sandmantoy
Well-Known Member
- Joined
- Jan 27, 2009
- Messages
- 541
- Reaction score
- 1
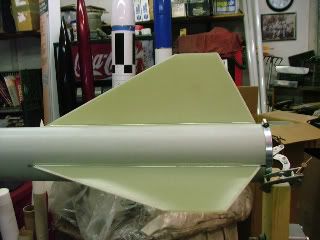
Hmm looks like 7 grams you could put a target on your fence ") Well I got my nose cone done. I epoxied a few Popsicle sticks in the nose to make a firm stopping point for the CR and I also used a brush and spread some epoxy over the inside surface about 3- 4 inches back from it to strengthen it up some more in that area. The nose cone is very light for it's size and easy to deform with a little squeeze so beefing it up a little I thought was a good idea. I guess I am going to start the electronics bay in the next day or so, once I plan out how I want to do it. Here are some pictures of the NC. Bench is a mess lol.
Well I got my nose cone done. I epoxied a few Popsicle sticks in the nose to make a firm stopping point for the CR and I also used a brush and spread some epoxy over the inside surface about 3- 4 inches back from it to strengthen it up some more in that area. The nose cone is very light for it's size and easy to deform with a little squeeze so beefing it up a little I thought was a good idea. I guess I am going to start the electronics bay in the next day or so, once I plan out how I want to do it. Here are some pictures of the NC. Bench is a mess lol.
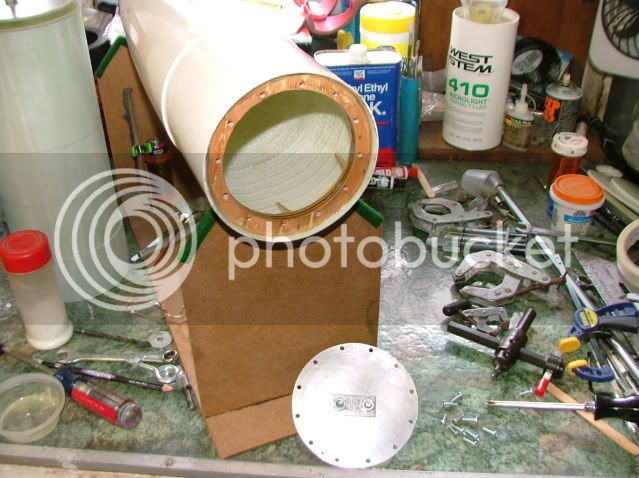
Well I got my nose cone done. I epoxied a few Popsicle sticks in the nose to make a firm stopping point for the CR and I also used a brush and spread some epoxy over the inside surface about 3- 4 inches back from it to strengthen it up some more in that area. The nose cone is very light for it's size and easy to deform with a little squeeze so beefing it up a little I thought was a good idea. I guess I am going to start the electronics bay in the next day or so, once I plan out how I want to do it. Here are some pictures of the NC. Bench is a mess lol.
GaryT
Well-Known Member
Tim:
You need the strength pulling out! not pushing in? I'd try to get a bead/fillet of epoxy on the outer edge of the wood bulk plate, You'll pull a truck with those screws and U-bolt lol but the whole assembly may yank right out.
You need the strength pulling out! not pushing in? I'd try to get a bead/fillet of epoxy on the outer edge of the wood bulk plate, You'll pull a truck with those screws and U-bolt lol but the whole assembly may yank right out.
sandmantoy
Well-Known Member
- Joined
- Jan 27, 2009
- Messages
- 541
- Reaction score
- 1
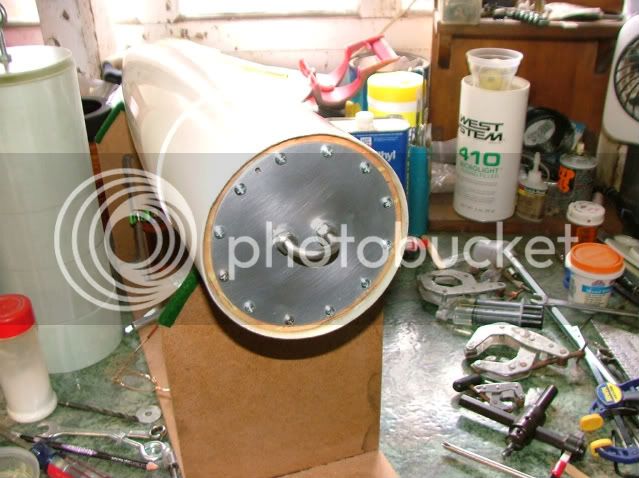
The CR is set back about a 1/4" and there is a fillet up to the edge but it does not show very well in the picture. I used Devcon 30 min. epoxy with micro glass in it also. It is supposed to have a 2 ton tinsel strength for the bond. I have had good luck with it in the past. The fillet extends from the edge of the aluminum to the outer edge, I was trying to keep it thick in that area. I was going to put a piece of coupler in there but the CR fits pretty snug and the fillet actually rolls over the edge now.
I should have said how I started to install it better. I epoxied the outer part first so when I put the West systems epoxy on the inside it would not seep through or move the CR while I was applying it to the inside. I wanted the inside done to help make that area more ridged.
Do you think it is to close to the end? It is the first time I have put a bulk head that close to the end.
GaryT
Well-Known Member
Naaa I think it will be fine where it is, Personally I like mine about 1" from the top of the NC Shoulder, 1 it adds more strength to the entire shoulder and 2 when your shear pins shear off you don't have them rattling around on the Inside of the NC lol (I Hate That)
lmt56
Well-Known Member
- Joined
- Jan 26, 2009
- Messages
- 411
- Reaction score
- 0
Hey Gary T.
I did a bp ground test for the lower body tube section today.
On the first test I used 3g's bp and on the second 3.5 grams.
I liked the results of the 3.5g's better.
For the test I used 3 .080" styrene rods for shear pins and had a 75/3840 motor case in place.
I would call this getting ready for Sweaty Balls.
My weather station showed a temp. of 100 and humidty of 92 percent.
Before the test I did let the thing heat soak.
It is not painted yet but if the humidity comes down before Sweaty Balls it will be a Teal color, if not it will be primer gray.
My question is what would be the max. bp charge you would use on the lower section?
Any advice for flying in hot humid weather?
GaryT
Well-Known Member
For my 5" kits I base my BP charge on 15psi, So for the I5 that calculation nets me 3g for the aft section, With a long enough shock cord you could put whatever amount you wanted in, 3g has working perfect for me, Your mileage may vary depending on what size motor case you use, How tight you have the 2 sections connected, What size vent holes you used and how many, Also don't forget that while "free falling" BOTH section blow apart from each other, You don't have one side held down by a rocket stand.
As for temperature I've never had any problems except once when launching 18 degree cold, Everybody's altimeter batters were way to cold to work, even kits with redundant set ups, For Humidity I'd say just keep your BP in a cool dry place and keep an eye on your connection points, Sometimes if you use tape to snug up a NC or other sections it may start to gum up holding thing together that you want! to come apart.
As for temperature I've never had any problems except once when launching 18 degree cold, Everybody's altimeter batters were way to cold to work, even kits with redundant set ups, For Humidity I'd say just keep your BP in a cool dry place and keep an eye on your connection points, Sometimes if you use tape to snug up a NC or other sections it may start to gum up holding thing together that you want! to come apart.
sandmantoy
Well-Known Member
- Joined
- Jan 27, 2009
- Messages
- 541
- Reaction score
- 1
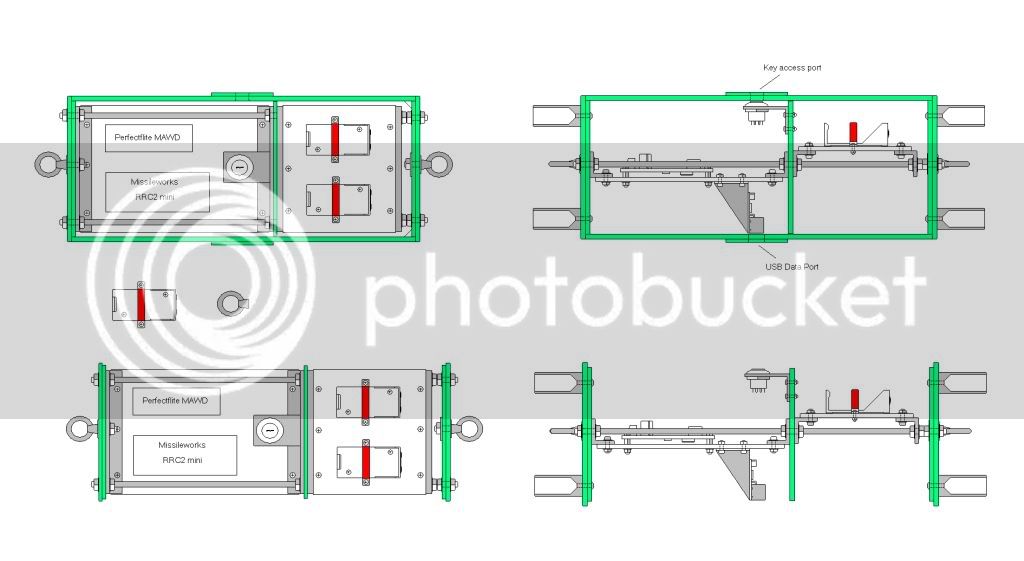
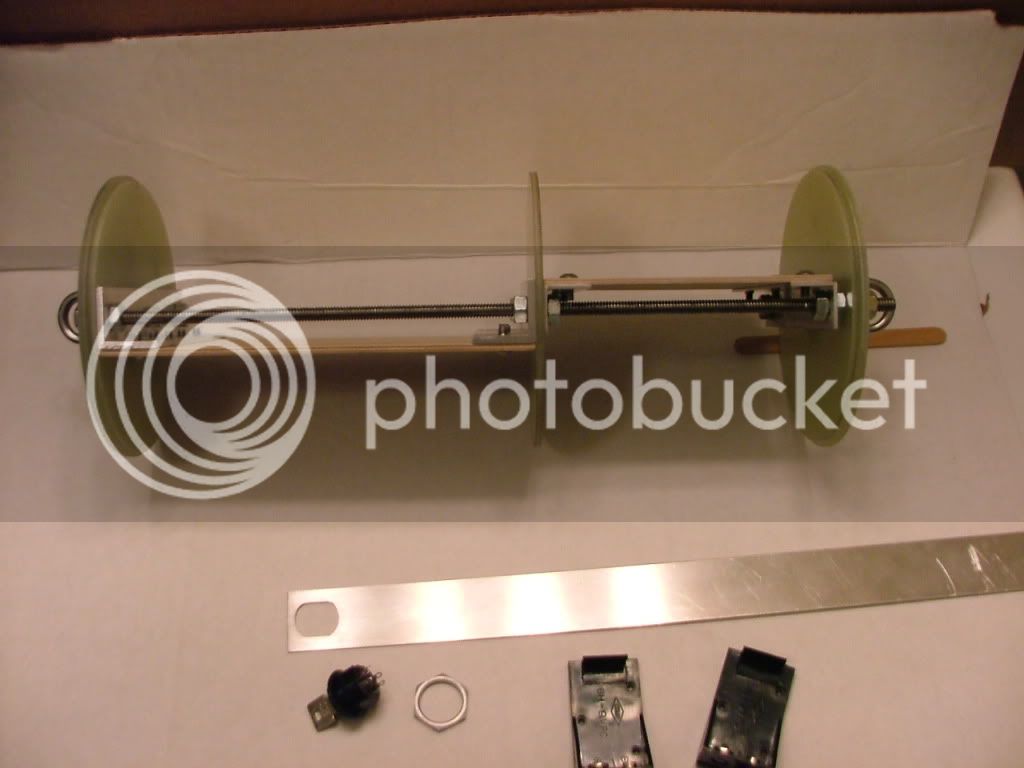
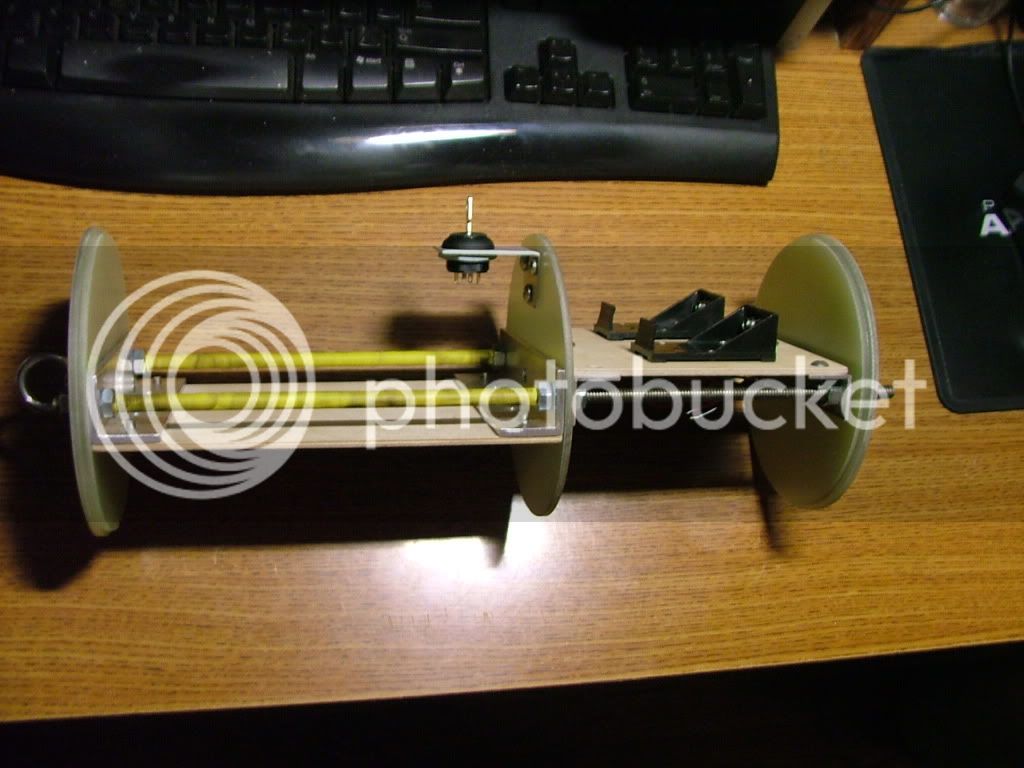
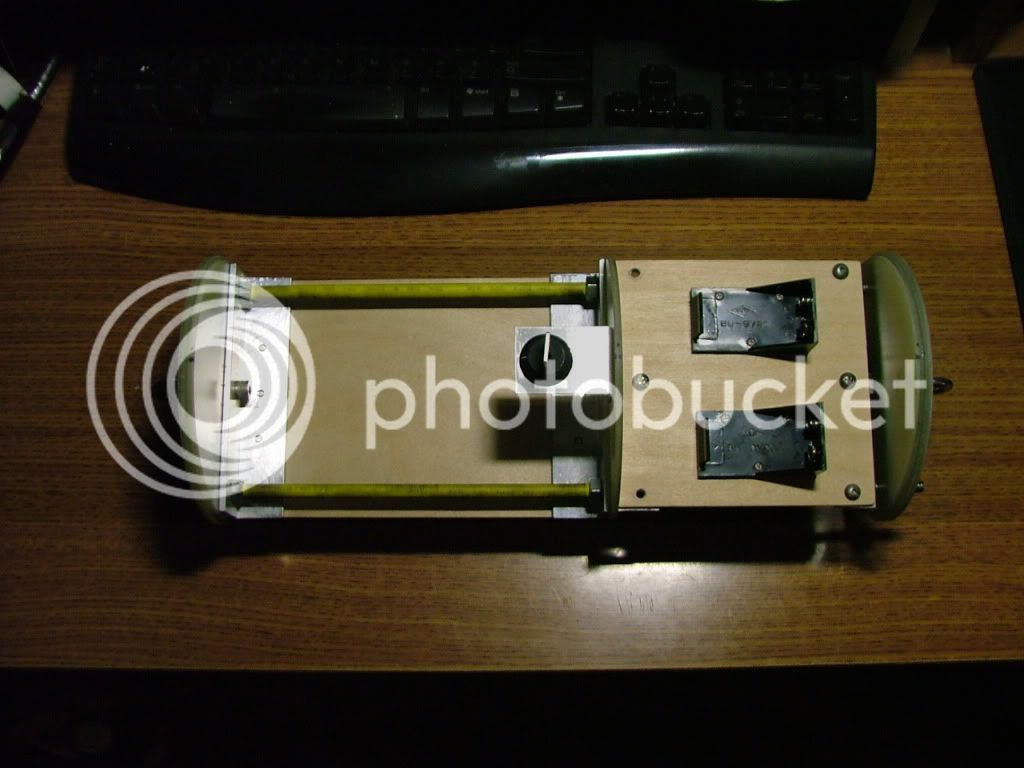
Today was a good day I got a lot done, I got the inside of the e bay roughed in and it is pretty sturdy. It is only temporary put together for fitting but it is starting to look like my sketch. I made the mounting hole for the switch. I am going to use one switch to turn on the altimeters. The switch is like the ones Aerocon sells but it is a DPDT switch from the same manufacturer. I put the center bulk head in to keep the threaded rod ridged with out having to tighten down the end caps so hard since I am going to attach the shock cords to center points on the e bay. I have the aluminum strap cut out for the switch mounting, I will put a 90 deg. bend in it and make it into a bracket once I am sure where I want it. I have decided to mount the switch inside the e bay and make an access hole to get to it. I have done this before on rockets and it works nice, it will also make good use of the center bulk head in the e bay. I am also going to put a USB data port on the other side. Here are some pictures of what I have done to this point.
dixontj93060
Well-Known Member
- Joined
- Feb 19, 2009
- Messages
- 13,083
- Reaction score
- 45
Just a beautiful build; craftsmanship is superb!

DAllen
Well-Known Member
Very kewl build but I was wondering...What is the purpose of the center bulkhead in the ebay? Added rigidity?
-Dave
-Dave
sandmantoy
Well-Known Member
- Joined
- Jan 27, 2009
- Messages
- 541
- Reaction score
- 1
Very kewl build but I was wondering...What is the purpose of the center bulkhead in the ebay? Added rigidity?
-Dave
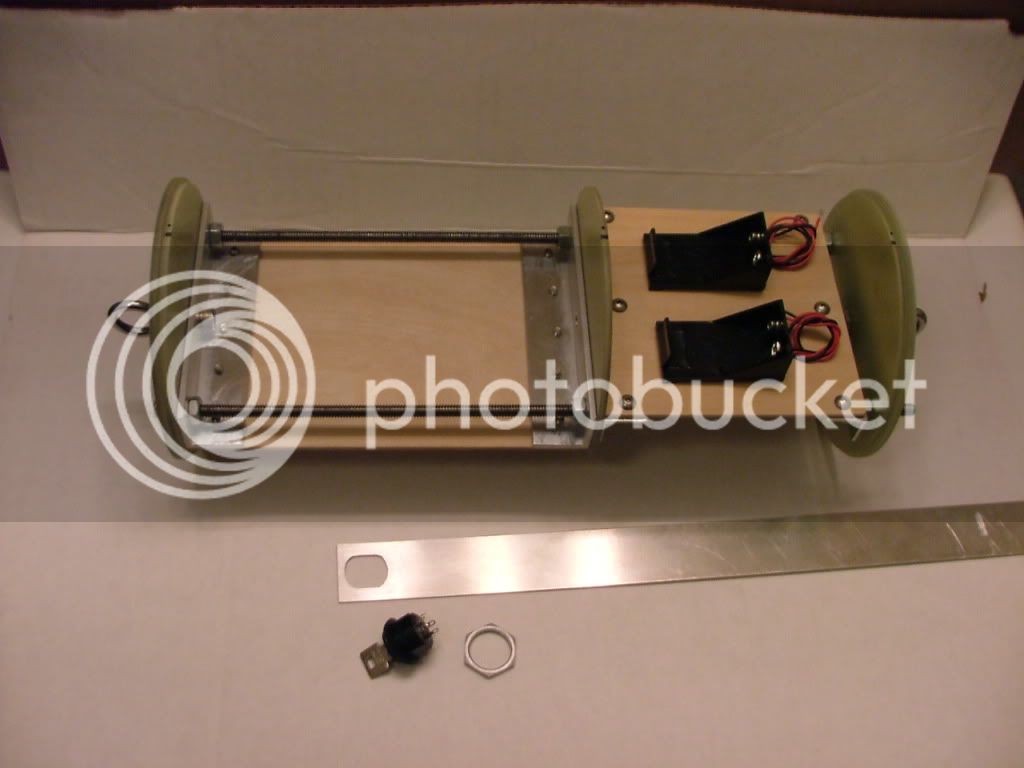
The center bulkhead will make it a little more ridged since the bay is 12" long but it is more for mounting my switches. I am sure the threaded rod being so long will flex some during the deployment stage. This is the first rocket I have done this way, it is not that necessary but for mounting my switches inside and keeping them close to the out side for easy access. I just mounted the arming switch for the altimeters which I do not have yet. It was a good idea at the time as I only had short pieces of sled material also lol. I always over build, for me I have more fun building the rockets than flying them. My rockets tend to be heavy but sometimes you can never get enough fire and smoke
When I get the altimeters and the USB board I will put more pictures in here as the build progresses. Here is some pictures of the switch I put in tonight, I mounted the battery holders also.
lmt56
Well-Known Member
- Joined
- Jan 26, 2009
- Messages
- 411
- Reaction score
- 0
Hey Gary T.
Just thought I would let you know my L3 flight on the I5 went well.
Came up a little short of the alt I was expecting.
Expecting about 9k and it hit only about 8k.
Winds were low and it did not weather cock.
Man it is hot in Kansas in July!!!
Just thought I would let you know my L3 flight on the I5 went well.
Came up a little short of the alt I was expecting.
Expecting about 9k and it hit only about 8k.
Winds were low and it did not weather cock.
Man it is hot in Kansas in July!!!
GaryT
Well-Known Member
Hey Gary T.
Just thought I would let you know my L3 flight on the I5 went well.
Came up a little short of the alt I was expecting.
Expecting about 9k and it hit only about 8k.
Winds were low and it did not weather cock.
Man it is hot in Kansas in July!!!
Hey! Congrats! on your L3! Post some Pic's if you can, Due to the weather I never ended up launching mine at LDRS28, I did fly my 6" Mad Dog on a KBA M3500R to 10,351' very nice flight, Also flew my 7.5" Bullpup on an M1500G to almost 8000' and some other stuff, Despite the Mud and rain we still had a Great! time.
stickershock23
New Member
- Joined
- Jan 17, 2009
- Messages
- 0
- Reaction score
- -47
Hey Gary T.
Whom did you have make your decal?
Letters are what about 3" tall?
Did you use one or two?
I was thinking about going with two.
Guys,
I can do custom lettering.
If you have a font you like, I can use it. or I can work up something custom if you like!
My prices are 20% lower than onyone I can find, and are made of 5 year rate vinyl!
Check out custom lettering here
thanks... And BEAUTIFUL rocket.. thanks for the build pics... :headbang:
lmt56
Well-Known Member
- Joined
- Jan 26, 2009
- Messages
- 411
- Reaction score
- 0
Hello GaryHey! Congrats! on your L3! Post some Pic's if you can, Due to the weather I never ended up launching mine at LDRS28, I did fly my 6" Mad Dog on a KBA M3500R to 10,351' very nice flight, Also flew my 7.5" Bullpup on an M1500G to almost 8000' and some other stuff, Despite the Mud and rain we still had a Great! time.
Sorry no pictures that I know of.
I think I was the second flight of the day on Sat.
I wanted to beat the winds incase they picked up.
They stayed calm for most of the day except for one dust devil that did do some damage to our tent encampment.
lmt56
Well-Known Member
- Joined
- Jan 26, 2009
- Messages
- 411
- Reaction score
- 0
Hello EricIt was a great flight on a great looking rocket. Congratulations on your L3 flight and surviving the heat.
Eric
Thanks for the comment.
Did we happen to meet and talk?
If so fill me in on the details.
I was a bit focused on my L3 flight.
My hat is off to the KloudBuster for another great launch.
What a great place to fly.
The hospitality is great.
hognutz63
Well-Known Member
- Joined
- Jan 17, 2009
- Messages
- 228
- Reaction score
- 0
Yes, I was there. I was the big guy with the white minivan that offered you guys the lawnmower when you pulled in. I flew the min diameter rocket on the L1400 that I never found on Saturday and the new I59 on Sunday. You are spot on about KLOUDBusters. I have only been flying with them a year now, and I don't think that there is any club that does things better than they do. Come to think of it, I think my wife and I sat at the same table as you at the banquet at LDRS 27. Didn't you win that 4" AeroPack in the raffle?
Eric
Eric
MartyAMC
Well-Known Member
- Joined
- Jan 17, 2009
- Messages
- 145
- Reaction score
- 2
Hi Larry,
Hope your trip back to Illinois was uneventful. I got home Sunday night about 6, a 3 1/2 hour drive that seemed like 5. Even the drive home was hot. You're right, another great time with Kloudbusters. I really enjoy flying with those folks. I did get a couple pictures of your rocket on the pad and a video of the launch from a distance. I'll post them on photobucket and send you a link.
Congrats again on the Level III.
lmt56
Well-Known Member
- Joined
- Jan 26, 2009
- Messages
- 411
- Reaction score
- 0
Yes, I was there. I was the big guy with the white minivan that offered you guys the lawnmower when you pulled in. I flew the min diameter rocket on the L1400 that I never found on Saturday and the new I59 on Sunday. You are spot on about KLOUDBusters. I have only been flying with them a year now, and I don't think that there is any club that does things better than they do. Come to think of it, I think my wife and I sat at the same table as you at the banquet at LDRS 27. Didn't you win that 4" AeroPack in the raffle?
Eric
Hey Eric
Thanks for filling me in and thanks for use of the lawnmower. Thats is Kloudbuster hospitality.
And you are right about the banquet. I remember when I won the 98mm AeroPack I thought I would never use it.
Well its got at least one flight on it now.
Say hello to the wife.
Hope you find the min dia. rocket
lmt56
Well-Known Member
- Joined
- Jan 26, 2009
- Messages
- 411
- Reaction score
- 0
Hey MartyHi Larry,
Hope your trip back to Illinois was uneventful. I got home Sunday night about 6, a 3 1/2 hour drive that seemed like 5. Even the drive home was hot. You're right, another great time with Kloudbusters. I really enjoy flying with those folks. I did get a couple pictures of your rocket on the pad and a video of the launch from a distance. I'll post them on photobucket and send you a link.
Congrats again on the Level III.
3 1/2 thats nothing. I made it home in just over 8 1/2.
This is for Lori.
Lori I can attest to the fact that Marty did have the weights on the legs of the pop up and it still went flying up and over the trailer and landed about 50 feet or more away.
And I did see him put on sun screen.
sandmantoy
Well-Known Member
- Joined
- Jan 27, 2009
- Messages
- 541
- Reaction score
- 1
Congrats on your L3 Larry, sounds like it was a great flight to see.
I am still working on mine. I have the electronics bay all most complete. I did not order my altimeters until just recently so they are just getting here. I went with the missileworks mini and a Perfectflite MAWD. I have been tinkering with it while I waited for them to get here and put a on board voltage meter on it for testing the batteries. I sill have to mount the USB board on it and it will be done. Look's heavy but it is coming out pretty good. I am going to weigh it with the batteries when it is complete to see what it is. I still have to finish the coupler section that goes over it as well.
I got an altimeter with one of the hook ups on backwards so I am just waiting for a replacement to get here. Jim at Missileworks has been great at getting it straightened out. Great place to deal with. Here are some pictures of how it is going.
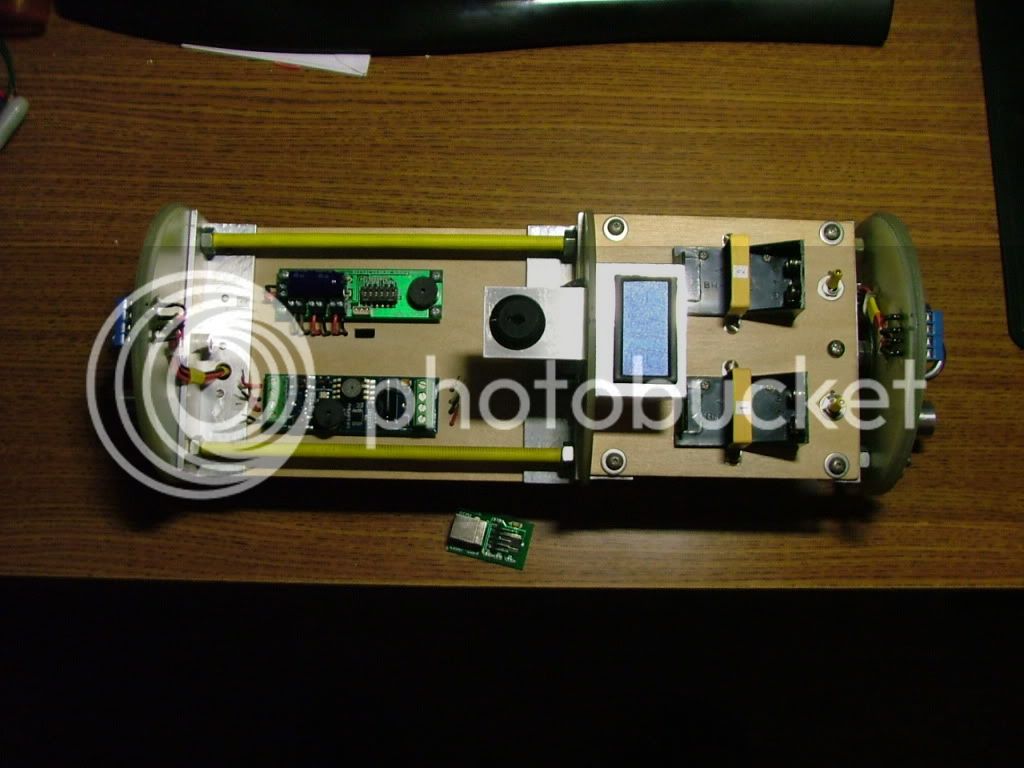
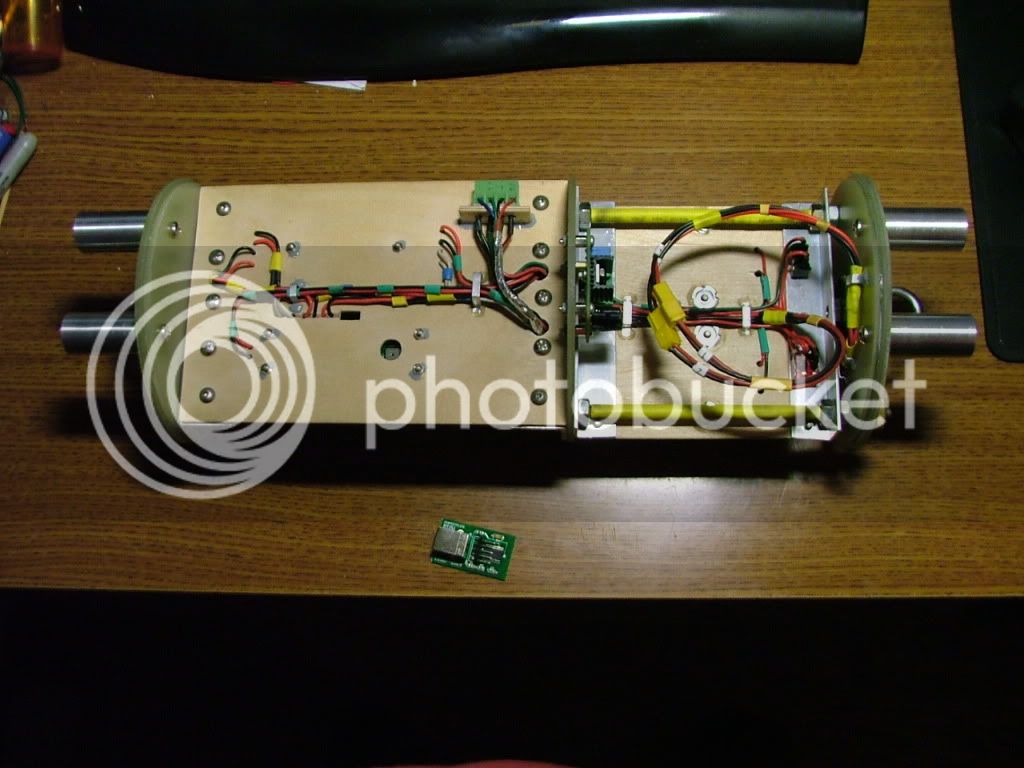
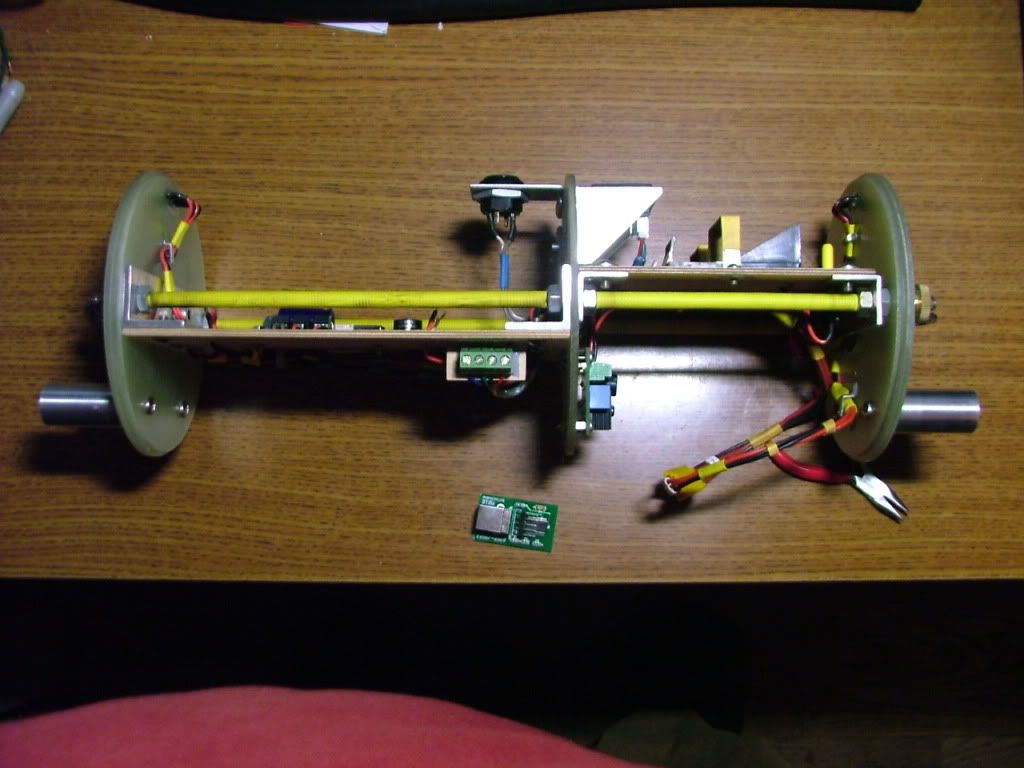
Similar threads
- Replies
- 6
- Views
- 644
- Replies
- 37
- Views
- 3K
- Replies
- 59
- Views
- 2K