Possible product for 3D printer owners

The Rocketry Forum

Help Support The Rocketry Forum:

This site may earn a commission from merchant affiliate links, including eBay, Amazon, and others.

Winston

Lorenzo von Matterhorn
Joined
Jan 31, 2009
Messages
9,560
Reaction score
1,748
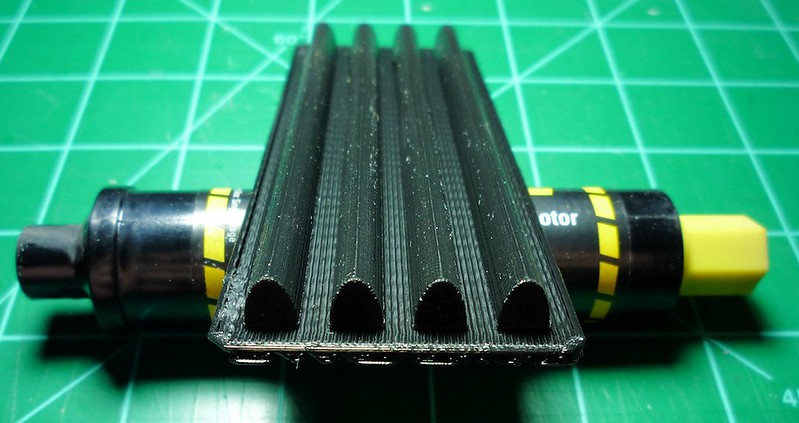
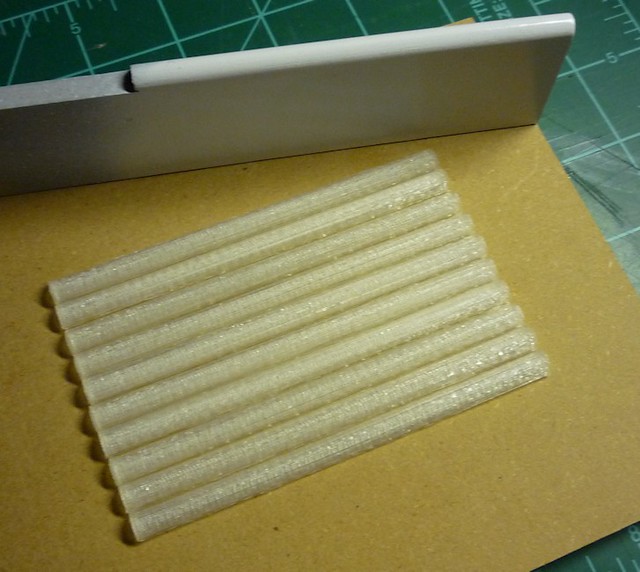
A possibly useful item for 3D printer owners to print - aerodynamically shaped leading and trailing edge strips for 1/4" and 3/16" plywood fin material. I'm tired of the manual method. The maker or buyer can perform the easy-to-do acetone vapor smoothing of the curved side.

I've researched adhesives and it is claimed that _thick_ CA works well with PLA, the plastic which can be used on 3D printers without heated beds like the one I'll hopefully receive later this year when the Kickstarter project ships. I didn't research ABS adhesives. I know that toluene-based model cement works well in ABS/ABS joints, and epoxy doesn't, but I don't know what would be best for an ABS/plywood joint.
 
Last edited:
I've noticed that the makers of plastic parts have come up with some neat techniques to make it easier to glue plastic parts to the wood. For example, they'll include barb-like projections on plastic parts which may be inserted into a hole drilled into the wood. Glue in the hole will adhere to the wood and hold the barb into place. For the leading and training edges, it would be hard to drill holes in the thin wood. But, the plastic part could be hollow with holes in the flat edge that meets the wood. Glue or epoxy in the wood would fill the holes and act like rivets.

-- Roger
Good ideas but, if possible, I'd like to keep the attachment process as simple as possible, otherwise the amount of work required begins to approach that of manually making the edge, although a 3D printed edge could be of an ideal aerodynamic shape that would be very difficult to make manually (at least the way I do things).

I have free access to some nice 3D printers in a public makerspace, but they are loaded with ABS spools. They only charge for the filament used. Hopefully, I can get them to allow switching out with a PLA spool because from what I've read thus far, it sounds more amenable to strong adhesive attachment using a readily available adhesive. I can justify buying an entire spool of PLA because my (hopefully) pending printer with its unheated bed requires it.

I don't plan to market this if it works well, only to use it for my own rockets (assuming it works in the first place), so to anyone reading this please feel free to make and sell it yourself if you want to do so.
 
You design it (and send me an STL file) and I'll print some for you.

I have a printer, I have the PLA.

-Kevin
 
You design it (and send me an STL file) and I'll print some for you.

I have a printer, I have the PLA.

-Kevin
Thanks, but I'll be asking the makerspace guys if I can swap out a spool tonight when I go there and asking them about their experiences, if any, in gluing PLA. Then I'll be climbing the 3D software learning curve before I come up with anything. I just downloaded and installed the freewares Blender and 123D Design last night, but haven't used either yet and, as a result, don't know which I'll make the effort to learn. Any recommendations?
 
Good ideas but, if possible, I'd like to keep the attachment process as simple as possible.

What I suggested was a way of making it easier to attach. It doesn't make it any harder to glue in place while making the choice of adhesive less critical.

-- Roger
 
What I suggested was a way of making it easier to attach. It doesn't make it any harder to glue in place while making the choice of adhesive less critical.

-- Roger
Drilling holes for tabs would add some difficulty and the holes in the flat side of the leading edge material would work well with epoxy, but it seems from what I've found online so far that epoxy doesn't work well with PLA just as it doesn't from my actual experience with ABS. I've read that PLA is porous and that's why thick CA supposedly works really well while regular doesn't. We'll see when I actually try this.

I just learned something really interesting last night from one of the makerspace guys in charge of the 3D printer section that some of you may already know - if you quickly run a PLA or ABS surface through a torch flame that's at greater than 1000F it changes the molecular structure at the surface, making the plastics much more gluable.
 
this might be a better application for openscad where you can tweak a few variables to change the object.

https://www.openscad.org/
What I'd really like would be something where I can just command-line create simple objects through the specification of precise dimensions for the only two personal uses I can think of for my purposes thus far - the creation of these leading edge strips and custom electronics enclosures.
 
Drilling holes for tabs would add some difficulty and the holes in the flat side of the leading edge material would work well with epoxy

Sorry if I wasn't clear, but I suggested making the plastic pieces hollow with holes in the edge that attaches to the fins. That way the glue or epoxy would fill the holes and form sort of a rivet. That way it really wouldn't matter if the adhesive stuck to the plastic or not, it would still firmly grip the plastic piece.

-- Roger
I understood and was mainly commenting on the barbs on the leading edge material portion of your comment being difficult to do because of the need to drill perfectly aligned holes in the leading edge. The reverse that you suggested, having the adhesive intrude into holes in the leading edge material, would rely upon the resulting rivet strength alone since epoxy wouldn't bond to the PLA anywhere else. With thick CA, supposedly the entire PLA surface would bond with whatever, in this case plywood, because the claimed micro-porosity of PLA allows intrusion of CA of the right viscosity, effectively like a bunch of micro-rivets. However, if it turns out that that isn't enough, I'll definitely try your rivet cavity idea.
 
are you only talking about low and slow flights? pla can distort just from sitting in a hot car on a summer day. It is a pretty low temp material.
 
are you only talking about low and slow flights? pla can distort just from sitting in a hot car on a summer day. It is a pretty low temp material.
Yes, no significant aerodynamic heating, at least in my intended use. I'm just wanting an easy method to create nice leading edges.

EDIT: But you bring up a great point for anyone who would eventually use this for really high performance flights. Is there any 3D printer material that once the part is created melts at a higher temperature than initially required to print it? If not, for high performance flights where aerodynamic heating is expected, the 3D printed leading edge could only be used by making it as a hollow "trough" mold for some other material.
 
Last edited:
Did some research and found this info. PLA melts at a higher temp, but softens at a lower temp than ABS:

PLA mp - 160°C (320°F)
ABS mp - 105°C (221°F)

ABS softens at 90C (194F), melts at 105C (221F), can be extruded at ~180C but needs to be ~240C to bond strongly to itself.

PLA softens at ~50C (122F), melts at ~160C (320F), extrudes and bonds well at 180C-190C.

PLA is harder than ABS.

EDIT: By comparison:

Polypropylene (HPR nose cones) mp - 161°C (323°F), softens 152°C (305°F)

While polypropylene has nearly the same melting point as PLA, unlike PLA the softening point isn't much lower than the melting point.
 
Last edited:
Good research - I've been thinking about trying to make a fully printed rocket and have been contemplating the materials. I've mainly been concerned about the material surrounding the motor and the damage caused by the ejection.

My thoughts were to use abs around the motor due to it's higher softening point or to insert a thin walled cardboard tube.


Sent from my iPhone using Rocketry Forum
 
I applied half-cylinder PLA 3D printed leading edge strips to two ends of a scrap piece of 1/4" plywood using two different adhesives. PLA adhesion to the plywood was excellent and apparently very strong with both adhesives. I banged the test strip against a solid surface in various orientations and tried to pull the leading edge strip off by hand (no prying tools); didn't budge.

I used a rubber infused (for a non-brittle, shock resistant joint) thick CA and a very inexpensive silicone adhesive intended for non-brittle foam-foam and foam/plastic to wood use in the RC hobby, available in Hobbytown USA stores and from other sources.

https://www.gorillaglue.com/gorilla-super-glue

https://www.bsi-inc.com/Pages/hobby/foamcure.html

Both worked great with plenty of alignment working time. The silicone type had no finger-sticking issues although it wasn't that annoying with the slow-curing thick CA either. CA accelerator locked the leading edge strip in place instantly once aligned when using the thick CA. The silicone based adhesive takes 12 hours to cure to full strength.

Considering how well both of these worked, I suspect many adhesives might work well. The serrated underside of the printed leading edge strips due to their easily breakable (as intended) attachment to the printing raft provides much surface area for adhesion and adhesive intrusion.

Finishing process after leading edge attachment: applied Rusto 2-in-1 filler primer; sanded very briefly; applied Elmer's Carpenter's Wood Filler (ECWF) along the leading edge strip and the wood/PLA leading edge joint line. I've found ECWF adheres beautifully to the Rusto filler primer even on plastic (I discovered this method on plastic nose cones to quickly fill molding gaps; the wood putty sands so easily); sanded briefly; (sloppily) painted.

Later plan is to attach the elliptical leading edges to a rocket that's already built with flat leading edges.

Elliptical PLA leading edges, 100% fill: 6.35mm (1/4") x 115mm - 3g each
Half-round PLA leading edges, 100% fill: 6.35mm x 100mm - 1.25g each

Elliptical leading edges on print raft:

15548032367_ee29565693_c.jpg


Half-round leading edges off of raft and one end of finished test strip:

15709511426_313b333cc2_z.jpg
 
This just occured to me while looking at one of my homemade half-round-routed wood sanding blocks I've used to created rounded leading edges in plywood the old fashioned way. I should have thought of this some time ago while working with these 3D printed leading edge strips - a 3D printed elliptical or parabolic grooved ABS (stronger than PLA) sanding block, dimensioned just right to hold the sandpaper + fin material thickness.
 
I just learned something really interesting last night from one of the makerspace guys in charge of the 3D printer section that some of you may already know - if you quickly run a PLA or ABS surface through a torch flame that's at greater than 1000F it changes the molecular structure at the surface, making the plastics much more gluable.

You can do the same thing with plastics to promote paint/primer adhesion. Like for plastic nose cones.
 
Back
Top