Photoshop Help Please!

The Rocketry Forum

Help Support The Rocketry Forum:

This site may earn a commission from merchant affiliate links, including eBay, Amazon, and others.

JAL3

Well-Known Member
Joined
Jan 17, 2009
Messages
14,333
Reaction score
268
I'll start by admitting that I have no great Photoshop skills or even a desire to become a Photoshop artist. I just find it to be a very useful tool for doing a very limited task that I do very often. If it matters, that would be cleaning up scans from old hymnals or prayer books.

My system just updated to the newest version and, apparently, my old setting did not survive. Now I am having a problem using the paintbrush tool. Usually, I am trying to paint plain white pixels. Rarely, I try to match some other color. I cannot seem to find the correct settings for my brush to just paint all the pixels in within the "brush" with the desired color. I almost always have to make 2 passes because a ghost of what is underneath usually shows through after the first pass. It has slowed me down much more than it should have and it is driving me nuts.

Can anyone clue me in as to what setting I am getting wrong?
 
Try sliding hardness to 100%.

Might want to try adjusting brightness/contrast to clean a scan as a whole.
 
Try sliding hardness to 100%.

Might want to try adjusting brightness/contrast to clean a scan as a whole.
I appreciate the reply..

Hardness is already at 100% and all of the other setting seem "right" to me but, as I said, my knowledge of the application as a whole is underwhelming.

Most of my scans come out pretty good. Some are a bit tainted by the source document but that is only an occasional nuisance. Much of what I clean up was scanned by others. Some are scanned to jpg, some are psd files and quite a few are pdf files of entire documents. My workflow with the pdf files has always been a pain but, with the latest revision, PS no longer lets me save directly to jpg. Now I have to export the file with legacy settings.

For people who truly use the capabilities of PS, the upgrade may have been great. I'm not qualified to judge. I feel like trying to revert back to the previous version though.
 
What "latest revision" are you using? I have Photoshop Elements 2021 a d I regularly export projects as .jpg files.
 
What "latest revision" are you using? I have Photoshop Elements 2021 a d I regularly export projects as .jpg files.

I am running the 2023 edition. It is the 24.1.0 release.

I have always been able to save as JPG but the option no longer appears as a choice for "Save As". When I checked online, I read that save as JPG has been discontinued but JPG can still be exported as a "legacy format". I have been doing so but it involves a lot of rigmarole and is slow. One of the comments I read indicated that Adobe is trying to drive everyone into using their PSD format as a default and intentionally making the others inconvenient.

In reality, the Elements version would probably do what I need but I have never tried it. The full program is part of my subscription and I would have to pay extra for Elements.

In the meantime, I have still not solved the mystery of why my paintbrush needs two passes to obliterate what is underneath. I am using a hard, round brush with hardness set to 100%. The size depends on what I am working on. In any event, the first pass with the brush turns the pixels to a light gray that is almost white. A second pass is needed to make them fully white.
 
I've never used photoshop, so I have no clue as to how exactly to help. The 'hardness' setting is similar in GIMP, so that was a great guess.

For troubleshooting purposes, if you do one pass and get a gray color, can you use the color sampling tool to see what the color code is? I'm wondering if it has something to do with layers instead of the specific tool. Obviously, they didn't change the software such that the paintbrush tool takes 2 passes (or if they did, it is a setting, not a fundamental change. . . ).

Feel free to PM me an example of a difficult scan you are working on and I'll play with it a bit using GIMP, just as a reference.

Sandy.
The paintbrush is set for FFFFFF, pure white, in most instances. Most of the scans are black and white. Occasionally, I will be working with a color scan and get an analogous problem but the brush is set to the desired color. It seems to me that PS is trying to "paint with a fine mist" such that it takes 2 coats to cover up the black pixels. I have found that when painting over pixels that are originally gray, I get the same issue with a proportionately lighter shade of gray.


I've attached a fairly clean example from an old, 1870 hymnal. there is a little bit of black noise but the main issue for this one is the hand written notes under the "titles". As you can see, I have painted over parts of it and it appears as if I used a very thin whitewash.


View attachment scan 9999b.jpg
 
Last edited:
This seems to cover what you say you're doing.

That is covering masking. I do something similar in Premiere Pro. It is much more complicated than what I am trying to do which is just have everything that falls under the cursor of my brush turn to the color I have set for the brush.

I do appreciate the effort expended on my behalf, though!
 
I am running the 2023 edition. It is the 24.1.0 release.

I have always been able to save as JPG but the option no longer appears as a choice for "Save As". When I checked online, I read that save as JPG has been discontinued but JPG can still be exported as a "legacy format". I have been doing so but it involves a lot of rigmarole and is slow. One of the comments I read indicated that Adobe is trying to drive everyone into using their PSD format as a default and intentionally making the others inconvenient.

In reality, the Elements version would probably do what I need but I have never tried it. The full program is part of my subscription and I would have to pay extra for Elements.

In the meantime, I have still not solved the mystery of why my paintbrush needs two passes to obliterate what is underneath. I am using a hard, round brush with hardness set to 100%. The size depends on what I am working on. In any event, the first pass with the brush turns the pixels to a light gray that is almost white. A second pass is needed to make them fully white.
Hmmm. That stinks. A bit of a pain, but as a workaround, maybe you could save as an allowed format, then open your saved photo in a free package like IRFANVIEW (which I used before I got Photoshop, and still use occasionally because I like the way it handles overlaying text), and then use Irfanview to save as a .jpg file.

I also found this explanative spin online:

New edition of photoshop won't save as jpeg?

This is because JPEG is not a native file format in Photoshop. Photoshop can open and edit JPEGs, but it cannot save images as JPEGs. To save an image as a JPEG, you will need to use a third-party software application or convert the image to another file format such as PNG or TIFF.

Which seems like bull... since it always has... until now.

And also this:

How do I save a Photoshop image as a JPEG 2022?


Image result for new edition of photoshop won't save as jpeg


How to convert files from PSD to JPG.
  1. Choose File and select Save As. Or, choose File, then Export, and Save for Web (Legacy). Either process can be used to save CMYK, RGB, or grayscale images. ...
  2. In the JPG Options dialog box, make any additional selections.
  3. Click OK.
 
It looks like you got the exact same first article I found. I wouldn't mind that save for web, legacy option were it not for the fact that the old Save As was virtually instantaneous and the export, save for web has a few steps in it where the program has to "think about it for 5 or 6 seconds. It just gets annoying and breaks the flow!

I think that the person who came up with this idea should be consigned to the super secret 10th circle of hell (a la Dante) previously used only for the geniuses who foisted Windows 8 on the world. Then I remember that I don't believe in that stuff, sigh, and wait for PS to actually finish saving.

Sigh.
 
Have you tried a different tool like the cloning stamp to erase the print?

Should be easy being it's a black and white scan.
 
Make sure your brush style is correct. With a brush you can do a spray can style with feathered edges.(or lots of other brush styles) Is it possible you have the wrong brush style defaulted in the update? The Brush style affects painting and cloning. Then set the pixel size for the brush. You can set the brush colour either by clicking on the colour pallet or by using the colour-picking tool to select a colour from the picture you are working on.
Lastly, don't forget that JPG format is a file format algorithm. This leads to averaging between colours next to each other depending on how you set the file size and sharpness. So between a black object and a white object is an area that could be black or white. The lower the file size/sharpness, the fuzzier these areas become. For text, you might want to consider running it through an optical character recognition interface and convert it from a picture of text to actual text in a document. Word has that capability.
Norm
 
Have you tried a different tool like the cloning stamp to erase the print?

Should be easy being it's a black and white scan.
I appreciate the input.

I will be the first to admit that I have heard of clone stamping but have only the vaguest idea of what that is. Recall that I have maintained all along that my use of PS is very basic and limited.

That said, I am whining because from the late 1990s until about 3 months ago, I could do what I want to do now simply, quickly and without even really thinking about it. Now, I actually have to be careful and pay attention to what I am doing! It's insufferable!

On average, I could process about 2 files a minute doing what I used to do. Now, I find that it is taking 3 or 4 minutes per file. It brings to mind many vocabulary words that both my wife and the bishop discourage the use of.
 
Make sure your brush style is correct. With a brush you can do a spray can style with feathered edges.(or lots of other brush styles) Is it possible you have the wrong brush style defaulted in the update? The Brush style affects painting and cloning. Then set the pixel size for the brush. You can set the brush colour either by clicking on the colour pallet or by using the colour-picking tool to select a colour from the picture you are working on.
Lastly, don't forget that JPG format is a file format algorithm. This leads to averaging between colours next to each other depending on how you set the file size and sharpness. So between a black object and a white object is an area that could be black or white. The lower the file size/sharpness, the fuzzier these areas become. For text, you might want to consider running it through an optical character recognition interface and convert it from a picture of text to actual text in a document. Word has that capability.
Norm

The brush style is set to hard round. I thought that was what I've been using for years but must admit to not being sure.

I use the brackets to set pixel size and it can vary greatly depending upon the resolution of the scan, the size of the area I'm trying to clean up and whatever else might be in the way that I want to stay away from.

Most of the time, my foreground and background colors are set to pure white and pure black and I occasionally have to swap them. Occasionally, I try to match a color in a colored scan and use the eyedropper to select what I want to match.

What you describe of the process makes sense in what it says but has never been an issue for me. For over 2 decades, I have have been able to set the brush so that it forces the pixels I hit with it to change to the desired color. I recall having to play with setting in the past to fine tune this and get past the "spraying" paradigm but I seem to be unable to duplicate that this time. It has probably been since around 2015 or so that I have had to mess with this; each new update just adopted what I had before. The difference this time is that the HDD died and I had to reinstall everything from scratch. I'm still working on that, trying to find documentation for purchases of legacy software has been... very similar to a root canal except that the dentist gives me something for the pain.

I actually often use OCR, usually in Acrobat but sometimes in Word. It does well for generating text files but sometimes I need a graphic image. I posted an example last night that was scanned from an old hymnal from the 1850s or 60s, IIRC, that was text only. That was very common back then. OCR doesn't handle engraved music too well however. I wish there were a way to integrate MuseScore and InDesign!!!!!
 
If you're just removing noise like in the jpg you posted. Download paint.net for free. Very simple and similar to PS. Paintbrush, Clone or Erase what you don't want and it will save in the same jpg format you opened.
 
I use Photoshop daily. In the full edition, click Save a copy and select jpeg.

In the older versions, that always worked. In the new version, that works if the file you opened up is a jpg. If the original is a PDF, however, that option no longer appears. You now have to go the export -> save for web (legacy) route. Instead of being almost instantaneous, it now takes appr 6-7 seconds to open the appropriate menu and about the same amount of time to actually save.

If the the file opened is in other formats, png, gif, etc, I don't know what options are presented because I get those so seldom. If it is opened as a PSD, then I suspect, but do not know, that the option is gone as well. In the last 20+ years, I have only had one file submitted as a PSD.

I scan directly to jpg. Most individual assets come in as jpg. When an entire volume is submitted, that usually comes as a PDF.
 
I have to disagree. I'm using PSD Ver 24.1.0, which is the latest release. I just opened (imported) a pdf, did a "Save As", clicked "Save A Copy"and chose jpeg. See screenshots....
 

Attachments

  • Screenshot 2023-01-06 at 7.22.05 AM.png
    Screenshot 2023-01-06 at 7.22.05 AM.png
    41.7 KB · Views: 0
  • Screenshot 2023-01-06 at 7.22.18 AM.png
    Screenshot 2023-01-06 at 7.22.18 AM.png
    61.3 KB · Views: 0
I have to disagree. I'm using PSD Ver 24.1.0, which is the latest release. I just opened (imported) a pdf, did a "Save As", clicked "Save A Copy"and chose jpeg. See screenshots....


You have my gratitude!!!!!


My screen looks nothing like your images but they did point out to me a critical issue. I have been long used to using ctrl+shft+s. In doing so, the save as dialog would appear. Now it still appears but jpg is no longer an option. JPG200 is the closest I can come.

What is different though, is that I caught the "save as a copy". That appears to be ctrl+alt+s, a combination I am pretty sure I have never used. Be that as it may, jpg was the default selection and there were many more other options as well when compared to the "save as". The actual saving may have been marginally faster but it was a background process and not like the export I mentioned earlier.

Your help has been of immense value and I am thankful.

That makes me almost hesitant to ask for more...

The original subject of this thread was my inability to get my brush to heed my wishes without multiple passes. It is set to hard round with a hardness of 100. When dealing with black and white images, painting with white turns the pixels a light gray instead of just vanquishing the black altogether. What have I got wrong?


PS: please don't let my helpless begging for assitance in the latter (initial) matter detract from my immense grattitude in the saving matter.
 
I'm glad I was of help... I'm assuming the slight differences are from the fact that you are using Windows, and I am on a Mac.
In regards to your original issue, I can only guess. I would look to see that your opacity settings are at 100%. It sounds like you are using something less... see attached screenshot.
 

Attachments

  • opacity.jpg
    opacity.jpg
    150.1 KB · Views: 0
I'm glad I was of help... I'm assuming the slight differences are from the fact that you are using Windows, and I am on a Mac.
In regards to your original issue, I can only guess. I would look to see that your opacity settings are at 100%. It sounds like you are using something less... see attached screenshot.
I just looked and opacity is set to 100

In fact, the setting are as follows (and I freely admit that I don't know what many of them mean)

size 100 px (i change this often depending on what I am trying to do)
mode Normal
opacity 100%
Flow 100%
smoothing 10%
angle(?) 0 deg.
 
Hmmmm. Hard for me to tell without actually being there, it could be many things. If you are on a layer, make sure the layer opacity is at 100%. Other than that, without being there, I'm not much more help than screen doors on a submarine....
 
I'll start by admitting that I have no great Photoshop skills or even a desire to become a Photoshop artist. I just find it to be a very useful tool for doing a very limited task that I do very often. If it matters, that would be cleaning up scans from old hymnals or prayer books.

My system just updated to the newest version and, apparently, my old setting did not survive. Now I am having a problem using the paintbrush tool. Usually, I am trying to paint plain white pixels. Rarely, I try to match some other color. I cannot seem to find the correct settings for my brush to just paint all the pixels in within the "brush" with the desired color. I almost always have to make 2 passes because a ghost of what is underneath usually shows through after the first pass. It has slowed me down much more than it should have and it is driving me nuts.

Can anyone clue me in as to what setting I am getting wrong?
As far as the jpeg issue I cannot help you with Adobe’s craziness. My suggestion is to look online to try and find a JPEG filter that you can insert into your filters folder that the app uses….if its all in the cloud and nothing is actually on your computer, then I do not know if 3rd party filters will work as they have to be accessed by the ”save as” menu.

With your paintbrush issue there is not only hardness but you can set an opacity….is your opacity set to 100%? I am going by older photoshop versions as I do not used the cloud versions so really can’t see the new menus. if your brush opacity is set to 100 then check your layer opacity. Also check to make sure it is a regular layer and not a “mask” layer.
 
Maybe I missed this above, but you can easily restore the 'Save as' legacy version so you can get the option to save as a JPG right from that screen, without having to use the 'Save a copy' option:

legacy-save-as.png

Under Edit > Preferences > File Handling, tick 'Enable legacy "Save As"' to restore the older Save As dialog box. No more gnashing and grinding of teeth! Note I also highlighted the 'Default File Location' setting – that should be set to 'On your computer' unless you want to save to Adobe Cloud.

In order to solve your other issue, PM me a screen shot when you are in Photoshop and are having the problem. I taught Photoshop for nearly 30 years and without seeing your screen, it's hard to understand exactly what's going on. The above suggestions of checking the Brush opacity and Mode setting are the usual suspects, but unless you are painting on a layer that has either of those settings wrong, you may need to reset your preferences. Also, try quitting then restarting Photoshop, create a new document, and then paint with a black brush on a white background and see if you are having the same issue. If not, you know it's something about the document and not a systemic issue.


Tony

PS: ideally for your kinds of image, you should avoid using JPG, as it is a lossy format (not only a resolution loss, but introduction of unwanted artifacts). The preferred formats are either TIFF or PNG. You can use RLE encoding with TIFF or 8 bit with PNG to 'losslessly' reduce file size with your black and white images.
 
Last edited:
Additional info:

Ideally, for JPG, you should be using File > Export > Export as > and Select JPG (same is true for PNG). Or, use File > Export > Export Preferences and set it to JPG or to whatever settings work best for you. Then choose Edit > Keyboard Shortcuts and set File > Export > Quick Export to whatever shortcut you'd like (I use shift-control-S, which is normally used for 'Save As...) and you can directly save to JPG without any dialog boxes (other than choosing where and what to name the file), which should make you very happy.

Adobe's official line is the the Export As dialog produces much better results than the older legacy version, and certainly than the Save As version. They are not equivalent in quality, so there is an advantage to using the correct version, at least according to Adobe.


Tony

The File > Export > Export As dialog box (set to PNG): (Green area is file type, Red allows you to change dimensions, and Yellow shows you the results)
Export-as.png

File > Export > Export Preferences: (Red area sets default file type, Blue is another way to get back to the old 'Save As...' dialog box)
Export-as-prefs.png

Using Edit > Preferences to add a keyboard shortcut to File > Export > Quick Export:
Keyboard-shortcuts.png
 
Last edited:
I wonder why subscribe and get updates, since you do not need any new features (and the newest feature of no Jpeg support is a massive bug).

I'm using my old G5 Mac, on very old 10.5.8 (which I use for PS, MacDraw, and not much else, otherwise I use my laptop). For CS2. After a drive crash I needed to reinstall Photoshop.... BUT, they killed the online updater support to allow completing installation.

Well, I can run it for a 30 day trial. And that is what I have been doing... for a few years now. I have an old Firewire drive that I boot up on, PS on it. 30 days later, when the PS trial is over, and I want to do some more PS stuff, I then erase the whole drive (I save my work to other drives, NEVER on that one), reinstall 10.5.8, and reinstall Photoshop (have to do that as the free trial leaves a hidden file in the drive that stops a free trial from being installed again). So, that boot drive is only for running Photoshop on it. I also have a "transfer folder" on an internal drive, that I use for the few apps, and some files (fonts and updaters) that I need to transfer and update each time I do it. It's a bit of a hassle, but the price is right.... FREE. Not a $25 a month "subscription" crap (which could never ever run on a 2004 PPC Mac anyway) . And I don't need the fanciest features (and clearly you do not either).

BTW - the Cloning tool is quite useful. Sort of surprised you have not used that. So easy to use, unless they screwed with it to make it more complex in recent years.

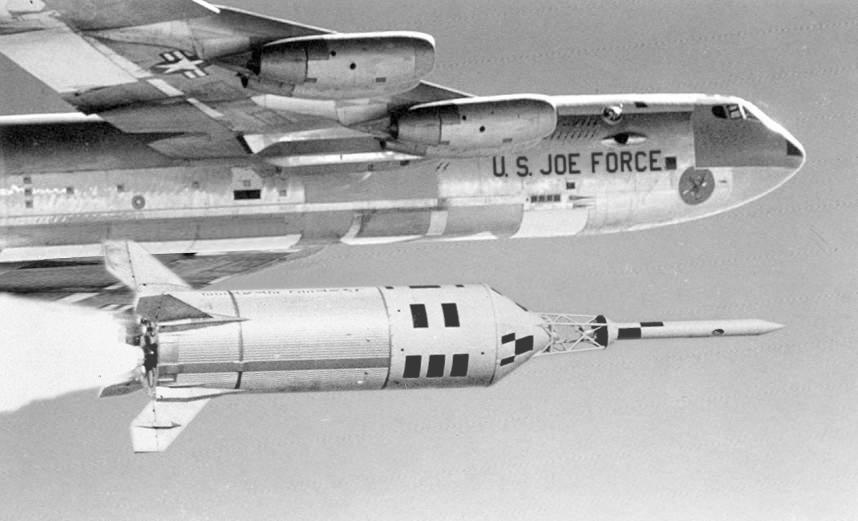
An example of something I've done with CS2. Had to use the cloning tool to help clear away the "AIR" text on the B-52, to add JOE in its place. Now that I look at this again, I should have used the "blur" tool on the Little Joe, it is a bit sharp compared to the bit blurry B-52. And maybe toned down the lighting/contrast.

FNdMrZi.jpg
 
Last edited:
Maybe I missed this above, but you can easily restore the 'Save as' legacy version so you can get the option to save as a JPG right from that screen, without having to use the 'Save a copy' option:

View attachment 555192

Under Edit > Preferences > File Handling, tick 'Enable legacy "Save As"' to restore the older Save As dialog box. No more gnashing and grinding of teeth! Note I also highlighted the 'Default File Location' setting – that should be set to 'On your computer' unless you want to save to Adobe Cloud.

In order to solve your other issue, PM me a screen shot when you are in Photoshop and are having the problem. I taught Photoshop for nearly 30 years and without seeing your screen, it's hard to understand exactly what's going on. The above suggestions of checking the Brush opacity and Mode setting are the usual suspects, but unless you are painting on a layer that has either of those settings wrong, you may need to reset your preferences. Also, try quitting then restarting Photoshop, create a new document, and then paint with a black brush on a white background and see if you are having the same issue. If not, you know it's something about the document and not a systemic issue.


Tony

PS: ideally for your kinds of image, you should avoid using JPG, as it is a lossy format (not only a resolution loss, but introduction of unwanted artifacts). The preferred formats are either TIFF or PNG. You can use RLE encoding with TIFF or 8 bit with PNG to 'losslessly' reduce file size with your black and white images.


BINGO!

This got it back to the way it used to work for me. Thanks. Now my fingers don't have to get used to different contortions for the "Save a Copy" option.

It looks like my paintbrush problem is done now too. I reported above what my settings were and opacity was set to 100%. Apparently though, I am going through some sequence of keystrokes that is lowering it to 90% when I am actually using it. I still don't know what is doing that but I did happen to glance up at the settings while actually painting and saw it at 90. I put it back to 100 and all is right with the world.

I agree that some of the other file formats have advantages but, for now, I am stuck with JPG because that is what is almost universally used among the people I am working on. It inserts easily into text files. When needing to save as perfect a copy of something as possible, we usually go with PDF. Some, not me, are real artists with the PSD files. I'm just a grunt. My expertise is more in the history and development of the actual documents and with the database that is being generated.


THanks again.
 
I wonder why subscribe and get updates, since you do not need any new features (and the newest feature of no Jpeg support is a massive bug).

I'm using my old G5 Mac, on very old 10.5.8 (which I use for PS, MacDraw, and not much else, otherwise I use my laptop). For CS2. After a drive crash I needed to reinstall Photoshop.... BUT, they killed the online updater support to allow completing installation.

Well, I can run it for a 30 day trial. And that is what I have been doing... for a few years now. I have an old Firewire drive that I boot up on, PS on it. 30 days later, when the PS trial is over, and I want to do some more PS stuff, I then erase the whole drive (I save my work to other drives, NEVER on that one), reinstall 10.5.8, and reinstall Photoshop (have to do that as the free trial leaves a hidden file in the drive that stops a free trial from being installed again). So, that boot drive is only for running Photoshop on it. I also have a "transfer folder" on an internal drive, that I use for the few apps, and some files (fonts and updaters) that I need to transfer and update each time I do it. It's a bit of a hassle, but the price is right.... FREE. Not a $25 a month "subscription" crap (which could never ever run on a 2004 PPC Mac anyway) . And I don't need the fanciest features (and clearly you do not either).

BTW - the Cloning tool is quite useful. Sort of surprised you have not used that. So easy to use, unless they screwed with it to make it more complex in recent years.

An example of something I've done with CS2. Had to use the cloning tool to help clear away the "AIR" text on the B-52, to add JOE in its place. Now that I look at this again, I should have used the "blur" tool on the Little Joe, it is a bit sharp compared to the bit blurry B-52. And maybe toned down the lighting/contrast.

<..image snipped..>
It's great to know a 20 year old PPC Mac is still out in the wild doing good work – an impressive testament to your fortitude and Apple's hardware (and software – that it's so easy to boot off an external drive.) Keep up the good work, no matter how you get it done!


Tony
 
BINGO!

This got it back to the way it used to work for me. Thanks. Now my fingers don't have to get used to different contortions for the "Save a Copy" option.

It looks like my paintbrush problem is done now too. I reported above what my settings were and opacity was set to 100%. Apparently though, I am going through some sequence of keystrokes that is lowering it to 90% when I am actually using it. I still don't know what is doing that but I did happen to glance up at the settings while actually painting and saw it at 90. I put it back to 100 and all is right with the world.

I agree that some of the other file formats have advantages but, for now, I am stuck with JPG because that is what is almost universally used among the people I am working on. It inserts easily into text files. When needing to save as perfect a copy of something as possible, we usually go with PDF. Some, not me, are real artists with the PSD files. I'm just a grunt. My expertise is more in the history and development of the actual documents and with the database that is being generated.


THanks again.
I'm glad my post helped. I can guess as to what's happening to your opacity setting: if you have a painting tool selected (or any of several other tools) and press a number on either the numeric keypad or one of the 'typing' numbers, it will set the opacity of the tool to that value. My guess is you are tapping a number key somehow and changing the tool. Give this a try:
  • choose the paint brush tool
  • paint a stroke
  • press the 5 key on either the num pad (with Num Lock turned on of course) or the typing numbers
  • paint a stroke to check its appearance
  • check the Opacity setting in the toolbar - it will be set to 50%
It's actually a very useful feature for certain kinds of work – you can be painting and very quickly modify the opacity of a stroke. I use it all the time. Each number corresponds to an opacity X 10, so 9 is 90%, 8 is 80%, and so on. To get back to 100%, press 0 (zero). If you press two numbers in rapid succession, such as 55, you'll set the opacity to 55%. (You can even press 0#, such as 05, to set it to a single digit opacity.) Pressing zero by itself always resets it to 100%. It's a lot like pressing [ or ] bracket to change the brush size – a great shortcut if you know it, but it will drive you crazy if you don't know about it and do it by mistake.

For super power user bonus points, pressing Shift and either the Plus or Minus key will change the tool to either the next or previous Blending Mode. Again, very useful for many kinds of work, but maddening if you do it by accident and then have no idea why your paintbrush or other tool is behaving so strangely.

If you don't have a modifiable tool selected, those shortcuts affect the entire layer itself! But only if it's a layer, and not a Background image. So if you have the Move tool selected, and press the number 5, the current layer will be set to 50% opacity, and zero will restore it to 100%. Pressing shift and plus or minus will change the Blend mode of the entire layer – you can see that in the Layer pallet.

Just FYI,


Tony
 
Last edited:
Back
Top