Night Launch at NARAM

The Rocketry Forum

Help Support The Rocketry Forum:

This site may earn a commission from merchant affiliate links, including eBay, Amazon, and others.

georgegassaway

Well-Known Member
TRF Supporter
Joined
Jan 17, 2009
Messages
5,204
Reaction score
1,547
What kind of models and/or lighting do people plan to use for the Night Launch at NARAM?

Some pics from the night launch at NARAM-48:

https://naramlive.com/naramlive-2006/naramlive/02saturday/nightlaunch.html

From NARAM-49:
https://www.naramlive.com/naramlive-2007/naramlive/02saturday/nightlaunch.html

Not NARAM, but photos I took at BRB’s night launch last year:
https://birminghamrocketboys.com/BRBGallery/main.php?g2_itemId=33622

The best model at our launch last year was Steward Jones’ “Chandelier” model, which had 7 very bright LED light units onboard. Two in each fin pod, pointed up and down, and one for the nose. Not only very visible on the pad, but visible for the whole flight since usually at least three lights were visible at all times (going up or down).

I got a number of good liftoff shots at that launch, as I had finally learned to do near the end of the NARAM-48 night launch shots I took. I used my camera’s strobe flash to get those shots. The compromise there was the camera shutter lag was a hair longer than normal due to the flash (not bad, but I noticed it). Of course, I had everything pre-focused before ignition or the shutter lag would have been terrible. And the flash limited the exposure to 1/500, but with darkness like that there was no way to shoot anything good at a higher shutter speed anyway. Some cameras may perform differently regarding flash and lag and night launches, so YMMV (I use a Canon S5-IS).

A YouTube video showing an LED “Finger Light” mounted into the base of a plastic nose cone:
https://www.youtube.com/watch?v=k0TBRsmC8z4&feature=channel

One thing I did last year was to add about 18” of a clear tube payload section to a Baby Bertha. I placed simple white paper inside the clear tube, then had LED finger lights mounted in the top and the bottom of the clear tube. The lights shined up inside of that white paper and made the translucent paper light up, sort of like a weak fluorescent light tube. Which was sort of fitting since the source of the clear tube was what is sold to cover and protect fluorescent light bulbs (such as at Lowe’s and Home Depot).

Want to wire up your own LED’s, but do not know how to determine the correct dropping resistor value, or the proper schematic to wire multiple LED’s for the voltage you plan to use? Use this on-line calculator page to figure out the resistors and the wiring for the given values it asks for.

https://led.linear1.org/led.wiz

- George Gassaway

IMG_1185.JPG

IMG_1187-crop.jpg
 
Last edited:
I just ordered some parts to start building my rockets. I have several LED toys I'm pulling apart to use. Been taking pics as I've disassembled, I'll be posting them soonish.
 
I'm cannibalizing a toy Sword/Lightsaber that I got at Busch Gardens last week. It's chocked full of LEDS(about 2 dozen), micro switch, and assorted parts that I plan on using for my rocket. I bought a few of them since they were only 5 bucks. I might just add some clear fins and motor mount to one of them and make a flying Lightsaber.
 
I'm cannibalizing a toy Sword/Lightsaber that I got at Busch Gardens last week. It's chocked full of LEDS(about 2 dozen), micro switch, and assorted parts that I plan on using for my rocket. I bought a few of them since they were only 5 bucks. I might just add some clear fins and motor mount to one of them and make a flying Lightsaber.

But boy did Craig have fun with it before he cut it up... Making his wife wear that cinnamon bun hairstyle and call him Luke Foosewalker...;)
 
If you're short on time, something like this might work. It is a flashing LED
glowstick that I found in the flashlight aisle at the drugstore (Walgreens).
It is 8" long, weighs 0.9 oz, has 7 flashing modes, and costs $2.
It fits snugly into a BT-20 and would probably work as a nose cone
with something like an Estes Yankee. It comes with a carrying cord so
remove that and tie the shock cord on, wrap a little tape at the bottom,
and you're ready to go.

jeff

IMG_4118_web.JPG

IMG_4112_Web.JPG

IMG_4111_web.JPG
 
Last edited:
Well, the night model I was going to bring to NARAM has been wiped out, during a test flight before dark last night.

It was an old R/C R/G, built in 1986 and last flown in 1989. I added VERY bright LED's in strategic locations. Some as "running lights", with two red ones the left wingtip, and two green on the right wingtip. Two blue ones on the tail. And four pointing forward like landing lights, and they did throw out beams. Not strong beams of light, but darned good for pairs of LED's drawing about 20 mAh per pair (in series). One on each wingtip, and two on the nose, pointed a little bit down.

The night glider lost the right outer wing. Tried it before dark. It pitched down pretty hard and I gave it full up, the mix of the speed and the attempt to pull up ripped it off. And the rest of the bird trashed itself when it hit. Really frustrating. That thing JUMPED of the pad seeming like it was powered by a D12. But it was a D7. That bird was about 195-200 gram glide mass, so it was not that much lighter than other D7 powered S8-E sized birds I have been flying lately. So I do not know if I had something go flaky with the engine, with too much thrust, or if it was "normal", but with the glider having too much down elevator trim for boost it just got horizontal too fast and moving too fast before I could do anything. Normally I would have done a C6 first flight boost to check that the boost trim was in the ballpark or not, but did not have time.

I did not even remember to take a picture of it before launch. In the fifth pic, after the crash, the left landing light is on, the right one is barely visible at the tail, near the rudder, as the wiring was blown back there as the G10 I had CA'ed on to fill over where the balsa skin was cut, to let the wiring run, all peeled completely off when the right wing went (but I know the sequence had to be, right wing breaks at the joint, then the rest rips apart). The other lights are not on because since it was not dark yet, I was saving power of the battery pack used for the other 12 LED’s (the two wingtip lights were powered by the R/C battery pack. So if the lighting battery went dead in the air, I would have the two wingtip landing lights to fly from rather than nothing).

I do not think I have time to try to convert another R/C R/G for night flying. I have actual NARAM contest birds to build.

- George Gassaway

Noselights.jpg

IMG_6389.jpg

IMG_6392.jpg

IMG_6394.jpg

IMG_6466.JPG
 
Last edited:
I did have one other night launch rocket. Well, it was a Baby Bertha, with a night payload section. The payload section has some clear tubing so the whole lighting unit could go inside rather than mounting the LED’s externally (or thru holes in the body). Also, by putting them in clear tube, then all the residual light they output and reflect can be seen. I even put some white trim monokote on top of the 1/32” plywood disk that the LED’s were CA’d (glued) to.

It used 4 super-bright 20,000 MCD white LED’s. The LED’s were wide angle, so rather than the normal rounded top, the tops are flat (or squared-off). I got them from c-leds.com, such as this listing on eBay:

https://cgi.ebay.com/100-x-5mm-Whit...trkparms=65:12|66:2|39:1|72:2122|293:1|294:50

Those are sort of the opposite of some of the ones I had on the R/C Night Glider, the “Landing Lights” on the glider put out beams of light and were not as visible from other angles as these are. And I did use two of these on the Night Glider’s fuselage belly so I could key on those for pitch angle during glide, when seeing it at a near-side view. Sigh....why did it have to crash.....

Anyway....

Originally, I was going to use 8 LED’s, running off of one “N” sized A23 battery (the kind used in Smoke Detectors, lightweight, and pretty inexpensive).

I built it to use 8, with two sets of 4 in series. But, I got concerned that the A23 battery might not last long enough, especially if there was a delay in retrieving the model. So, I decided to make it flash, so it would be off a lot more than it was on. To make it flash by the simplest cheapest way possible, using a flashing LED. Well, it turned out that the flashing LED could not drive 4 white LED’s in series with much brightness when they flashed. So, I did a test and found the flashing LED could drive two white LED’s in series, and found that it could drive two more LED’s also in series. So, I decided to go with just that, to only use 4 white LED’s, a parallel pair of 2 in series, and all of those in series with the flashing LED.

It turned out to work very nicely. The light output when it flashed was very bright. So, 8 would have been a bit overkill, 4 of those LED’s are fine.

Attached is a diagram for the wiring and how the LED’s are oriented.

Plus, some pics of the unit, and liftoff photo when it was mid-flash.

BTW -for other pics from BRB’s night launch yesterday (the 18th), go to:
https://birminghamrocketboys.com/BRBGallery/main.php?g2_itemId=129506&g2_page=1

I have uploaded a movie clip to YouTube showing the flashing LED unit in operation in a darkened room. The red lighting you see reflected between flashes is from the camera. The 4 white LED’s are slightly lit (very dim) in between flashes.
https://www.youtube.com/watch?v=mDVyEzibCsY

BTW - the YouTube vid plays very jerkily on my browser, and/or the conversion process really hurt it badly. A LOT of the flashes are missing on YouTube. In real life, it flashes about once per second. Of course the flash rate is totally dependent on the flashing LED rate.

- George Gassaway

Night-Flashing-LEDs.gif

IMG_6482.jpg

IMG_6490.jpg

IMG_6481-crop.jpg

IMG_6481.JPG
 
Last edited:
While I won't be attending in person George:
Jim Filler (Naram-51's Night Launch RSO) will have my Phantom Nike-Apache lit up at the range head, Hopefully He'll have a chance to fly it but it'll be there in Red,Yellow& Orange LED's.

One power supply not mentioned George:
If your looking for Light weight battery power; 3v Lithium coin cells are the way to go. Over the past couple years i've converted all my other power packs to either single 20mm CR-2032 or if I need 6volts double 20mm CR-2032holder and batteries.
Burn time testing has shown these loaded system lasting more the 20 hours (depending on the load) most are mulit strings of 6 to 8 20ma Superbright LEDs. ranging from 5000 to 12,000mcd.

Edit: Another thing I've discovered over time: Unless you've located your power supply in a totally unaccessable area, Switches are really nothing more then an unnecessary failure point. More often then not they flip themselves off at the most inapproprate times like at launch or landing. if you must use a switch I'd suggest a screw switch or heavyduty slide switch, staying away for toggle or other types.
It's also important to be very sure your battery supply is LOCKED into the holder if not using Heavy duty coin cell holder secure batteries with wire or tiewraps to keep them in place. Also be sure to place your powersupplies with the springs oriented AWAY from the line of Thrust and landings;)

Hope this helps...wish I could be there:(
 
Last edited:
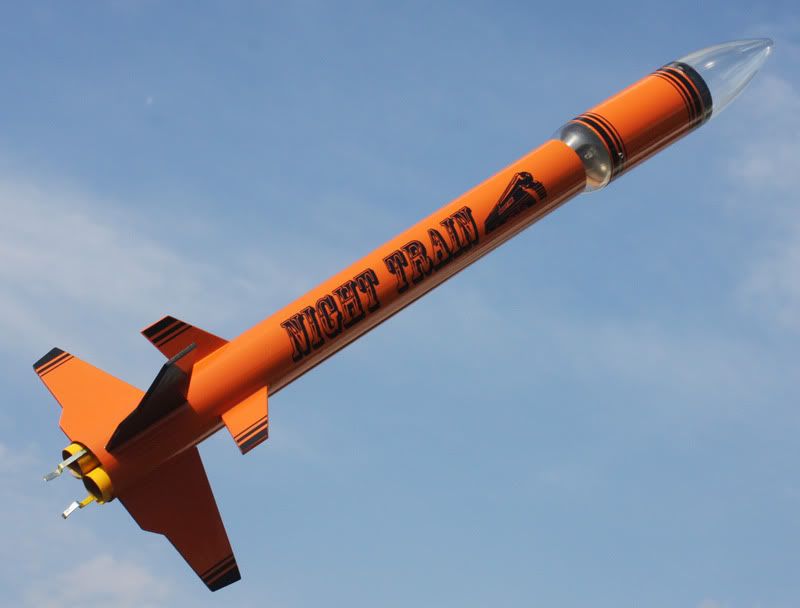
My night vehicle is ready. Quest has a new kit that is a prime candidate for a night flying mod...it's the Magnum Sport Loader. It's a dual 18mm cluster that comes with their well known egg payload section, only they've replaced the standard black capsule with a clear capsule. This model begs to be illuminated. As such, I had to change the name of the rocket and make my own custom graphics.:)

Magnum-Night-Train.jpg


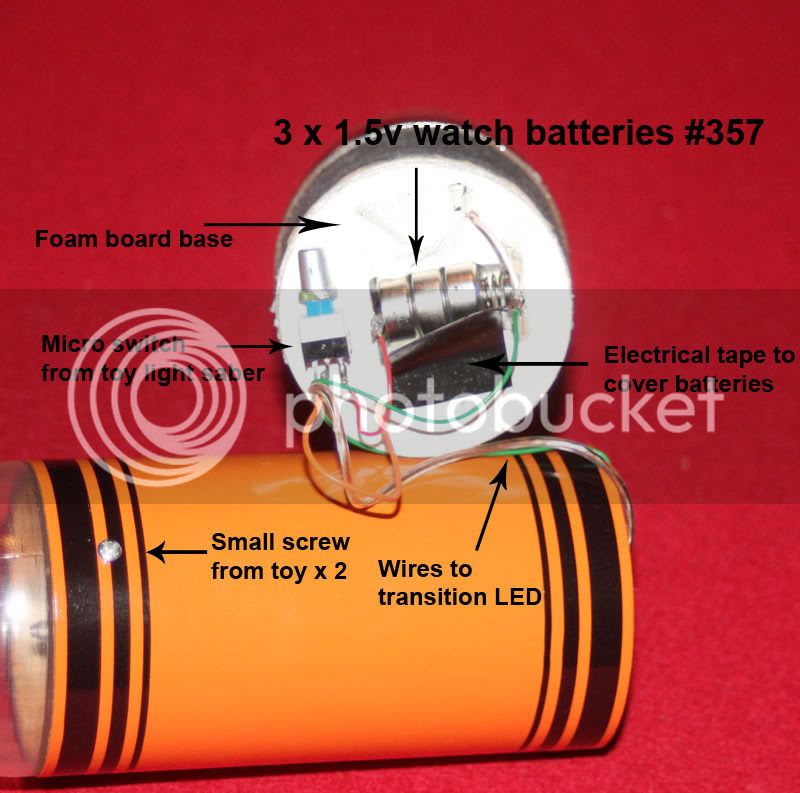
As noted earlier, I took apart the toy light saber. I used the LED's, battery terminals, micro switch, and some screws. The light saber had 22 blue LED's powered by 3 AA batteries. I wasn't happy with the weight penalty of the AA's and only planned on using a fraction of the lights anyway, so 3 -AA's was overkill despite the weight. I wanted to keep the LED's happy with the 4.5 volts so I used three #357 1.5v watch batteries instead. I'm not sure what the amp draw is from each LED, but I've seen various LED toys powered by similar batteries. I'm not entirely sure how long these batteries will last, but we'll see.


Night-Train-battery-wire-up.jpg


I stacked a couple foam board circles to make the battery/terminal mount and switch mount. The switch was glued to the foam board with small dab of CA after the solder connections were made. Rather than mess with the fiddly task with taking the batteries in and out to turn the lights on, I felt the switch would be an easy solution(especially at night). Slide the nose cone off (friction fit), press the button, slide the nose cone back on, and she's ready to roll. I thought about cutting a small hole in the BT and letting the switch stick out of the side of the payload section, but I was felt there might be a small chance the switch could be turned off if it made contact any part of the rocket after ejection.... so inside it went. I didn't want to glue the payload sections together in case any electrical repairs needed to be made in the future. The plastic transition piece had a fairly small shoulder compared to the nose cone section(which used a coupler), so I used a couple screws to fasten the transition to middle payload section(standard body tube).

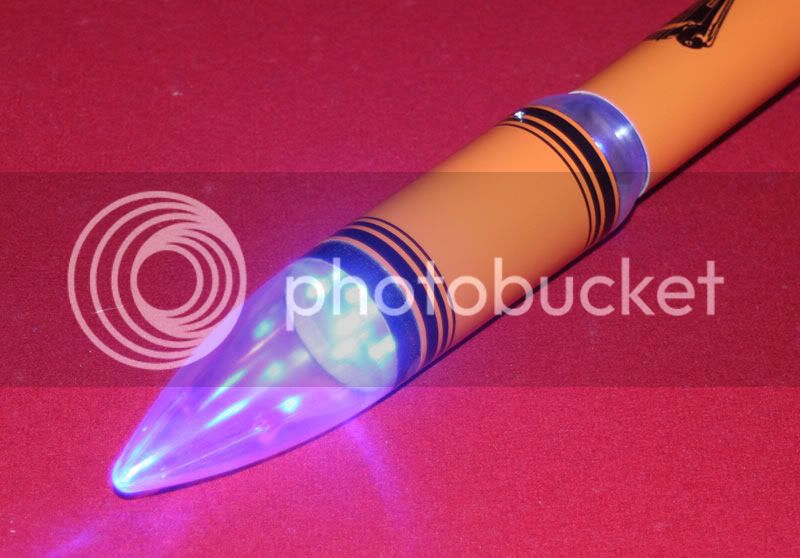
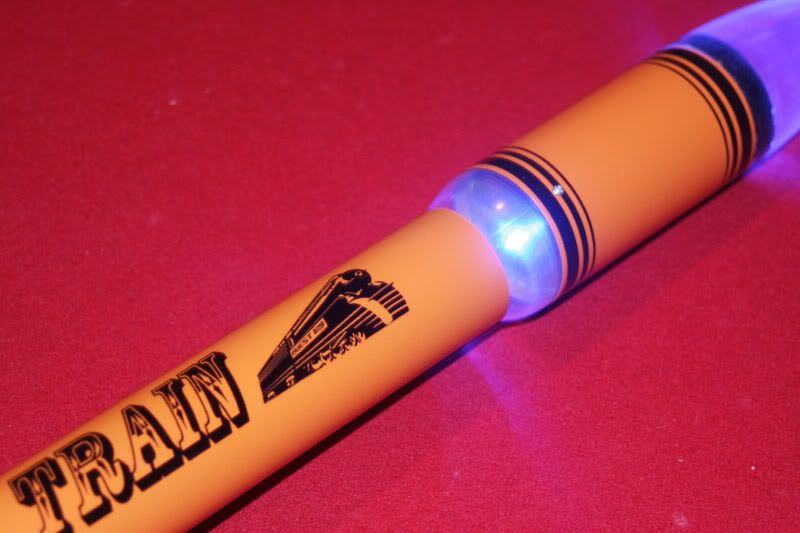
I used 6 LED's total- five for the nose cone and one for the lower transition.
I cut out circles from presentation type foam board to mount the LEDs.

Night-Train-Nose-LED.jpg

Night-Train-transition-LED.jpg
 
Last edited:
My night vehicle is ready. Quest has a new kit that is a prime candidate for a night flying mod...it's the Magnum Sport Loader. It's a dual 18mm cluster that comes with their well known egg payload section, only they've replaced the standard black capsule with a clear capsule.
Magnum-Night-Train.jpg

Well, I guess I'm unlucky. I just ordered the Magnum Sport Loader, and mine
still had the black capsule. :mad:
 
Well, I guess I'm unlucky. I just ordered the Magnum Sport Loader, and mine
still had the black capsule. :mad:

Oh man, that stinks. I wonder how many were packaged with the clear capsules? I know the earliest ones have clear. Perhaps too late now, but maybe they'll send out the clear ones per special request when the order is placed. I also suspect mine was made and packaged here in the USA....judging by the tubes that came in the kit. I wonder if they've gone over to the China parts on these now?
 
Mike, if you end up using the stock decals you may want to coat them with decal film or something. They weren't impossible to use, but were very thin and stretchy....reminded me of some of the Estes decals we've been getting lately. I almost ruined a couple of them trying to get them into position. In contrast, the Quest Raptor decals were thicker and much easier to work with.
 
I have modified another old R/C R/G for a Night Glider. A few pics attached. First pic is with one room light on, the rest were shot in total darkness with the model as the only light source. Last pic is belly-up.

Same LED's, mostly same layout as the first one.

I did add an upper "fin" to the engine pod, to raise the lateral LED's that shine on the wingtip panels, to get a better "spotlight" angle on them.

There is one other thing I added, but I’ll save that as a surprise for those who attend the Night Launch Saturday at NARAM.

BTW - I have confirmed that the first Night Glider crashed because the engine had way too much thrust. I’m making sure that will not happen again, with this one.

- George

IMG_6555.jpg

IMG_6559.jpg

IMG_6562.jpg
 
Very very nice Foose and George,
I like both models,
I ordered a magnum sport loader and clear capsule a while ago that are still sitting in the box. I'd hoped to do something with it before now but have been in one of those building slumps.
Perhaps your model with spark a little something to get me moving before the Clubs September Night launch? we'll have to see.

Good lookin Stuff both of you!
 
A long overdue update about the R/C night glider I flew at NARAM-51.

It flew three night flights. First was a D7 boost. That went so well, and the glider was easy enough to see to be able to control the boost that I flew it on E6 power for two more flights.

A short video by Chris Taylor, with some music added that I wished I’d had to play when it flew:

https://www.youtube.com/watch?v=jvu3iZA2vow

When you see the video, keep in mind that red = left wingtip, green = right wingtip, and blue = tail. And if you see yellow, that is the outer top surfaces of the wings, lit up by “spotlight” LED’s.

Photos:

1st - Daytime test boost (Photo by Chris Taylor).

2nd - On pad (in glider tower). It is mostly self-illuminated. But I did make use of a white LED “lamp”, mounted to an 8 foot tall pole, about 3-4 feet away from the pad, to shine light down and at an angle to the pad and glider. Sort of like a small and weak streetlight. This helped in setting up the model for flight and hooking up the clips.

The lit up yellow parts of the wings are self-illuminated by beam-like LED’s on the glider’s engine pod, shining mostly outwards. See previous “workshop” photos.

3rd - After landing. When ready to land, in the last 10-15 feet of altitude, the four forward-shining beam-like white LED’s (one on each wingtip and two on the nose) helped to light up the ground ahead well enough to be able to tell the altitude for the landing. It was landing in an area known to be “clear” of obstacles, and all people had some form of illumination on themselves.

BTW - The “surprise” was an on board piezo beeper that beeped in an irregular pattern. So, when it glided by, it could be heard beeping. Also of course beeping before liftoff and after landing.

Here is a link for Chris Taylor’s night launch photos at NARAM-51:
https://naramlive.com/naramlive-2009/naramlive/02saturday/03.html

And here is a page for photos I shot that day, mostly daytime, but the last few at night:
https://naramlive.com/naramlive-2009/naramlive/02saturday/04.html

- George Gassaway

CIMG8245.JPG

IMG_6721.JPG

IMG_6710.JPG
 
Last edited:
Back
Top