Neil_W's half-baked design thread

The Rocketry Forum

Help Support The Rocketry Forum:

This site may earn a commission from merchant affiliate links, including eBay, Amazon, and others.
Could this Indian hypersonic vehicle be the basis of a semi-scale rocket model? It looks like it might.
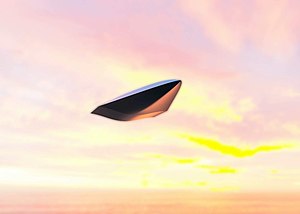
HGV-202F.jpg
Illustration of HGV-202F as obtained on HTNP Industries's PR and Twitter account

Or this.
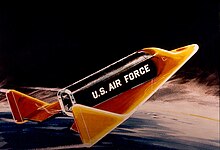
To date, the X-20 Dyna Soar is the project that has come closest to actually building a crewed boost-glide vehicle. This illustration shows the Dyna Soar during reentry.
 
Last edited:
Could this Indian hypersonic vehicle be the basis of a semi-scale rocket model? It looks like it might.

HGV-202F.jpg
Illustration of HGV-202F as obtained on HTNP Industries's PR and Twitter account

Or this.

To date, the X-20 Dyna Soar is the project that has come closest to actually building a crewed boost-glide vehicle. This illustration shows the Dyna Soar during reentry.

@aerostadt 's X-20 Dyna Soar Model Rocket

1638972421924.png
 
After seeing a picture of the Valley Forge in another thread, I knew I needed to try doodling it in OR. This kinda sorta captures its flavor, maybe. Some interesting ideas in here.
1641090616653.png
Would need lots of details and/or greebles to really work. Probably a good candidate for some 3D printed parts, a la @BigMacDaddy.
 
Last edited:
A simple 2-stager. Would be dependent on a good paint job to be interesting. Colors show separation of booster and sustainer.

I am bothered by the similarity to the Estes Solar Flare.

1645151056520.png
1645151097476.png
 
I have fallen behind on my Goonies. This one needs a updated decal. Kind of cute.
View attachment 505159

There was a local restaurant that chose to post their web address in vinyl on a window and then follow up with things they specialized in on subsequent windows. It went something like:

JoeRestaurant.com [window divider] Steak.pork [window divider] Chicken.fish

Yep, they put dots between all words and it was well displayed. Decent food, but of course as a bunch of engineers, when it came to lunch time, the question was "McDonald's, Bojangles, blah. . . blah. . . blah. . .or Chicken.fish?

So, based on about 3-5 people on the planet that would get a joke that you weren't involved in as you live in a place where people don't post 'Chicken.fish' as an advertisement, my vote would be to call this one the "Blk.fsh". I request you ignore this suggestion, but if you ever see a built Goony-Blackfish with an alternate decal, you understand the source.

Regretfully, the restaurant is gone now, or I'd absolutely post a pic of Chicken.fish, just to prove it. . . right as you walk in the door it said Chicken.fish. . .

Sandy.
 
I am bothered by the similarity to the Estes Solar Flare.
I wouldn't be. The Solar Flare is awesome, and some resemblance to it is nothing to be bothered by (IMO, or course). You're ring-in-ring is a point of difference, an I have no doubt you will add more differences. It's a good start.
 
Over one year since posting to this thread!

Revisiting Enigma, using geometries unavailable in OR, so this is a hack in TinkerCad (so ignore crude decor). I like the recessed grooves and lack of a ring. Would be an interesting build.

TinkerCad was getting very cranky given the size of the design, I need to practice more. Also they have some ability to do coded parameterized objects now, need to investigate. In the meantime this suffices for rough visualization.
1682378196651.png
 
Very interesting! Have you thought about how to build it? Sliced up tubes and ... ???
The indentations are cylindrical, so yeah they'd be sliced up tubes. Probably skin the remaining areas with 1/32" balsa. Standard Estes nose cone up front, and the forward bulge is a body tube with transition up front. Pretty buildable, all things considered. The big change from the old is elimination of the ring, and the more interesting (I think) cone-shaped airframe.

I also have one other variation to try out. It's very tedious in TinkerCad, so slow going. Had these two ideas pop into my head last night while trying to fall asleep, needed to get them "on paper" to get them out of my head.
 
It reminds me a lot of this hypersonic / ramjet / mach 5 or somethingarother rocket I saw somewhere. Definitely cool.

EDIT: Aah yes, the "Sprint" ballistic missle, zero to Mach 10 in 5 seconds.

1682382055533.png
 
Last edited:
Over one year since posting to this thread!

Revisiting Enigma, using geometries unavailable in OR, so this is a hack in TinkerCad (so ignore crude decor). I like the recessed grooves and lack of a ring. Would be an interesting build.

TinkerCad was getting very cranky given the size of the design, I need to practice more. Also they have some ability to do coded parameterized objects now, need to investigate. In the meantime this suffices for rough visualization.
View attachment 577006
I need a less fuzzy picture so I can copy it properly...:)
 
It reminds me a lot of this hypersonic / ramjet / mach 5 or somethingarother rocket I saw somewhere. Definitely cool.

EDIT: Aah yes, the "Sprint" ballistic missle, zero to Mach 10 in 5 seconds.

View attachment 577017
I guess any long pointy cone is going to look somewhat Sprint-y. Up to the other design elements to differentiate. There is way more I can do to this one but too hard to do in Tinkercad, at least for the moment.
 
Could you get together with BigMacDaddy and have him print you out the main body assembly?

That is one cool looking rocket.
 
Hey Neil,
I hope you don't mind this.......

I wanted to see if I could reproduce your design in Fusion 360. I came pretty close.

Neil's Rocket - Fusion360-Small.jpg

All dimensions are just guesstimates.

If you are interested I can send you the file.
 
Cool design.

FWIW - there are some tricks that let you 3D print complex designs like this and keep things quite light (not as light as poster-board and cardboard but light enough to load up nose weight and get it to fly with reasonable engines).

From my perspective, the key goal is to get the shell to be exactly 2 layers / walls thick. You might be able to do this with Fusion 360, but I found the easiest way is to let the slicing software hollow it out. Use 2 walls, 0% infill, and 0 top / bottom layers and the printer will print a shell. Then you make centering rings or incorporate motor mounts, etc... separately a glue together (or there are some creative ways to use cut outs to get the printer to make internal features). By the way, the printer is MUCH faster when it is printing exactly 2 walls without any extrusion adjustments, extra partial wall infill, etc...

I did that with the latest iteration of my JB-3 Tiamat model.

1682413571982.jpeg
 
Hey Neil,
I hope you don't mind this.......

I wanted to see if I could reproduce your design in Fusion 360. I came pretty close.

View attachment 577037

All dimensions are just guesstimates.

If you are interested I can send you the file.
That's basically all correct, other than dimensional tweaks. No need to send me the file, though... I have never learned Fusion360 although it was on my "todo" list during COVID lockdown... got about as far with that as with the other things on my list (other than "don't get COVID", which I succeeded at.)

The render is certainly a lot clearer than what you et out of TinkerCad. What I really need to learn in TinkerCad is how to efficiently replicate an array of objects (e.g. the fin pod things). Manually, how I'm doing it now, is ridiculous.

I think I need the design to be a bit weirder, and the front, um "bulge" needs to be more prominent. Will work on it.

Also: it occurs to me that I have some old scripts for calculating all the cuts into the cone for the grooves, and it could be done pretty straightforwardly with balsa skin. The only parts that I would really want custom-fabricated a couple of star-shaped bulkheads to support the skins and tube cut-ins. Laser-cut lite ply would be best. Will deal with that if/when I ever come around to building it, which feels a bit more feasible now than it did in my past rendition.

Hope to get this thread going a bit more regularly again after an appalling multi-year bout of designer's block.
 
Careful Neil.... you'll poke your eye out with that thing. ;)

Your balsa skins idea is old school cool. You could easily make the bulkheads yourself with a bench top drill press, Forstener bits, and some papered basswood.

002.JPG003.JPG004.JPG005.JPG
 
That's basically all correct, other than dimensional tweaks. No need to send me the file, though... I have never learned Fusion360 although it was on my "todo" list during COVID lockdown... got about as far with that as with the other things on my list (other than "don't get COVID", which I succeeded at.)

The render is certainly a lot clearer than what you et out of TinkerCad. What I really need to learn in TinkerCad is how to efficiently replicate an array of objects (e.g. the fin pod things). Manually, how I'm doing it now, is ridiculous.

I think I need the design to be a bit weirder, and the front, um "bulge" needs to be more prominent. Will work on it.

Also: it occurs to me that I have some old scripts for calculating all the cuts into the cone for the grooves, and it could be done pretty straightforwardly with balsa skin. The only parts that I would really want custom-fabricated a couple of star-shaped bulkheads to support the skins and tube cut-ins. Laser-cut lite ply would be best. Will deal with that if/when I ever come around to building it, which feels a bit more feasible now than it did in my past rendition.

Hope to get this thread going a bit more regularly again after an appalling multi-year bout of designer's block.
Neil - one hack in TinkerCAD is to make a giant flat disk that is bigger than your design centered on your design. You can use this to copy shapes to various angles around your design (the issue this overcomes is that when you rotate an asymmetrical design--including one with an odd number of duplicated elements around its perimeter--your design will shift its center point).

Basically you make the big disk, center it on your design (or a fixed central point in your design). Then copy your element or group of elements that you want duplicates of. When you copy them it will make a copy in the same position along the y axis but half the width of the object(s) shifted over in the X-axis (X/Y is relative as you are looking at it). I move those copies off to the side further along the x-axis to make it easier to select things. Then rotate your design and the disk whatever number of degrees you need to for your next copy. Then center 1 set of copied elements along the x-axis on the big disk (or on a fixed central object in your design). Rotate the design again (including all your newly placed copies of elements), center another set, etc... Repeat for the number of copies you need.
 
Last edited:
You could easily make the bulkheads yourself with a bench top drill press, Forstener bits, and some papered basswood.
The word "easily" is doing a lot of work there, given that I lack the aforementioned tools. I have a work"bench" but not really a work"shop" to speak of. If I can't do it by hand it doesn't get done for the most part, other than basic drilling.
 
Back
Top