


Every year, Alibaba holds a "Global Shopping Festival" on 11/11. It's basically a copy of Amazon prime day, but given Alibaba's size, it's turned into a much bigger sale. Last year Alibaba did over $84 BILLION during their 11/11 sale, vs. Amazon doing just shy of $12 Billion for prime days.
Last year I found a giant 3d printer for sale from a company I had never heard of before, Dowell3d. The price looked too good to be true given the size and speed. I contacted the company to see if they were real (they were) and if they would be willing to use Alibaba's escrow service for payment to ensure I wouldn't get scammed. Long story short, I ordered an 1800 x 1200 x 1600 mm printer from them (like this one: Dowell3d 1816 printer ) for a fraction of what they are charging now. I added a few accessories like doors and enclosed sides and sent payment through Alibaba escrow
That was in November of last year. The company maintained decent communications throughout the process and consistently sent me videos of the printer being built and tested. Five months later, I got a call from the seaport that my package had arrived! I looked at what it would take to get it to my house and residential delivery was prohibitively expensive. I could opt for freight delivery but, I don't own a forklift, and renting one also turned out to be expensive.
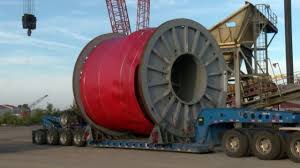
So, I hooked up a trailer to my Tesla and headed to the warehouse.
 - Copy.jpg")
The well-constructed shipping box and the whole package weighed about 450 kg (~ 1000 lbs).
Wasn't easy getting off the trailer without a forklift, but we own a UTV with a winch which was very helpful, and I've slowly started to empty the box and put things together. Things were packed very densely, but everything seems to have survived the transit. I still haven't pulled the giant piece of glass out, which I guess is my largest worry.

Lots, and lots of small parts, but they are all labeled with English labels, and the documentation (both a video, and a printed manual) has big diagrams which make this a big job, but fairly straightforward if you've ever built a 3d printer CNC machine, x-winder or similar machine before.

Here you can see they've labeled the 80/20 struts, to make it fairly easy to put it back together exactly like they had built it in the first place.

Some of the parts actually came pre-built, like these struts, which I will just need to screw in place for rigidity.

This thing is big! I've started building it upside down (their recommendation) so I'm not installing extruders motors, motherboards, and power supplies on a ladder. Once I finish the frame and struts, I'll turn it right side up.
One major issue I've found is it takes a plug I've never seen before. In retrospect, I should have had it set up for 240V service, which I have multiple outlets in my rocket barn. When I was first talking with them, they indicated it would run no problem on 110/120v, so I said sure. this is the end result:

The power supply requires a nema 5-50 connector, which is a 120v / 50 amp circuit! Luckily, I'm pretty handy in the electrical box and have already ordered an outlet and a new 50 amp breaker. I should have known a heated bed of this size would need a small nuclear powerplant.
That's it for now, I'll add to this thread as the build continues.
Last year I found a giant 3d printer for sale from a company I had never heard of before, Dowell3d. The price looked too good to be true given the size and speed. I contacted the company to see if they were real (they were) and if they would be willing to use Alibaba's escrow service for payment to ensure I wouldn't get scammed. Long story short, I ordered an 1800 x 1200 x 1600 mm printer from them (like this one: Dowell3d 1816 printer ) for a fraction of what they are charging now. I added a few accessories like doors and enclosed sides and sent payment through Alibaba escrow
That was in November of last year. The company maintained decent communications throughout the process and consistently sent me videos of the printer being built and tested. Five months later, I got a call from the seaport that my package had arrived! I looked at what it would take to get it to my house and residential delivery was prohibitively expensive. I could opt for freight delivery but, I don't own a forklift, and renting one also turned out to be expensive.
So, I hooked up a trailer to my Tesla and headed to the warehouse.
The well-constructed shipping box and the whole package weighed about 450 kg (~ 1000 lbs).
Wasn't easy getting off the trailer without a forklift, but we own a UTV with a winch which was very helpful, and I've slowly started to empty the box and put things together. Things were packed very densely, but everything seems to have survived the transit. I still haven't pulled the giant piece of glass out, which I guess is my largest worry.
Lots, and lots of small parts, but they are all labeled with English labels, and the documentation (both a video, and a printed manual) has big diagrams which make this a big job, but fairly straightforward if you've ever built a 3d printer CNC machine, x-winder or similar machine before.
Here you can see they've labeled the 80/20 struts, to make it fairly easy to put it back together exactly like they had built it in the first place.
Some of the parts actually came pre-built, like these struts, which I will just need to screw in place for rigidity.
This thing is big! I've started building it upside down (their recommendation) so I'm not installing extruders motors, motherboards, and power supplies on a ladder. Once I finish the frame and struts, I'll turn it right side up.
One major issue I've found is it takes a plug I've never seen before. In retrospect, I should have had it set up for 240V service, which I have multiple outlets in my rocket barn. When I was first talking with them, they indicated it would run no problem on 110/120v, so I said sure. this is the end result:
The power supply requires a nema 5-50 connector, which is a 120v / 50 amp circuit! Luckily, I'm pretty handy in the electrical box and have already ordered an outlet and a new 50 amp breaker. I should have known a heated bed of this size would need a small nuclear powerplant.
That's it for now, I'll add to this thread as the build continues.


")


