MercuryRedstone

The Rocketry Forum

Help Support The Rocketry Forum:

This site may earn a commission from merchant affiliate links, including eBay, Amazon, and others.

Steward

Well-Known Member
Joined
Jan 18, 2009
Messages
874
Reaction score
1

I don't know why...???
Got a wild hair this evening, and started building... really simple, but while the paint dries, I've thought of a couple of questions...

Am I right in guessing that the (real) reason for duel parachutes is that the capsule couldn't handle the stress from a normal (single 'chute) set-up...(shock cord and backlash,wise)...???
I'm thinking that even though I've set pretty heavy on the glue... It's not very strong...!!!

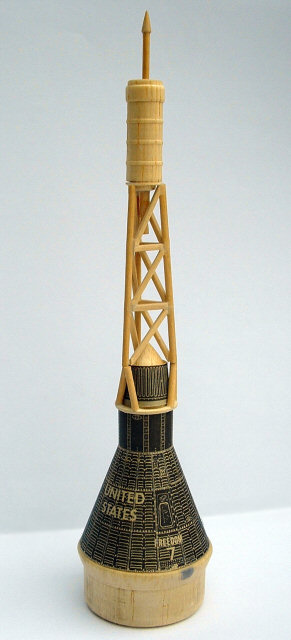
And I also gather that any sealing and painting should be done pryor to placing the decals... unless you think ahead you might miss that part until it's too late... This model is the "Freedom 7" and I haven't opened the decal package yet... They are or should be the water slide type...right...???

Thanks ahead of time... and as always..."TRF rocks"

Steward
 
I thought the 2nd chute was to protect the escape tower. (see instructions on how the chute goes on the capsule) Don't know about the decals, my Liberty Bell 7's were stick-on not waterslide.
 
Steward,
Go to the Scratch Built forum and look at the thread for Estes Redstone-Testbuilders wanted. There is going to be a beautiful paper wrap with all the markings available soon, but you'll have to modify the rocket somewhat. The second chute is to protect the escape tower and for the added effect of the capsule returning separately. The decals are peel and stick, and the booster markings are not correct for Grissom's Liberty Bell 7 (should me MR 8 instead of MR-7 over the fins).
Drew Tomko
 
This kit has changed over the years? I just picked one up and from building one back in the 80's, there are a few differences. One is the plastic fin assemblies, the old kit had wood, only one chute (hence only one launch with the tower intact), and waterslide decals.

Glad to see a few improvements.
Scott
 
The palstic fins are new to the latest reissue. However, they are oversized and stick out past the back of the body tube more, so the length of the body tube has been reduced. This is based on the Centuri 1/35 version; the original, original Estes version was smaller with a balsa capsule with a paper wrap around. I don't think any Merc Redstone ever came with one parachute. If yours has only one, it maybe missing the other. Does the new one have waterslide decals?
DT
 
Originally posted by dtomko
Go to the Scratch Built forum and look at the thread for Estes Redstone-Testbuilders wanted. There is going to be a beautiful paper wrap with all the markings available soon, but you'll have to modify the rocket somewhat.

I bought an Estes Mercury Redstone and was about to start on it when I saw the test builder thread. The wraps are going to be awsome so I thought I'd wait until they were available.


O.K... just checked the decals and they are in fact peel and stick...

I have had somewhat of a time building the escape tower
though... seems like the sides aren't quite tall enough... I may have routed out the matching holes a little too much though...

Oh well.. hurry up and wait...

Steward
 

I guess I know why there is a seperate parachute for the mercury capsule... It's a bugger to get together...

I have a better way to protect it... I've so much time in it now...
I don't think I want to fly it...LOL


I'm not really pleased with the way this thing is turning out...

Do they sell a replacement capsule...???

AAARRRGGGGGHHHHH...!!!
 
it is a little tricky, just take your time.
I found the easiest way is to glue one piece of the ladder to the
bottom hat and let dry, than the second piece, let dry , than the final... once that assembly is dry glue the top on. by letting each piece dry the next piece can be anchored to it with tape to help hold it in position, rather than wrestle with three pieces at one time.

hope that helps
 
Originally posted by ScottRC
This kit has changed over the years? I just picked one up and from building one back in the 80's, there are a few differences. One is the plastic fin assemblies, the old kit had wood, only one chute (hence only one launch with the tower intact), and waterslide decals.
Hey, you should have seen the original Estes K-41 Mercury Redstone!

No plastic at ALL... a turned balsa nose cone and escape tower rocket, and you had to build up the escape tower from small pieces of dowel rod!

I seem to remember the instructions recommended using a sharp piece of flint to cut out the fins, too - but I might be wrong on that point.:D
 
Originally posted by vjp
Hey, you should have seen the original Estes K-41 Mercury Redstone!

No plastic at ALL... a turned balsa nose cone and escape tower rocket, and you had to build up the escape tower from small pieces of dowel rod!

I seem to remember the instructions recommended using a sharp piece of flint to cut out the fins, too - but I might be wrong on that point.:D

.... and I'm still working on mine, taking my time :)

Picture:
Redstone_Capsule.jpg
 
Originally posted by Leo
.... and I'm still working on mine, taking my time :)
Beeeeeeeeeeeeeautiful! Seeing that takes me back to when I was 13 - thanks!
 
Gorgeous! Yep, that does bring back memories. Remember the escape tower "dowels" came attached to each other in a sort of sheet. You had to cut each out, and then round them. And those fins . . . But they looked much better than the later flat ones.
DT
 
Leo - that is truly a beautiful capsule -please update us with more pictures when you get to building the body and fins
 
A bit of advice on the capsule parachute...tie a single string to the bottom of the capsule, then run it through the top of the capsule before you glue the tower on to the capsule. Then tie the chute to the single string. It will prevent the capsule from coming down tower first and breaking on the first launch. You'll end up launching with a white string running down the outside of the capsule, but it'll come down a lot cleaner and a lot more realistic. Learned it the hard way on my first capsule.

Doug


Good point about the parachute...

Going to the final paint shop tommorrow...
Maybe it won't be quite so bad... I've got to get a little more orange into/on the tower...


It's getting to the point where I'm going to go buy another one...
Use this one as a traning tool...LOL

The decals the bottom of the booster are all wrong...anyone direct me to a difinitive pattern for the fins...I didn't catch the Estes instructions were wrong until I passed them... I'm pulling them off and will just paint them on... Look better anyway...!!!

I guess it's not too bad... but I know I can do it better...

Thanks ahead of time...!!!
 
The capsule and tower look OK in your picture. The problem with the plastic parts is that the molds are very old - going back to the original Centuri release - so the parts no longer fit together neatly. My tower was pretty twisted and I built mine 3 or 4 years ago, so things have only gotten worse.
As far as the fin paint patterns, I don't know what the current Estes instructions look like. If you can wait, you can hold off until the paper wraps for the whole booster come out. Otherwise, there are plenty of pictures on the net. I used pinstripe black decal to get neat lines and then filled the larger areas with black enamel brushed on. You could use solid black decals as well.
DT


A picture to go along with my frustration...

Also... I can't any pictures of all four side at the same time... and somewhere, sometime, someone talked about the red stripe where the capsule and rocket meet... but I've never seen a picture of that either...

Oh well... patience is a virtue...


Take a look here:
https://mek.kosmo.cz/newware/nw047p2.htm
It's a picture of the excellent NewWare 1/144 Merc Redstone. The red stripe goes around the lower part of the capsule. Not molded on the Estes capsule are the three bump outs that are not red. On mine I just masked off three areas and left them black. You could easily glue plastic strips for a more realistic look.
DT
 
Thanks for the link :)

As for the red stripes I just left that out.

I think the capsule looks just as nice without but can easily be added of course :)

Picture:
mercuryredstone_1_pic.jpg
 
I've built mine with only one parachute; less likely to lose something. I also added a "Centuri" baffle, and upgraded the shock cord mount to "Quest" style (on the motor mount) with a long Kevlar (R) cord. Works fine, although the tower did partially crack off on the 3rd flight. A little plastic cement, and it's as good as new.


I just caught the fact that I didn't post a finished picture...


When does the fear of flying it pass over...???


I'm really scared to fly her..(it)...???

on the paint stand... final drying out


Back
Top