Mercury Engineering co invader

The Rocketry Forum

Help Support The Rocketry Forum:

This site may earn a commission from merchant affiliate links, including eBay, Amazon, and others.

Gillard

Well-Known Member
Joined
Jan 18, 2009
Messages
1,973
Reaction score
3
This is the first time that i've done a build thread on TRF - usually i just submit reviews for EMRR.
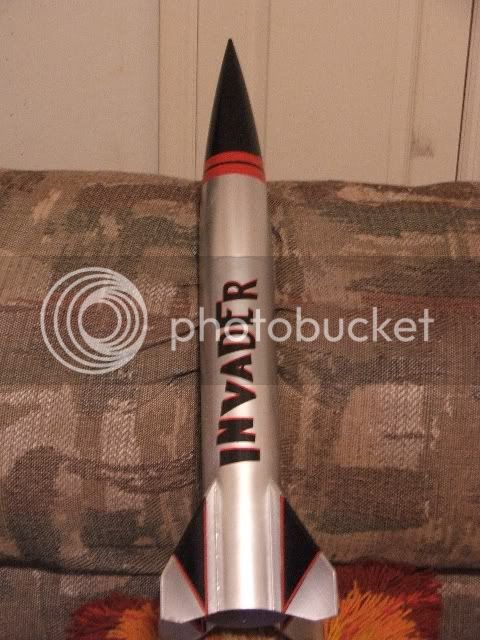
This thread is for a Mercury Engineering Co - Invader. Which i won on last year's Design this spaceship contest on EMRR.
Got it in the post a few days ago - little bit annoyed as customs decided that they wanted to look at it, and then charged me £11 (about $16) on duty and handeling fees.
Still it looks a good kit and Mercury Engineering were very generous: not only did they provide a really good kit for EMRR, but they also included a second free parachute - which i think is fantastic service.
Posting in low power as it takes a D engine, but it also could take an Estes E as well, so it could be MPR as well
 
the kit comes in a plastic bag, with an art card, instructions and the kit itself.

on opening and inspecting the kit i was pleased, the body tube is of a good quality, although there are some spirals that need filling. the balsa wood is of a good quality. the instructions are brief but very clear with diagrams.
the only thing i was a tad disappointed with, is that the fins are not TTW for attachment.

parts.JPG
 
That's funny!


Customs (see Homeland Security) had to look in the box to see just what kind of Invaders were entering the country...


(in my best Disney voice)

Sacre bleu! Invaders!

:D
 
motor mount assembly.

the motor mount assembly is straight forward.
the body tube is quite thick, as are the centering rings.

the engine hook is for an E motor - an adaptor is supplied.

the whole lot goes together in the normal fashion

mount.JPG

mount parts.JPG
 
whilst i was waiting for the glue to dry, i cut out the fins.
the balsa is of good quality and the parts were laser cut.
i sanded the balsa down befor cutting out the parts.
then i sanded the leading edges down to a rounded profile

fin cut.JPG
 
Also whilst the glue was drying, I marked the fin positions on the body tube with the template provided.
I then rough up the tube and remarked the tube again.

tube mark.JPG
 
With the mount now dried, I added a length of Kevlar cord to the mount. The kit calls for the shock cord mount to be attached to the body tube and uses the Estes three fold card method. I personnally nearly always add a kevlar cord to all my rockets that don't already include it.
After the cord was added, i filleted the joints with white glue.

mount kev.JPG
 
whilst waiting for the new fillets on the mount to dry, I attached the fins and lug to the body tube. to do this I used CA gel, which dries and holds the fins inplave within 5 seconds. but it is not the strongest of holds and is prone to cracking if the fins are hit.
After the fins were attached I filleted the fins and lug with white glue.

this was a slight skip from the instuctions as they have the mount being installed before the fins.

fin attached.JPG
 
i've just finished coating the rocket with sanding sealer. Will probably be installing the mount tomorrow, after a night of sealing and sanding.
 
I have built one..It is a nice kit..And it flies great too! ;) Can't wait to see how you finish yours Gillard!
Invader.jpg
 
i'm not the best when it comes to finishing, the colours always run, or seep under the masking tape. so there's a fair chance that this one will be monochrome for its first flight, and if i'm pleased with it, i'll go for a better finish.
pantherjon - are you entering the box of parts competition this year?
 
Here's one for you. It's my daughter's rocket. Fins were laminated w/100lb cardstock, glue riveted (72 per fin), 1/4" launch lug and four interchangeable engine mounts (3x18mm, 1x24mm, 2x24mm, 3x24mm). Have only flown it on 3x18mm and 2x24mm so far.

IMG_7364.jpg

IMG_7415.jpg

_MG_7473.jpg

_MG_7477.jpg
 
Those glue rivet holes look pretty sizeable...what did you use to make them? I've used pushpins to make rivet holes before but never thought of going any larger.

I'm thinking about a Mutant Daddy which also lacks TTW fin construction (same bird different fins and decals) and the glue rivets look like just the thing for that.

Thanks!
 
I'm pretty sure they are 5/64 but may be 1/16. I had it written in my original TRF build thread. Hopefully they can recover the data in time.

The two 14" WACA chutes were not the way to go. At the time I was having Deby from Recovery Technologies sew shroud lines on the supplied chute so I went with the two 14". Due to the spill holes, it came down a little fast on the 2x24mm launch and broke the fillet on one side of one fin but the joint was still fairly strong. I'll probably move up to a 28" or 30" chute when launching on 3x24mm D's & E's. As you can see I also used a 6x6 nomex chute protector.

BTW, all the engine mounts were purchased directly from Soloman @ Mercury along w/a 3" coupler to make the rear and forward retention for 24mm mounts and spacer for the 3x18mm. If you blow the picture up you can see one of the 3 aluminum screws w/neoprine washer that pass through a roughly 3/4" long piece of coupler w/nuts epoxied on the inside. 3oz of nose weight was added for stability for the three E motor configuration.

Unless Gillard doesn't mind, PM me with any further questions so we don't hijack his thread.
 
Unless Gillard doesn't mind, PM me with any further questions so we don't hijack his thread.

by all means discuss the rocket, thats what the tread is for.

I agree those holes for the fillets look good,

i got some WACA chutes before it all went bad. i think i'll probably use my own handmade chutes on this bird. recently purchased some military ripstop parachute material, and using eyelet rivets have been making some quite strong chutes.
 
Last edited:
i've just finished coating the rocket with sanding sealer. Will probably be installing the mount tomorrow, after a night of sealing and sanding.

The spirals in the body tube are taking some filling. if i had thought they were this deep, i would have used a different method that spray paint primer to fill them.
better finish what i've started.
 
Motor mount installed this morning. Goes in really smoothly, a perfect fit.
Still spraying and sanding the bodytube. On a plus side the fins have filled in smooth.
The nose cone is possible the best bit in the kit. Next to no flash marks where the two pieces have been sealed together - it has primed up lovely.
 
I'm about to finish with the priming - it's taken a whole spray can.

You can just about see one or two faint grooves, i reckon by the time i've finished with the enamel paint it will look smooth.

primed.JPG
 
Before I start to paint the rocket, I've just attached the elastic shock cord to the kelvar one that i added.
In addition to this, I've added two sheets of fireproof wadding very similiar to nomex. I have had one or two problems in the past with nomex wadding moving to one side in a large body tube and the hot gases frying my chute. to lessen this, I now add an eyelet rivet to the corner of the wadding which seems to help - so far no problems.
The elastic provided with the kit is about 1 meter in length.

nomex.JPG
 
Finally finished spray painting. Went for a lilac colour - because I had a tin of lilac spray paint! Also it kind of fits with the red on the decal. Black gloss nose cone.
Still faint traces of the spirals.

The decal went on easily.

Next is the parachute, i think i'm going to swap for one of my own.

nearly finished.JPG
 
Mine comes in at 252g, without parachute or motor,
Apogee components website has it at 268.6 g without motor.

i did alot of sanding between coats!
 
So that's roughly 9oz w/out motor. You should be fine. Just sounded like alot of primer. Your recent tennis elbow from sanding will be worthwhile.

Mine comes in at 10.05 w/chute and 3x24mm mount w/out motors. Keep in mind, I added 3oz of nose weight. It weighs in at 15.35oz w/3 D's and 17.4oz w/3 E's.

I haven't launched either of the 3x motors. When I do, I may move up to a 28" chute but the 24" should still be okay.
 
my flying field is marginal for D/E and i've lost several rockets there.
so i intended to fly this sunday at a mouch larger club meeting - but its cancelled due to snow:(
so it looks like i'll be waiting for another month.
 
The Invader is a great kit. I had one, until it landed in a puddle, ok, a water filled hole, and got waterlogged real quick.

I have the fins and the nose cone. So I'll rebuild it. Maybe even build it for a 29mm motor mount. But now that I have my 24mm case, I may not have to.
 
finally flew this rocket today.

the lift was good and slow, and on a D12-5 ejection was just after apogee
and then things went wrong.

the nose cone came out, but the parachute - one of my own , not the supplied one failed to show.
she came in hard
but there was no damage...........
until i tried to remove the motor.

the heat of the motor must have softened the glue i used on the mount, as the motor mount itself moved through the centering rings, the motor was well and truely stuck in the mount.

this is the first time i have had a mount move and i have flown hundreds of rockets

long story short.. had to remove forward CR and mount. should be a quick rebuild - with epoxy.

i am really impressed that the rocket took a free fall and came out undamaged.

invader.JPG

invad fly.JPG
 
Last edited:
Bummer about the motor mount..But glad that is the only damage sustained..Glad to hear it will fly again! ;)
 
rebuilt her last night. she's ready to fly again, will opt for a thinner 'chute that has a better chance of deployment.
looking at the nomex sheets, it looks as if the gases went around the wadding and chute.
i might puy a small chute up by the nose cone to pull the larger chute out.
 
"looking at the nomex sheets, it looks as if the gases went around the wadding and chute."

That always happened with my flights with rockets sized BT-50 to BT-101 until I switched to cellulose insulation - dog barf. never a deployment issue again. I like the priciple of a reusable flame retardant wadding system but it seems dog barf gives a tighter seal.
 
Back
Top