Will you be using expanding foam
You are using an out of date browser. It may not display this or other websites correctly.
You should upgrade or use an alternative browser.
You should upgrade or use an alternative browser.
Madcow Cowabunga Mammoth build
- Thread starter Nathan
- Start date


Help Support The Rocketry Forum:
This site may earn a commission from merchant affiliate
links, including eBay, Amazon, and others.
Nathan
☢
- Joined
- Apr 19, 2012
- Messages
- 2,230
- Reaction score
- 755
Will you be using expanding foam
I wasn't planning to. Where, you mean in the fin can?
grouch
Well-Known Member
I know it’s too late now, but that would have been a good rocket for a cluster of 2 or 3 75 mm motors.
Not too late at all, all he needs is a new after centering ring with a few more holes and some motor tubes. Looks like he could easily stick 6 38’s in there. Not trying to corrupt or anything but that would be pretty sweet.
FalconRocketry
Well-Known Member
I would think 3x 54mm motors around central mount.Not too late at all, all he needs is a new after centering ring with a few more holes and some motor tubes. Looks like he could easily stick 6 38’s in there. Not trying to corrupt or anything but that would be pretty sweet.
Will you be using expanding foam
I wouldn't with all that open area to make fillets.
Tim51
Well-Known Member
Fascinating build - thanks for posting. Just out of curiosity - how thick are those fins?Just finishing up the internal fin fillets. Sure is easy doing fillets in a 11.5" tube.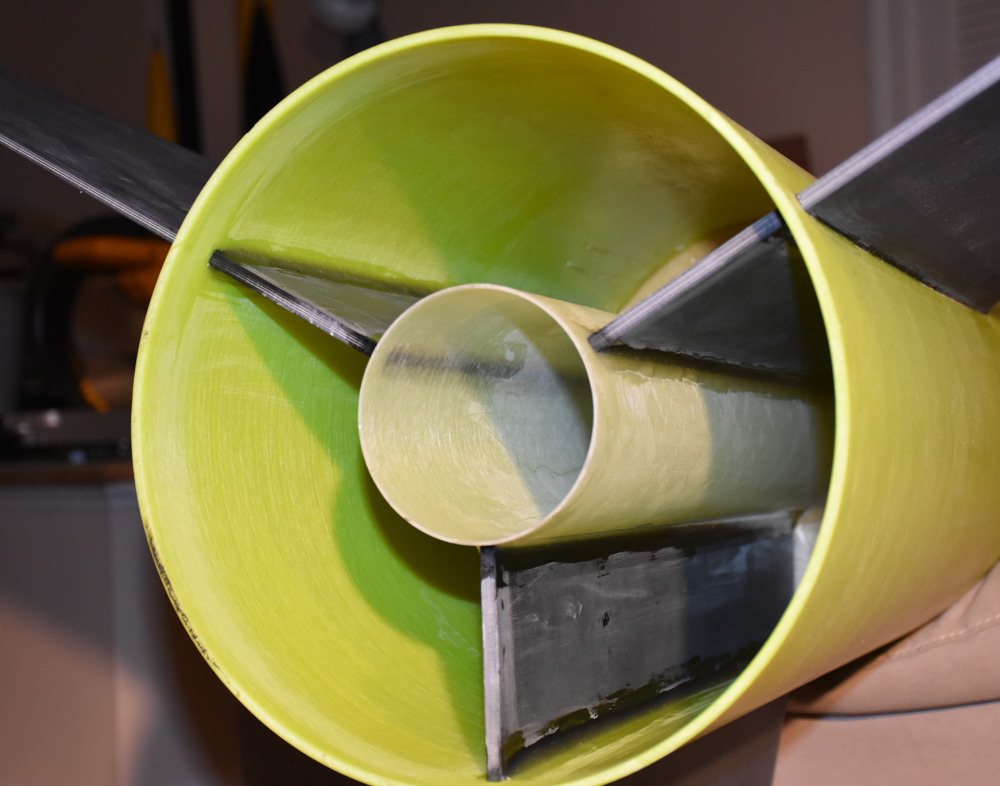
ChrisAttebery
Well-Known Member
- Joined
- Feb 15, 2014
- Messages
- 2,454
- Reaction score
- 90
Agreed. If it were mine I’d add some heavy FG tape to the MMT to fin joints though.
I wouldn't with all that open area to make fillets.
Nathan
☢
- Joined
- Apr 19, 2012
- Messages
- 2,230
- Reaction score
- 755
Fascinating build - thanks for posting. Just out of curiosity - how thick are those fins?
Fins are 1/4" G10.
Tim51
Well-Known Member
ThanksFins are 1/4" G10.
- Joined
- Jan 16, 2011
- Messages
- 5,620
- Reaction score
- 1,088
Nathan
What do you mean by 1st pass on fillets. I would guess you run another fillet over the top of the 1st one. I have never done that. You may have got the last very large dia. kit MC ever does.
What do you mean by 1st pass on fillets. I would guess you run another fillet over the top of the 1st one. I have never done that. You may have got the last very large dia. kit MC ever does.
Nathan
☢
- Joined
- Apr 19, 2012
- Messages
- 2,230
- Reaction score
- 755
What do you mean by 1st pass on fillets. I would guess you run another fillet over the top of the 1st one. I have never done that. You may have got the last very large dia. kit MC ever does.
On the last few rockets I have been putting a thin layer of 30 minute Bob Smith epoxy over the Aeropoxy fillets. The Bob Smith epoxy starts out pretty thin and levels more nicely than the thicker Aeropoxy. But for this rocket I think I'm just going to use Bondo putty to smooth out some of the areas where the Aeropoxy is a little uneven. I'll post pics when I do that.
Looks great so far! I apologize if I missed it, but have you mounted rail buttons yet?
No not yet. I will be attaching 1515 buttons to the forward and aft centering rings with 2" screws. I'll drill the holes and install them, then remove them and leave them off until after painting and finishing is complete before reinstalling them.
djkingsley
Well-Known Member
- Joined
- Feb 22, 2014
- Messages
- 378
- Reaction score
- 16
Have you decided on a paint scheme for this rocket yet?
Nathan
☢
- Joined
- Apr 19, 2012
- Messages
- 2,230
- Reaction score
- 755
Have you decided on a paint scheme for this rocket yet?
No haven't given that much thought yet. Anyway I won't be able to do any painting other than primer until we get some less humid weather, probably September. That House Of Kolor Ice Pearl intercoat that I did on the square rocket came out so nice that I'm thinking about doing that again in a different color.
Nathan
☢
- Joined
- Apr 19, 2012
- Messages
- 2,230
- Reaction score
- 755
I have just about completed work on the chute cannon dual deployment recovery system. The chute cannon is a removable 6" diameter tube mounted inside the 11.5" airframe. There is a cap on the cannon tube, attached with shear pins. The av-bay sled is bolted to the bottom underside of the cannon tube. The drogue will be packed below the nose cone and the main chute will be packed in the chute cannon tube. The apogee charges are on the outside of the chute cannon tube pointing up and will blow off the nosecone and release a 30" drogue on a 25 ft harness. The main charges are at the bottom inside of the chute cannon tube pointing up and at 700 ft will blow the cap off of the cannon tube and release the 120" main on a 30 ft harness.
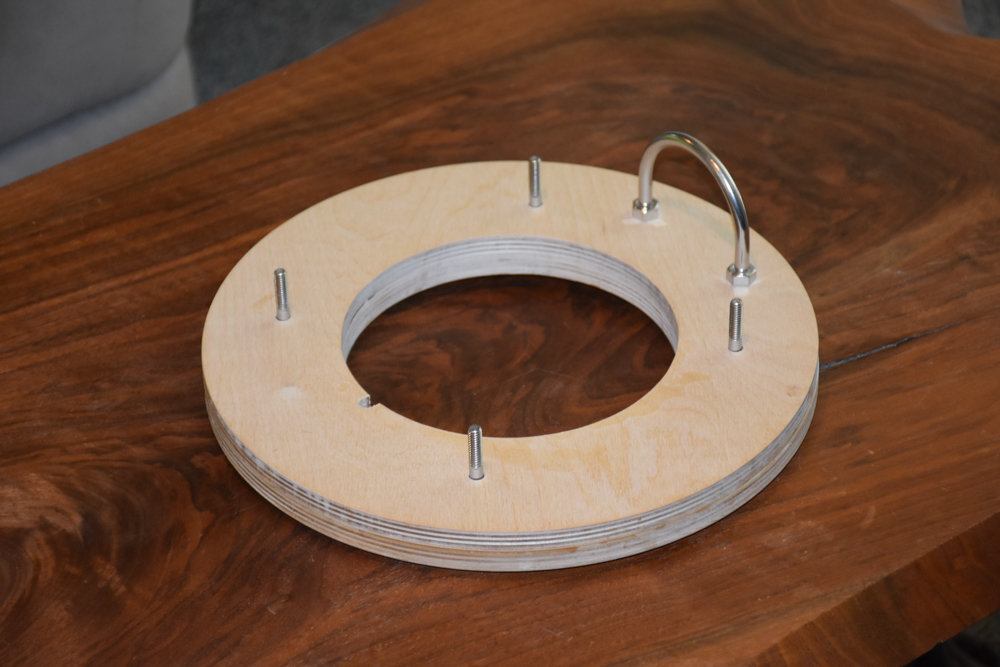
The chute cannon tube is mounted to a single 1" thick plywood centering ring by four bolts and wingnuts. The CR will be fixed to the airframe with six 2" machine screws and also epoxy. That CR is also the attachment point for both the main and drogue harnesses. One end of the drogue harness will be attached to the CR and the other end will be attached to the drogue and the nosecone. The main harness will attach to the CR at one end and to the cannon tube cap at the other end. The main chute will be attached to a U-bolt on the underside of the cannon tube cap, by a short 3 ft harness. Teddy Chernok from Onebadhawk.com is custom making all of the harnesses from 7/16" tubular Kevlar.
Here is the mounting ring which will be installed 13" down into the airframe tube:
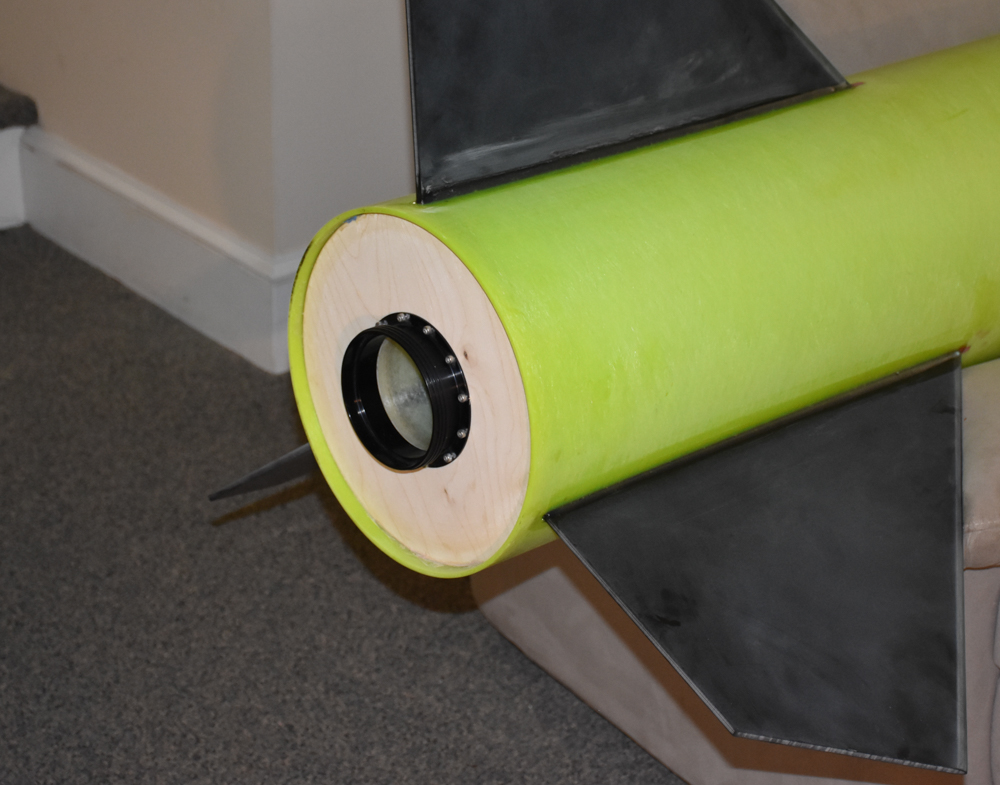
Here is the chute cannon assembly. I haven't wired everything up yet. When I'm done the only wires I need to connect when installing the cannon assembly will be the two connectors to the switches mounted on the airframe:
This is the cannon tube cap, showing the inner U-bolt where the main chute will be attached:
Here is how it looks bolted to the mounting ring:
With the cap off, showing the main deployment canisters at the bottom of the cannon tube:
And from the bottom side. This is the same av-bay sled that I use for my other big rockets, except it is mounted horizontally. I did this because there is not enough space between the bottom of the cannon and the top of a 75mm 6 grain case to mount the sled in a vertical orientation. I had to trim the corners off of the sled to get it to fit through the mounting ring. I also replaced the plastic wire wraps that hold the batteries with steel wire, since that will be all that is keeping the batteries from falling out.
This is how it will look during descent under main:
The chute cannon tube is mounted to a single 1" thick plywood centering ring by four bolts and wingnuts. The CR will be fixed to the airframe with six 2" machine screws and also epoxy. That CR is also the attachment point for both the main and drogue harnesses. One end of the drogue harness will be attached to the CR and the other end will be attached to the drogue and the nosecone. The main harness will attach to the CR at one end and to the cannon tube cap at the other end. The main chute will be attached to a U-bolt on the underside of the cannon tube cap, by a short 3 ft harness. Teddy Chernok from Onebadhawk.com is custom making all of the harnesses from 7/16" tubular Kevlar.
Here is the mounting ring which will be installed 13" down into the airframe tube:
Here is the chute cannon assembly. I haven't wired everything up yet. When I'm done the only wires I need to connect when installing the cannon assembly will be the two connectors to the switches mounted on the airframe:
This is the cannon tube cap, showing the inner U-bolt where the main chute will be attached:
Here is how it looks bolted to the mounting ring:
With the cap off, showing the main deployment canisters at the bottom of the cannon tube:
And from the bottom side. This is the same av-bay sled that I use for my other big rockets, except it is mounted horizontally. I did this because there is not enough space between the bottom of the cannon and the top of a 75mm 6 grain case to mount the sled in a vertical orientation. I had to trim the corners off of the sled to get it to fit through the mounting ring. I also replaced the plastic wire wraps that hold the batteries with steel wire, since that will be all that is keeping the batteries from falling out.
This is how it will look during descent under main:
- Joined
- Oct 8, 2016
- Messages
- 2,834
- Reaction score
- 1,211
I really like your setup. Well thought out.
Nathan
☢
- Joined
- Apr 19, 2012
- Messages
- 2,230
- Reaction score
- 755
One of the trickiest parts was routing the wires from the apogee charge terminal blocks to the altimeter. The wires go through a hole drilled through the plywood shoulder that the terminal block is mounted on, then through a groove routed on the back side of the shoulder, then through a channel routed down the inside edge of the mounting ring. Then aluminum foil tape holds the wires to the side of the cannon tube between the mounting ring and the av-bay. All that is necessary so that the wires don't get in the way as the cannon assembly is slid down onto the mounting ring and also so that the cannon assembly shoulder seats tightly against the mounting ring.
- Joined
- Jan 11, 2013
- Messages
- 6,450
- Reaction score
- 961
Absolutely beautiful build Nathan..
Very tricky deployment set up...
I'd really like to be there when this animal flies..
Do you have any plans for when the maiden flight will be ??
And where ??
Higgs, I hope..
Dennis I'm really sorry it's taking me so long to get to your stuff,,
I've been really busy,, I'll get to yours today,, lol..
Thank you guy's so much for all of your support...
Teddy
Nathan
☢
- Joined
- Apr 19, 2012
- Messages
- 2,230
- Reaction score
- 755
Thanks Teddy, yes first flight will be at Higgs this season but probably not at Red Glare.
Before I can transport this rocket I first want to buy a new trailer because it won't fit in my truck. I have a trailer but it's too big and kind of beat up. And of course I can't put my shiny new rocket in a beat up old trailer.
Before I buy a new trailer I first want to get rid of the old one, which I am using for storage.
Before I get rid of the old one I want to have a 24x14 storage building built so that I have somewhere to put all the stuff in the old trailer.
I'm currently waiting for approval of building permit for the storage building.
And I just got my harnesses in the mail today, thanks!
This is kind of like "The House that Jack Built" in reverse.Thanks Teddy, yes first flight will be at Higgs this season but probably not at Red Glare.
Before I can transport this rocket I first want to buy a new trailer because it won't fit in my truck. I have a trailer but it's too big and kind of beat up. And of course I can't put my shiny new rocket in a beat up old trailer.
Before I buy a new trailer I first want to get rid of the old one, which I am using for storage.
Before I get rid of the old one I want to have a 24x14 storage building built so that I have somewhere to put all the stuff in the old trailer.
I'm currently waiting for approval of building permit for the storage building.
And I just got my harnesses in the mail today, thanks!
")
Nathan
☢
- Joined
- Apr 19, 2012
- Messages
- 2,230
- Reaction score
- 755
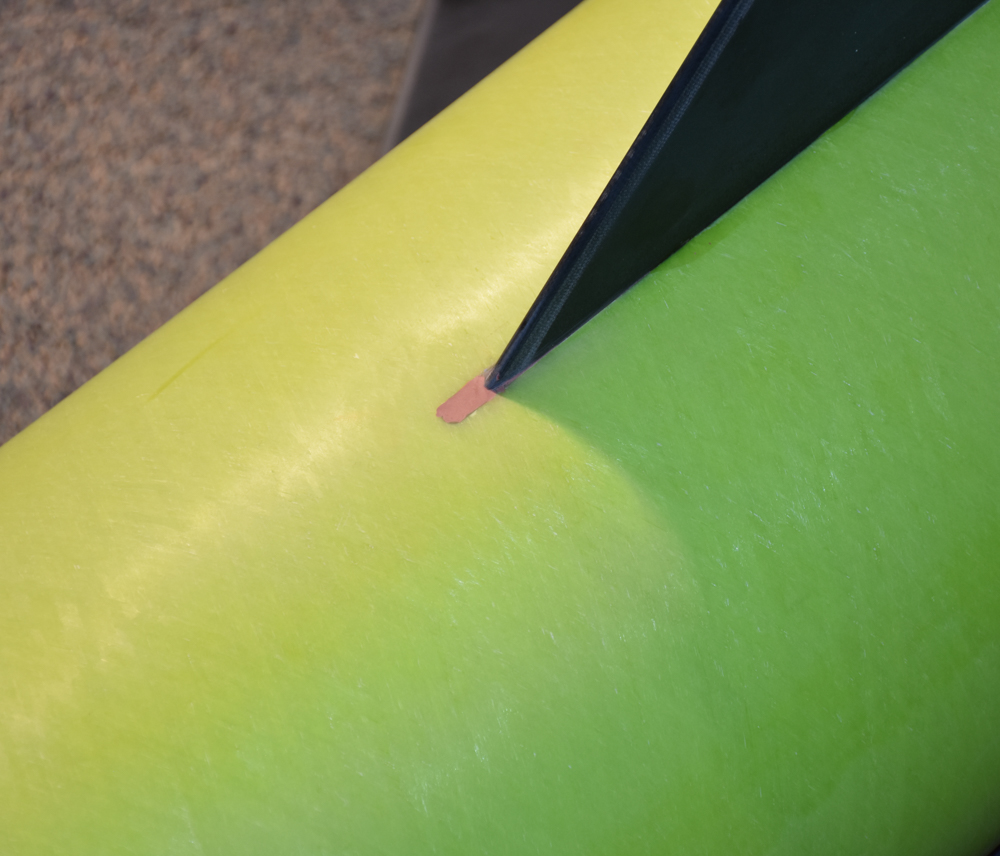
Switches installed, vent holes drilled, and holes also drilled for nose shear pins. I no longer use the plastic Shurter rotary switches that I used to use. Now I use Digikey metal key switches. There are three 3/8" vent holes, and three 4-40 nylon shear pins.
The switch connector wires have to be long enough to hang about a foot out the top of the airframe so that I can connect them to the avbay sled before sliding the cannon assembly into the airframe. One concern is that when the cannon is in place, those long switch wires can come in contact with the hot motor casing which extends several inches out the forward end of the motor tube. I don't know if that could melt the switch wires, but just in case I will run the switch wires through a Kevlar harness protector. I'll put that on my shopping list for MDRA this month.
I also need to buy a couple of Unistrut buttons, since I have decided to go with Unistrut instead of 1515. 1515 buttons would probably work okay (55 lb rocket), but since I will be flying this rocket on M motors I will be required to fly it from the away cell and most of the away cell pads have Unistrut rails.
Nate Lowrie is the only person I know of who is making Unistrut buttons any more. He is supplying Aerocon Systems. Do you need his contact info?I also need to buy a couple of Unistrut buttons, since I have decided to go with Unistrut instead of 1515. 1515 buttons would probably work okay (55 lb rocket), but since I will be flying this rocket on M motors I will be required to fly it from the away cell and most of the away cell pads have Unistrut rails.
blackjack2564
Crazy Jim's Gone Banana's
Ken Allen....Performance Hobbies has them
captbk
Well-Known Member
I hope Im seeing this wrong but those two holes above the fin arent your rail buttons? My eyes aint too good.
Swissyhawk
Well-Known Member
- Joined
- Sep 11, 2013
- Messages
- 261
- Reaction score
- 4
Forget about rail buttons. This rocket is begging for a fly-a-way rail guide.
Nathan
☢
- Joined
- Apr 19, 2012
- Messages
- 2,230
- Reaction score
- 755
Nate Lowrie is the only person I know of who is making Unistrut buttons any more. He is supplying Aerocon Systems. Do you need his contact info?
No thanks, If AMW doesn't have any I'll order them from Kenny or Aerocon. I won't actually need them for a few months.
I hope Im seeing this wrong but those two holes above the fin arent your rail buttons? My eyes aint too good.
I think you are looking at the two power switches.
Nathan
☢
- Joined
- Apr 19, 2012
- Messages
- 2,230
- Reaction score
- 755
Forget about rail buttons. This rocket is begging for a fly-a-way rail guide.
Ha, I'll ask Bill Cook if he has a 11.5" diameter flyaway rail guide in the works.
Similar threads
- Replies
- 40
- Views
- 1K
- Replies
- 43
- Views
- 2K