Mach Buster Rocket Kit - Go fast on a budget!

The Rocketry Forum

Help Support The Rocketry Forum:

This site may earn a commission from merchant affiliate links, including eBay, Amazon, and others.

patelldp

Well-Known Member
Joined
Jan 23, 2009
Messages
5,647
Reaction score
101
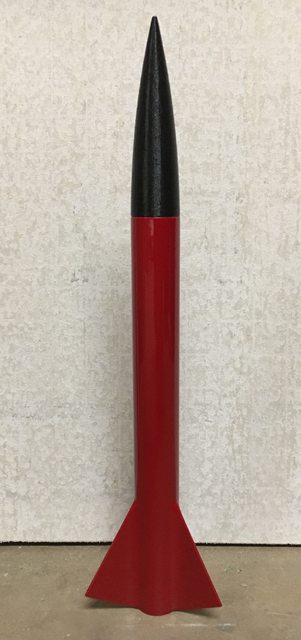
The Mach Buster is set to make its return! This 1.125" diameter kit accepts 24mm motors and features state-of-the-art 3D printed components. These kits will take whatever motor you can fit, just don't blink when it lights!

QC42Xkzl.jpg


Kit Specs
Length - 14.25"
Diameter - 1.125"
Weight - 4oz (with epoxy, paint, and streamer)

Motor Recommendations
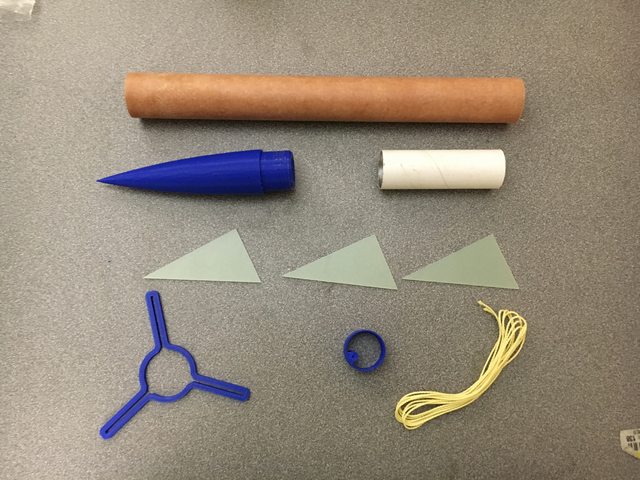
  • Estes: C6-5 (requires adapter), C11-7, D12-7, E9-8, E12-8
  • Aerotech: E18-7W, E20-8W, F35-11W, F39-9-T, F32-8T, F44-8W, G55-10W (if you can find one!)
  • Cesaroni Pro24: 1-3G motors (6G fit but leave very little room for recovery)

What's in the bag:

L9pgY1jl.jpg


  • XX Phenolic Body tube with 24mm Motor tube
  • 3D Printed Nosecone with integrated shock cord mount
  • 1/16" G10 fins, precision CNC cut
  • 6 ft. 250# braided Kevlar shock cord with 3-D printed anchor
  • 3D Printed fin alignment guide

Price is $30 plus $5 shipping to the US. I currently have six bagged and ready to go with many more to follow. These will be TRF exclusive for the time being! PM me with interest!
 
PM sent. I have been waiting for something like this for quite a while. I had the original kit years ago but after it beamed off the the pad one day I never saw it again. No trackers in my rockets at that time. But speed was always on my mined after that. I built a 29mm version that hit mach 1.7 last year on a G80.

IMG_1384.jpg
 
PM sent. I have been waiting for something like this for quite a while. I had the original kit years ago but after it beamed off the the pad one day I never saw it again. No trackers in my rockets at that time. But speed was always on my mined after that. I built a 29mm version that hit mach 1.7 last year on a G80.

Your Mach Buster heads out today, thanks for your business! That 29mm version looks sweet!
 
Dan, mine arrived today and looks great. I hadn't expected several of the items :) The alignment guide is great!
 
Received mine today as well. Kit looks great. Thanks Dan. I whipped up a OR file with actual weight and dimensions of each component. Looks like the CTI F85 loaded in a 3 grain case will get me there. Mach 1.04 using a 4 foot tower. Fins will be ground into paper cutters and the finish will be polished. I am contemplating machining the nose cone a little to install a altimeter. Not much room for recovery but I think it will all work. I just sent images and OR file to Mark at Sticker Shock to see if some decals can be made. I will keep you posted.

IMG_0224.jpg


Screen Shot 2017-05-07 at 9.00.06 AM.jpg
 
Good looking kit, I really like that you have a fin alignment guide. :)
I'll have to buy one when I get a little more cash.
Thanks,
 
Progress. I decided to go the extra mile on this one. Nose cone got a little fill with some Bondo and turned down on the lath. Fins were ground to a clean sharp 10 degree edge. The root edge was dress with some 100grit paper. I also dresses 8mm up the side of each fin for the fillets. The original kit had a slotted body tube. So I went to the mill and added a .5mm deep slot for each fin. Fins were set with JB weld. After all that dried I added the fillets with Rocket Poxy at a 1/2" radius. Fillets are a little overkill but that is the idea with this kit anyway. Here is the OR file and Marks rendering of the decal.

IMG_0225.jpg


IMG_0227.jpg


IMG_0226.jpg


IMG_0228.jpg


mach.jpg


View attachment Rocket Vision Mach Buster.ork
 
Progress. I decided to go the extra mile on this one. Nose cone got a little fill with some Bondo and turned down on the lath. Fins were ground to a clean sharp 10 degree edge. The root edge was dress with some 100grit paper. I also dresses 8mm up the side of each fin for the fillets. The original kit had a slotted body tube. So I went to the mill and added a .5mm deep slot for each fin. Fins were set with JB weld. After all that dried I added the fillets with Rocket Poxy at a 1/2" radius. Fillets are a little overkill but that is the idea with this kit anyway. Here is the OR file and Marks rendering of the decal.

Now THAT is impressive. The slotting of the tube is something I wanted to include but I just am not set up for it...hence the alignment guide. The slots really don't add much strength for fins of that size but do help with alignment.

That looks awesome! Keep up the good work!
 
Now THAT is impressive. The slotting of the tube is something I wanted to include but I just am not set up for it...hence the alignment guide. The slots really don't add much strength for fins of that size but do help with alignment.

That looks awesome! Keep up the good work!

I agree that looks awesome. Mine has a rough nose and square fins and I dare anyone to eyeball the performance penalty. LOL.

I ditched the slotting because of the guide. My fins are attached with good old 5-minute and, since they are small and the rocket is light, I don't think they are going anywhere. BTW, the original was slotted to the motor tube so it would be easy to do with a dremel at this size. Just remove the motor mount first (mine was in the body as received).

retortec: Any word on when Mark will have decals?

The nosecone can be made smooth through a few heavy applications of high build primer. Spray it on thick and let it drip a bit, then wet sand with 320 grit. Do that 3-4 times and it should be good to go!
 
The nosecone can be made smooth through a few heavy applications of high build primer. Spray it on thick and let it drip a bit, then wet sand with 320 grit. Do that 3-4 times and it should be good to go!

Yeah, I figured. I don't want to cover that pretty yellow plastic ;) I didn't sand/prime my Boyce Sat V either. Too many nooks and crannies. Looks good from 10'
 
Yeah, I figured. I don't want to cover that pretty yellow plastic ;) I didn't sand/prime my Boyce Sat V either. Too many nooks and crannies. Looks good from 10'

No problem, posted that for everyone. It's not too bad to do.
 
No problem, posted that for everyone. It's not too bad to do.

That is a really good reason to mention that! I see some people say to rub the prints with acetone, but I don't know what material they were talking about. Sounds like a disaster waiting to happen. I would just prime and sand.
 
Progress. I decided to go the extra mile on this one. Nose cone got a little fill with some Bondo and turned down on the lath. Fins were ground to a clean sharp 10 degree edge. The root edge was dress with some 100grit paper. I also dresses 8mm up the side of each fin for the fillets. The original kit had a slotted body tube. So I went to the mill and added a .5mm deep slot for each fin. Fins were set with JB weld. After all that dried I added the fillets with Rocket Poxy at a 1/2" radius. Fillets are a little overkill but that is the idea with this kit anyway. Here is the OR file and Marks rendering of the decal.

I asked in another response but it is buried...so I thought I'd ask on a quoted post. The question was whether you know when Mark may have decals available?
 
Sorry for the slow response. I'm at work. He was hoping to have some available in a couple days.
 
Sorry for the slow response. I'm at work. He was hoping to have some available in a couple days.

No problemo, thanks for the info. Haven't decided whether I was any for sure....this is so likely to get lost :)
 
I had a couple hours in the shop after work today. I got a good start on mounting the altimeter in the nose cone. I removed the shock cord anchor and chucked the shoulder back up in the lath. The center was reamed to 18.5mm at a depth of 45mm. The inside was darn close to this I just needed to square it up for the sled. There still is 40+mm of tapered room for nose weight if needed. The Firefly just drops into the sled and the walls of the nose cone keep it in place. Three screws will hold the sled in the shoulder. Once the holes are drilled and threaded I will treat them with CA. That will make the holes rock hard to help prevent stripping later. Venting for reliable barometric sampling is 4 cal back from the nose cone shoulder. So it looks like I will vent the main airframe near the shock cord mount and the rear of the altimeter sled. With that configuration how I pack the laundry will be important. A few more details and I can start paint.

IMG_0230.jpg
 
Mark at Stickershock23 just filled my order. I hope to have the decal set early next week. I will post pictures then. If you are interested in a set I suggest emailing him directly. Being so new it may be a little while before they are listed on the site. Ask for the Rocket Vision Machbuster.:)
 
That is a really good reason to mention that! I see some people say to rub the prints with acetone, but I don't know what material they were talking about. Sounds like a disaster waiting to happen. I would just prime and sand.

This was probably for ABS filament. Acetone works well with bonding/smoothing/dissolving ABS (another commonly used 3D printing material).
 
Altimeter bay, venting and recovery are complete. After a couple coats of white primer and sanding I decided on yellow. Yellow and black were my original paint choices back in the 70's. I still need a coat of clear and a buff to be ready for decals on Monday. Transitions turned out smooth and I even managed to punch a hole in my thumb on one of the fin points. :rolleyes:

IMG_0016.jpg


IMG_0018.jpg
 
Back
Top