K'Tesh's OpenRocket Parts Library

The Rocketry Forum

Help Support The Rocketry Forum:

This site may earn a commission from merchant affiliate links, including eBay, Amazon, and others.
Do you take requests? I'd be interested in OR models of AeroPack retainers (specifically the 54mm flanged version), but it would be cool to have OR files for all the retainers since they are so commonly used.
 
I need either a sample, or a very detailed measured (engineering type) drawing and photos to sim something up (or lots and lots of descriptions of what I'm trying to sim up).

Sorry if I'm not entirely coherent, really bad sleep last night, and I worked today (small kids take a lot of energy).
 
So I have some questions about OR that maybe someone can answer.
1. Are individual components like nosecones or fins stored as .ork files somewhere? Or are they some other file extension?
In reference to the OpenRocket program, nosecones = yes (sort of), fins = no. Nosecone shapes are based on specific parameters for each type/style. OR uses those parameters along with user input for length, dia, etc to create the desired nosecone.
2. Let's say I have created a motor mount consisting of a motor tube, centering rings, and engine retainer. Can these be saved or copied & pasted into a new instance of OR? It would be nice as I make changes to a design or incorporating into a new design.

Yes, this is easy to do. Open two instances of OR on your computer. In one instance open (Load) the .ork file you wish to copy part(s) from. Next, in the parts tree list highlight a specific part then press "Ctrl + C" keyboard combo to copy part to the clipboard (Computer memory).
Now go to the 2nd instance of OR, navigate the parts tree to where you wish to insert the copied part and press "Ctrl + V" keyboard combo. In the case of a new (empty) OR design, just highlight the word Sustainer and then "Ctrl + V".
 
In reference to the OpenRocket program, nosecones = yes (sort of), fins = no. Nosecone shapes are based on specific parameters for each type/style. OR uses those parameters along with user input for length, dia, etc to create the desired nosecone.


Yes, this is easy to do. Open two instances of OR on your computer. In one instance open (Load) the .ork file you wish to copy part(s) from. Next, in the parts tree list highlight a specific part then press "Ctrl + C" keyboard combo to copy part to the clipboard (Computer memory).
Now go to the 2nd instance of OR, navigate the parts tree to where you wish to insert the copied part and press "Ctrl + V" keyboard combo. In the case of a new (empty) OR design, just highlight the word Sustainer and then "Ctrl + V".

Tobor, that worked great! Thanks. Saves a lot of work. :)
Another question. My nosecone is larger than my bodyy tube so I need to lift my launch lugs a wee bit. What would be the easiest way to do this? I'll probably use 3mm birch plywood.
 
I created 2 short trapazoidal fins to put my launch lugs on. Then I recreated the launch lugs and moved them to the correct fore/aft positions. How do I move them to the top of the short fins?
 
Been playing with OR again, and I've been developing some new techniques for improving visual accuracy... Here's my new Estes 29mm Motor Retainer Set (072412))


You can adjust the outer ring by playing with the "Position Relative to: Bottom of parent component" for motors with thrust rings. And yes, you are seeing the notches in the base of the inner ring being faked. Due to the nature of the threads, they are not 100% accurate, but it's better than nothing.
 

Attachments

  • Estes 29mm Motor Retainer Set (PN 072412).ork
    3.4 KB · Views: 22
Last edited:
Been playing with OR again, and I've been developing some new techniques for improving visual accuracy... Here's my new Estes 29mm Motor Retainer Set (072412))


You can adjust the outer ring by playing with the "Position Relative to: Bottom of parent component" for motors with thrust rings. And yes, you are seeing the notches in the base of the inner ring being faked. Due to the nature of the threads, they are not 100% accurate, but it's better than nothing.
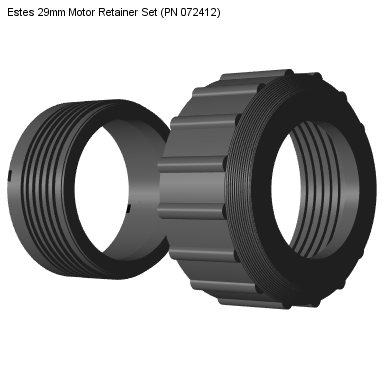
Good work! but the link to the file doesn't work.
 
Check again... I was editing it... I realized that the grips were standing too proud, and did a quick fix to get them right.

Eww! Those are the icky, icky grips I always sand off! 🤮 Nice work though. No offence 😇 (i just discovered these emoji gimmicks and looking for excuses to use them, so don't mind me)
 
Here's a new part for the library... a 3/16" Quick Link

1616407519001.png

This should be "flight" worthy, I created one using air fins, but it may play merry hobb with the flight characteristics.
 

Attachments

  • Quick Link .1875 inch.ork
    5.7 KB · Views: 9
Last edited:
Different parts, "different" manufacturers, one common ancestor... These are a couple of the variations of the Enerjet 1340 Plastic Fin Unit...

Here's a pair of photos of what was sold on eBay as a "Sealed/Mint" Enerjet 1340 Sounding Rocket.

1617818288816.png 1617818313843.png

That blue looks to be a match for what I simmed up for the Centuri MARS Project (5313) Display Model Rocket:


It has been molded in at least three other colors, possibly more. There's photo of the Centuri Phoenix Bird (5407) that sold recently (Jan 2021) on eBay that makes it appear that there was a very dark blue version, but the catalog photos of the Phoenix Bird makes it appear black. I'm looking for anything on the Phoenix Bird that instructs the builder on the color of paint to use... JimZ's site and plans.rocketshoppe, both do not have them. Estes' tribute to it doesn't give a color recommendation.


Estes has released it in black, yellow, and dark blue in kits such as the Long Shot (2128), Eliminator (1950), and Maniac (2091).


Other colors that have been seen in photos online include red, and white... However, those appear to be 3D prints, or painted fin cans from what I can tell, and are not accurate to any stock built kit (I may be wrong, but I've yet to see those colors on any commercial kit in a clear color photo).

[EDIT] Dontcha just *HATE* it when you trust someone's drawing, only to find it is wrong? I modeled the fins based on a drawing (that I can't find now), and it turns out that it was wrong on the fin span. Later, when I got a physical sample in hand I used that to sim up the launch lug, but didn't doublecheck the fins. The drawing had fins with a span of about 2.5", when the actual unit's fins are 2.189". I should have realized that the fins I had were too "tall and skinny".

TLDR: The old sims of the fins are wrong, if you're one of the people who downloaded the .ork files for the fin units... Toss 'em, and download these corrected sims
Thanks to ZoomieG for catching the error and letting me know. [/EDIT]
 

Attachments

  • Centuri F-413L (5467) Plastic 4 Fin Unit (Blue).ork
    3.4 KB · Views: 9
  • Estes Molded Fin Unit (PF-56A (34064))(Black).ork
    3.7 KB · Views: 8
Last edited:
Correction on the Plastic Fin Unit posted above... If you were one of the people who downloaded the old version, please toss it, and download the corrected version.
 
Back
Top