Weekendshooter
New Member
- Joined
- Jul 4, 2006
- Messages
- 3
- Reaction score
- 0
Hello All,
First time review...
Mark & Loretta Hawks stopped in on one of our monthly club launches, displayed their goods and it was a no brainer -- Picked up their Super Trident and Super Cherokee and been at 'em awhile.
The Super Trident is a Skill Level 4 model styled after Estes kit K-33. If you ever built the K-33 and were to see the Super Trident kit in front of you, resisting it is simply futile. The 1.68x upscaled balsa nose cones will get you first. Especially the Aft Passenger Section Cone that measures 7.25" long. All you middle aged crazys be honest now... When's the last time YOU ever saw a balsa nose cone that long. Huh?
The instructions are pretty good but you're building a Skill Level 4 kit so you don't need instructions. Right?")
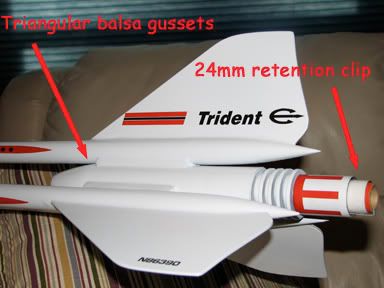
Affixing the three Storage and Supply Tubes and Fins is what makes this a Skill Level 4 kit. Back when we built the K-33, we typically used wood glue and getting everything to align properly took either tooling which we kids often did not have or more often, a steady hand and keen eye to get the subtle angular adjustments "just right" as the glue set. Fast forward 30 years. I suppose one could use CA to tack the tubes and fins in place followed by a heavier glue treatment. Here's where you start listening to that little voice in your head -- Not having any interlocking/TTW features on the Super Trident to guarantee proper alignment and using CA seemed risky. Instead, we used 15 minute epoxy to make the initial tacks through final fillets. With a total curing time of something like 3 hours, we had ample time to use our keen eyes and get the Storage/Supply Tubes and Fins aligned "just right". A gal named Sue McMurray (sp?) once posted on the usenet to make sure and play some good music when doing these intensive hands-on jobs so as to better become one with their rocket. Good advice then and good advice today.
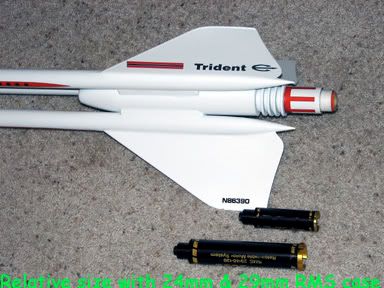
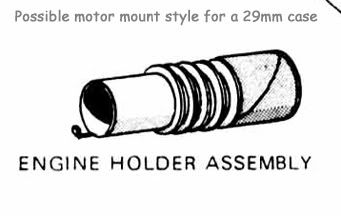
The motor mount kit provided is a 24mm setup. If I were to build this kit again, I'd fashion an upscaled engine hook made from either windshield wiper blade steel or a left over aerotech clip and use it on the Atomic Drive similar to that in the original K-33 kit. This model flew well on an E18-4W and almost well with an F24-4W (see below). There are reports of it handing an E30 with no problems. I believe it can easily handle a 29mm G33 and possibly a G64 but will never know now. Will I?
The supplied shock cord is a kevlar/elastic combo, similar to Quest, but a bit longer. Built to the instructions, you'll have the kevlar extending beyond the end of the tube. This is where I followed the instructions but wished I'd relied instead upon the lessons from HPR. Fortunately, I got a second chance and during rebuild (see second flight, below), went to a heavier braided kevlar and bowline looped it about 1" shy from the end of the tube. Simply a suggestion...
The supplied launch lug is for a 3/16" but a 1/4" lug made more sense for me.
The description for the Super Trident has it weighing in at 10.5 ounces. Fully sealed, primed & painted, mine came in at 15.5 ounces. There's alot of surface area on this model and it can take several cans of spray easily...
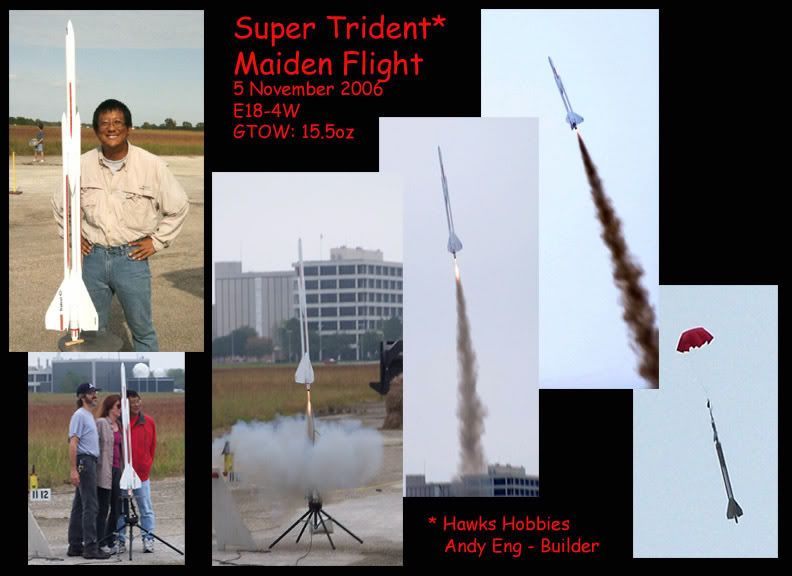
Here are a few pictures of the maiden flight. The flight was pretty close to perfect on an E18-4W. After all I've been through, I don't think I'll use any less motor unless I see somebody else get away with it.
Here are a few pictures of the second flight on an F24-4W.
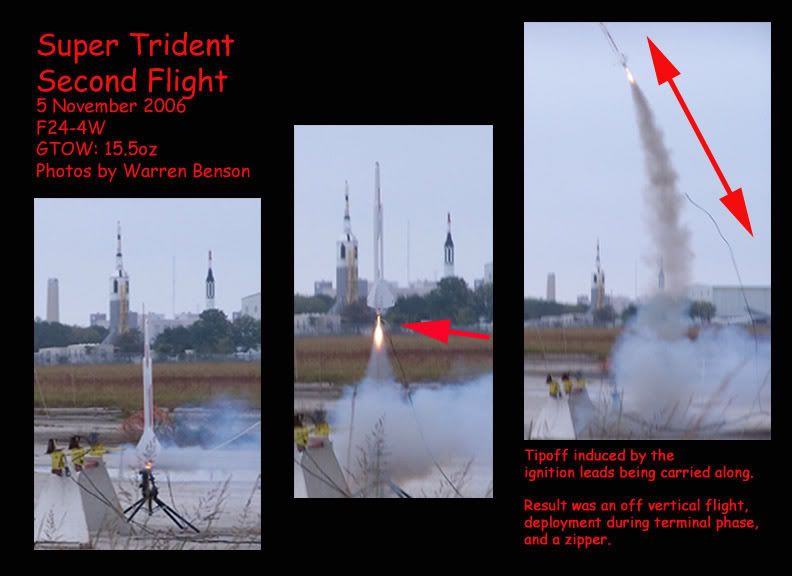
The pictures don't show it but deployment was very well into the "gonna be a lawn dart" mode. I estimate that complete chute deployment took place somewhere around 8-16' AGL. Despite scaring the bejeezus out of us, this proved as useful evidence that Loretta's handmade ripstop 30" nylon chute held up nicely. While the zipper was clearly my fault, Mark & Loretta were simply swell and sent me a long piece of coupler to repair the 14" long zipper. She'll be ready this weekend for another F24-4 and possibly an F39-6.
You can tell alot about people and a company on how they tend to the little things. Working through the Super Trident, it's obvious that Hawks really cares. Plus, they've the blessing and encouragement of Verne Estes himself. Two good signs...
First time review...
Mark & Loretta Hawks stopped in on one of our monthly club launches, displayed their goods and it was a no brainer -- Picked up their Super Trident and Super Cherokee and been at 'em awhile.
The Super Trident is a Skill Level 4 model styled after Estes kit K-33. If you ever built the K-33 and were to see the Super Trident kit in front of you, resisting it is simply futile. The 1.68x upscaled balsa nose cones will get you first. Especially the Aft Passenger Section Cone that measures 7.25" long. All you middle aged crazys be honest now... When's the last time YOU ever saw a balsa nose cone that long. Huh?
The instructions are pretty good but you're building a Skill Level 4 kit so you don't need instructions. Right?
Affixing the three Storage and Supply Tubes and Fins is what makes this a Skill Level 4 kit. Back when we built the K-33, we typically used wood glue and getting everything to align properly took either tooling which we kids often did not have or more often, a steady hand and keen eye to get the subtle angular adjustments "just right" as the glue set. Fast forward 30 years. I suppose one could use CA to tack the tubes and fins in place followed by a heavier glue treatment. Here's where you start listening to that little voice in your head -- Not having any interlocking/TTW features on the Super Trident to guarantee proper alignment and using CA seemed risky. Instead, we used 15 minute epoxy to make the initial tacks through final fillets. With a total curing time of something like 3 hours, we had ample time to use our keen eyes and get the Storage/Supply Tubes and Fins aligned "just right". A gal named Sue McMurray (sp?) once posted on the usenet to make sure and play some good music when doing these intensive hands-on jobs so as to better become one with their rocket. Good advice then and good advice today.
The motor mount kit provided is a 24mm setup. If I were to build this kit again, I'd fashion an upscaled engine hook made from either windshield wiper blade steel or a left over aerotech clip and use it on the Atomic Drive similar to that in the original K-33 kit. This model flew well on an E18-4W and almost well with an F24-4W (see below). There are reports of it handing an E30 with no problems. I believe it can easily handle a 29mm G33 and possibly a G64 but will never know now. Will I?
The supplied shock cord is a kevlar/elastic combo, similar to Quest, but a bit longer. Built to the instructions, you'll have the kevlar extending beyond the end of the tube. This is where I followed the instructions but wished I'd relied instead upon the lessons from HPR. Fortunately, I got a second chance and during rebuild (see second flight, below), went to a heavier braided kevlar and bowline looped it about 1" shy from the end of the tube. Simply a suggestion...
The supplied launch lug is for a 3/16" but a 1/4" lug made more sense for me.
The description for the Super Trident has it weighing in at 10.5 ounces. Fully sealed, primed & painted, mine came in at 15.5 ounces. There's alot of surface area on this model and it can take several cans of spray easily...
Here are a few pictures of the maiden flight. The flight was pretty close to perfect on an E18-4W. After all I've been through, I don't think I'll use any less motor unless I see somebody else get away with it.
Here are a few pictures of the second flight on an F24-4W.
The pictures don't show it but deployment was very well into the "gonna be a lawn dart" mode. I estimate that complete chute deployment took place somewhere around 8-16' AGL. Despite scaring the bejeezus out of us, this proved as useful evidence that Loretta's handmade ripstop 30" nylon chute held up nicely. While the zipper was clearly my fault, Mark & Loretta were simply swell and sent me a long piece of coupler to repair the 14" long zipper. She'll be ready this weekend for another F24-4 and possibly an F39-6.
You can tell alot about people and a company on how they tend to the little things. Working through the Super Trident, it's obvious that Hawks really cares. Plus, they've the blessing and encouragement of Verne Estes himself. Two good signs...