Hangar 11 4" X-15 Build

The Rocketry Forum

Help Support The Rocketry Forum:

This site may earn a commission from merchant affiliate links, including eBay, Amazon, and others.
***SPOILER ALERT!!!***
(NOTE: I'm behind on writing and updating the build thread since I was rushing to finish the rocket for the club's last launch. If you don't like spoilers, please ignore the totally awesome posts here and skip to post #71.) :grin:


Hey Guys!

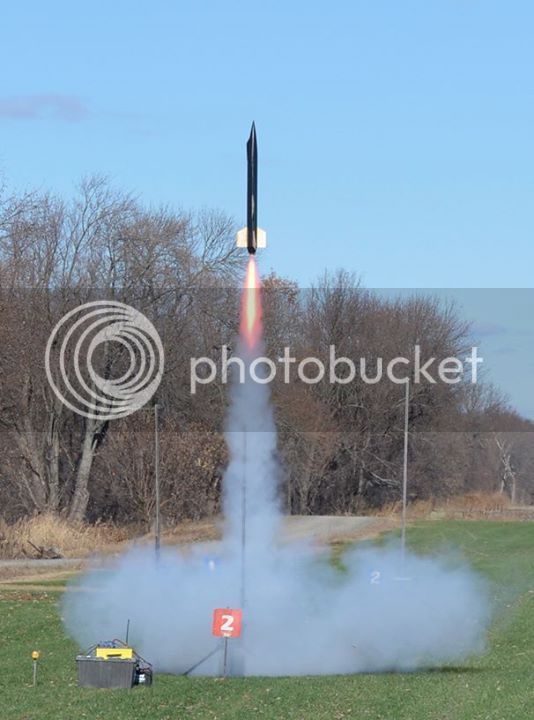
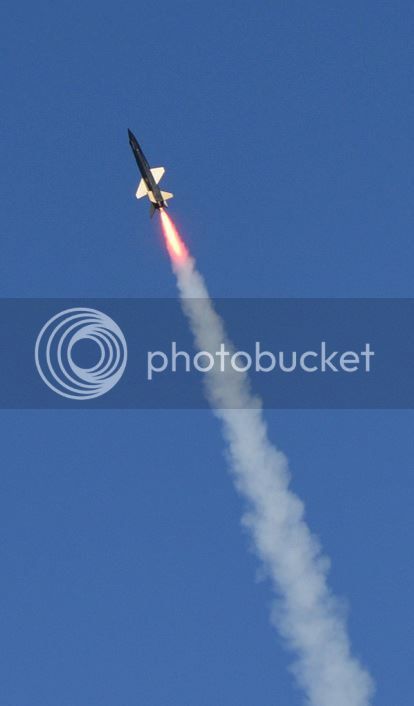
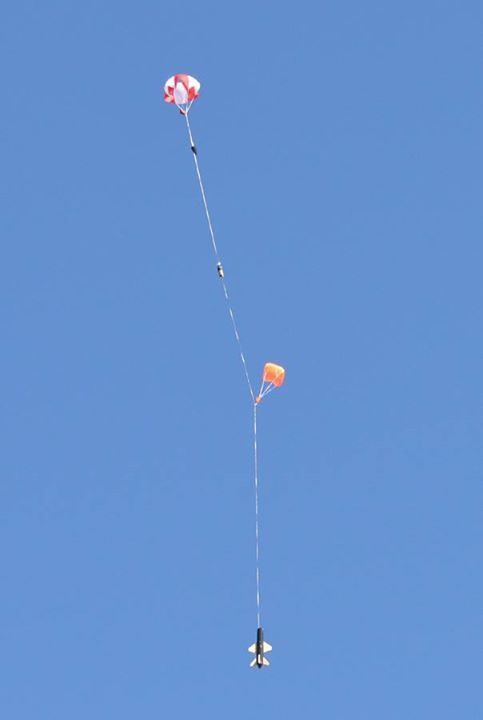
Guess what I did with the X-15 today? L2 Yo! :grin:

I'll update this build thread over the course of this week since I'm exhausted right now, but great news is that my custom DD mod was (as the announcer put it) "perfectly executed" and I've certified L2 with the X-15 in this thread. :w:

Here's a video of the maiden (sorry for the poor video quality...I had lots going on and didn't have a chance to grab another camera):

https://www.youtube.com/watch?v=ZRnYykwEKyw&feature=youtu.be

[video=youtube;ZRnYykwEKyw]https://www.youtube.com/watch?v=ZRnYykwEKyw&feature=youtu.be[/video]
 
Last edited:
Ken,
Congratulations on the L2 cert, it definitely was a pretty flight. Boy, didn't take you long to update your signature, must have done it on the field before the rocket even landed! LOL
 
Congrats on the L2!

Ken,
Congratulations on the L2 cert, it definitely was a pretty flight. Boy, didn't take you long to update your signature, must have done it on the field before the rocket even landed! LOL

Thanks guys! :)

Of note is that after boost, the rocket had a whistle effect for a bit. Bonus!
 
Nice, looked like it weather cocked just a tad but not bad, nice job.

Frank

What a great rocket to certify with, well done.

Thanks guys! :)

Yeah, it weather cocked, but it was expected given that it was somewhat windy (10-15mph winds...you can hear it in the video).

BTW - Anyone have any requests for any specific build pics? I've kept you guys waiting for a while since I was so busy getting this ready for this weekend's last flight (note it was the last rocket launched this year at my club as well :grin:). I don't mind posting any pics earlier as long as I have them...unfortunately some I just forgot to take.
 
What did I miss? I was reading this thread and all of sudden its launch?

Nothing really missed...I'm behind on writing up on the build thread. I had to prioritize the building before the thread writing due to the sudden upcoming launch deadline. Writing out the building steps is actually a very slow process for me...I have to recall the steps, write them out, find the pics, download, then re-upload to a photo site in order to link, check, go back since i forgot something, reread, repeat last two steps. :wink:

I posted the launch early since I hate reading a build thread, then the person gets close, but then drops off and everyone wonders what happened, how (and if) it launched and how it performed. I'm providing current updates and catching up on the build steps writing as I go.

Don't worry, I think I've stated earlier that I'll update all the building steps this week (starting tomorrow) since flight season is now officially over for me and I can put this back on track. Thanks for your continued support! :)
 
I just found out that someone was taking pics of my rocket launch...man, I feel so lucky this guy got shots...he's a really good photog too!

12191016_985510791491208_749532122518926888_n.jpg


12208456_985510811491206_7979285908258159155_n.jpg


12219630_985510834824537_8054825425086997149_n.jpg


Thanks Andy!!! :clap:
 
Last edited:
Let the building thread continue! :grin:

Step 6 Aft Fin Set
:

This section is almost a repeat of the front wings. You test assemble the section outside the rocket much like before and then you assemble inside the rocket: "If all fits well disassemble and then assemble inside the BT". Simple, right? Nope. The front wings can be accessed from both ends if needed to get everything lined up and put together; however with the rear fins you only have access to the rear end. How do you insert in the first/foward CR, put in the fins, then put the back and bolt everything together?


I read ahead and noticed that the instructions say to glue in the motor tube at Step 9, after you've glued in the rear CRs and the above assembly. While that can be done, I thought it would make more sense to glue in the mmt first so it can be glued up to the wing's rear CR for a straighter and stronger mmt (the mmt doesn't fit through the wing CRs, but butts up against it...the middle hole in the wing CRs are the same diameter as the mmt inner diameter).

So I first found a long 38mm rms casing (720, which is a great case for this bird!), put it in the motor tube, then I glued the mmt to the rear wing CR with CWG (Carpenter's wood glue, which works well with cardboard to wood joining and isn't as heavy as epoxy) with a heavy fillet and before the glue was dry, I screwed the bolts onto the forward fin CR and slid it on to center it. The bolts allowed me to then put in the rear fins and pull the CR up into position.

2015-10-28%2020.25.52.jpg
 
Last edited:
Next I glued that CR in place with more wood glue so the fins, CR, mmt and bt joints all had glue. Talk about strong! Before the glue was dry, I test fit one of the rear CRs partially inserted on top (not all the way down) so I can be assured the fins and everything fit and were aligned. I then left it in place while it dried. After it dried, I removed the bolts and glued on the last two CRs...the very last CR is supposed to extend out the back by about 1/8" so that the tail cone can be glued on.

Here's a pic of the assembly bolted together, but before adding glue to the last CR. Note that Bobby says to use the outer holes for bolting; however I had already used the inner by the time I found out.
2015-10-30%2011.21.25_1.jpg


Note how nicely and neatly everything fits together...really great parts here!

BTW - I'd recommend adding some glue over the bolt heads so that there's no chance of them loosening after you've glued everything shut. :)
 
Last edited:
So here is where I am at this point in the build...looking nice!

2015-10-29%2013.23.59.jpg


For some reason it reminds me of rotisserie chicken. :tongue:

Note that I've drawn a center-line down the middle of the tube (done on both sides) so that I can see how the wraps in the next step line up. This I feel is a very important step when dealing with two-sided body wraps.
 
Last edited:
Step 7 Installing the wraps:

Okay, this is the step that many find daunting since it is a tricky operation when you think about it. It's not as simple as "cut out the triangle and you're done" since the wraps come in halves and don't have any holes/slots cut out for the wings, tail and rudder.

The instructions first note to make sure you have a left and a right wrap since while they look the same, there is a difference and there is a longer "face" which should point up.

In my case, I ended up with two right side wraps. I was talking a lot with Bobby when I picked up the kit and I didn't check it earlier, so it was not entirely his fault. Here is a pic showing how one "face" is longer than the other...I've measured and written down the length of the faces (33mm & 38mm). It's a good pic to see how similar the side wraps look, but how they are actually different:

2015-10-29%2018.20.44.jpg


Barefoot rocket building...when you're such a rocket-head that you've spent all your money on rockets.

The longer face pointing up is important since the back fins angle downwards, so if the longer face isn't on top, the fins would end up coming out of the bottom of the shroud wrap rather than the side/corner.
 
So the instructions say "Mark the nacelle for the rear fin [REMEMBER measure for length AND position of the slot at the OFFSET distance from the air frame NOT the FIN ROOT]...Move onto the forward fin. Same careful measuring and slotting."

The easy part is the Rudder and Dorsal fins since you know the length and thickness and I just used scissors to cut them. The tricky part here is those fins and wings since you have to measure for a hole/slot that should be in a position a distance from the fin root.

My first idea was to take accurate measures of the distances from the top/bottom (NOTE: This was later determined to not really work in my case):
2015-10-29%2019.14.55.jpg


I found that the measurements didn't work since I was measuring distance on the round body tube while trying to transition that to the wraps, which weren't round. FAIL. :facepalm:

I next thought about the back fin first...since the wraps are symmetrical, I can use the right wrap, flip it over, place it on the end on the left side and mark it on the left fin, which should give me a good measure for the right fin:

2015-10-29%2019.20.23.jpg


Now that's using my noodle! :cyclops:
 
Last edited:
Now in regards to cutting the wraps, the instructions note that you can use a Dremel with a cut off wheel or a hot knife (adding that you need proper ventilation if using a hot knife). I've cut plastic with a Dremel cut off wheel on a number of occasions and I personally didn't like it since the plastic tends to grab onto the wheel and the wheel can suddenly slip and make marks across the plastic. Also I find using the wheel leads to a very rough (and IMHO ugly) cut. YMMV. I had a hot knife, but in this case I tried using a plain X-acto knife, lightly scoring first, then repeating it several times and that actually worked very well for me since the plastic was somewhat "soft" and cuts very well with careful scoring.

Here is a pic where I had decided to first drill a big hole to start the slots, figuring it would be easier than cutting those small vertical cuts. I later found out this hole wasn't needed since scoring with a X-acto knife worked fine again here. I had also made a larger hole than needed since I didn't have the right drill size on hand and I figured I would use filler/fillets later anyway:

2015-10-29%2019.43.08.jpg


Viola!

2015-10-29%2019.51.03.jpg
 
Now the rear fin slot is done and time to move onto the front wing slots. I tried one way first and it worked, but later figured out the BEST way in this case and did that for the other side to much better results.

Now let's test your noodles: Given what those of you "brave-enough-to-read-through-to-this-point" have read, anyone have any ideas of a good way to measure/cut the front wing slots?

To be continued...
 
Last edited:
Now let's test your noodles: Given what those of you brave enough to read through to this point have read, anyone have any ideas of a good way to measure/cut the front wing slots?

To be continued...

I honestly don't remember how I did mine... I remember one of the two was easy, but can't even remember which--rear I think.
 
Marching on!

Here's what I did with the first wrap; however I later figured out a better way for the left wrap (to be disclosed when we get to that point).

For the right side wrap wing slot, I tried almost the same as the rear fin slot and placed it upside down on the left side to get a reference on where to place it on the one axis, marked it with a silver marker, then I used a string and pulled it from one end to the other, held it taut and marked a centerline for the wing. The tricky part is that the wing area falls on the roundish section rather than the flat section and transitions to the flat section. I then measured a slot to cut, drilled (smaller hole this time) and then cut with an X-acto knife:

2015-10-29%2020.05.03.jpg


Then I tried a fit...in the first pic you can see why the wing slots are harder due to the wrap shape transition:

2015-10-29%2020.20.00.jpg

2015-10-29%2020.21.21.jpg

2015-11-01%2009.47.05.jpg

2015-10-30%2009.22.57.jpg


Not bad! (or so I thought...)

Note that I've skipped the part about trimming for the Dorsal and Rudder fins since I think that's fairly straightforward since it's on the edges of the wraps.
 
Last edited:
Some items I should add...it's a good idea to mark the wraps with notations for Right or Left as well as Up to avoid any confusion before marking and cutting. Also it was very helpful to mark "Top" and "Bottom" on the body tube.

2015-11-01%2009.41.39.jpg

2015-11-01%2009.48.54.jpg
 
While waiting to get the other wrap, I went about figuring out what adhesive to use. Epoxy? CA? ABS Glue? Testors Plastic Cement? Boogers?

Well, I checked with Bobby and he noted that I should use ABS glue, but good epoxy should do fine. I wanted to test it myself, so I first cut some pieces out of the scrap I got from cutting the slots and then grabbed an extra piece of PML phenolic I had on hand as well as the glues I have. The ABS glue I found at Lowes while shopping for PVC charge wells and the other two I already had on hand.

2015-11-01%2020.39.38.jpg

2015-11-01%2020.45.24.jpg


2015-11-01%2021.22.44.jpg


Notice that the ABS glue looks like it's melting the plastic a bit (actually probably hard to notice since the glue itself is black, but trust me on this)...similar to how plastic model cement works.
 
The CA dried first (obviously), with the ABS not too long after that; however the West Systems Epoxy (with Fast 205 Hardener) took a loooong time...maybe close to an hour (I lost track and patience watching that pot boil).

When all dried, I did a simple two finger pull/push/nudge test on all the pieces and they all held very firmly without any movement whatsoever! I was actually quite surprised by how well all three held.

After that, I started hitting them each lightly with a small hammer, progressively hitting each harder until one would fail. The ABS was the first to fail.
2015-11-02%2010.45.55.jpg


However I felt that perhaps it wasn't a good glue bond since it was my first time using ABS glue, so I followed the application directions again and reglued it on to test it again; however with the second application of more glue, the plastic started to melt more and looked messier and meltier, so I decided against using it since parts of the wraps vary in thickness and I felt that too much glue on a thin section may be bad. YMMV

2015-11-02%2020.17.39.jpg


In the end, I decided to go with West Systems due to: 1) Bond strength; 2) Generous setting time; 3) Spreads well and is gap filling.
 
Back
Top