Finishing Ideas/Techniques/Suggestions- 8" Dia. Turned Foam Nosecone?

The Rocketry Forum

Help Support The Rocketry Forum:

This site may earn a commission from merchant affiliate links, including eBay, Amazon, and others.

jmmome

Well-Known Member
TRF Supporter
Joined
Jan 11, 2013
Messages
496
Reaction score
223
Location
Maumee (Toledo) OH
Starting to build a crude lathe to turn an 8" max dia, 38" long (44" total with Blue Tube shoulder) nosecone for a 6" dia. Honest John rocket. Spine of the nosecone will be a 3/8" threaded rod. 1" thick sections of foam board insulation will be threaded over the rod and glued to the previous piece of foam board to get to the 38" total nosecone length. At about 14" from the tip of the nosecone, I'll cut a 2" dia. hole from the center of each of six pieces, and add BB's and epoxy for some nose weight. Sandpaper will be used to shape the foam board on the lathe.

So.......how should I put a finish coating of SOMETHING on the foam nosecone? I could use fiberglass cloth, but I can't figure out how to make it conform to the odd shape of this nosecone. I could use several coats of sanding sealer, but that wouldn't give a very durable surface. I could paint on that Flex Seal stuff I see advertised on TV, which seems like a weird but doable option.

What would you recommend? I've already checked pricing for 3D printing, but it is way out of my budget range. A custom wood turning from basswood also is at the fringe of what I'd want to pay, so the foam nosecone seems to be my best option financially, IF I can learn a way to finish the nosecone that would give some strength and look good.

Thanks!honest john inage.jpg
 
I would cover it in light weight fiberglass using Dan Parson's technique. You can get .56 oz cloth from; https://thayercraft.com/0.56-oz-104-volan.html
Epoxy from Amazon or Ace Hardware;
Envirotex lite.jpg
Here is his method which I have used many times with great success.
You will want to cut the glass cloth in a few pieces to conform.
 

Attachments

  • img001.jpg
    img001.jpg
    245.4 KB · Views: 18
  • img002.jpg
    img002.jpg
    263.4 KB · Views: 15
  • img003.jpg
    img003.jpg
    204.7 KB · Views: 9
You can cut the cloth into strips and lay them on. I did this with a foam rocket that I built. I used long tapered strips that narrowed as they approached the tip of the rocket. You can beef up certain areas with extra patches. After a layer of glass, you can sand it smooth on your lathe. (I don’t have a lathe, so I didn’t do this step).

My first foam rocket was a success for what I was trying to do, but I definitely went about it in a difficult, inefficient way with less than ideal tools. For Christmas, I ordered myself some good hot wire foam cutting tools from this company:https://hotwirefoamfactory.com/ They also stock coats and finishes for foam projects. A person I spoke to told me their Styroplast product gives a hard plastic finish and is often used by people who make RC planes. She also mentioned it has a bit of a learning curve. There’s a flexible one called Bounce that I might try with some smaller LPR rockets that need minimal protection.

I want to build a lathe too, so I’m interested to see what you come up with.
 
Thanks fellas- that gives me a great start. I'll post a photo of the "lathe" after I do a bit more work on it- a high power hammer drill laying on its side is the power plant. :)
 
My mentor made several large (6-8" dia, 36" long or so) nosecones from foam on a homemade lathe. I know he glassed the foam but I don't know the specifics. Based on what he usually had in his shop, he almost certainly used 4 oz or 6 oz cloth.

His lathe was welded angle iron because welding is his real job. I'm sure that a lathe with a bed constructed of 2x4s and a couple of pillow blocks would do the trick.

Best -- Terry
 
I have been thinking of trying fiberglass sleeves to finish a nosecone.

https://www.sollercomposites.com/FiberglassSleeves.html
For an 8 inch nosecone you can use the 7 inch sleeve which will go from 9 inches to 3.1 inch. Cut that off when you cant get it smaller then use a piece of 3 inch sleeve that would go 3.6 inch to 1.2 inches. Then 1.5 inch to finish it off. Then use a small piece of fiberglass cloth to wrap the tip or get a metal or wood tip to the nosecone. Probably need 2 or 3 layers in total. Something I am going to try next year.
 
Check out this guy’s foam lathe setup. After he shapes the foam plug and sands it down on the lathe. He adds a layer of fiberglass with the foam plug still mounted on the lathe and the template still in place. Then he uses the lathe to sand and polish the cone. It looks perfect.

https://speedmotionrockets.com/Foam Lathe.html
 
Hi Mike, I am just getting ready to glass the transition. Cut the cloth oversize, in kind of a cone shape. If you look at the above post you can see how I did the NC. this one I covered in saran wrap as I want to remove the foam, then it will be just a shell. Will build like a normal rocket with CR's. Although I did get a full length MMT, 60", from Madcow and it will be the back bone of the bottom end. It will run up into CR's in the main tube. Anyway, just start at one end of the cloth, wet it out and it will stick in place. Then just work your way around the NC. When the cloth gets wet you can shape it to just about any form you want. Try a scrap piece first to kind of get the hang of it. Just wrap it all the way around, wetting it out as you go. When you get to the end overlap it. Now on the second piece of cloth star at the overlap and do the same as before. Just keep putting on glass until you have the right thickness. I did the shoulder separate and then glued it on. I hollowed it out to install LOC 7.5 tube to tie it all together and to give a bulkhead something to glue to. I also have a removable nose weight system to go in the NC. You might think about it so that you can adjust your weight as needed. Good luck.
 

Attachments

  • foam nc w shoulder 001.JPG
    foam nc w shoulder 001.JPG
    181.8 KB · Views: 25
  • foam nc w shoulder 002.JPG
    foam nc w shoulder 002.JPG
    107.2 KB · Views: 23
  • foam nc w shoulder 003.JPG
    foam nc w shoulder 003.JPG
    119.6 KB · Views: 22
  • foam nc w shoulder 005.JPG
    foam nc w shoulder 005.JPG
    153.2 KB · Views: 22
Again- thanks to all for the ideas!

I bought the 4' x 8' x1" foam board this evening, and cut it into 2 x 4 strips for transportation. Also bought the 3/8" threaded rod center spine. I'm going to use the Gorilla Glue spray glue which I have- tried it on two pieces of scrap board, and it HOLDS.

I'll probably build out the "lathe" tomorrow. The question will be if the 3/8" threaded rod will sag too much over it's 50" or so. I have an idea or two which may combat the sag if it appears to be a problem.

I fiberglassed this BIG project (for me) in 2016- the only time I've really done it with a large project. I'll just have to get over my fear about it. :)
FILE0106.JPG
 
Again- thanks to all for the ideas!

I bought the 4' x 8' x1" foam board this evening, and cut it into 2 x 4 strips for transportation. Also bought the 3/8" threaded rod center spine. I'm going to use the Gorilla Glue spray glue which I have- tried it on two pieces of scrap board, and it HOLDS.

I'll probably build out the "lathe" tomorrow. The question will be if the 3/8" threaded rod will sag too much over it's 50" or so. I have an idea or two which may combat the sag if it appears to be a problem.

I fiberglassed this BIG project (for me) in 2016- the only time I've really done it with a large project. I'll just have to get over my fear about it. :)
View attachment 440424
Please tell us about this, looks rather interesting, and well.off the beaten path!


Fairly accurate reproduction of the 1990's McDonnell Douglas "Delta Clipper", which was a vertical landing craft. The actual project was scrapped after only three of its four landing legs deployed during one test flight, and it exploded.
 
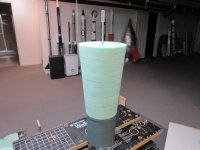
Built a crude sanding lathe with some scrap wood I already had. Cut an 8" dia plywood circle for the largest dia., and used a 6" plywood bulkhead with a Blue Tube piece epoxied to the circumference to equal the 6" body tube diameter. A 3/8" dia. threaded rod runs through the foam pieces, which were epoxied together well to the inside, so I didn't have any epoxy spots to sand as the diameter shrunk.

Screwed the two plywood circles to the 14" long pieces of foam board. I tried to test the rig with the full 38" long threaded rod, but that length flexed too much, so I'm going to turn the nosecone in two pieces.

Epoxied 60 grit sandpaper to a 16" long piece of wood to be used as a sanding block, since this 14" long section of the nosecone is straight from the 8" diameter to the 6" diameter. I clamped a clamp onto the Bosch hammer drill's trigger to keep it running.

The amount of foam dust is horrible. I think I'll take the rig outside when I'm ready to turn the 24" 3.1 Ogive top portion of the nosecone.

For this 14" section, there are only a couple of spots where my initial 8-sided cuts into the 1" thick foam board were angled, so I have a few low spots. I think the fiberglassing will cover them up.

IMG_5375_1.jpg

IMG_5376_1.jpg
 
So far- so good. First 14" of 6" body tube dia. to 8" fattest part of the nosecone done, including adding the 6" long shoulder which will go into the body tube.

IMG_5377_1.jpg

Next 8" of disks of the final 24" of the ogive portion are cut. I'll cut a 24" long ogive template, attach sandpaper to it's edge, and see if I can hinge it to the tip of the nosecone end of the sanding lathe. I'll start sanding from the 8" diameter, and work my way down to the tip by adding consecutively smaller foam board disks. I could "freehand" the ogive sanding, but I'd like to try this first.
 
Epoxied all 14 pieces together before turning. Going to try the same method with the next 12 pieces which begin the ogive section. Most complicated will be inches 12 through 6 (going toward the tip) which will be hollow and will eventually receive BB's and epoxy nose weight.

I'll probably turn inches 6 through 1 on a smaller sanding lather i made for a small job some time ago, since I can use a really small diameter threaded rod as the center turning rod instead of the 3/8" rod I'm using for the rest of the nosecone.
 
Starting to look nice. Will love to see pics as you go. I have the transition ready to be cut to length and start to install fin can. Have to leave tomorrow so it will give a couple weeks for all to set up and final cure. Good luck with yours.
 
Since I've never done "fiberglassing for appearance" like this before- my previous fiberglassing experience was on projects that were quite large and forgiving and look "just ok" from 20 feet away (photos attached), any specific directions-step by step- would be appreciated!

IMG_5443_1.jpg
 

Attachments

  • FILE0099.JPG
    FILE0099.JPG
    160.3 KB · Views: 6
  • vlcsnap-2020-11-13-11h41m03s864.png
    vlcsnap-2020-11-13-11h41m03s864.png
    640.4 KB · Views: 5
You can pull the wrinkles out after the cloth has been wet down. When you squeegee out the resin, if the cloth is shiny, take out more resin. If the cloth is still white, it needs more resin. I always cut over size and make sure to run the resin out past my part. You will get a much cleaner cut after it has cured.
 
Back
Top