Fin alignment techniques for big rockets...

The Rocketry Forum

Help Support The Rocketry Forum:

This site may earn a commission from merchant affiliate links, including eBay, Amazon, and others.

ewomack

Well-Known Member
TRF Supporter
Joined
Jul 8, 2019
Messages
910
Reaction score
829
Continuing on with HPR newb questions, I'm just getting to the point in the DX3 of epoxying down the fins. As I test fit them a few times, I realizied that for LPR I would usually just eyeball the alignment and consider that "good enough." Eight times out of ten it worked out fine. But with a much larger, not to mention much more expensive, kit the stakes seem higher and I would like more assurance that my eyeballs haven't deceived me. I've played around with a few possibilities but thought I would likely get better ideas and answers from the forum that has already helped me out immeasurably with all things rocket-wise.

Does the following have any validity: assume a flat surface and place a square next to the body and line the fin up with the straight line carefully as pictured?

IMG_9764.JPG

Or do any tools exist for larger rockets to help with alignment?
 
Yes, Badass Rocketry fin build guide. Get one for a 4 inch motor tube and use it to glue the fins on the motor tube. Then cut slots at the rear of your slotted airframe and slide the motor tube fin assembly into the airframe.
 
That is an awesome free tool. For the DX3, I used 4" diameter, 3 fins, 3.25 fin width and .25 fin thickness, all in inches.

I just need some foam board. Thank you! This will give me far more confidence in the fin alignment.

If I had a 3D printer, I would give that path a try, but alas!
 
Setting one fin at a time with slow cure JB Weld epoxy, I fasten the rocket securely to a couple of nesting fruit boxes with the center of the fin slot carefully aligned straight up (0 degrees). I use weighted containers (stacking Crystal Light jars filled with pennies) to firmly hold basswood rods against either side of the fin to immobilize it. Then I simply align the fin visually with the vertical pattern on the door opposite my workroom (verified plumb with a bubble level). Six hours later, the fin is is set, and about as perfectly straight from center as it gets.

Simple, accurate, and effective...even if the machinist who cut the fin slots for me was off by a degree or two from their being exactly 120 degrees apart, an advantage over a jig.

Good skies,
GlueckAuf

1628386549795.jpeg
 
This cutout method seems to work, but I wouldn't mind combining it with dr wogz's method as well to make extra sure that the fins are as perfectly aligned as possible. The foamcore at least boosts my confidence somewhat.

1628458363106.jpegIMG_9767.JPGIMG_9766.JPG
 
Well, I've used the level technique. First made sure my workbench was level and then used a level to hold each fin at 90deg. Very good tip to tip measurements that way. More recently (a Christmas present from my brother-in-law who also is into rocketry), I was given the guillotine type fin alignment kit that Apogee sells. Here's a pic of it in action.
 

Attachments

  • IMG_20210125_104429060.jpg
    IMG_20210125_104429060.jpg
    100.5 KB · Views: 56
I believe it's important to control both the angle of the fin (perpendicular to the body tube) and the angle along the body tube. I use a foam board template for perpendicular and a couple pieces of angle iron to get the fins straight with the body. Sort of the old Estes door jam approach. Obviously, this only works with flat fins.

Jim
 

Attachments

  • IMG_0523.JPG
    IMG_0523.JPG
    96.5 KB · Views: 52
It seems like many of these methods rely on a single flat piece to align the fins. I'm wondering if this could still possibly allow for a bit twisting or misalignment.

Is there something that could firmly hold the fin perpendicular to the body tube at the proper location during gluing so there would be no eyeballing needed?
If there are fin slots in the tube, that axis is covered. If you have purely surface-mounted fins, then using something like Jim mentions to keep the fins aligned with the long axis is necessary as well.
 
With the fin jig on I can look at the fins because I left the rear centering ring unglued. I pull the rear ring and look at the fin root to make sure it' perpendicular. The JB Kwik Weld sets in 6 minutes so you don't have to wait long for it to set. I'm sure there other ways to do it besides eye balling it.
 
Well, I've used the level technique. First made sure my workbench was level and then used a level to hold each fin at 90deg. Very good tip to tip measurements that way. More recently (a Christmas present from my brother-in-law who also is into rocketry), I was given the guillotine type fin alignment kit that Apogee sells. Here's a pic of it in action.

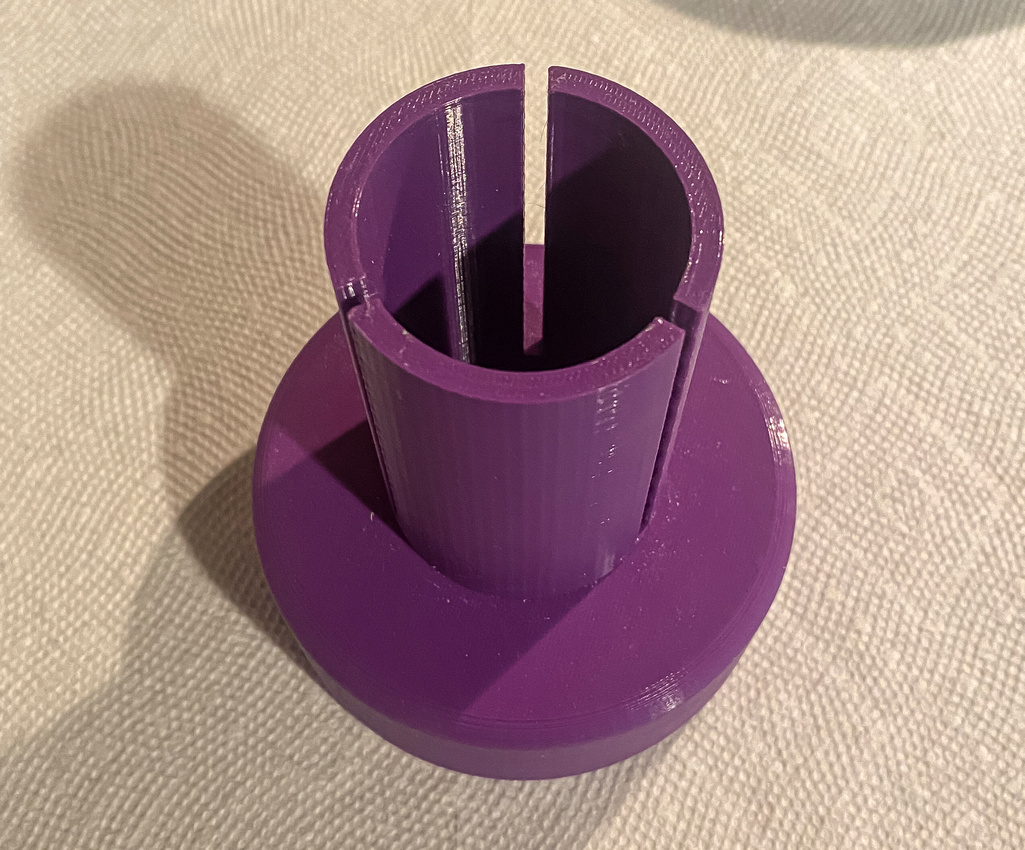
I used the jig in this post and a square. A level requires everything to be "level". A square assumes that the box is square so the vertical fin should be square to the base. I also used this 3D printed widget:

p2643647819-5.jpg


The fat part is a good fit inside the sustainer tube. The center piece fits around the motor tube. The slots are for the fins. I tacked the fins into the sustainer tube then epoxied them. I need to modify this model to let the motor tube pass through the fat part. Between this and the wood jig the fins were perfect

That’s a nice idea to do it from the inside … kudos!
 
Back
Top