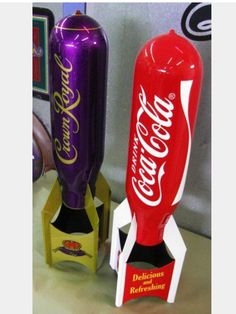
Inspired by the bomb rocket, but decided to make it just a bit better. I figured what fun is it, if it doesn’t rear eject and come down like a bomb. Top of the rocket is bt-80 with a hollow transition to bt-60 at the bottom. Used a pnc-80 round nose cone. After gluing the body together, used dap sealer to simulate welds on the body seams. I am currently building the fins, will update when I have them finished. Now I’m just trying to find a parachute that will fit between the motor pod and the bt-60.
Love rear eject rockets.
a trick. Use the smalles central body tube you can for the pod. What motor size are you using? Easiest way is to use the minimum diameter mount tube for your motor, so if you are going with a BT-60 and your motor is 24 mm, use BT-50 (this will still be tight in a BT-60.). You are even better if you use an 18mm motor and go with BT-20.
but wait, you can even do better! You CAN go SMALLER than the diameter of your motor.
say your motor mount is BT-50 for a 24 mm motor. Extend the mount an inch forward of the motor block. Now use centering rings (or a masking tape wrap to make a center ing ring) to mount a BT-5 or a BT-20 INSIDE motor mount extending forward. your Transition will Prevent you for using the all the space inside the BT-80, but you CAN extend the BT-20 INTERNALLY inside the BT-60 all the way up to (and potentially even INSIDE) the nose cone If you extend the BT-60 forward.
so on the outside your transition is wherever you want to put it for looks, but on inside the tube goes forward to buy you some more useable length for your pod. So even on the outside if your BT-60 is only 8 inches, if your BT-80 goes forward another 12 inches, you can extend the BT-60 internally all the way forward to the nose cone shoulder (or for a hollow plastic cone, you can cut off the base and even extend it forward INTO the nose cone past the shoulder. Another tip here: If you use this, and IF the rocket needs nose cone weight, attach the weight HERE on the pod. It will eject with the pod, so when your rocket descends there is LESS weight on the rocket body and the nose will not hit the ground as hard. this is also a GREAT tip for rocket gliders that eject the internal pod, as it give you all the weight you want for boost stability and then takes it OFF the glider component at ejection.
stay with me here. Say you have a 24mm BT-50 mount, and you downscale your motor mount extension to BT-20 (you can go BT-5 if needed.). Extend THIS TUBE nearly to the forward edge of the BT-60. Put a centering ring around the forward edge of the BT-20, glued ONLY to the BT-20. Sand the outside a bit so it slides easily with the rest of the internal pod into the main rocket. It provides stability to keep the extension tube centered, and acts as a baffle so you don’t need wadding to protect the chute.
you DO need to provide a heat shield for your downsized internal tube just forward of the motor mount, as the ejection charge heat WILL be much more concentrated just forward off the motor within the smaller tube. Cut an aluminum can segment at least three inches long (or just go length of side of can), roll it up and put it inside the motor mount extension tube just forward of the motor. This doesn’t get much mechanical strain, so any glue (white, wood, epoxy, CA) will hold it in place. If you don’t to this, you may get scorch through after two or three flights.
you will need to attach your shock cord to the nose cone of somewhere forward of the forward end of the pop pod.
when prepping for launch, the excess shock cord can either be pushed into rocket ahead of the pod, or put some wadding in the motor mount and push the excess cord into the motor mount extension (the crochet hook daisy chain method takes time but saves space and makes excess length much easier to manage. It’s good practice to route the cord THROUGH the forward extension centering ring and tape it flat along the extension tube attaching it it the BASE of the extension tube near the motor block, so the stress is NOT on the smaller Less sturdy extension tube but on or near the motor mount.
Attachment point for the chute should ALSO be at the rear end/base of the extension tube.
using this technique provide a HUGE increase in useable volume for your chute, and makes packing and prepping much easier.
best of luck!


