Estes SR-71

The Rocketry Forum

Help Support The Rocketry Forum:

This site may earn a commission from merchant affiliate links, including eBay, Amazon, and others.

markg

Well-Known Member
TRF Supporter
Joined
Jun 18, 2014
Messages
480
Reaction score
274
Location
Windsor, Ontario
I've had two of these in my build pile for a couple of years and have finally decided to take the plunge.

IMG_20200729_203925 (Medium).jpg

It looks like a challenging kit, but at least the paint job should be pretty easy :p

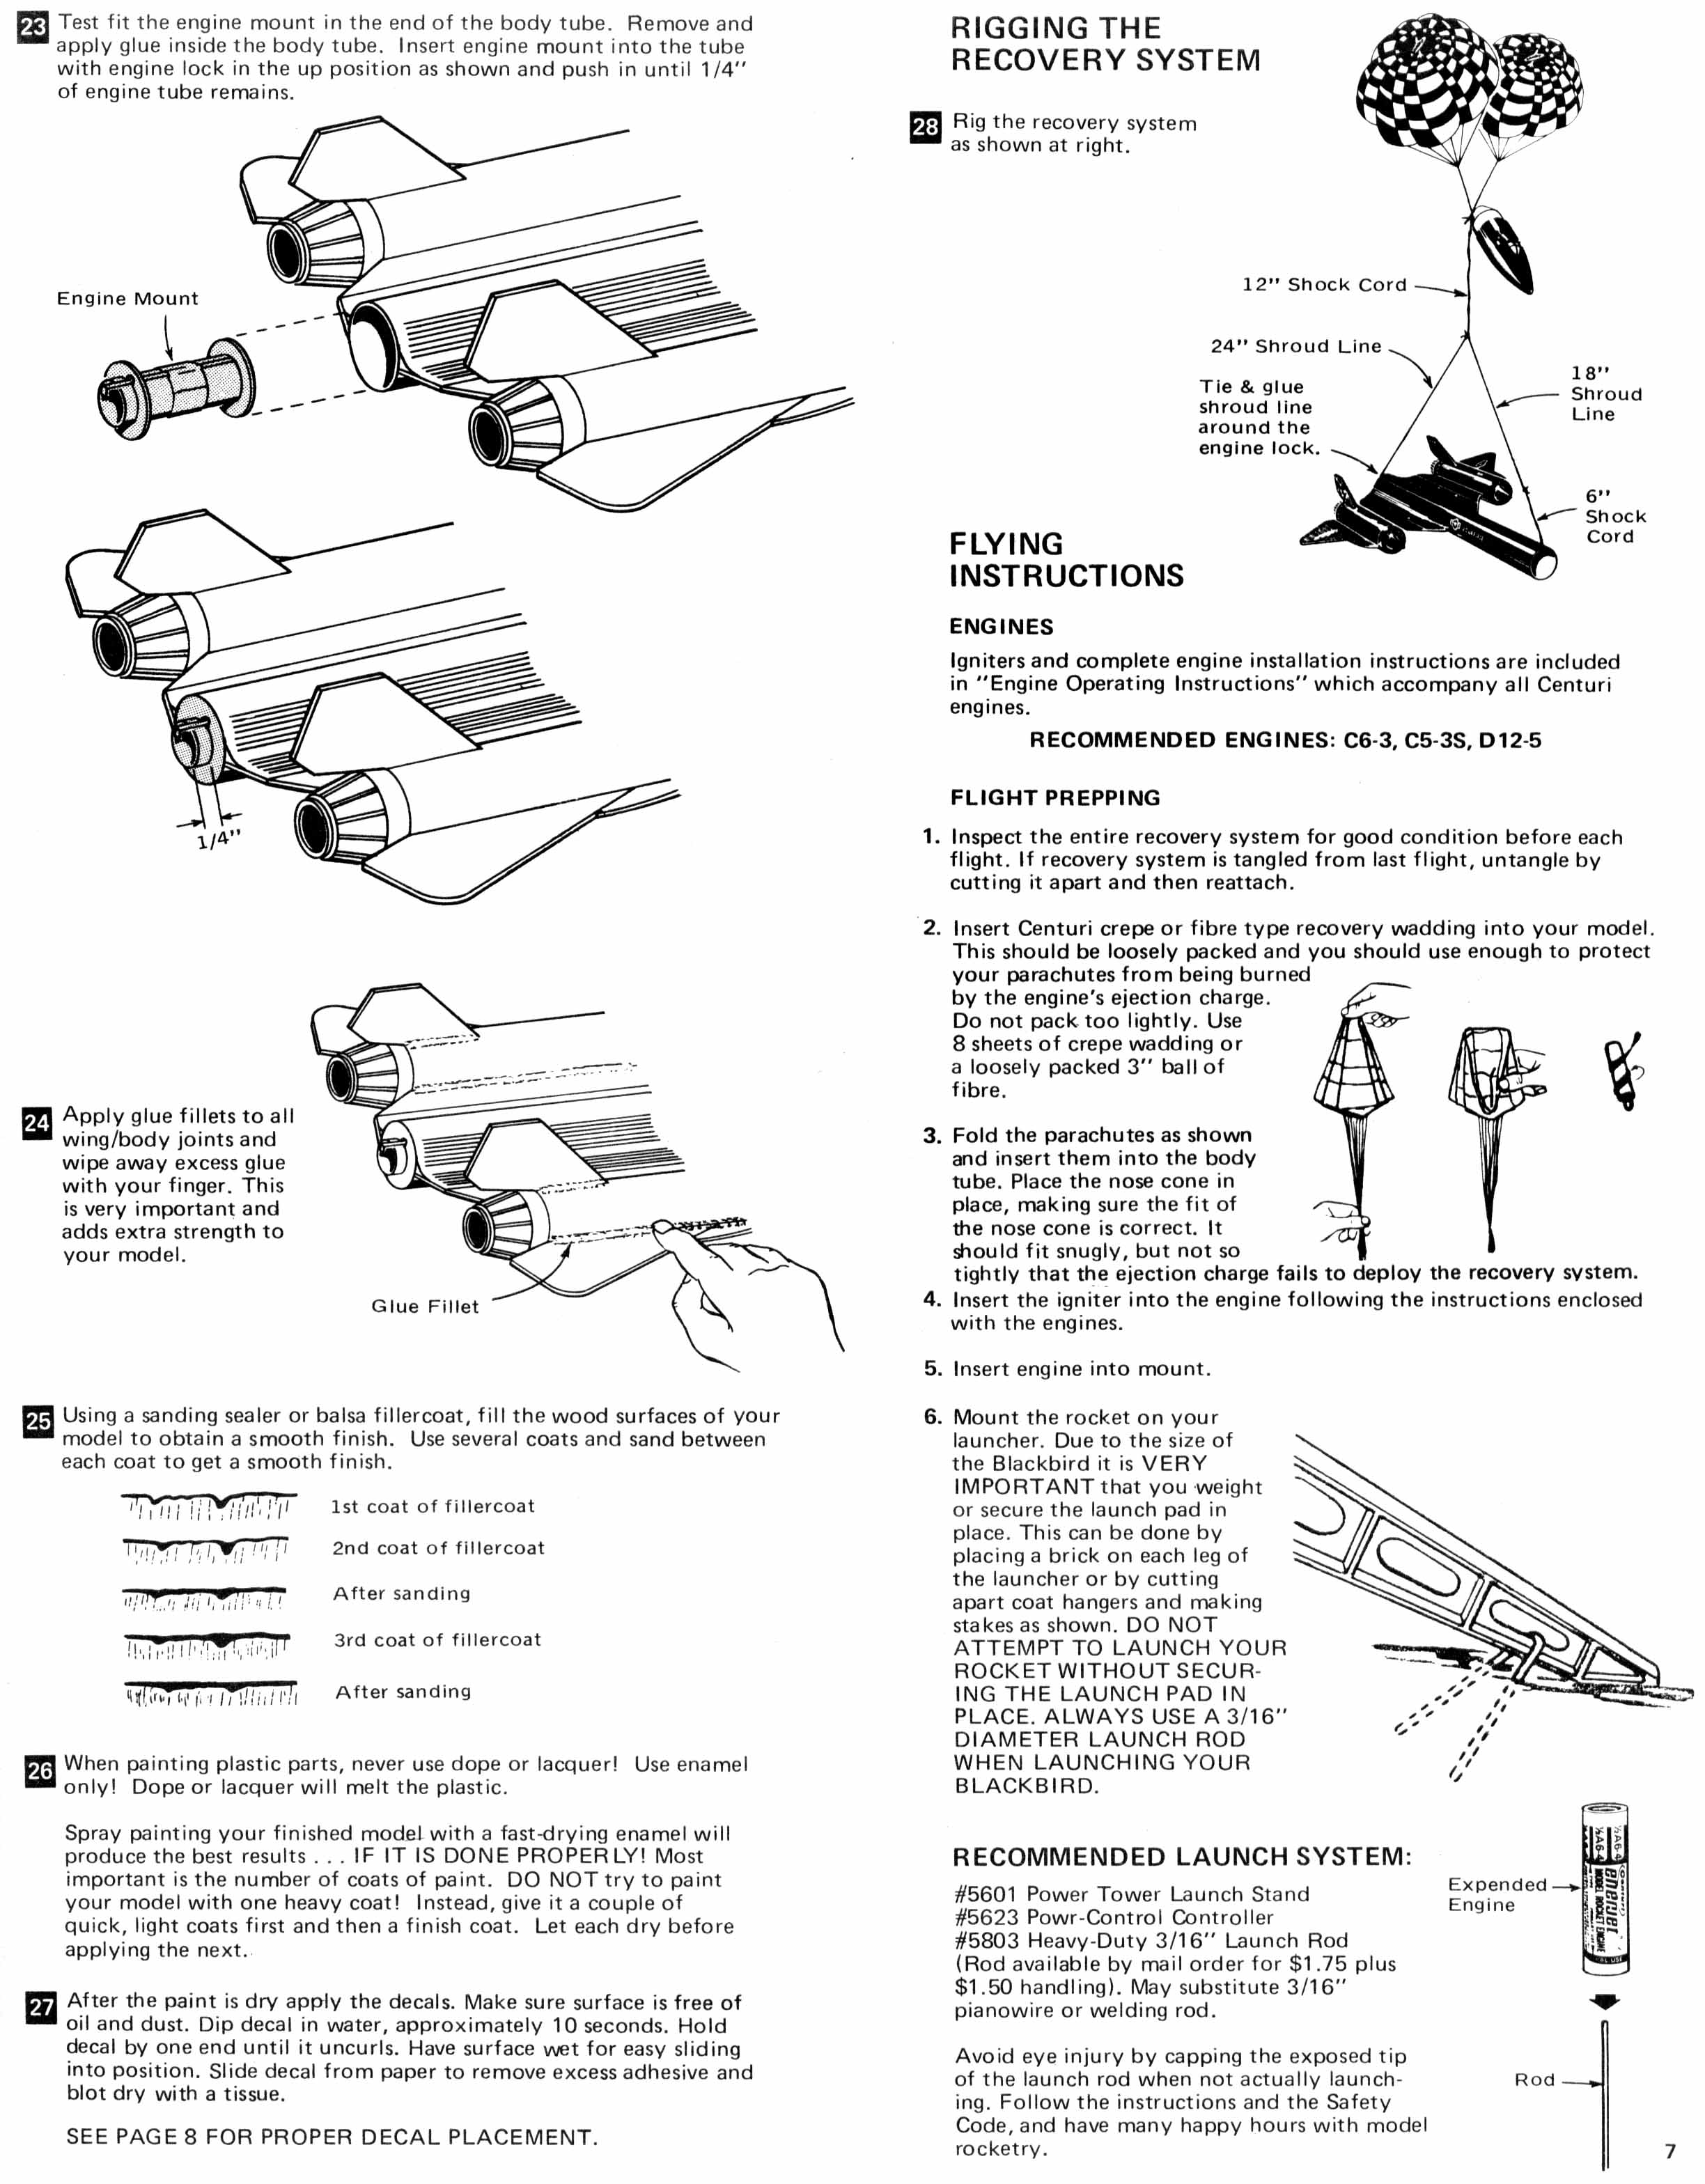
Started off with gluing up the 3 part inner wings and 2 part outer wings. Also cut and glued in the inlet/outlet for the engines. My plastic cement tube was dried out so I used a bit of 5 min epoxy to put them in. The instructions indicated 1 1/4" for the inlets, but that didn't look quite right so I eyeballed them a little further in for a better look.

Once those parts dry I'm going to hit them with some thinned CWF to fill the grain and spirals then some primer before moving on.

Now the unfortunate part. This kit comes with stickers. YUCK! A lot of the decals are white, so I can't print my own. I found some 1/72 decals online, it looks like this model is approximately 1/72, so I'm thinking of ordering those decals. Can anyone confirm the scale for this kit?

IMG_20200729_212709 (Medium).jpg
 
This kit comes with stickers. YUCK! A lot of the decals are white, so I can't print my own. I found some 1/72 decals online, it looks like this model is approximately 1/72, so I'm thinking of ordering those decals. Can anyone confirm the scale for this kit?

You must have the "newer" kit of 2003-2008 vintage.
The "older" #7003 (from 80s and/or 90s) still had waterslide decals. However, mine were really old, and lost some of the transparency over the years.
https://www.rocketryforum.com/threads/coronavirus-work-from-home-build-thread.158551/#post-1984200
My finished kit was ~19.125" or 1.59375' foot long.
Wikipedia claims that: SR-71 is approximately 103.876 feet excluding the nose probe, which is four feet, eleven inches

So, 103.876 / 1.59375 = 1 : 65.
With the nose probe, it would be 108.792667 / 1.59375 = 1 : 68.

Neither is 1/72, but within 5% of that, so might be close enough to make those decals work.

HTH,
a

P.S.: Beware of gluing the paper shrouds onto the airframe tube with Titebond or similar wood glue. They shrink while drying, and distorted the contact / glue patch areas of the shrouds. It took me a fair amount of time, CA impregnation and bondo application to fix that.
 
Had one, remember the chute being difficult to pack into the small body tube. Fun flyer, though. Lost it in a shop fire, along with a Comanche 3 and a S.W.A.T.......don’t ask, stupid error involving a box of motors and a shower of sparks. Yay, me. :eek::oops::rolleyes::p:)
 
Save one for a simple conversion to a three motor cluster.

Shroud is easily attached with some CA dots and tacky glue. Paint gloss black then use matte finish.

Can drag separate on a 3 C cluster.
 
Last edited:
Great rocket.

My worst painting nightmare.

Had a decent black coat.

Put decals on, still pretty good (for me, anyway)

Put on clear coat........total orange peel.

Sanded it down, painted it flat black, flew a few times.

It’s my wife’s favorite rocket, I gave it to her as display model.
 
I had the 18mm/24mm powered Centuri kit when I was a kid. They have you rig up a shroud line to the tail from the shock cord so that the parachute suspends the rocket horizontally, it really looks like it is gliding in for a landing when it comes down like that. PS- Apogee makes a rear eject glider in a 13 mm power version.
https://www.apogeerockets.com/Rocket-Kits/Skill-Level-3-Model-Rocket-Kits/SR-72-Darkbird
https://www.spacemodeling.org/jimz/cen5349.htm

cen5349g.jpg
 
Had one, remember the chute being difficult to pack into the small body tube. Fun flyer, though. Lost it in a shop fire, along with a Comanche 3 and a S.W.A.T.......don’t ask, stupid error involving a box of motors and a shower of sparks. Yay, me. :eek::oops::rolleyes::p:)
Yes, difficult to pack chute in small air frame and the wrap at the end of tube...at nose cone..always came unglued. Flies nice, thought which surprise me...had a few straight boost. Now she is retire. had issues with the getting all fins on correctly. I
 
Thanks for the tips everyone. I like the parachute rig that brings it down horizontal. My Estes Pro Series Jay Hawk has the same instructions (haven't flown it yet).

Starting to look like something now. The paper shrouds were a bit of a challenge but not as bad as I thought they would be. I got some wrinkling up at the front, I'll see how it looks after I hit it with some primer and then decide how much work I want to put into making it look good.

As you can see in the photo, the front of the shrouds don't line up with the nose cone, I will taper them off to improve the fit. I also had to trim the BT back about 3/16 to get a good fit between nosecone and the front shroud.

I'm a bit undecided if I should build it with an 18mm mount or just friction fit a 24mm in there. I think I'll leave out the mount until I finish it and get a final weight on it.

cheers - mark

IMG_20200803_203333.jpg
 
Thanks for the tips everyone. I like the parachute rig that brings it down horizontal. My Estes Pro Series Jay Hawk has the same instructions (haven't flown it yet).

Starting to look like something now. The paper shrouds were a bit of a challenge but not as bad as I thought they would be. I got some wrinkling up at the front, I'll see how it looks after I hit it with some primer and then decide how much work I want to put into making it look good.

As you can see in the photo, the front of the shrouds don't line up with the nose cone, I will taper them off to improve the fit. I also had to trim the BT back about 3/16 to get a good fit between nosecone and the front shroud.

I'm a bit undecided if I should build it with an 18mm mount or just friction fit a 24mm in there. I think I'll leave out the mount until I finish it and get a final weight on it.

cheers - mark

View attachment 426908
Looks good..yes front shroud (body wraps) extend beyond tube and help the nose cone fit....that is where mine kept getting unglued..probably from my fat fingers packing chute.
 
Looks good..yes front shroud (body wraps) extend beyond tube and help the nose cone fit....that is where mine kept getting unglued..probably from my fat fingers packing chute.

After you have completed the shroud assembly, soak the ends of the shround in thin CA. Do the same to any exposed areas where the shroud meets the balsa. It will help with stopping the shroud from coming loose and give much needed strength up by the nose cone.

I'm restoring one of these right now. Down sized the parchute to 15 inchs and stuck with the 18mm mount as I can always stick an Aerotech D21 in it.
 

Attachments

  • B1.jpg
    B1.jpg
    107.9 KB · Views: 91
Got the gloss black on and ordered 1/72 decals for it. I might do some more sand and fill before the decals get here. There are a couple of wrinkles you can see on the top left of the shroud. I might just leave it, it's not as noticeable IRL.

Once I get the decals on I'll hit it with a Matte clear coat to finish it off. I think I'm going to put in the 18mm MMT and plan to fly it on C5-3s.

Now I'm thinking about setting the second one up as a cluster with ducted ejection charges and thinking about a 3" upscale :) This always has been my favourite plane, I got to see it up close at Georgia Air Force museum, it looks like it's going mach 1 while sitting in the hangar.

IMG_20200811_144310.jpg
 
I'm looking at buying the Estes SR-71 from Ebay to build and fly :) Which one would you all recommend - the kit number 1942 or 7003?
 
the kids loved it because they could see it the whole time.
View attachment 429864
I’m technically an adult (my better half may differ) and I like flights where I can see it the whole time. Unless you have a camera aboard or an altimeter or are shooting for duration competition, for low power sport flying I fail to see the point of flying a rocket out of sight. Maybe I’m just old.
 
I'm looking at buying the Estes SR-71 from Ebay to build and fly :) Which one would you all recommend - the kit number 1942 or 7003?

I've built 7003 (boxed re-issue kit from '96-'98 timeframe), and liked that so much that I had bought another one.
So now I went to check which one is in my spare/build pile, and low and behold, found two SR-71 baggies with 1942 and 7003 kits, pics below.
SR71 packaging-back.jpg SR71 packaging-front.jpg

The parts of the two kits look absolutely identical.
The only meaningful distinction seams to be the packaging and timing of production.
7003 that I have has a long card-board insert, and the 7003 that I had built came in a box.
1942 seams to be in the older (likely '85-'95 vintage), original baggie with minimal packaging decorations, and waterslide decals.

The only material difference (to some) is that some later kits switched from waterslide to stick-on vinyl decals. I don't know when that happened, or what years were effected. My guess would be the later #1942 kits from '03-08 timeframe, but I'm not certain.
Some folks have preferences for waterslides, some don't. The upside is that they (can) blend into the paint seamlessly. The downside of older waterslides is that they crack and become brittle with age, and even with outmost care, a few may fall apart and will require you to apply them in pieces.

HTH,
a

P.S.: If you want to, you can have 1 of my 2. I doubt that I really need 2 spares.
 
Last edited:
It has been done. I had a friend do that over 20 years ago. I think that maybe there was a write-up in Sport Rocketry magazine years ago, too.
I am a cluster fan, but I am not crazy about it when the outboards are that far..... outboard. It's great when they all simultaneously light, otherwise not so much.
 
I’m technically an adult (my better half may differ) and I like flights where I can see it the whole time. Unless you have a camera aboard or an altimeter or are shooting for duration competition, for low power sport flying I fail to see the point of flying a rocket out of sight. Maybe I’m just old.

I’m of the same mind. I think it’s most fun to be able to follow the whole flight. Though There is a thrill to the occasional out of sight in a blink of the eye kind of launch, they aren’t quite as exciting beyond the initial streak.
 
mo2872 said:
Wonder if anyone has run either dual motors in the engine tubes, or triple with one in the center, too.....hmmm.....

It has been done. I had a friend do that over 20 years ago. I think that maybe there was a write-up in Sport Rocketry magazine years ago, too.

I built mine with engine blocks inside the wing side-pods (tubes are identical to those used for the 18mm MMT), just in case I decide to stick an C6-0 in there, some day. C6's are ~25g each.
However, if I ever wanted to act out that wish, I would first need to add a fair amount of extra weight to the nose cone, to restore stability. So figure ~+50g in the nose cone. The secondary problem with adding extra weight to the nose cone, is once you do that, the kit becomes much heavier even for the stock 1-motor flights.

So now the whole thing gets much heavier, which can still be OK. Unless, 1 of the 2 outboard motors doesn't lite up or doesn't come to pressure quickly enough, and the airframe lifts off the rod and starts cart wheeling. The only likely outcome of that scenario is a crash and spontaneous re-kiting.

My stock airframe is ~125g, painted, and with the Rocketarium motor retainer.
If you add +50g for two outboard motors and +50g for the ballast, now the flight-ready model is upto ~225g. I will probably need to add a bigger chute, so heavier still.
Estes advertises C6's for max liftoff weight of 113g: https://estesrockets.com/product/001613-c6-3-engines/
So if only 2 out of 3 motors light up, the model is borderline overweight, without even taking into account thrust asymmetry.
So you really need to be confident that you can reliably ignite all 3 motors, or not even bother trying to fly on anything less than C5's, or better yet, Quest 18mm D16.

a
 
Last edited:
And all that flicking nose weight makes the nose cone want to drag seperate. Will bang up the paper shroud tip even with CA reinforcement. Plugging C6 0 motors is illegal and uncouth. A super complex venting system is cool. Clustering these things is silly. Long launch rods, old school igniters, fancy clip whips are soooo much trouble. Motors in pods are scary. Having to wait for near perfect launch conditions doesn't sit well with the need for instant gratification. The cluster won't go much higher. Airplanes are airplanes and rockets are rockets. Yes, I have completely and logically talked myself out of it. :)
 
And all that flicking nose weight makes the nose cone want to drag seperate. Will bang up the paper shroud tip even with CA reinforcement. Plugging C6 0 motors is illegal and uncouth. A super complex venting system is cool. Clustering these things is silly. Long launch rods, old school igniters, fancy clip whips are soooo much trouble. Motors in pods are scary. Having to wait for near perfect launch conditions doesn't sit well with the need for instant gratification. The cluster won't go much higher. Airplanes are airplanes and rockets are rockets. Yes, I have completely and logically talked myself out of it. :)
Don’t need to plug the C6-0s. Just eject them.
Rail mini buttons and a 6 foot 10x10 rail, gives you a lot more time to get all motors to light if your clip whip has some loose wire. Also more length to let the rocket to get up to speed.
Hadn’t thought about drag separation of the nose.

I love outboards that are one minimum diameter off center. Much more than that, I get itchy. My feeling on clusters is that ideally, if an inadequate number of motors light, it has insufficient thrust to get of the pad. Also a bit touchy when only one motor supports ejection system. Reeaaaalllly bad if that one doesn’t light.
 
If only two light on your SR 71 3 motor cluster the lack of thrust is a good thing because the crash site will not be so far away. Asymmetric thrust on that SR 71 bad boy is the real problem. A mini rail is just super cool! Gotta get that nose cone snuggness just right - like baby bear. Balanced between drag sepertion tight and single motor eject loose. Good chute packing technique a must. Cluster electrical connection primadonna a must.
 
Out west ejecting them an get you in more trouble than plugging them!
I’ve been ejecting them for years without any problems. But I have read that for sod farms even small casings can cause big problems. My latest motor eject birds have a slightly larger motor compartment (they are tubeless, no formal motor mount, the motors are held in quite nicely by the rotors and rubber bands) to accommodate streamers for the motors. I don’t think an 18 mm or even 24 mm Estes motor casing is likely to hurt anybody tumbling free, although maybe the Quest casings are a bit heavier and might smart a bit if it hit you. But the streamers both slow them down and perhaps more importantly make them easier to find. Not much different from a rocket that separates and comes down under two different chutes.

For the SR-71s, might consider downsizing the outboards or using adapters to go with 13mm motors, since you are mainly doing it for effect rather than thrust. Has a lot of advantages, less weight to screw up CP, less asymmetric thrust if only one lights, a bit cheaper.

If only two light on your SR 71 3 motor cluster the lack of thrust is a good thing because the crash site will not be so far away. Asymmetric thrust on that SR 71 bad boy is the real problem. A mini rail is just super cool! Gotta get that nose cone snuggness just right - like baby bear. Balanced between drag sepertion tight and single motor eject loose. Good chute packing technique a must. Cluster electrical connection primadonna a must.


If the one that DOESN’T light happens to be the one in the middle, it’s going to be a beautiful St Louis Arch flight!
 
I see more than ten excellent reasons above NOT to cluster yer SR71.
List a good reason to cluster it...
Um....uhh..
Huh huh...
Um.....
Hey. BEVIS want to blow something Up! That would be cool. :)
 
Back
Top