Estes Announces 1/45 Little Joe II !!!!

The Rocketry Forum

Help Support The Rocketry Forum:

This site may earn a commission from merchant affiliate links, including eBay, Amazon, and others.
What kind of glue do you all use on these Estes kits these days? I have not built one since the early '70s & I don't remember any plastic parts back then.

It depends on the parts, the glue area, and likelihood of glue oozing where you don't want it, and how careful/patient you are.

Also, plastic does not equal plastic. That is, blow-molded type parts are not styrene. So what might be a good compromise glue for gluing styrene to a blow-molded part, would not be the best glue for styrene to styrene

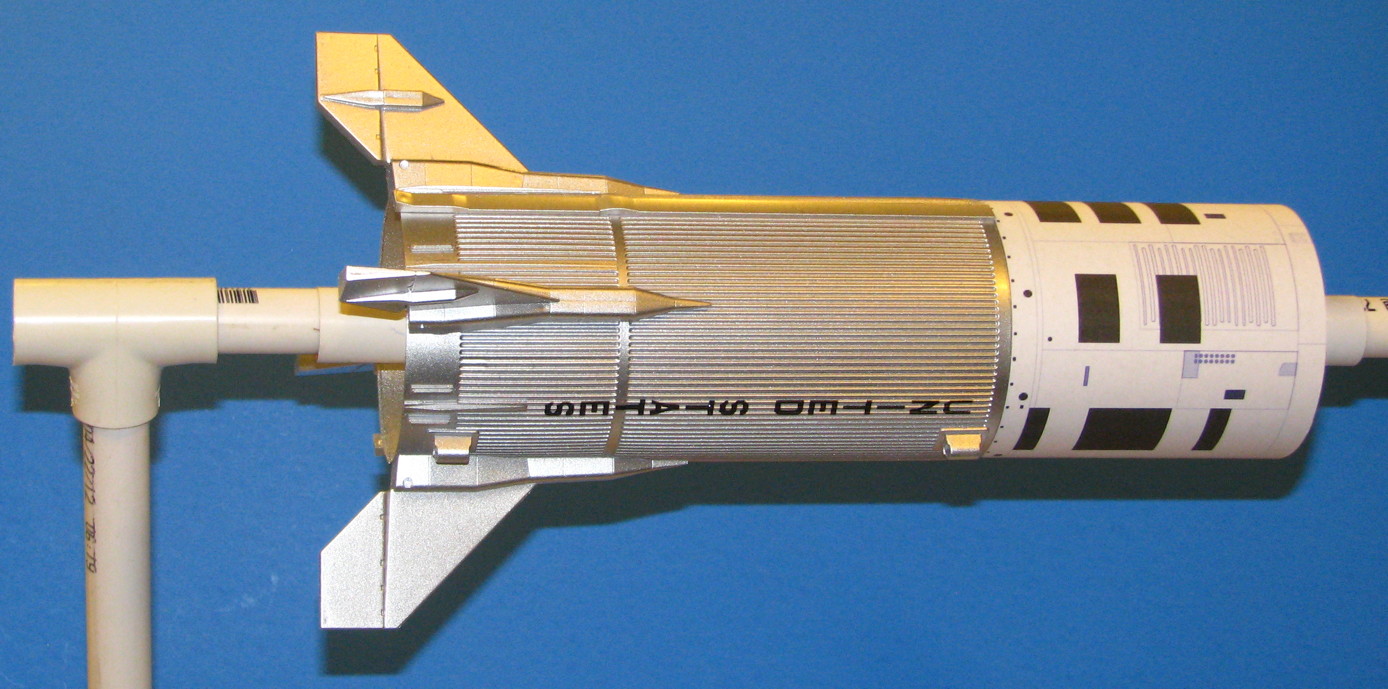
That said, for the 1/45 Little Joe, I am using either liquid cement (Plastruct brand), or good old Testor's glue in a tube. The kit instructions generally shows tube cement for all styrene to styrene gluing, but in some cases liquid cement can be better/easier unless you are sloppy (get a drop of liquid cement onto the body wrap... don't even try to wipe it off, it would turn a small drop into a huge smudge).

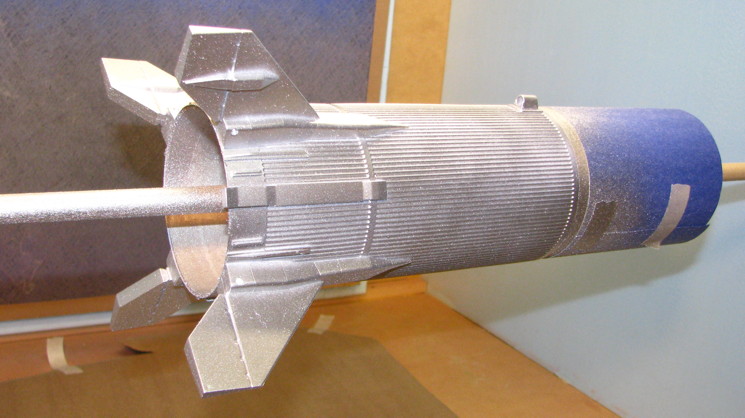
Liquid Cement - For assembling the fin halves, Algol nozzles, and Escape Tower struts and ring. Also for attaching the longerons, both the six big ones (2 long ones (N) and 4 shorter ones O)), and the eight little ones (P). I used self-closing tweezers to grab and place the little ones. I also plan to use liquid cement to assemble the RCS thruster quad housings, and to glue the RCS nozzles too. Later, the RCS thruster assemblies will be painted, dry, and then glued to the Service Module using carefully applied thick CA

Tube Glue - To glue the fin to the styrene body, mostly on the inside areas that contact the alignment/attachment tabs, as well as a bit on the root and the horizontal arcs on the inside. When I glue the Tower assembly onto the "capsule", I plan to put it in place dry, then on the inside brush in some liquid cement to seep in (but not run to the outside), then still working on the inside, add some tube glue to the remaining "stubs" of the bottom of the tower legs that protrude inside. Lugs just got glued on with tube glue.

For the escape rocket nozzle assembly and Tower skirt, I will use tube glue. But first I will paint both parts flat black, then scrape away paint in the areas to be glued, those areas will be so deep as not to be visible. Otherwise, painting after gluing would require a lot of paint to get into the resulting nooks and crannies. After painting the capsule/tower white, I will carefully scrape paint from the top of the tower pins, and use a small drill bit to help to remove paint inside of the holes in the skirt assembly, and use tube glue to bond the tower skirt to the tower struts. Before gluing though, I'll temporarily place the escape rocket motor tube onto the skirt and after gluing the skirt to tower, I'll rotate the capsule to check that it is at 90 degrees, no wobble when rotated, otherwise adjust it before the glue sets up.

For the shock cord attachment that is glued inside the capsule, I used liquid cement for the initial bond, then went back and added tube glue. I have to admit that I used the original round "long donut" (shown as "not used") for that purpose, and not part "HH".

When it comes time to glue the centering rings to the model, I will use a small amount of 5 minute epoxy. I have sometimes had nasty surprises when using Elmer's or Titebond to glue in a ring, where over time the glue shrinks and shrinks down the area of the tube where the glue holds the ring, on a well-finished tube you can see where it is sunk in. But epoxy won't do that. Also of course, more time to get the placement just right with 5 minute epoxy, it won't "freeze" as can happen at times with Titebond, often not in the right place. When it comes time to glue the mount, do take note of the proper orientation of the 6 outer holes in relation to the fins and system tunnels.

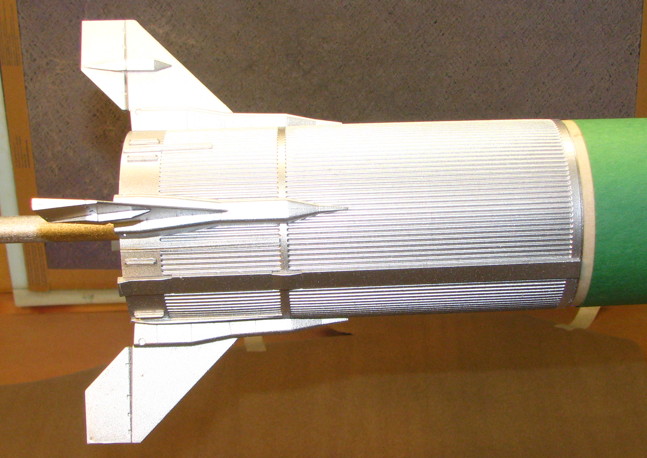
Ah yes, another step ahead before gluing the mount. On the 12-51 series Little Joe-II's (the ones with movable fins and aft RCS capability) a coating of white RTV was applied to the base for heat protection (QTV and A-001 were left natural aluminum). So, I'm going to paint the body silver without the mount in place, then paint the bottom of the mount ring flat white, and then glue the mount in. I will add the Algol motors later, possibly not even glue them as the fit is nice and snug.

- George Gassaway
 
Last edited:
George, thanks for documenting the build. Greatly appreciated.

After returning home from being on the road, I was finally able to look over the kit.

Looks like the old injection molding tooling is in pretty good shape and the new parts are very nice. A few plastic sinkholes, but nothing to complain about that a little dab of filler will not fix quickly.

I am just glad Barry Tunick never sent this old tooling off to salvage!

The vac formed wrap is very nice.

Decided to not do a 29mm version at this time. I had forgotten about the new RMS 24-60 case and the F35 reload for it. If I get the urge to ramp up the power a little, this will do the trick, I think. Will simply build it without a thrust ring and will mod the motor retainer as needed. Modifying the nose weigh as needed for this is a given.

Still going to make the cluster display nozzles and that centering ring removable to save some weight on some flights, if I want to. Nice to have the option to fly it either way. Easy enough to add another light weight centering ring behind this assembly.

Still mulling over wrapping VS painting the forward airframe.
 
Last edited:
I’ve started a build thread inside of the Tips, Tricks, and Modifications thread:

https://www.rocketryforum.com/showthread.php?131767

Won’t document gluing the fins till later, maybe Saturday night. But until I get caught up there, I did get the body painted Friday, using the new DIY Spray Paint Booth for its first real model. I did not install the engine mount because the bottom ring will be painted flat white to represent the white RTV coating applied to the base due to the greater heating of the later flights.

Also have some other stuff done, such as Tower glued to Capsule, and LES Skirt and nozzles painted black and assembled. A bit hamstrung by my camera acting up. May be Monday till I can make new (good quality) pics, but have a lot of other pics in the hopper (including the LES skirt/nozzles) and some other non-build things to get done meanwhile.

- George Gassaway


Q85pymY.jpg


uUvx2AI.jpg
 
Last edited:
George, what color paint is that? And is it just the picture or do I see 2 colors of paint?
 
[...]

Decided to not do a 29mm version at this time. I had forgotten about the new RMS 24-60 case and the F35 reload for it. If I get the urge to ramp up the power a little, this will do the trick, I think.

[...]

Tom,

If you have the 24/40 RMS, the F39 has roughly the same peak thrust (actually a tad higher) but it just drops off a bit faster. Obviously it has less total impulse than the F35. The E28 reload also would do the trick.

I have what seems like a lifetime supply of 24/40 reloads, so it looks like I'll get to use up a few on the LJII.

I'd sure like to see more reloads for the 24/60 case. I'd likely be more tempted to buy the set.

Aware of the current 24-40 options. Just looking for more N-s for a future flight.

Two more 24-60 reload options have been announced, I believe. Given that I prefer WL propellant, I see that F35 in my future.
 
George, what color paint is that? And is it just the picture or do I see 2 colors of paint?

I used Krylon metallic silver. I had done a test spray that looked OK, better than Testor's Silver had tested, but am not happy how it turned out on the model. So I do not recommend it.

What worked great for me in the past was SNJ Aluminum, and later Model Master Metalizer lacquer, the non-buffing Aluminum.
PRlYfoT.jpg


But they come in expensive little bottles and require using an airbrush..... I wanted a simpler paint job out of a spray can. Should have tried some others or just gone with the lacquers and drug out the airbrush stuff.

The blue you see on the Service Module area was some blue paper taped in place to mask off the body tube in that area. I'm going to use a printed paper wrap for the SM.

Update - I sprayed it with a clear gloss lacquer (Testor's), after doing a test. The clear gloss makes it look a bit better. I this pic, green paper is masking the SM. May try to apply the kit's vertical UNITED STATES decals to the body by Sunday night. if I screw them up, I have some clear decal film for making more.

- George Gassaway

4yIKQjA.jpg
 
Last edited:
George,

Looks really good after the clearcoat. My biggest concern is finding a silver that looks realistic after clear coating.

Is your Krylon spray labeled "ColorMaster"? I have a new can of this ColorMaster I bought for another project and I really like the way it goes on, but it is a little rough to the touch. I just used very fine steel wool to knock off the tiny bumps.

Also, I bought Nickel Satin, which has a slight gold look -- like Champagne Silver on cars. I think the color you used looks pretty natural.
 
James Duffy is using Tamiya Gloss Aluminum. If I could do it over, and still use paint out of a spray can, I'd go with that.

Check the Tips, Trick, and Modifications thread, James Duffy & I both have build threads going on there:

https://www.rocketryforum.com/showthread.php?131767

Here's my model at the moment, with a prototype paper SM Wrap taped on. Check the above thread to see how it got that far:

- George Gassaway

lDfzHTs.jpg
 
Last edited:
I went the paper wrap route back in the day with my 1/39.5 kits, hopefully I can find those old Illustrator files and resize.

Terry Kosel

Hi Terry,

I bought a couple of your LJII kits; They've been in my 'build pile' ever since. If you can't find your files, let me know and I'll scan the wrap and
send it over to you.

Sean
 
Saturn V is back! Check and see what pro rockets have been dropped.
 
Looks like they are keeping most PSII kits as well as the composite motors. They wouldn't put it in the catalog otherwise! Sorry to digress...

LJII's looking good, George!
 
I just did a search on the Estes website and didn't see one. Is it in the catalog?

I also have been looking for that & can't find it anywhere. Estes doesn't even have it listed in the "What's New" section.

I see it now. Page 11 of the Catalog. I didn't see an online version until I saw a different thread.


https://www.estesrockets.com/media//catalogs/Estes_2016_Catalog.pdf


The catalog says that it will be available in June.
 
Back
Top