El Juan

The Rocketry Forum

Help Support The Rocketry Forum:

This site may earn a commission from merchant affiliate links, including eBay, Amazon, and others.

Handeman

Well-Known Member
TRF Supporter
Joined
Jan 18, 2009
Messages
9,129
Reaction score
1,947
Location
Stafford, VA
This is a build thread for my L1 rocket. To understand how this came about, read this thread over on Rocketry Online Why keep it Simple?

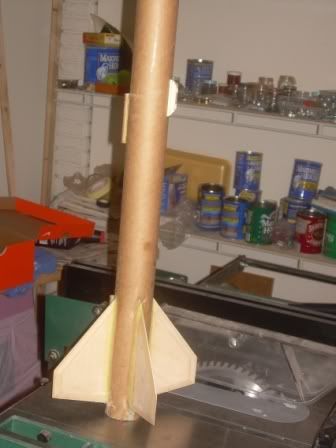
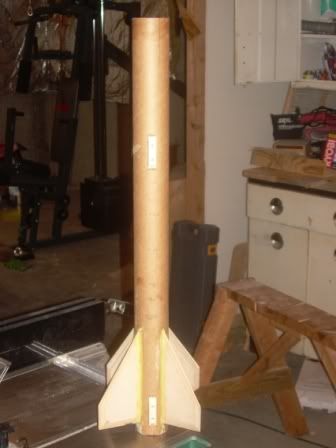
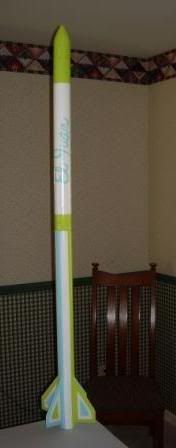
I'm going to call my rocket El Juan It will be a scratch built, 38mm MMT, with dual deployment electronics build out of two 2.25 OD. 2.00 ID tubes I have. It will be about 55 inches high and weigh about 40 oz. I don't have the exact dimensions yet because I haven't built a nosecone for it yet. I do plan on building a 29mm adapter so I can do test launches with G motors in my RMS 40/120 cases.

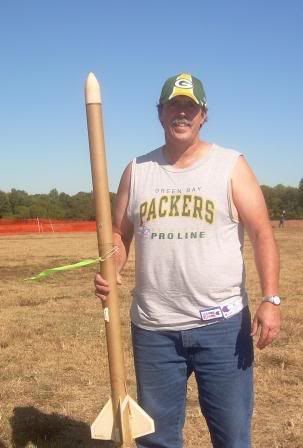
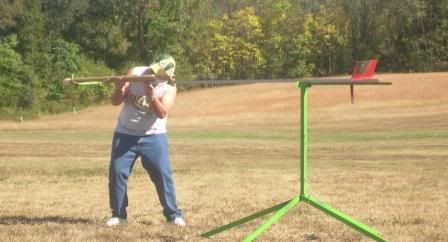
I expect this will take most of the summer to get it built, test flown, and finally certified. I would like to certifiy with Mike and Ed at Tripoli Central Virginia (#25) and Tripoli East Virginia (#82) perfects, but they don't launch at Culpeper again til Oct. when the crops are in. I'm not sure I can wait quite that long.

Either way, this thread is going to keep popping up from time to time because this isn't going to be a quick build, but it should be fun.

BTW, Yes, I will have pics at as I go along.
 
Finally, a L1 build thread! I look forward to following your progress.
 
I just read that link, and more power to you! I agree wholeheartedly with those sentiments. My L1 cert was a 2.6" cluster-R sandhawk, modified for altimeter based dual-deployment, with a sealed motor compartment (motor backup? we don't need no steenking motor backup!). I also enjoy pushing the envelope, though not in the direction that most people do. I laughed when I saw him talking about using a G80 to launch a 4" rocket to "push the envelope" for low-n-slow prior to a L1 cert. The next rocket in my build Queue is a 4" rocket intended for G20 flights! I guess I like to push that particular envelope further than most folk do ;).

Go for the gumption!

-Rick
 
Originally posted by Rick Lindsey
I just read that link, and more power to you! I agree wholeheartedly with those sentiments. My L1 cert was a 2.6" cluster-R sandhawk, modified for altimeter based dual-deployment, with a sealed motor compartment (motor backup? we don't need no steenking motor backup!). I also enjoy pushing the envelope, though not in the direction that most people do. I laughed when I saw him talking about using a G80 to launch a 4" rocket to "push the envelope" for low-n-slow prior to a L1 cert. The next rocket in my build Queue is a 4" rocket intended for G20 flights! I guess I like to push that particular envelope further than most folk do ;).

Go for the gumption!

-Rick


Rick

Sounds like a really cool L1 rocket! Got the cert on the first try I'll bet! Not that it really matters.:rolleyes:

A 4" on a G20? Sounds OK to me if you can build it light enough or have a long enough rod. I plan to fly my 4" Thug on a F52 this weekend and if the reloads hadn't been backordered, I would try it on a F40. Of course if the winds are light (semi-small field) I'll put a G64 in it. I luv that motor!:D:
 
Originally posted by noise
Finally, a L1 build thread! I look forward to following your progress.

noise

I'll post as I get things done, just don't expect it done in a week or two, or even a month for that matter. I get up for work @ 4:30 am and usually get home from running the daughter to swim practice about 8 pm. Doesn't leave much time, and she got her learners permit today, so add driving lessons to that. Boy, am I going to need some relaxation time!

The first step is to make a nosecone. Any suggestions?:confused:

I don't have balsa (can get some) but do have the pink foam board. I'm going to try that first.
 
Originally posted by Handeman
noise

I'll post as I get things done, just don't expect it done in a week or two, or even a month for that matter.

I'm in no hurry. :)
 
Here are most of the parts I'll be using to build El Juan.

Assortedparts.jpg


The tube on the right is a 29mm MMT with two centering rings I'll use to build an adapter for testing with my RMS 29/40-120.

The second from the right is the 38mm MMT, the next two are the body tubes. The short piece will be the outer electronics bay, the longer piece standing up will be the coupler tube for the EB. The 5 layer plywood under all the tubes will be used for the fins. The foam on the dowel is going to be the nose cone, I hope!
 
Here's some pics of my first attempt at a nose cone. Since the pink foam is near the same density as balsa, I intend to shape it, use epoxy resin as a filler/coating and use the nose cone like that.

Here's the foam being glued up. I used 3M spray adhesive on both sides and left it clamped for 24+ hours.
NCGlueup.jpg


Here's the setup I used to rough shape the nose cone. The sander was clamped down and a hole punched through the coffee can with the vacuum hose attached. It actually worked quite well. The foam doesn't sand down very fast, but the can/vacuum caught almost all the dust.
NCruffshaping.jpg


Here's the setup for the fine shaping of the nose cone. I found I had to have a hole in the bottom of the foam and a dowel for it to spin on to keep everything from wabbling too much. I used a hand drill with a 2" rotary sander to shape the nose cone as it spun in the drill press. Worked OK. Lathe would be better.
NCfineshape2.jpg


More pics as I attempt to finish the Nose Cone.
 
Here's some pics of further work on the nose cone. I was very pleased with how the nose cone came out, so don't burst my bubble!:) I'm not real happy with how the pictures came out, so you can knock on that all you want.:(

The final shape. Since the pink foam has a density similar to balsa, I decided to coat it with epoxy resin as a filler/stiffener. Here it is coated.
NCshaped.jpg


Nose cone inserted into one of the tubes. A snug but excellent fit.
NCintube01.jpg


Here it is with the centering dowel cut down and a screw eye inserted.
NCwithtubenoflash.jpg


Finally, the nose cone on the scale. It weighs 1.0 ounces.
NConscale.jpg


more to come
 
Just a few updates. I got some centering rings made. They were a little tougher to make then I thought, the OD is 2" and ID 1 5/8" Turned out pretty well though.

I use the hole saw to get the initial CR. The 1 5/8" forstner bit is used for the center hole. The center point on the forstner bit is aligneded in the center hole from the hole saw to align everything. The plywood is clamped over everything when drilling the center hole in the CRs.

CRsdrillingcenter.jpg


Here's most of the parts, including the MMT with three centering rings and the home rolled coupler tube for the electronics bay.

PartsEBandCRs.jpg
 
Originally posted by Ropes4u
Love the nose cone I will have to try that one of these days..

If I had to do it again, it would make sure I let the epoxy dry for at least 24 hours before turning the NC.

Using a wood dowel in the center to turn the NC works well because you can then screw in an eye screw for shock cord connection.

If you're making a larger NC, I would suggest the method explained to me by PlasticPaul. Put a steel threaded rod and a threaded coupler inside the NC and use a piece of threaded rod in the coupler to use in the drill press/lathe to turn the NC. Then remove the threaded rod used in the drill press/lathe and replace it with a threaded eye bolt. Coat the NC with a layer of fiberglass and you're done.
 
After redoing the den:( I finally got in some build time for the El Juan (sort of). I came across pictures of a fin alignment fixture on this forum that someone was using. It was pretty cool, made of aluminum and the link to the manufacturer had a price of $150+.

I decided to make my own. I bought a 2' x 2' piece of 3/4" plywood. I cut each corner off to use on the four fin holders. I then trimmed it down to 18" x 18". I used the four corners, some 3/8 ply, and the trimmed off pieces to make the fin holders. I used a 1/2" dowel and spend motor casings, 18, 24 and 29 mm to make the holders for the body tubes. The larger tube with the CRs will be used to adapt the 29mm post to use with the 38mm MMT I'll be using on El Juan. A few #10 screws, washers, and wingnuts and I was done.

I'm sure it won't be quite as accurate as the $150+ aluminum one, but for $16, I'll make do.

If you decide to make your own, there are two critical parts/steps that really contribute to accuracy.

The first is to make sure the face of the fin holders are exactly 90º from the base. This is where you use the four corners that you trimmed off. The plywood manufactures cutting jigs/fixtures tend to be very accurate.

The second is to make sure you drill the center hole exactly square to the surface of your board. My drill press wouldn't reach the center of the board, so I glued two pieces of 3/4" ply together and drilled a hole through them on the drill press. I then used these as a drill guide to drill the center hole with my hand drill.

My advice would be, if you don't have an accurately aligned table saw and drill press, think twice before building a fixture. If you don't know what I mean by an "accurately aligned table saw and drill press" then you probably shouldn't attempt this.

Now for a few pics of the fixture.

Finalignmentjig001.jpg


a second pic

Finalignmentjig002.jpg


If you have any questions, let me know.
 
I got the fins finished.

I cut them out on the table saw and cut the 10º bevels with the router table.

The bevel turned out to be a lot easier then I expected. I just set the table saw to 10º and trimmed the edge of two pieces of plywood. Attached one to the other with a couple of screws and I was ready to go to the router.

Here's a pic of the fins cut out and ready to bevel

Fins.jpg


Here I'm beveling the edges of the fins.

Finscuttingbevel.jpg


Here you can see the beveling better. I put masking tape on each piece as I beveled it to keep the top layer from splintering. This helps a lot, but you do need to really burnish the tape onto the wood.

Finscuttingbevel2.jpg


The finished fins.

Finsbeveled.jpg


.
 
Thanks.... :)

Next I try out the fin mounting fixture:rolleyes: when I build the fin can. The Aerotech 38/720 motor is 13.205 inches long and will take loads up to J. I don't think I'll be doing a L2 with El Juan, but I plan to make the MMT 14" just in case.

Anyway, that's next up.
 
It's a good idea. I changed the MMT in my Expediter from the 10" one to 24". It will make it easier for the ejection charge to work.
 
Well between the curtain rods, door knobs and other assorted things on the honeydo list, I managed to get the fin can started.

I cut the MMT to 14" and glued the fins to it. Still need fillets but here are a couple of pics.

Finsinfixture01.jpg


Finsinfixture02.jpg


Guess I need to get a few more of the clothespin clamps. The C-clamps work OK, but they're a PIA in this case.
 
Here's a few more pics.

Got the fin can glued up. I don't have enough space for an eye bolt for recovery attachment, so I'm going to JB Weld 1/16" steel cable to the fin can and quick link the shock cord to that.

I will also JB Weld two #10 - 24 hex coupler to use for motor retention. pics will follow.

Here it is so far.

FinCan.jpg


.
 
I got my altimeter from Whatsuphobbies. It took the full 14 days to arrive, but that's OK. It's not like I was waiting on it to fly this.

I started assembly of the electronics bay. Here it is without the electronics or outer tube.

EBay.jpg


.
 
Well, I got the e bay built.

This pic is the screw terminals that go on the end caps for the ejection charges to connect to. I drilled small dimples in the edge of the terminals for the JB Weld to get a good grip on. I soldered the wires to the pins. The wires were feed through small holes in the cap and the screw terminals was JB Welded to the end caps.

EBayterminals.jpg


This next pic is the e bay with the altimeter installed and the ejection charge terminals connected to the altimeter. The wires are extra long so I can feed them through the bay and connect them before assembling everything. I guess I'll only need to have one end long, but...

EBayelectronics.jpg


This is the battery and switch side of the e bay. I used the same switch setup that the manual suggested. I think it will work quite well. the outer tube of the e bay is behind the innerds. You can see the hole for the switch pin to go in. Now all I need is a "Remove Before Flight" ribbon.

EBaybatteryandswitch.jpg
 
Got more done. I didn't expect to be able to fly this weekend. Now it looks like I'll be able to. So I'm trying to get to the point I can do a test flight with El Juan on a G64.

I haven't done a final weigh in, but it looks like the whole thing should come in at about 2lbs, 4oz when ready to fly. Of course thats with a single chute and no motor. Might have to get a G80. Guess it will depend on rod length, wind conditions and the RSO.

Anyway, here's some pics. I got the fin can done and in the lower BT. I went with the same two piece 1/4" launch lugs setup that has worked so well on my Calisto. Since this was build around a 38mm MMT, I also build a 29mm to 38mm adapter for the test flights.

Here's the adapter. I still need to notch the thrust ring to clear the screws on the motor retainer. The brown on the top of the tube is two layer of craft paper to build up the OD of the 29mm MMT I used. I used a 1 1/4" forstner bit to drill the center hole in the thrust ring. It is just a smidge too big.
29to38mmadapter.jpg


Here's the lower BT with the launch lugs drying. I used a 1/4" rod taped to the BT to hold everything in place while the glue set up.
Launchlugs.jpg


Finally, here's a shot of the business end. I used JB Weld to put two threaded hex coupler in the slots the fins slid into when everything was assembled. It's a little hard to see, but they will be what the motor retainer screws will screw into.
Fincanmotorretainer.jpg


.
 
I've been working on the rocket once in a while lately. Most of it involved ground testing the altimeter. No pics of that.

I also added some rail guide opposite of the launch lugs. I may take the lugs off later, but for now they can stay. I did have some pics of that.

lugsandraillugs.jpg


launchraillugsinstalled.jpg


.
 
The maiden flight!!!

My son and I went to the Vikings Rocket Society launch at Pole Green Park near Richmond today. I launched the El Juan on a G64 for it maiden flight.

The folks at Viking are great! If you ever get a chance to launch with them, by all means, don't miss the chance.

I had simmed El Juan out at 559 ft. but only got 462 ft on the altimeter. Guess I'll have to up the cd some.

Here's some pics.

The Proud Rocketeer (obligatory pic)

L1andMe.jpg


Loading the Rail. This is my first rocket that uses a rail instead of a rod.

L1loadingonrail.jpg


Another Proud Rocketeer (2nd obligatory pic)

L1andMe2.jpg


On the pad. I'll only post 1 of the 3 I got and I won't go into why I got 3 pics.

L1onPad02.jpg


The launch. A little blurry????

L1launch.jpg


The laundry is out. Again, a little blurry.

L1laundry.jpg


Back safe and sound.

L1landing02.jpg


The flight went great. It got up to 462 ft. Opened at apogee and started to drop, no drouge chute. At 400 ft the main chute came and opened perfectly. It was breezy but the El Juan landed less then 100 yard from the pad.

The folks at Viking seemed quite impressed with the flight and I got a lot of congratulations. I'm not sure the flight was that impressive, but as I said before, the folks at Viking are great. They sure made me feel glad to be there.
 
Had to paint El Juan before doing the cert flight. Can't certify naked:D

Unfortunatly, there's a state wide burn ban on in VA due to the drought and today's launch was cancelled. :cry::cry::cry: No cert flight today!:mad:

Guess I'll have to do my rain dance and hope for next month.

Anyway, here's the pic of El Juan all painted up in the pattern my daughter chose and the colors my wife picked out.

L1paint001.jpg
 
Anyway, here's the pic of El Juan all painted up in the pattern my daughter chose and the colors my wife picked out.

L1paint001.jpg


Most excellent. :cool:

Look at the bright side. Having been rained out of an anticipated cert weekend too, now you have another month to display your nicely finished rocket before it starts to earn "battle stripes."

Having your daughter devise the scheme and your wife pick the colors makes it that much better, eh?
 

Latest posts

Back
Top