Dr. Zooch Atlas-Agena

The Rocketry Forum

Help Support The Rocketry Forum:

This site may earn a commission from merchant affiliate links, including eBay, Amazon, and others.

luke strawwalker

Well-Known Member
Joined
Jan 18, 2009
Messages
9,147
Reaction score
40
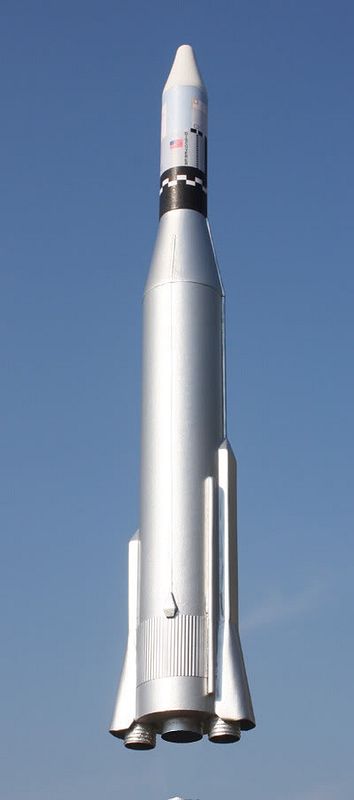
Started my next build last night-- the Dr. Zooch Atlas-Agena. This is a pretty cool looking BT-60 based kit with a BT-50 serving duty as the Agena upperstage. The kit consists of said tubes, along with a BT-20 motor mount tube and associated hardware, a BT-5 "engine spoof" tube for the outboard engines of the Atlas booster (and also serve to hold the flame fins for stability in flight), three centering rings, a balsa transition for the conical upper section of the Atlas to which the Agena is mated, and a balsa nosecone for the Agena, parachute, balsa sheet, the usual signature Dr. Zooch smart-aleck instructions, and a wrap/pattern sheet for the Agena wrap, flame fin pattern, centering ring cutout patterns, side-pod patterns for the Atlas booster engines, and various other paper stuff.

So, lets get started. The kit starts off with the motor mount. Get two of the three centering rings from the box and the wrap sheet, and with a sharp hobby knife, carefully cut out the two centering ring cutout patterns. Smear a light coat of white glue onto the centering rings, and carefully glue the patterns onto the centering rings, press firmly to set them, and put them aside to dry. Take the BT-5 "engine spoof tube" from the kit (be sure and double-check the lengths as there are SEVERAL short tubes in the kit of differing diameters that are fairly close in size, so make sure you've got the right one) and measure, mark, and cut it in half. Wrap a strip of paper around the spoof tubes and mark a line around the tube 1/2 inch from the rear ends of the tubes. Get the "poly coated popeilium" shroud line material from the box and cut two nine inch sections off it, and using a dab of yellow glue, glue them onto the rear end of the engine spoof tubes just below the line. Set aside to dry. Once dry, smear some wood glue around the end of the engine spoof tubes, and carefully wind the string around them to make the engine 'hatbands'. Straighten up any misalignments of the strings, and smear a little more glue over them, and set aside to dry. I found that clamping the end of the string down with a hemostat clamp REALLY helps them stay put during drying. Cut the half-moon sections out of the sides of both the centering rings per the instructions, and carefully trim any overhang of the glued-on pattern to the exact outside and inside diameters of the centering rings so they don't interfere with the rings going over the motor mount tube or into the main body tube. Take the main motor mount tube and using a brass angle (or door frame) put a pencil line down the side of the motor tube. I also wrapped a strip of paper around the motor tube, marked it, measured it to get the circumference, and halved that to put another DOTTED line on the exact opposite side of the tube, to help align the motor clip later on when it's installed. (That step isn't in the instructions but it helps me anyway). I also wrapped the strip of paper around the motor mount tube and marked a ring around the tube at 1/4 inch and 1 1/4 inch to help get the centering rings squared up properly to the motor tube. Install the two centering rings and CAREFULLY align the index marks on BOTH of them to the line previously marked on the motor mount tube. Make DOUBLE SURE both rings are perfectly aligned with the vertical index line on the motor tube and as square as you can get them (aligned with the rings drawn around the motor tube). Set this aside to dry. Once dry, fillet the rings. Measure and cut the slit for the motor hook per the instructions. Cut the 'reinforcement band' from the wrap sheet, spread a little white glue on the back, and glue the band directly below the hook slit in the motor tube. Glue in the engine block ring above the hook. Glue on the top centering ring near the top of the motor mount tube.

I deviated a little bit from the instructions and went ahead and installed the motor hook and taped it down with electrical tape before gluing on the side booster engine spoof tubes. I figured this would be a lot easier than trying to thread sticky electrical tape between them to hold the engine hook on after they were glued in place. Then, after marking another ring line around the tubes with the handy paper strip to give the proper 9/16 inch overhang of the spoof tubes, I sanded off the glassine to roughen the tube for a good glue bond, then I carefully test fitted them, trimmed any tight spots in the ring cutouts, and carefully glued the spoof tubes to the outsides of the centering rings per the instructions with white glue. This completes the motor mount with the two outboard booster engine 'spoofs' which also hold the flame fins for flight.

Meanwhile, I also went ahead and hardened the balsa nosecone and transition with CA glue, and sanded them down smooth, went over them with a coat of thinned Elmer's wood filler, and sanded them down smooth, and primed them. I also filled the spirals on the main body tube with Elmer's filler, and sanded it down and primed it. They're drying now.

Here's the pics of the motor mount... more to come! OL JR :)

DSCF0001.jpg

DSCF0002.jpg

DSCF0003.jpg
 
Ok... as you might guess this is a realtime build thread, unlike my last two (Zooch Saturn V and Titan III MOL) where I built the rocket on vacation and posted the threads after the fact all at once.

After a few hours in the 95 degree + Texas heat, the primer had cured enough for sanding (without clogging the paper TOO badly anyway) so I started sanding the tube, transition, and nosecone. After going over them with 220 grit to get rid of a lot of the primer and level the surface, I switched over to 600 and damp sanded to take them down glass smooth. Sighting down the parts and watching the sunlight reflection off the surface highlighted a few imperfections that were quickly sanded out. Satisfied the tube and cones were smooth, I moved back to the work table.

The instructions call for aligning the tube over a BT-60 sized marking guide on the wrap sheet with a pair of arrows on either side, which are guides for marking the tube for the cutouts for the spoof engine tubes. I carefully aligned the tube over the guide, and found that the ring was completely obscured by the tube, so I drew a circle around it to make sure I had the tube centered. I found out I was off a bit to one side, so I moved the tube over a bit accordingly. I then marked the tube base at the arrows' indicated spots, used my handy aluminum angle (or doorjamb) and put two 1 5/8 inch lines from the marks vertically up the tube on both sides. Next, after wrapping a strip of paper around the tube and taping it to itself to form a sleeve, I aligned that precisely 1 5/8 inches from the tube base, and connected the two vertical lines on either side. This outlines the portion of the tube that must be cut away on both sides to allow the spoof tubes to stick out and the motor mount to slide into the rocket. Using the sleeve as a guide, I carefully scribed the tube with a sharp hobby knife to slice through the top of the cutout, and then using the aluminum angle for a guide, I cut the vertical lines by scribing several times with the knife. Be careful cutting the second one, as the tube gets a bit flimsy under the pressure of the knife, and using either a BT-60 coupler or an old nosecone or something similar to help beef up the tube for cutting is probably a good idea.

Once these cutouts are removed, carefully test fit the motor mount into the body tube, and ensure it can slide up into the tube freely until the spoof tubes bottom out against the body tube at the top of the cutouts. Once everything is fitted up properly, you can remove the mount, spread some white or yellow glue inside the tube above the cutouts, and reinstall the motor mount. I went a bit further than the instructions, in that I used white glue instead of yellow, installed the mount about 3/4 of the way, then dribbled a bit of white glue in around the motor mount inside the main tube between the cutouts for the middle centering ring to glue up to the tube with. Work quickly so the glue doesn't grab (I wouldn't try this with yellow glue-- it grabs pretty quick and REALLY hard!) and then push the motor mount in until fully seated.

I also deviated a little in the instructions in that, since there is kevlar line in the kit for a shock cord mount, I decided to go ahead and make a harness of it and install it over the motor mount. I tied a surgeon's knot on one end for the recovery system, and a slip-loop over the other with a surgeon's knot to slip over and tighten up around the motor mount, and then notched the top centering ring near the outside for the harness to go through. Then I fed the top part of the line (recovery loop) down through and out the bottom of the motor tube, slipped the top over the top centering ring, and tightened it up snugly around the motor tube, and fed the line through the centering ring notch. I could then hold the line tight as I installed the motor mount into the rocket by pulling on the loop sticking out the bottom of the mount. Once dried the harness loop can be pushed back up through the motor mount into the body tube, eliminating the trifold shock cord mount.

Here's the pics... more to come... :) OL JR :)

atlasparts1.jpg

atlasparts2.jpg

atlasparts3.jpg

atlasbuildbase.jpg
 
Let's see...

Next up in the build we start doing detail parts. First cut out four strips from the balsa stock-- two are 4 inches long and two are 2 5/8 inches long, all 9/16 inch wide. Lucky for me I bought a strip cutter from the hobby shop awhile back, so this was the perfect use for it. I installed a blade, dialed in 9/16 inch width, and zipped off the four strips-- sure beats lining up the steel ruler and cutting them with the hobby knife! Anyway, the two long strips are glued sandwiched together, and the two short strips as well. Once the wood glue was applied and some small clamps locked on, I set them aside to dry.

Next we cut out the engine heat shield patterns from the wrap sheet. Using a dab of white glue spread on some extra balsa, these are then glued to the balsa to strengthen it up and form patterns for cutting the balsa out later. Set these aside to dry. Once dry, cut them out carefully, sand them down to conform to the paper pattern, stack and sand them a tiny bit to make them near identical, and then using a piece of sandpaper wrapped around a pencil, carefully sand out the inside radius so they will fit snugly over the BT-5 spoof tubes sticking out from the motor mount. Test fit and sand til they conform neatly.

Returning to the now dry sandwiched strips, (hmmmm... sandwich... :) ) take the body tube and wrap a piece of 220 grit around it and holding the strips aligned lengthwise down the tube, start sanding them to the contour of the tube. I used a spare BT-60 for this to prevent dinging the fininsh on my kit BT-60. Once you have them sanded to contour, test fit them to see how well they match the tube. I found that they wouldn't QUITE lay flat against the tube on both sides-- I guess they 'rock' a little while sanding, so I wrapped a strip of sandpaper over the tip of my finger and carefully sanded down the center of the concave on each strip to make it SLIGHTLY deeper, allowing the edges to neatly contact the tube while still touching the surface of the tube across the concave surface... in other words, don't sand a deep groove; less is more here... :) Anyway, once these were test fitted to my satisfaction, I then measured down 1/2 inch on each side of the strip and marked, and marked the center of the end of each strip, and then using the steel rule, carefully cut each strip to a triangular point. Invert the strip and sand the triangular end down to a point that will lie against the surface of the tube, then round the edges off very carefully with the sandpaper so they are all neatly radiused over from the tip to the flat opposite end. Rounding over the pointed end is sorta like sharpening a pencil with a piece of sandpaper, so take your time and work slowly so you get a nice even radius that blends to the rounded over edges of the rest of the part. Once you've got it all smooth and rounded over, test fit again to make sure everything fits smoothly, and you're done. I decided to go ahead and harden these balsa parts with CA glue and then sand the CA down smooth, and brush on a coat of thinned Elmer's filler so they're won't be any unsightly wood grain showing.

We move onto cutting out the paper engine lower fairings from the wrap sheet with the knife and ruler. These are then CAREFULLY curled to shape. I started by using a spare peice of 1/8 inch rod about a foot long that I have on the workbench for aligning two-piece launch lugs (to ensure they don't bind on the rod). Taking the rod, I aligned it carefully with the dotted line printed on the wrap and then slowly rolled the cardstock over into a "U" shape, which then opened back up into a rounded "L" as it should be. Fold both sides in carefully to make the whole fairing into a flat bottomed "U" shape, and then using a small marker, I rolled the fairing around it to make it a more rounded "U" shape which will conform to the heat shields cut out of the balss stock previously. These will then all be test fitted together before gluing them up.

Here's some pics... back to work! OL JR :)

atlasfairingparts.jpg

atlasfairingparts2.jpg

fairingmockup.jpg

fairingfiller.jpg

fairingheatshields.jpg
 
Ok... now that the 'family stuff' is caught up for awhile (like parent's 40th anniversary, church, family dinner, swim lessons, etc) I can get back to it...

After the engine fairings are glued to their bottom heatshields, cut a few thin (bout 1/16 by 1/16 strips from the balsa stock, about 1 inch long) and glue them inside the fairings to stiffen them up. The one that goes in the bottom of the "U" shaped fairing should really be cut down to half thickness so it doesn't have to be trimmed down later, as it will have to be trimmed to fit over the BT-5 spoof tubes. I guess I should mention that there is no EXACT spot given on the fairings or in the instructions for where the heatshields should be glued as they are sorta 'custom fit' to your particular kit as it goes together. Looking in my handy "Rockets of the World 4" the Atlas had it's fairings for the outer engines hanging down 14 inches below the end of the main body cylinder, so that equates to a little less than 1/4 inch in this kit. I found I could JUST get the overlap needed on the balsa upper fairings and get roughly 1/4 inch overhang at the bottom, so I marked the heatshields' outline inside the fairing with a pencil while holding it all together mocked up, so I'd have a line to glue the heatshields to. Worked pretty well. Once all this is dry, test fit the fairings to the spoof tubes and trim as necessary to get everything to fit nicely. You may have to trim some off the "U-bottom" reinforcement balsa stick to get the fairings to lay down properly, which is a lot easier before they're glued inside the fairing. A little sandpaper and some careful work (or better yet a sanding stick) will do the job with a bit of patience. I found that when gluing the fairings to the upper balsa fairings, that a scrap peice of the 9/16 balsa strip from which the upper fairings are made and a rubber band REALLY HELPS get the top of the fairing to stay put while the glue sets up. I used a couple scrap pieces of balsa and a clamp to hold the sides of the fairing against the upper balsa fairings while the glue set. After it's all dry, you can fillet the fairings and toughen them up with either CA or white glue.

Once the fairings are done and the glue is all dried, obtain the mylar corrugated wrap material from the kit, carefully unroll it, and using your steel ruler and hobby knife, trim it to exactly 1 1/8 inches wide along the whole length as per the instructions. Measure up 5/8 inch from the bottom of the body tube and make a few marks to guide you in putting the corrugations on straight. Carefully lay the corrugation strip on the body and using a fingernail or well rounded pencil (or something similar) gently crease the mylar into the root edge between the fairing and body tube, so you get a trapezoidal shape outline of the corrugation section. Carefully cut it out (I'd cut it a bit oversize since holding the curl-prone mylar still against the tube while outlining both sides is a difficult proposition akin to herding cats through a dog pound) and trim it down to a precise fit. Once fitted, apply white glue to the body tube and glue it down securely. Repeat on the other side.

Next is more details... and be relaxed and take your time. Some of these parts are SMALL!! Start by cutting out two elongated diamond shapes approximately 1/4 inch wide by 1/2 inch long from the balsa sheet-- these are the "vernier engines" of the Atlas. These are then further cut down into a wedge shape on both ends-- a long wedge on the long end meeting a short wedge on the short end. You can sand these to shape, or if you're handy with your hobby knife (and VERY careful!) you can whittle them down to shape. These get glued on just above the corrugated wraps, centered between the fairings. This is where the strip cutter REALLY came in handy! (All this CAN be done with a metal ruler and hobby knife but is a LOT quicker and easier with a cheap balsa stripper from the hobby shop) First, cut a 1/16 inch strip 11 inches long off the edge of the wrap sheet-- these are cable trays or tunnels of some type on the booster. Eight inches of this strip is glued on above one vernier, and the remaining 3 inches is glued above the other vernier on the opposite side. Somehow I missed this step in the text and put a full 8 inch line on BOTH sides-- oh well, now I have the rare "double line version" of Atlas... (grins) Next we cut a 1/8 strip of balsa off the edge of the balsa sheet, and roll it over and cut it in half again to get an 'ultra-thin stick'. This is then SANDED down into an inverted "U" shape to form a tunnel that runs the length of the Altas from the tip of the longest fairing, up the side of the rocket, up the conical transition, and up the side of the Agena about 1/2 an inch. Once this strip is cut and sanded to shape, glue it on in stages so you can get it straight and cut it at the appropriate locations (and hopefully don't snap it in the process-- it's a VERY LONG and VERY THIN part!!! It DOES look pretty sharp though when installed!

There is another dowel approximately 1/8 inch diameter by about 6 inches long, which represents a vent line or something on the Atlas-- round the end over to one side and glue it to the body next to the long fairing between the fairing and vernier engine per the instructions. Next, glue the launch lug on the opposite side of the rocket from this vent line. I split my lug and tapered the ends to make it look better. Fillet the launch lug and she's ready to prime. Since the BT-50 Agena gets a wrap, I cut a little piece of spare BT-50 to hold the nosecone on the transition for priming. Cut the wrap for the Agena from the wrap sheet, precurl, apply white glue around the edges, and roll it onto the BT-50 aligned with the vertical line you've drawn on the tube.

Here's a few pics... more later! OL JR :)

fairing1.jpg

fairing2.jpg

primer1.jpg

primer2.jpg

primer3.jpg
 
So, now that she's primed and needs awhile for the primer to harden up (and probably a little bit of red dent-n-ding stuff to fill a few spots in the paper fairings) I moved on to the flame fins. Included in the kit is a long piece of BT-3 which is halved, and the 6 flame fins are cut from the balsa sheet using the pattern cut from the wrap sheet. Once the 6 fins are cut and stack-sanded, they're ready to glue to the flame fin tubes. They are glued to the tubes to make a 90 degree "T" shape, like a four finned rocket missing one fin. I wrapped a piece of paper around the tube and marked where the end overlapped, then laid it out flat and measured it to get the circumference, and divided that by four to get the fin spacing and marked that on the paper, and wrapped it around the tubes again and marked the fin locations, and put fin lines on the tubes with a handy brass angle. Using the double-glue joints and an egg crate to hold the fins while the glue tacked up, I installed the fins and then set them aside to dry. Later I installed the two BT-3 to BT-5 centering rings that hold the flame fins in the engine spoof tubes for flight. Once installed, I hardened the balsa fins with CA glue and sanded them down fairly smooth, and then after taping off the centering rings to prevent overspray, I painted the flamefins sun yellow.

Here's a few extra shots while I wait for the primer on the body to dry... :)

Later! OL JR :)

ff1.jpg

corrugation.jpg

detail.jpg

primer4.jpg

primersky.jpg
 
That's coming along very nicely. I had fun building the beta version of this... and it went together rather quickly if I recall. The little detail bits make all the difference on this. I'm still looking forward to seeing a Mercury version. I'd probably get a few dozen more gray hairs building the tower, so maybe it's just as well.:eyepop:

Zooch-Atlas-Agena-2.jpg


Here's one right at apogee...

Agenacoast.jpg


I still need to rebuild the fins on mine. I flew it a NARAM last year and the flame fins rotated such that both sets of fins were in the direct path of the motor exhaust during the boost. Charred them up pretty good. On a positive note, the rocket remained stable the entire flight. Next time, I'll make sure those rings are nice and snug and have no chance of turning.
 
Great little thread. Perfect timing too, I'm probably going to start mine this week (picked it up at LDRS).
 
That's coming along very nicely. I had fun building the beta version of this... and it went together rather quickly if I recall. The little detail bits make all the difference on this. I'm still looking forward to seeing a Mercury version. I'd probably get a few dozen more gray hairs building the tower, so maybe it's just as well.:eyepop:

Zooch-Atlas-Agena-2.jpg


Here's one right at apogee...

Agenacoast.jpg


I still need to rebuild the fins on mine. I flew it a NARAM last year and the flame fins rotated such that both sets of fins were in the direct path of the motor exhaust during the boost. Charred them up pretty good. On a positive note, the rocket remained stable the entire flight. Next time, I'll make sure those rings are nice and snug and have no chance of turning.

Oh, man, that's AWESOME looking foose! Maybe one day I'll be as good as you... :)

What kind of paint did you use on it?? I have a can of Rustoleum Chrome here I was thinking of using. I think I'm gonna paint the upper half white like the instructions indicate since it's supposed to be "frosted over" when it flies... I know that I can't expect the chrome to actually shine like chrome but the only other thing I saw was a "metallic" finish like a silver automotive metallic (Rustoleum brand but I didn't think the 'metal flake' looked right.)
Just curious what you used there, foose...

I'm kinda thinking of a plug in 'Centaur' for this kit... it would look great and shouldn't be TOO difficult to do.

More to come... I did a little filling and sanding on the fairings and then a light reprime. Looking good so far... :)

L8er... OL JR :)

Thanks, but I think your already there. I've had mixed results when using chrome paint so I generally tend to avoid it, but that's really what it needs for the mid section(white or chrome for the upper Atlas section). I didn't want to have to sand and paint it all over again if the chrome paint didn't cooperate. Also, it takes a long while for that stuff to dry.

I have some chrome trim monokote that I have set aside for projects such as this, but since this was a beta build, I needed to get it done quickly and more or less stick to the instructions(even though I didn't simulate the frost).

Nah, in the interest of time I sprayed the Atlas with Krylon silver and coated with future. Done. If we are lucky enough to see a Mercury version, I'll probably spend more time on paint and/or monkote detailing on that one.


Trim monokote would be REALLY make this rocket POP! but man would it ever be a big job! (if you were cutting the parts to simulate the panel lines of the original Atlas anyway... wouldn't be a small job even if you werent... covering the compound curves and intersections of those Atlas fairings and stuff would be a BIG pain!) How is the Estes Mercury Atlas finished??

I've already thought of two great upgrades based on this kit and my ROTW book-- using some of the stuff I've learned to do a BT-80 or BT-101 upscale, and it wouldn't take a whole lot of work to do a Centaur upperstage for this BT-60 based kit and it would look awesome... Main thing is the nosecone. Anybody know if Semroc (or any other vendors) sell a simple cone of the correct proportions that could have the tip rounded off for a Centaur-- I figure it should be a BT-60 straight cone about 2.656 inches long with the tip rounded over to about .200 inch radius (little less than 1/4 inch). I COULD turn my own (if I have to) but I'd rather use off-the-shelf if I can-- and I can't really afford having one custom turned.

The other thing I've thought about doing is getting another kit and setting it up as an Atlas ICBM with the standard white RV like those used on the Titan I's. That would look pretty cool, especially in a semi-scale functional coffin launcher!

Later... gotta go paint... :) OL JR :)


Heck, the Centaur would be easy. Why not roll a nose cone with cardstock since it's only a BT60? Just use a program like rocksim or one of those other computer widgets to create a cone, only you'd actually be making a transition-like shroud with a small opening at the top. Soak with CA(and you do that step anyway with balsa;)). Then, use an appropriately sized, rounded off, piece of a dowel to plug the hole in the top of the transition(cone). Add a little FNF and then sanding to make a smooth transition from the cardstock lip to the dowel. Use a BT60 coupler(or make one from a piece of BT60) and use that as the cone's base. Might sound like a lot of work, but really, it wouldn't take that long and would be extremely cost effective.

As for using monokote to cover this thing- it might take a little time but I think the results would be worth it. The key would be to make some templates beforehand and use a sharp xacto.
 
Last edited:
Well, I just might change plans in midstream here... that chrome paint DOES go on kinda funky! It's not like regular spray paint at all. First thing I noticed, since I tend to spray with a rather fast but a little closer to the subject than most folks do, is that it goes on HEAVY. I ALMOST had a run but managed to save it (thankfully I have the rocket mounted on a highly technical painting tool which consists of an old round curtain rod with an expended 18 mm engine case glued to the end of it). I managed to prevent the run from developing by turning the rocket like a glassblower would a gather on his blowpipe until the paint tacked up. I put on a second coat after about 15 minutes (like I usually do) and this time virtually 'cropdusted' the stuff on, WHIPPING the can past the rocket as I painted. I tried "backing off" from the rocket a bit but the stuff ends up going on like a dry spray and doesn't even out very well. I had to let it tack up and do a few passes a little closer to the 'dry spray' areas to get them to flow out and blend. The paint looks awful thick though. Seems like the "chrome" paints work by the metallic color "floating" to the top of the carrier, which is part of why it's SO difficult to get it to go on right. Additionally, I just did a little test by spray painting over part of the box I usually set nosecones and transitions on to paint with the chrome, and letting it dry about 45 minutes (in the 99 degree heat and strong wind outside) and then put a piece of masking tape over the chome (to simulate having to mask over the long fairing and the "vent line" head end on one side since the frost line extends below them but the DON'T frost over during fuelling) and then painting on the white above it to simulate the 'frost line' on the rocket. The white paint seems to 'float' on the chrome and after a 15-20 minute "tack up" when I touched one part of the white it simply lifted right off on my finger. NOT GOOD. SO, I may just leave the rocket completely chrome since it looks fairly good so far.

I know from reading these forums that folks really gripe about the problems with silver and chrome paint jobs; that they turn dull with handling and that using a clearcoat or Future over them causes them to go dull, stuff like that, so I KNEW I'd have my hands full... seems I was right.

Trim monokote, while being a project in itself, WOULD really be the only way to get a durable fine proper 'chrome' finish on these birds...

Here's some prelim pics...

Later! OL JR :)

PS. I may just try the transition nosecone idea you mentioned. I just usually stick to balsa for the added weight, which would devfinitely help with stability. But it wouldn't be too hard to 'weight up" a paper nosecone... :)

Atlaschrome1.jpg

altaschrome2.jpg

atlaschrome3.jpg

atlaschrome4.jpg

atlaschrome5.jpg
 
Last edited:
Okay, this paint is REALLY starting to tick me off...

I mentioned the difficulties in applying it in the post above. Well, that's just the start. Reading the can instructions, it says "dries in one hour, cured in 24 hours." Well, it's been 24 hours, with about 5 hours of that out in 99 degree heat and strong SW winds, and the rest overnight in the air conditioned house at 74 degrees, and the stuff ain't even close to hardened up. It's not wet, but it's soft as clay. I removed the nosecone from the top to paint it white. I gently scuffed it with a worn peice of 600 grit so the white would bond-- it sanded down fairly well, didn't clog the paper and gave off a bit of sanding dust, no problems right?? Wrong. Went outside to the end of the house out of the wind and shot on a couple thin coats of Walmart Colorplace Flat White and set in in the drying rack on the porch to dry. Went back 15 minutes later to dust on a second coat-- first one should have been well tacked up by then, but when I gingerly touched it, the white coat came off like a blister. I took it in the house and wiped off the white paint with a paper towel-- NO adhesion whatsoever. SO, with a messy nosecone with a little paper towel lint stuck to it from the gummy white paint, I got another paper towel and dipped the corner in paint thinner, and wiped the nosecone down. The remaining gummy white goo with paper towel fuzz AND the Chrome wiped off cleanly down the the primer. A bit of polishing and I was back to smooth primer like it wasn't ever even there. So, I moved the nosecone outside to dry in the sun/wind to get rid of any remaining paint thinner (the primer was still perfect, and the sanding "spots" where the red primer was peeking through the gray primer was still exactly like it was when I started, so the primer was unaffected by the thinner. It had an hour to dry, so I wiped it down with a clean rag and then shot a light coat of flat white over it and so far so good.

As I was working outside, I didn't realize the rocket had tipped a bit on it's "painting stick" and touched the chair it was standing on. I came back in and stood the rocket up straight, but the paint had a small 'flat spot' on it where it touched the chair, so I carefully removed it from the motor mount paint stick and found that I was embossing fingerprints all over it. NOT good. I quickly picked up a clean work rag and replaced the model on the paint stick in the motor mount, but then I had to carefully burnish out all the fingerprints from the paint job, and the flat spot. They pretty well came out but it changed the patina of the paint a little bit, making it look a touch more 'gray' than it was. I noticed that some color had rubbed off on the cloth as I polished the rocket out, which is probably why the color changed slightly. It still shines, but the paint is too 'soft' to do anything with the rocket. So, I figured, "Well, it must be the surface layer or the underlayers that aren't fully cured, and probably aren't curing properly in the house because of the A/C, so I'll put it in the truck in the 99 degree heat with the windows cracked so it's like 120 degrees in there and BAKE the paint on the rocket to toughen it up. I moved the rocket out to the truck, and went out and turned it on the paint stick every 15-20 minutes, and after an hour when I went to turn it I noticed a distinct "bubble" about 1/8 inch diameter on one balsa fairing. I took it inside and carefully punctured it with the hobby knife and using the flat side of the blade, carefully laid it back down onto the fairing and pressed it out, so it's barely visible. I guess I'll just have to leave the rocket sitting here for a week or so and see if the paint ever dries properly.

I'm doing a paint test on another piece of tube to see if I can put clearcoat over it or if it'll have the same issues as the white. I have some Rustoleum Clearcoat, same brand as the Chrome, but the Chrome instructions also say "clearcoats not recommended" so I don't hold high hopes.

SO, I guess I'm going to wait and see if this stuff will ever actually harden up enough to work with. In a week if it's still this soft impressionable crap that it is now, I'll probably just get a rag and some paint thinner and start cleaning it all off, which will be a job with the nooks and crannies of this model, and probably try some regular silver paint of some sort. Maybe that will work better.

The other alternative would be expensive and difficult but would look fantastic... bare metal foil. Embossing it onto the lower half of the rocket with the nooks and crannies of the propellant lines, fairings, and corrugations would be difficult though... :)

Oh well, live and learn. For now, I'd suggest NOT using Rustoleum Chrome Paint...

Why couldn't NASA have just painted their Atlases white and be done with it?? :rolleyes:

Later! OL JR :)
 
Wow! Great thread and great looking Atlas. Your paint job came out great, the surface looks like metal.
And you are right about chrome paint, it is a major headache. Spray too light it isn't chrome. Spray too heavy and it runs. Can't touch it, ever, or it clouds. Can't clear coat it or it clouds. And can't let it touch anything, ever, or the paint is damaged.
:bangbang:

Anyway, can't wait for the flight pics.
 
"I'll put it in the truck in the 99 degree heat with the windows cracked so it's like 120 degrees in there and BAKE the paint on the rocket to toughen it up."


LOL! :roll: Definately a backyard fixer-upper, engineer type, thinking outside the box. I like it, I like it! :rolleyes:

Note to my rocket guy, Layne-Not in MY truck though! Use your own!!

Trudy
PemTech's Art Department and saner half 50% of the time
 
Thanks Layne and Trudy...

I'm rapidly getting an education with this stuff, and I can say definitively, I DON'T LIKE IT!

I may try something different... I'm still thinking about it. Someone on YORF suggested trying Alclad II, but being a lacquer, I'd probably have to strip it down to the bare tube, so that's probably a no-go for this one... I may yet end up taking all the chrome off (it wiped off the nosecone with simple mineral spirits like it was never there, right down to primer which was completely unhurt) and go with either plain silver (how does clear/Future go over that?? Anybody know?) or Bare Metal Foil... with the white upper part of the rocket to simulate the frost, that might not be too bad. Don't know how durable it is for a flying model though... Just thought of that.

The "bake it on" idea didn't last long-- too much heat I suppose created a bubble on the short fairing, which I then had to carefully prick and press back down with the hobby knife. It's not too bad but bad enough...

That Chrome paint IS some tricky stuff, read my post above.

I'm not sure what I'm going to do with it right now. I think I'm going to play a waiting game.

One thing IS for sure-- White paint is NOT going to go over that stuff worth a tinker's darn, at least not anytime soon. And probably to get it to adhere at all even if the paint DOES harden up well in a few days or week or so, it'll probably have to be tooth-sanded with some 600 grit so the white can 'grab' it.

I thought about the white base coat idea first, but wanted any 'paint line' from the white to be above the chrome, so it looked more like frost over the top of the steel rocket underneath. Bad idea. I didn't think about it at the time, but the masking tape would probably screw up the patina of the chrome, since from what I've read even going over Chrome paint with Future or clearcoat will dull it down to a plain aluminum silver look. Given how "soft" the surface is, the masking tape would leave horrible "prints" in/on the paint and ruin it, so that idea is out, at least for now. The nosecone wiped clean and is halfway painted right now, first two light coats are on and I need to go put a couple more light coats on it and let it dry. I was just amazed at how the Chrome wiped off with the white goo after 24 hours of drying time. And this was just plain mineral spirits paint thinner, NOT lacquer thinner or any type of "hot" paint thinner, either, and it had NO visible effect on the primer coats underneath, even with considerable 'rubbing' to make sure all the chrome crap and white goo was completely cleaned off.

The tube for the Agena is already had it's wrap applied and is sitting on the table. It went on pretty well-- I had a TINY sliver of a gap at one end for some reason, but some prodigiously careful work with a sharpie fixed that up so it's not noticeable. I cut a scrap piece of BT-50 about two inches long to cover the shoulders of the transition and nosecone for painting. I did that on purpose so 1) the shoulders wouldn't get a coat of paint on them making them not fit the tubes without sanding the paint off them, and 2) to use the nosecone and tube piece as 'test subjects' for the white paint coat on top. I'm sure glad that I did it that way, because as I said the white won't stick to the Chrome and I had to use paint thinner to clean all the mess off down to bare primer. Luckily it was just the nosecone and NOT the entire rocket, or I'd be cleaning for the next four hours at least I switched the nose over to another piece of spare BT-50 before I painted it, so I still have the 2 inch Chrome piece for doing a clearcoat experiment later. I also shot a piece of BT-70 with chrome awhile ago to see if clearcoat can be applied over it worth a darn, but that'll have to dry until AT LEAST tomorrow before I can try. I may try on the short piece here in a bit.

There's gotta be a better way... OL JR
 
Wow! Great thread and great looking Atlas. Your paint job came out great, the surface looks like metal.
And you are right about chrome paint, it is a major headache. Spray too light it isn't chrome. Spray too heavy and it runs. Can't touch it, ever, or it clouds. Can't clear coat it or it clouds. And can't let it touch anything, ever, or the paint is damaged.
:bangbang:

Anyway, can't wait for the flight pics.

Hey Layne, what do you use on your Space Ark Junior?? I saw that one at NSL 2007 in Muncie and thought it looked GREAT!

Later! OL JR :)
 
Well, I just tried Colorplace clear over the little chromed piece of BT-50 that I swapped off the nosecone before painting it white. The clear turned it flat silvery-gray. Doesn't even look like the same color. It's drying outside now and we'll see what it looks like after it dries.

The second coat of flat white W/M paint went on the nosecone and it looks great. It's out drying in the wind and heat right now.

More later! OL JR
 
Ok I'm gonna try a few pics to see if what I'm talking about can be shown... given the subtleties and the limitations of cameras (either film or digital) I'm not sure if this is gonna show up right or not. But, here goes...

First pic is the "bubble" that came up while drying in the truck. I carefully pierced it with the tip of the hobby knife, and pressed it back down with the knife side.

Second pic and espeically the third pic show the difference in patina since I had to polish out the fingerprints and stuff... it's slightly darker than it was before. The third pic really shows this, as there is a slight "camera artifact" on the fairing and stuff that looks somewhat gray-- this is a little closer to the actual color than the bright chrome finish visible in the light-- not that it's that pronounced, as the eye sees things with much better clarity than a digital camera, but you get the overall effect. I polished the whole rocket down so the patina would match pretty much all over...

The fourth pic and fifth pics are the 2 inch BT-50 tube section painted with the rocket, which has been clearcoated with W/M Colorplace clearcoat. It went on a bit milky but dried clear, but the Chrome underneath has turned a VERY dull gray metallic color... My guess is is has something to do with the light-scattering properties of the chrome paint, and the clearcoat affects this like water in a glass refracting light to make a straight straw look bent.

OL JR :)

DSCF0002.jpg

DSCF0003.jpg

DSCF0004.jpg

DSCF0005.jpg

DSCF0006.jpg
 
Last edited:
Here's a pic of the finished Agena and nosecone. The nosecone turned out fine with the W/M flat white paint, and I hand painted the nosecap black with Testor's flat black, which wasn't even dry yet. I put the nosecone on the Agena and she's set aside to dry.

OL JR :)

DSCF0007.jpg
 
Hey Layne, what do you use on your Space Ark Junior?? I saw that one at NSL 2007 in Muncie and thought it looked GREAT!
)

Thanks!
I use Dutch Boy Chrome, but it is as "difficult" as all other chrome paints I have tried. My secret recipe for good looking chrome paint?
Repaint the little #*%^! before every event and transport it so that nothing touches the paint in transit. It will look good for a couple of days but then gets all dull and milky. At NSL2007 Sandman told me about Duplico paints, and claimed the silver would resist smudging and it would take a clear coat. Haven't had a chance to test them yet, but you may be willing to try.

Duplico?? Haven't heard of that one... are you talking about DUPLICOLOR?? The auto supplies sell duplicolor, and I bet they have a chrome for touching up bumpers or something. Duplicolor is lacquer, and toejrb over on YORF suggested Alclad lacquer metallics-- he swears by them and he has had some nice results:
https://www.alclad2.com/alclad-home.html
https://www.swannysmodels.com/Alclad.html
https://forums.rocketshoppe.com/showthread.php?t=5483
https://forums.rocketshoppe.com/showthread.php?p=73388#post73388

He discusses it in detail in reply #12 here:
https://forums.rocketshoppe.com/showthread.php?t=5647&page=2

Sounds like pretty good stuff, as the pics on the webpage show, but it is a lacquer and having already applied regular walmart cheapy enamel primers, I'm not sure how it'd react.

If I had it to do over, I'd definitely either try duplicolor or the alclad... :)
Thanks again Layne and hope you're recovering well... at least you have a handy medical professional there to give you backrubs when you need them :D

Later! OL JR :)
 
Duplico?? Haven't heard of that one... are you talking about DUPLICOLOR?? :)


YES!
That is it...Guess I didn't gt al th leters typd ot...


Thanks again Layne and hope you're recovering well... at least you have a handy medical professional there to give you backrubs when you need them :D


You are welcome....
And I will be sure to inform Trudy of your medical recommendation.
;)
 
Last edited:
Great looking build JR:
I feel your pain concerning "Chrome Paints". Been Trying for years to find a "Chrome" Paint that can retain is shine. With the possible exception of Alsa Chrome system, I don't believe it exists:(
About a year ago I want through exactly the same thing your doing JR. with my mini-dead ringer... NOT the same model as Fiskits deadringer. it looks great but ya STILL can't touch it after a YEAR Plus. Nor have any of us found a clear that doesn't grey these spary on chrome products. I'm sure if you do a search in TRF-1 you'd find the thread. don't know if I tried the Wrong Duplicolor Chrome or not but the stuff I got greyed as soon as any clear coat touched it:(

I thought about going the bare metal foil route also but the expense turned me away. It'd be very kewl, but I just couldn't spend the dough.

My suggestion is to go with a standard metallic silver, and frost the tanks flat clear over white. That's what I did on my Scratch built BT-60 Mercury-Atlas some years ago.
I also built add-on Agena & Centaur upper stages for my model but they are still sitting in a box waiting to be Painted and detailed. BT-60 is a Nice size for these models..1:73.3 Scale

139a4_Merc-Atlas_3pic pg (300dpi)_05-30-93.jpg
 
Last edited:
Great looking build JR:
I feel your pain concerning "Chrome Paints". Been Trying for years to find a "Chrome" Paint that can retain is shine. With the possible exception of Alsa Chrome system, I don't believe it exists:(
About a year ago I want through exactly the same thing your doing JR. with my mini-dead ringer... NOT the same model as Fiskits deadringer. it looks great but ya STILL can't touch it after a YEAR Plus. Nor have any of us found a clear that doesn't grey these spary on chrome products. I'm sure if you do a search in TRF-1 you'd find the thread. don't know if I tried the Wrong Duplicolor Chrome or not but the stuff I got greyed as soon as any clear coat touched it:(

I thought about going the bare metal foil route also but the expense turned me away. It'd be very kewl, but I just couldn't spend the dough.

My suggestion is to go with a standard metallic silver, and frost the tanks flat clear over white. That's what I did on my Scratch built BT-60 Mercury-Atlas some years ago.
I also built add-on Agena & Centaur upper stages for my model but they are still sitting in a box waiting to be Painted and detailed. BT-60 is a Nice size for these models..1:73.3 Scale

Thanks John... I appreciate it!

What is the "alsa" product you're referring to?? toejrb over on YORF suggested a product called Alclad II https://www.alclad2.com/alclad-home.html and https://www.swannysmodels.com/Alclad.html which looked pretty good in the photos. Is this something similar and could you post a link or more info about it here??

I sorta knew going in from the discussions from time to time that chrome paints are somewhat 'problematical' and didn't expected SOME problems, but definitely less than what's occurred. Foose4string posted some excellent ideas about using Trim Monokote, which is similar to what the Estes kit uses (I suppose, not having built the Estes kit but having seen them anyway) but it would be a pretty big job cutting all those sections and applying them. I thought the job would be nearly impossible near the base, going over the compound curves of the fairings and all, but fooseman posted some pics that show that the Atlas really was just sort of a dull silver finish from the corrugations down, basically, and that only the barrel sections above the corrugations was actually a 'chrome' looking material (polished stainless steel IIRC was what the Atlas was constructed from). SO, using trim monokote on the upper sections would certainly be doable without TOO terribly much difficulty. The Alclad product looks fairly promising as well. I agree that Bare Metal Foil would be rather expensive, and foose rightly questioned whether such a coating would be survivable on a flying model (which I started wondering myself right after I posted it, actually-- glad to know somebody else thinks ahead and that I'm not totally off my rocker! :D)

Those are some nice looking builds there too-- I REALLY like the Mercury Atlas, it looks sharp. The twist-lock fins are a nice touch too...

Well, sorry to hear everyone else is having the same problems with 'chrome' paints, but in a way it's nice to know that "it ain't just me"...

Later! OL JR :)
 
Alsa Corporation www.alsacorp.com offers "Killer Chrome" Spary paint line, a 3 12oz can,3 part Black Basecoat, Chrome & clear topcoat kit that is really quite amazing...and also outragiouly expensive...last time I looked about 115.00 + freight per kit. I nearly ordered a kit until I learned that once you activate the cans, they have a very short shelf life. For the models I'm currently building they cost was simply prohibitive.

Back when I was building my Merc-Altas I was torn as to what method of finishing to use. I really wanted to go with some form of Mirror silver metallic to simulate the .040" Stainless steel skin of the Atlas. While they are not really mirror finished, according to scale data they were more a #6 mirror brite stainless finish that still shows a good amound of grain, but in our scales this wouldn't really show. If I were to do it again or if I very get around to finishing the other stages, I may just go with Bare Metal Foil as it really does conform to the worst compound curves and details where any mylar or vinly film just will not.

Chrome adhesive backed Monokote is another good material, although I'd consider looking at say Calon (Arlon) #07 Mirror Chrome adhesive backed mylar is usually a bit thinner 3mils. than monokote.
As for Chrome Bare metal foil. I have use it on a couple models with excellent success. It holds up as well or better then mylars and vinyls, it's drawback is the same as Alsa Corps "Killer Chorme" product is pretty expensive to use;)

I have a couple bottle of Alcad Chrome silver laying around the shop, I just haven't had an opportunity to use it. It's an Airbrush or gun type product so it's another step in the process.

Thanks for the info.... that's good to know...

Geesh! $115 bucks for 3 cans of paint?? (These are rattlecans, right??) :y::y:

I'd start feeling like some of these jokers around here driving a $600 car with $4000 worth of rims and tires on it and a $2000 stereo, amp, and speaker setup... and I ain't THAT redneck! $115 bucks to paint a $25 kit, yeah, that'd be about right... LOL:)

Good to know that the BMF has help up well and is tougher than it would first appear. Maybe doing the 'frosted Atlas' with it wouldn't be so expensive, but that kinda defeats the purpose I guess... :)

Later! OL JR :)
 
Ok, so I finally finished up. The paint has hardened up fairly decent, at least I can handle it now without leaving fingerprints and can wipe it down nicely to get rid of the fingerprint oils. Doesn't look bad at all... could've done better, but for my first foray into chrome rockets, it'll work.

Here's the glamour shots... :) OL JR :)

glam1.jpg

glam2.jpg

glam3.jpg

glam4.jpg

glam5.jpg
 
Back
Top