Crayon Bank Rocket build times two..

The Rocketry Forum

Help Support The Rocketry Forum:

This site may earn a commission from merchant affiliate links, including eBay, Amazon, and others.

rharshberger

Well-Known Member
Joined
Oct 13, 2014
Messages
12,731
Reaction score
4,731
Location
Pasco, WA
Started today building the two Crayon Bank rockets for my kids :wink:. Got most of the parts cut except the fins. Most parts are dry fitted and ready to be glued up. While these are meant to fly on G motors, I most likely will fly them on baby H's too.

Picture 1 is the blanks for the CRs and Bulkplates.

Picture 2 all the parts cut and ready to assemble, the 6 hole bulkhead are my shock cord attachment point and Parachute shelf.

Picture 3 the Nose Cone AV bay parts ala John Coker style, the wellnuts (black washer with screw) are pass throughs for igniter wires so that I can use DD with a cable cutter if needed.

Picture 4 another shot of the dry fitted MMTs, I went with 38mm just for variety and I might want to fly Hs on occasion, the 38/720 casing is just for test fitting alignment, I seriously doubt the airframes could hande a J motor without some reinforcement and it will most likely be flown on G's and H's most of the time.


CrayonRockets.jpgCrayonRockets2.jpgCrayonRockets3.jpgCrayonRockets4.jpg
 
Looks like a solid but slightly heavy build. You'll be happier with high thrust Gs and mid Hs.

crayon rockets can easily handle L2 motors when you are ready. Think about J350, J420... And K550. At that thrust build a double, two tubes lengthwise. 1/4" ply for fins if you want but 3/16" is fine too.
 
I seriously doubt the airframes could hande a J motor without some reinforcement and it will most likely be flown on G's and H's most of the time.
Actually I fly the 5in Dia, 54in tall, version of these banks on J Motors all the time, one with a 54mm mount, and one 38mm. No fiberglass to the airframe. I did my level 2 Cert on this.

IM000071.jpg

LDRS Fri 035m.jpg
 
Last edited:
Mainly I want to stick to affordable motors, I may only get to fly Js a few times per year, I also havent weighed all the parts yet so I re-simmed the OR design for accuracy.
 
Mine turned out kinda heavy, it has clear plastic fins and a baffle, its only 29mm and if I had to do it over again it would be 38mm. I only get about 500 feet with a G which isn't all that bad but it makes for some hair raisingly low deployments. I don't own any H class 29mm cases. Your kids will love it its a fun rocket, and looks like you got a good plan so far. I found no glue that would stick to the plastic parts so every thing had to be a compression fit or screwed together.


TA

crayon.jpg
 
Last edited:
Mine turned out kinda heavy, it has clear plastic fins and a baffle, its only 29mm and if I had to do it over again it would be 38mm. I only get about 500 feet with a G which isn't all that bad but it makes for some hair raisingly low deployments. I don't own any H class 29mm cases. Your kids will love it its a fun rocket, and looks like you got a good plan so far. I found no glue that would stick to the plastic parts so every thing had top be a compression fit or screwed together.


TA

I had guessed that the glue was going to be a problem with the plastic. The MMT is basically a thrust plate on the outside screwed to an inner CR, then an upper CR in the plastic piece of the bottom of the crayon, only the ShockCord mount and the top of the MMT CR will actually be glued with any guarantee of success as they are wood to paper. All the rings fit the plastic pieces tightly. The NC AvBay ring I will attempt to epoxy and possibly even screw into place which is why its made of 1/4 inch material (it also added weight which as currently simmed, it needs about 12 oz. which includes the Electonics).
 
Gorilla Glue works on the Crayon plastic end caps. Not sure what it does with acrylic or polycarbonate.
 
Gorilla Glue works on the Crayon plastic end caps. Not sure what it does with acrylic or polycarbonate.

Gorilla Glue polyurethane type glue is what I am going to assume is being referred to here and not the other Gorilla Glue products (since they also make, SuperGlues, Epoxies and Wood Glues these days).
 
As to the durability of the airframe, I have flown my 29mm version on I200's and routinely put the 38mm Crayon up on I195s, I212s, I218Rs, and I225FJs. The airframe is capable but the rocket does get really small in the sky and it's a motor deploy. 2500' is about my limit of tracking visually.
View attachment 256334
Crayon on I225FJ - photo courtesy of Captain Low 'n' Slow (Qquake2k)
 
Gorilla Glue works on the Crayon plastic end caps. Not sure what it does with acrylic or polycarbonate.

Really? :confused2: I couldn't get Gorilla Glue to work at all, sounds like they use different plastic form time to time, good to know I want to build a green or blue 38mm. You could use some low expansion spray foam on the bottom fin can to hold it all together.


No wait, I need a purple one next, I like the red one too.

Can you show us some shots of the business end I like the way it looks like it is set up, maybe some, how it is assembled?


TA


Before I do final assembly of the MMT I will take some better photos for the crew here on TRF. Hopefully I will be back at the build this weekend.
 
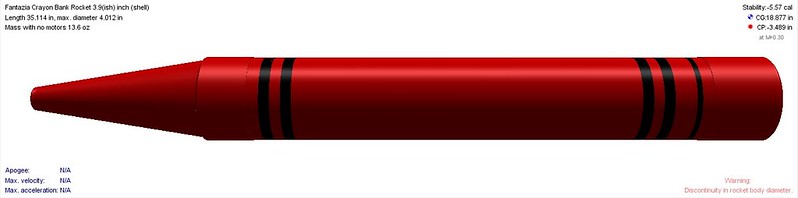
Day 2 of twin crayon rocket build

My day kinda got shortened by having to watch my 3 kids while the SWMBO did the grocery shopping, if not for the youngest I could have thrown the two older ones outside to play since it was 65 degrees F, the youngest is 9 weeks and taking her into the shop would get me killed by the wife. Ive set my shop up with a removable fence/barrier across the rollup door so that it can be open the the 4 and 6 year olds cant get in.

Today was assembly of the fin can/mmt that makes up the lower cap of the crayon.


20150307_162804.jpg20150307_162856.jpg20150307_163028.jpg20150307_163246.jpg20150307_195108.jpg

For thobin here are some photos of how I'm doing the "business end"

Pic 1: Inner CR and outer Thrust plate, obviously holes line up

Pic 2: Inner CR and Thrust plate sandwich bottom of lower crayon bank cap

Pic 3: Inner CR, notice how edge is profiled for the rounded corner it fits into, all CRs are snug fit.

Pic 4: Lower cap, hole in center is not neat originally I drilled it with a hole saw but it was off center. One nice thing about the plastic these caps are made of is that they cut really easy with a sharp Xacto or Stanley Utility knife, a sharp chisel was used to remove a few distortions in the plastic.

Pic 5: Assembled nose cones and MMTs, the upper CR in the MMT is put in before the motor tube, and is wedged against the upper shoulder. All CRs in MMT are epoxied in place (if it actually sticks), all I could really do for prep was wash parts, scuff heavily with 60grit sandpaper, and then wipe with acetone followed by denatured alcohol.

The epoxy is US Composites 635 w/ Medium Hardener, thickened with milled FG.

The part I forgot to photo was the rail button block epoxied to the lowest CT, but you can see the screw on each MMT side. The top CR goes into the cardboard airframe and will be attached with Titebond II (I prefer it for Wood and Paper construction. The fin slot locations are marked, and I will cut them next session along with the fins.

Nose bulkheads are fitted snug and filleted on both sides, Scotch tape (just enough to cover tee nut holes) was used to keep epoxy out of the threads on the T-nuts.

The coin slot I covered with a piece of Scotch tape turned sticky side up and then taped in place with more Scotch tape. Thickened epoxy was then smeared into the slot and on top of that was two layers of the Bondo brand FG cloth, I have other FG cloths but decided to just use this stuff, since the weight is unknown to me, in my inventory I have .5, .75, 2, 4, 7oz cloths but I'm using the Bondo stuff in non-visual areas.

Entire Nose cone assembly weighs about 7-8 ozs. The complete bulkhead weighs about 3.3 ozs, the NC weighs about the same, plus an ounce or so of epoxy and FG cloth, and I still will have to add a fair amount of weight to the nose.

My L1/L2 project is kinda dead until these two are done, actually I'm considering doing my L1 on one of these. I was going to glass my airframes today but ran out of time.

Photos were not turned sideways by me, it happened when I uploaded them somehow.

In a few hours I will go out and pull out the all the screws so they dont get permanently epoxy threadlocked, the bottom three screw are for motor retainer clips.

One of the assembly steps for the MMT since the motor tube goes in last is that all screws are left loose until the tube has been slid into place and a motor used to line up the outer thrust plate (tube butts up to thrust plate). After everything is lined up the screws are tightened down. Once the MMT is assembled theres no going back inside without drilling at least one hole in the upper CR ( I accidently shifted the block for the rail button). A person could pre-drill some larger holes in the upper MMT CR and fiddle with stuff inside like adding additional fillets and stuff. Between the thrust plate and the upper two CRs (mmt and airframe) I dont think the motor is going any where its not supposed to, MMT tube does actually carry some of the structural strength of the MMT (I dont think its a lot though).

AFAIK, no glue I know of actually sticks to this plastic which is why I'm depending on mechanical retention methods (I don't think even the plastic welder type epoxies work on this stuff very well).
 
Okay, on to Days 3 and 4 of the twin build.

Motor Mount with motor casing and retainer clips.
CrayonRocketDay3two.jpg

Trimming and Dryfit of fins
CrayonRocketDay3.jpg

Fins are now permanently attached and awaiting epoxy to cure before I add fillets to the upper section, lower section is now inaccessible due to fin tabs locking upper tube and mmt together. Both sets of tabs were double buttered CJ style. 1/4" Birch Ply for fins is probably a bit heavy but should be fairly tough. Nose cone slots were plugged with thickened epoxy and two layers of glass cloth (bondo brand FG, unknown weight).
CrayonBankDay4build.jpg

Still need to put upper CR in after internal fillets are done, then once Parachute is made I will know where to put the chute shelf and shock cord anchoring plate, once that is done and the external fillets are complete its on to a little bit of paint. My plan for the external fillets is to make epoxy "rivets" by drilling 1/16" holes along the plastic mmt section.

If I didn't already mention it the plastic these are made of is most likely polypropylene (same as cheap rope) and it cuts with a sharp exacto like butter, so slotting for the fins was easy, the tubes were actually more work to slot.

Reason for notching the tabs was to keep some structural integrity to the tube and mmt sections so they wouldn't deform, especially the ring where the two join. Not seen in any of the pictures are the 20 or so 1/8" holes drilled around the mmts coupler shoulder (once again to help form epoxy rivets between the plastic and the cardboard tube). I have been tempted to foam the upper section of the fin can, but am trying to avoid any extra weight and I believe the design should handle the flight/boost stresses just fine.

Next time I do one of these I will turn plugs on my lathe of the Nose cone and Bottom piece and make a mold to layup the pieces from FG.
 
Heres some more of yesterdays and todays work:


Pinholes drilled for epoxy "rivets", each hole is about 1/16" diameter

CrayonBanksDays5and6-1.jpg


Some filllets, only one set on each rocket to do, and all internal fillets are done. In a couple of hours I will go out and do them, then later tonight the upper CRs can be installed and filleted which will almost finish the lower piece of the rockets, just the chute shelf/shock cord attachment and rounding the fin edges, then painting the fins and maybe trying to find some vinyl to make graphics with.
CrayonBanksDays5and6-2.jpg
 
Day 7 of the Crayon Bank Rockets is now completed.

Todays steps were:

installing the upper rail button (on each).
installing the innards of the AV Bay
static ports for altimeter.
finishing the 38mm to 29mm MMT adapter.
making sure the programming on the RRC3x was the way I want it, even though the altimeter will just be along for the ride, and practice for me. The AV Bays are set up for HEDD with cable cutters.
weighing everything, what a chore!


Its amazing how rockets gain weight as you build them. I probably should have made the fins out of thinner material, but I wanted them to take some abuse so they are 1/4" birch. So far the weights and all sim well at about a Stability Margin of 1.3 in a 10 mph wind off our 1010 rail.


Still to do:

Manually check CG and estimated CP against the OpenRocket sim. (Im not a fan of Landsharks, and I don't think the RSOs are either).

Finish parachute, only need to attach the lines. Its a 12 gore 48" chute, I wanted to do the gores in Red, Yellow, and Blue, but only had Red and White on hand. \

Ground Testing

Oh yeah, and fly it! No paint on the fins for first days flights which hopefully will be next weekend.

CrayonRocketDay7Pic1.jpg

CrayonRocketDay7Pic2.jpg
 
Last Saturdays launch (18 April 2015) was both and exciting and a little disappointing. The Crayons flew (and one crashed) for the first time.

Getting the Red one in the air was an interesting series of events ranging frome a GSE failure (pad relay was bad), to me failing to vent the redcap properly and the igniter popping out (thanks to Dave King for his assistance and guidance).

Flight 1

When we finally did get Red in the air it was a beautiful flight on a AT 29/40-120 G76G to 500' per the OpenRocket Simulation and confirmed via the MissleWorks RRC3 in the nose cone. It went downhill from there (pun intended) the delay was too long and the ejection charge fired 30 or so feet above ground, the 20' kevlar shock cord and parachute were attached to the NC, the chute started to deploy at about 15 feet, but the 20' shock cord allowed the airframe to slam into the ground basically at full velocity. After action review, the delay wasn't drilled properly due to the fact the bit on my delay drilling tool was loose, so the delay was too long. The rockets boosted fine under the G motors used, but will require electronic ejection in the future with these motors as the delays cannot be shortened enough. Damage was 2 cracked fins and a crimped body tube, due to location of BT damage this rocket will not be flown again (most likely).

Flight 2
L1 Certification Flight

The Pink Crayon things went much better. Motor was a AT RMS H123W to 1200' again nearly perfectly on the sim from OR and confirmed via the RRC3, it was a great flight. Chute deployed properly (thanks to my dear wife the seamstress) it was a 48" twelve gore with 6" spill hole Red and White panels, a beautiful chute, with a descent rate of 21 fps according to my math. The rocket landed about 2500' SE of the launch area in the sod near Frontier Rd.

Flight 3

The Pink Crayon flight 2 was on a AT 29/40-120 G64W once again to 500'. Deployment was again via motor ejection. I realized that my RMS Delay Drilling Tool had an issue and L. Kennedy (I hope I got the name right) was gracious enough to loan me his to adjust the delay. It was almost the same scenario as Reds first flight only this time the delay was shorter and the chute deployed in time to keep the rocket from hitting the ground to hard.

Conclusions

These rockets weighed about 58 to 60 ounces each, motor delays cannot be adjusted short enough if flown on a G motor less than a G138, and require electronic ejection. 1 gram of 4Fg BP was used and that was plenty, especially since shear pins were not necessary. The rockets were definitely built tough enough as the Red one actually held together really well given an impact velocity of over 200 fps. I would definitely fly these again on G motors only with electronic ejection, since they are low and slow its a good show for the crowd.


Evidently the epoxy "rivet" technique worked fairly well, as the epoxy fillets held well, actually a piece of the fin peeled off with the fillet.
[CrayonBanksAfterFlight2.jpg


Crimping of airframe was at the parachute shelf/shock cord attachment, so I am unable to access the are for repairs as I would not have enough tube to put a coupler in to splice tube back together.

CrayonBanksAfterFlight1.jpg
 
The area where your fin failed is common on Crayon rockets. My 29mm Crayon fin failed in the same location. I attribute this to the notch cut in the fin tang. My 38mm Crayon has a similarly constructed motor mount/tail cone but I used 4 centering rings. Overkill, right? Well, recently I neglected to attach the parachute and its "perfect burrito" to the shock cord which caused the rocket to fall in a flat spin from over 2000' while the chute drifted lazily to the ground. No discernible damage to the rocket so I dodged a bullet on that one.

Worth pointing out is that my fins are also 1/4" aircraft ply.

Nice work on the av-bay sled. Converting the 38mm Crayon to DD with Cable Cutter is the next modification I want to make but I'm leery of trying to attach a centering ring to the nose cone. Still thinking about alternate methods...screws, screw blocks, etc.
 
Just in case someone hasn't seen it... I've created a .ork file for the Fantazia Crayon bank used for this build. It's just the shell. So, you can design your own inner workings.


17147514566_39144561fe_c.jpg


For what it's worth, I've found that uploading my images to flickr (which is free), then posting them here prevents images from being rotated in odd manners.
 

Attachments

  • Fantazia Crayon Bank Rocket 3.9(ish) inch (shell).ork
    1.4 KB · Views: 26
Last edited:
The area where your fin failed is common on Crayon rockets. My 29mm Crayon fin failed in the same location. I attribute this to the notch cut in the fin tang. My 38mm Crayon has a similarly constructed motor mount/tail cone but I used 4 centering rings. Overkill, right? Well, recently I neglected to attach the parachute and its "perfect burrito" to the shock cord which caused the rocket to fall in a flat spin from over 2000' while the chute drifted lazily to the ground. No discernible damage to the rocket so I dodged a bullet on that one.

Worth pointing out is that my fins are also 1/4" aircraft ply.

Nice work on the av-bay sled. Converting the 38mm Crayon to DD with Cable Cutter is the next modification I want to make but I'm leery of trying to attach a centering ring to the nose cone. Still thinking about alternate methods...screws, screw blocks, etc.

Thanks for the kind words. The fins actually cracked along the surface of the airframe as far as i can tell, since the airframe landed and bounced on those two fins. The fins below the airframe seem to be just fine, I plan to inject epoxy into the cracks and clamp the fin back between two boards to see if they can be repaired without having to try and totally remove them. The Red crayon will most likely never fly again as I plan on removing all the recoverable metal parts and giving it to my son as a toy.

The Av-Bay is nothing more than 1/4" aluminum rod that I threaded, and the sled was made of left over Baltic Birch from several projects, I tend to save cutoffs of my BB ply because it machines and stays together well even in small sections like the 3/4" x 3/4" x 1.75" pieces that make up the top and bottom of the sled. The section the RRC3 is mounted to is made of a laminate of two pieces of 1/8" (3mm) BB to trap the mini t-nuts in between. The top and bottom have 1/8" slots from my table saw milled into them and tongues from the sled are glued into the slots, it turned out nice and strong.
 
Rich - Apologies for digging up an ancient thread, but I know you're still active on the forums... I've been tinkering with a crayon build off and on for the last year and just found this thread. If you have a moment, could you describe a bit more how you are handling the head end deployment (mostly where the charges end up being placed)? I'm also curious how you handled placing nose weight above the av-bay.

Thanks!

For what it's worth, my own ORK file is attached. It's far from complete - more of an evolving notepad of ideas than anything else. The only real construction I've done so far is cut three centering rings and mock things up a bit.
 

Attachments

  • Crayon Rocket mockup alt.ork
    795.2 KB · Views: 8
Rich - Apologies for digging up an ancient thread, but I know you're still active on the forums... I've been tinkering with a crayon build off and on for the last year and just found this thread. If you have a moment, could you describe a bit more how you are handling the head end deployment (mostly where the charges end up being placed)? I'm also curious how you handled placing nose weight above the av-bay.

Thanks!

For what it's worth, my own ORK file is attached. It's far from complete - more of an evolving notepad of ideas than anything else. The only real construction I've done so far is cut three centering rings and mock things up a bit.
Its not really HED, HED puts the chute inside the nosecone, my solution was to put the altimeter inside the nosecone and the deployment charges on the plywood bulkhead for the bay. I will try and dig up some old pics of the setup. Its basically a ply centering ring with tee-nuts for threaded inserts so a bulkplate can be attached to the ring.
 
That would be great. And I wasn't sure about HED being the correct term. My thought process was to have the av-bay in the cone but the charges near the upper centering ring. I just wasn't sure about the implications of an approach like that as far as passing the wiring down to there, etc.
 
Back
Top