Cormoran MK1, my firts rocket and design.

The Rocketry Forum

Help Support The Rocketry Forum:

This site may earn a commission from merchant affiliate links, including eBay, Amazon, and others.

Nacho

Active Member
Joined
Jan 6, 2019
Messages
42
Reaction score
7
Location
United Kingdom
Hi,
Today I would like to share with you my first ever rocket:

Cormoran MK1

oI731V4l.jpg


OZpBfqGl.jpg


Specs:
  • Length: 370mm
  • Body diameter: 32mm
  • Propulsion: C6-3
  • Mass with motors:124g
  • Expected apogee: 150m (~495ft)
  • Build material: PLA

About it:
I have been interested in rocketry for a long time. For one reason or the other I really never got into it. I recently purchased a 3D printer and I thought I would give a try at designing my own model rocket!
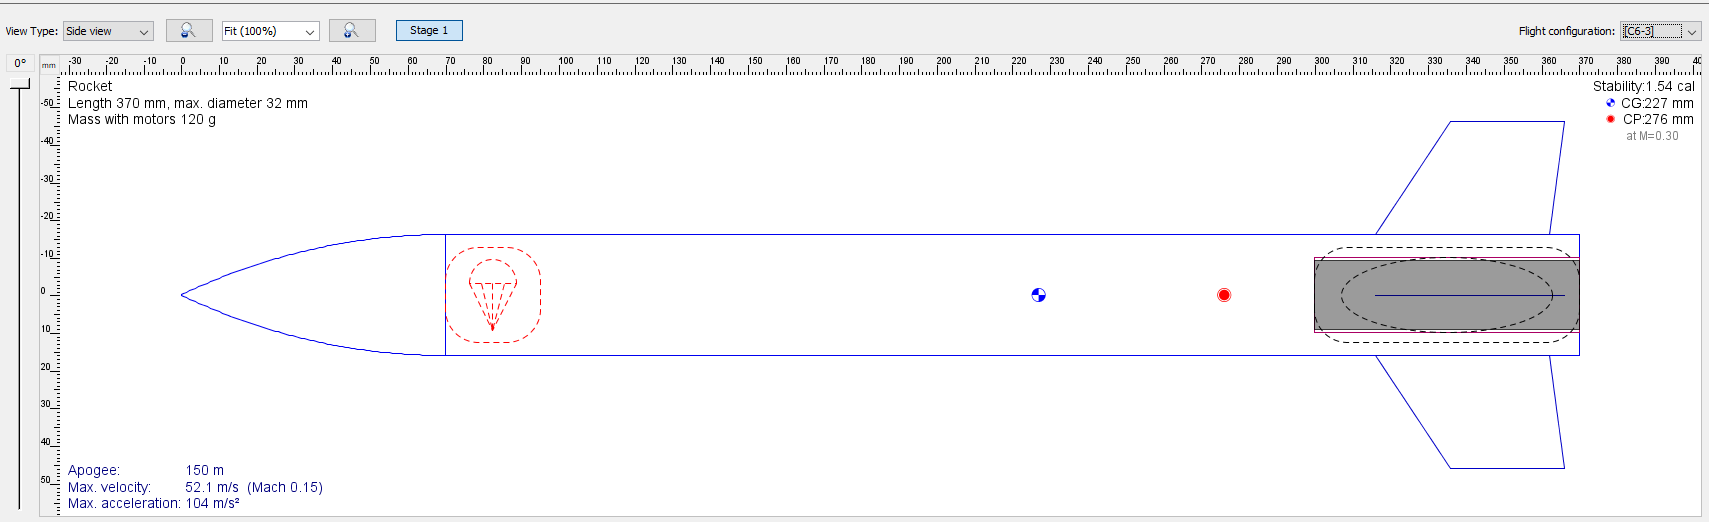
I started by printing some test parts: body tubes, parts with holes, nose cones etc. After having a better idea of the weights and dimensions I jumped to OpenRocket and made the rocket design:

nVMTpNf.png

From here, I started designing the actual components using Fusion360. It took me a few weeks to learn the tool and also perfect the measurement of parts that had to fit together.

Up-coming flight:
At this time, the rocket is finished and I am running some simulations to make sure it will fly safely. I am also finishing my chute assembly. This week I will start the works on the launch pad. I am expecting to be ready to go in about 2-3 weeks.

The first flight will be performed using a smaller engine (B4) and the apogee should be at around 50m (~170ft). I think this is a good idea as I have never launched a rocket before :p.

Once I confirm all the parts are working nominally, I will proceed to launch with the C engine.


OpenRocket Files:

You can download the plans for this rocket in the attachments section.
At some point, I would like to release the actual component parts, however, I would prefer to first test this design and make sure it actually flies!

Thanks a lot for reading, wish you clear skies!
~Nacho.
 

Attachments

  • Cormoran1.2.ork
    1.8 KB · Views: 65
Did you physically measure the CG? Or are you relying on OpenRocket to calculate it? If it's programmatically derived, you might want to double check it since I don't see fin roots or centering rings in your snapshot above.
 
Did you physically measure the CG? Or are you relying on OpenRocket to calculate it? If it's programmatically derived, you might want to double check it since I don't see fin roots or centering rings in your snapshot above.

Yeah, I double checked it once I got the motors and it is pretty close to the simulated CG!
 
What brand motors are you using? I hope they aren't Quest! Those suckers burn hot. If you are using Klima motors you should ask people how hot they get. We don't have them over here in the colonies so most people on the forum have no experience with them.

Is your motor mount plastic or does the motor slide into a paper tube (or liner)? I know people that have 3-D printed rockets and plastic motor mounts are questionable as the heat from the motor can damage them. I believe they recommend keeping the motor in the mount until it has cooled. That way the spent motor keeps the mount from warping as everything cools. Still, you may want to build our next rocket with a paper motor mount to reduce the heat and warping issue.

Cool looking rocket.

Hi Zeus, I'm using ESTES motors. And yes, I did 3D print the mount. I'm a bit concerned about how will the mount react to the heat of the motor. However, the burn time is quite short so I hope it will keep its integrity during flight.

For my next project, I will replace the body material for cardboard and I would like to experiment with ABS for the mount (this material has a higher glass transition temperature).

Thanks for your feedback :)
 
If you can get it, try PETG as a filament.

We have a club member that prints it for 29mm motor mounts (metal case reload motors) and it hasn't seemed to be a problem yet.
 
If you can get it, try PETG as a filament.

We have a club member that prints it for 29mm motor mounts (metal case reload motors) and it hasn't seemed to be a problem yet.

That's a good choice, I will consider using it in future builds.


These last few days I've been working on my chute assembly:

gqd49y9l.jpg


I will be redoing my CG tests as I had to add a few parts to hold the shock cord.

~Nacho.
 
Today I finally launched the rocket, and it was amazing! Just as a note, this is the first time I ever do this + this is my own design. I was a bit worried about two things:
  • Motor case melting: this rocket is fully 3D printed. After inspecting the rocket, everything looks good.
  • Getting stuck on the launch pad: while static testing the rocket on the pad, it was a bit rough, however, this wasn´t a problem in the end.
The only bad note from this is that the chute didn´t work. The deployment happened after apogee but the chute didn´t grab enough air so the rocket just hit the ground (breaking 2 fins).

In any case, this was a great experience and I can´t wait to launch it again!

Thanks!
~Nacho.
 
Did you use wadding or fireproof material to protect the Chute from the ejection charge? Plastic chutes like that can easily melt and stick together
 
I'm happy that you enjoyed the launch. Sorry to hear that you broke two fins. But as many of us say, if you aren't repairing your rockets then you aren't flying them.

Is it cold where you are flying? Sometimes the plastic parachutes get stuck together if it is cold. Put some baby powder (absorbs moisture and makes things slippery) on the inside of the parachute. And Nytrunner had a good point, protect the parachute with wadding.
 
That's Nacho rocket! :D

You seem to be a serious hobbyist who already knew what you were doing before you started. Folks here are very helpful. I predict success!

We'll be waiting for flight video. ;)
 
First, thank you all for the nice comments. Makes one happy to see others interested. :)

Did you use wadding or fireproof material to protect the Chute from the ejection charge? Plastic chutes like that can easily melt and stick together

Yeah, I used wadding. I inspected the chute and seems normal, perhaps it was just too well packed...

I'm happy that you enjoyed the launch. Sorry to hear that you broke two fins. But as many of us say, if you aren't repairing your rockets then you aren't flying them.

Is it cold where you are flying? Sometimes the plastic parachutes get stuck together if it is cold. Put some baby powder (absorbs moisture and makes things slippery) on the inside of the parachute. And Nytrunner had a good point, protect the parachute with wadding.

Repairing is also fun haha. I'm in the UK, and this morning was quite cold (around 6ºC). I like the baby powder idea, will try it! I´m also considering using a streamer instead of a chute for this smaller rocket, I will give some thought.

That's Nacho rocket! :D

You seem to be a serious hobbyist who already knew what you were doing before you started. Folks here are very helpful. I predict success!

We'll be waiting for flight video. ;)

Luckily there's a lot of information in places like here. Sadly I did mess up the video recording... In any case, I will try to launch next week!
 
OK, 6ºC is cold is funny. Good grief, I'd love to be launching in 6ºC weather this time of year. Our winter (high power) launches are almost always on the other side of zero.
 
Hi!
Another (almost) fully successful launch! Today I went to the field and tested my rocket with a C6-5, quite a nice flight. I used the baby powder trick as @Zeus-cat mentioned and the chute deployed nicely this time. The only problem was that that's not the right delay!!! I should have used the 3sec one. In this case, the chute opened quite late and the forces of it opening at such speed broke two of the plastic holders:

N7yOPfAl.jpg


To be fair, I think I need to use a large chute, although I don't have much space left.


Here some pics:

ZcBJtv2l.png


82u2yRhl.png


I'm really happy with how this went in general (the design and construction of this rocket). There are some things that I want to change:
  • "Fully 3D printed", this was something really cool to try and I got a chance to learn how to design and manufacture parts. However, for my following builds, I will reconsider printing the body in favour of using cardboard.
  • Fins. The way I attach the fins to the body is not strong enough I want to try new methods.
  • Motor mount. For this build, the motor is friction mounted (I basically roll it with tape until its tight and call it a day). The problem is that if I want to change the motor after a flight, I need to disassemble some parts to push out the motor. I would like to improve this with a simpler mounting mechanism.
Anyways, thanks a lot and have a nice weekend.
~Nacho.
 
Back
Top