Colonial Viper from Estes designer sets

The Rocketry Forum

Help Support The Rocketry Forum:

This site may earn a commission from merchant affiliate links, including eBay, Amazon, and others.
Originally posted by Mister Rogers
Hey Justin,
is the hollow nose opening a desired design element ? If you wanted to you could cut a piece of styrene (plastic) to fit the opening and glue it flush like a plate. It would make sense that it would cut down on drag but since it is at an angle it may try to push the rocket. I don't know how you could sim that:confused: Just a thought....

Sorry I didn't answer this before. Yes, the Vipers on Battlestar Gallactica had hollow noses. You know, you HAVE to have air intakes for your engines while flying in a vacume:D

I'm not sure how deep the hollow was however. I want to say for the "scale" of mine it should be 1/2" ish deep. I am not going to create the plate though. Just paint the inside flat black to hide the weight.

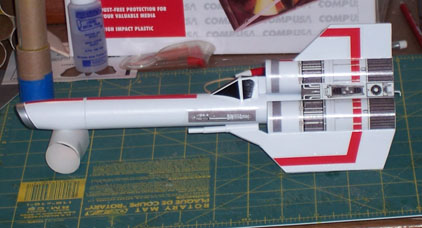
This pic is not related to anything I just said:) It's just one of the reference pics I was using I thought you guys may dig. The guy who made this models name is on it. I hope it's okay to post this.
 
Originally posted by Leo

NetMan, I don't think it is worth opening an extra thread.

Leo--I respectfully disagree. That's one of the more awesome rockets I've seen here. Details, man, details! And launch pics, of course!

MetMan
 
The viper will hopefully get a test flight on tuesday. I ended up with about an ounce of nose weight to compensate for all the extra gizmos. The origional had about .60 ounces from what I have found on the forum and elsewhere, but mine is more detailed and tail heavy than the Estes, so we'll see what happens.

The nose weight is a machine screw with washers held on by a nylon lined bolt. I figure this will make the weight adjustable for me and add a neat look'in thingy if you look down the nose of the fighter.

I'll try to post a pic of the primed "boiler plate" version tomarrow. It is missing some fine surface stuff and the guns for the first flight.
 
Justin,
It might be worth your time to take a look at using some lead strip ballast around the inside of your nose 'intake' instead of a big pile of ballast at the rear end of the nose cone.
If you check the distance from your existing ballast location to the c.g. of the rocket (loaded with motor, chute, etc) you can calculate the nose trim moment (weight x distance) required for safe and stable flight. If you then find the new distance to the alternate (forward) location near the inlet, you can divide this distance into your moment to determine a new ballast weight.
You should be able to hide the ballast fairly well and still keep the looks of your open inlet by bending the lead to fit the inside contours of the NC and gluing in place? Another way to do it would be to scuff sand the inside of the plastic, apply some epoxy or gorilla glue, wait for it to get good and tacky, and imbed a layer of lead (or steel) shot in the adhesive---cover with some filler or with more adhesive and it would not be easy to see.
It would not surprise me at all if you could save 25 to 50 percent of your trim ballast weight by moving the ballast location forward, and on your model (with all the detail parts on the back end) this could make the difference on getting decent altitudes from your limited motor power.

(PM me if you would like help figuring this out)
 
Powderburner-
The weight washers are at the tip of the intake. I used a 1" section of bic pen as a spacer. I aggree with you that against the bottom of the NC was a bad place for weight. 1 ounce does seem excessive, but I added a lot of stuff, and shortened the overall fighter.

I thought about gluing in weight, but I want to be able to fuss with it. I have no CP or CG data on this thingy...Kinda wing'in it. No pun intended;)

Here's a pic of the weight assembly seperate from the nose. The crappy drawing in the background shows how it sits in the NC.
 
That Bic-pen extension should help out, it will certainly make your nose ballast more effective.
Something to think about: you may want to insert some sort of metal clip under the head of your anchor bolt to which you could attach the parachute. If you attach to the built-in plastic loop on the NC, the weight of that ballast could cause a separation.
Another one: if you are concerned about stability on scale models, you can 'cheat' a bit and increase the aft fins by 5 to 10 percent before most people will notice that they are out of proportion to the rest of the vehicle.
Good luck!
 
I thought of increasing fin size, but I forgot about until after I made them...I can be flakey..

I was worried about the plastic nose loop too. I had a Quest Zenith 2 ? payloader tear itself apart at ejection carrying a NAR 28 gram payload. I had to make wood bottom with an eyebolt epoxied in..

For the Viper origionally I planned to use a machine threaded eye bolt in place of the machine screw. Kill 2 birds with 1 stone. I couldn't find an eyebolt the right length with out a MASSIVE loop on it though..

What do you think of a tiny strip of cloth over the loop and a little epoxy?
 
The Viper works! I finnally got to fly it. It went up perfectly straight with a little roll on a C6-3 on Thursday. Not too high to find again, and the delay seemed perfect. I think Adam Selene MIGHT have a pic, If He does, I'll ask him to post it.

One thing the origional estes viper did was arrange the grain on the tail fin so it would pop off on a hard impact, and not wreck the top tube. I did not do this. I lined up the grain properly and filleted well. I also ran a bead of titebond around the edge. With the centering rings in the front and rear of the side tubes it's pretty strong. On recovery it came down directly on the rear fin in a concrete parking lot, and was barely scratched. I was very happy.

The bird worked fine with the nose weight and centering rings in the side tubes as described in the thread. It didn't even notice the extra stuff.

It's just primed now, Gotta add laser cannons and surface detail, then off to the space fighter paint and body shop.:D

I'll post pics after the paint job.
 
I forgot to mention recovery system was 18" of 1/4 elastic cord on paper mount, with an Estes orange 8"? chute.
 
Justin,

Visit this tread:

https://www.rocketryforum.com/showthread.php?s=&threadid=15547

It's about the Estes Colonial Viper; this is my best shot at simulating the flight stability of this design using RockSim version 7 software.

The added thrust rings don't affect the stability of the simulation by that much, however the stability margin falls just below one caliber, see attached RockSim Version 7 file.

There is significant air flow through open tubes down to a certain diameter at given wind speed and pressure. Most tubes over 0.5 inches in diameter with a length to diameter ratio less than 10 will have significant air flow through them.

Bruce S. Levison, NAR #69055
 
thanks teflonrocketry-
I don't have rocsim, so I'll try to figure how to get a look at those. There may be a Mac rocsim this year:D ..I hope..

I have been wondering about airflow through tubes since listening to guys talk at NARAM 45. I think it's great you have delved into these theories and posted on TRF.

I am also interested in seeing rocsim data on my custom viper which has various differences in diameters and lengths. And a pile of other cobbled together stuff....I gotta get rocsim..

APPOGEE! MAKE THE MAC VERSION! MY COMPUTER IS TOO OLD FOR A EMULATOR! :(
 
The Viper is finnally done. Some of you may have seen it at NARAM this year. I finnally got all the pics cut right, and decided to post them to keep it all together. The pics here pick up right where I left off on this thread in 1954.

This first one shows the millions of styrene bits going on..
 
This is a close up of the laser cannons, and the beginning of painting. The guns are made from q tips, coffee stirrers, a straw, paper and styrene bits, and a wire tie from my girlfriend's daughter's Breyer Horse model.

I weathered this bird like on the show, so I sprayed it silver first. Then I taped off little chips so when I painted it white it would have real chips in the paint through to silver metal in places.
 
Here she is airbrushed and decaled. I made the weathered decals on Apple Works 6.
 
This pic looks closer to the models actual color. I'm not a great photographer...
 
Heres a bottom view. I tried to simulate the launch rails it had in the show..
 
Love the details. I just bought a built Viper on E-bay and had plans to restore it since the original paint yellowed and one of the guns broke off. I originally had in mind doing a little scratchbuild on the engines. Now I see that it can be done.

Great looking model!!!
 
I worked hard on that one. I'm happy with it. It's shorter, and closer to the origional than the Estes kit I belive. If any of you guys want to make one, or hook up an Estes version with some detail, just Email me and I'll tell what I used and stuff in more detail. I used this model for NARTREK advanced level Static Display, so I have it pretty well documented.
 
My BSG Viper clone is built and ready for paint... here's a shot of it "nekkid":

Viper_built.jpg


Nose cone by Moldin Oldies, and I used Semroc ST-10s as a substitute for the BT-52 turbo tubes. Originally, I went with 29mm tubes for the turbos, but research at Ye Olde Rocket Shoppe pointed out the error of my ways.

Semroc offers a nice set of washer weights that I used in the nose.

You can read about the build and my oopses here on my rocket blog.
 
Justin -

I love the battle scars! Well done!

Bill -

Your Viper is looking good. Dang it, now I want to build one!
 
Thanks for the compliments guys.

I want to find someone at a launch with an Estes Viper so I can take a picture of mine next to it. Mine really is a COMPLETELY different bird (except the grain pattern of the lower wings).

I'm working on a base for it now that has scale landing gear incorporated into it. I'll post pics If I ever finish...:)
 
OK - this build has gotten me thinking - I'm thinking of doing an upscale using BT-60s (167% upscale) and the PNC-60AH (Screamin' Mimi) nose cone with a 24mm mount. I'll have to run it through Rocsim and see if it'll work. If that's too big and heavy, it might also work with a PNC-55AC (Meteor Masher) cone (135% upscale). Could be fun. Barring that, there's also a 55% downscale using the PNC-5 from the Quark. That should rock on an A10-3!

Greg
 
Justin, that viper looks quite trashed! It must be that foul-mouthed Starbuck's ride! :p :D Great job!

Bill, cool job you have - I'm jealous!

OK, you guys, this thread is how old? and I hope you've posted launch pics elsewhere or consider yourselfs in trouble! :D

Pat <- had a Viper in his youth!
 
Actually there are no flight pics of mine. It flew once primed, but thats it. Because of my job, I only get to fly once ir twice a year most years. :(

The viper flew really well that time though..:D
 
Finally finished my Viper - the decals from Tango Papa came in yesterday, and I applied them this evening. Here's a couple of pics:

BSG_Viper_Decaled001.jpg


BSG_Viper_Decaled002.jpg


I'm pretty pleased with how it turned out... A special thanks goes to Mike Schmidt at Moldin Oldies, who made the nose cone. For those of you interested, details of the construction are in my rocket blog.
 
Those decals look dead-on straight! Looks like real nice decals. Nice and shiney too!

Hope 'someone' :rolleyes: launches theirs someday! :p :D

Pat
 
BEAUTIFUL!!!!! still have my origenal and it needs some tlc after a crash because of a faulty ejection charge.
 
Back
Top