At the encouragement of a buddy over the past few weeks I finally got around to having a look at this thread this morning from beginning to end. I'm not much of a "forum" or even a social networking kind so forgive me if I perhaps say something not quite to "protocol."
To start off, I have been selling a
"Little Joe II Skin Kit" on eBay for for a few weeks. They are very thin white printed vinyl (it's "tensilized" so it's not stretchy like you might think) and very thin (much thinner and not at all like the heavier clear vinyl self-stick "decals" that many think of when the word "vinyl" is mentioned). Anyway, just
go to eBay and search for "Estes Little Joe II" and you'll find it or check out my website,
www.accur8.com for more info. A couple of folks have asked if my wrap kit was created from the files and wraps that George has presented in this forum. No, they are completely created from scratch but I DID use the data by Gassaway/Beach from when I was editing American Spacemodeling in the early 90's. A tip of the hat to them!
I certainly regard George Gassaway and Tom Beach as the "Little Joe Pros" going back many years so if I seem to step on their toes or seem to repeat what they have said, it is strictly incidental. I have been a Little Joe "nut" since the 60s and have build a number of them. I had access to the Little Joe II at Johnson Space Center since it arrived there in the 70s as I lived just north of JSC...all I had to do was ride my bicycle around Ellington Air Force Base (almost bordering JSC to the north) and I was "there." Recently (well, a little over 10 years ago) when working on the Saturn conservation project at JSC I was able to spend a LOT of time closeup of the thing. I'm well aware that it is pieced together but the pieces are "real" whether actually related to LJ flights or not. Some extra LJII parts (I think fins and some fairings) were, at least 10-12 years ago, were in a JSC industrial location storage area along with some Saturn V "extras". Don't know if that stuff is there anymore and they may either be parts from a "lost" LJ that was produced or simply "spares."
The Wrap
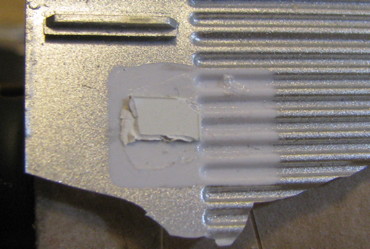
Estes includes a short section of body tube to fill the slight gap around the aft end of the wrap when it is wrapped around the tube. The tube section Estes provides is much too thick. The easiest method to fill the gap is to simply cut a strip of heavy card stock...the way Estes used to do such things in the distant past (I use "cover stock" available at office supply stores...mine is about .11" thick...which is thick enough) and glue it around the aft end of the body tube using white or yellow glue. Some people have recommended plastic strips but you get a far better paper to paper bond than a paper to plastic bond in just about any situation.
One of the very first things I noticed about the kit was that the wrap that was obviously formed from ABS and not regular polystyrene. From fairly extensive experience with ABS in the past I knew regular plastic cements (as, unfortunately, recommended in the Estes instructions) would not work. I have done MANY plastic wraps and have two techniques that I have favored. One is to use transfer tape (sort of an adhesive-only without a backing) and the other is to use a suitable spray adhesive (again, the Estes instructions miss the mark in not prescribing something other than just a spray adhesive). Since the "corrugated" nature of the wrap reduces the contact area available when using transfer tape I decided a heavy duty spray adhesive is perhaps the best solution. I have found two brands in a couple of different formulations each that can do the job. There are the Scotch
3M 77 and
90 sprays and there are the
Loctite 200 and
300 sprays. I formerly used the 3M 77 for years but discovered the Loctite 200 is a bit stronger (my opinion...no formal tests to prove it). Both the 3M 77 and Loctite spray smoothly and evenly (the Loctite seems to be a bit thicker. The heavier and stronger bonding 3M 90 and Loctite 300 will work but can be a bit messy because they have "stringy" spray characteristics.
What ever spray adhesive you choose, be sure to mask off the "Service Module" portion of the body tube as well as inside the aft inside portion of the tube. Spray adhesive can (and likely will) unexpectedly find its way to unmasked surfaces. I use 2" Blue painters tape for masking such at this. I also peel off a strip, stick it to a clean surface and then pull it off before masking the model. This reduces the "tack" and makes it easier to remove.
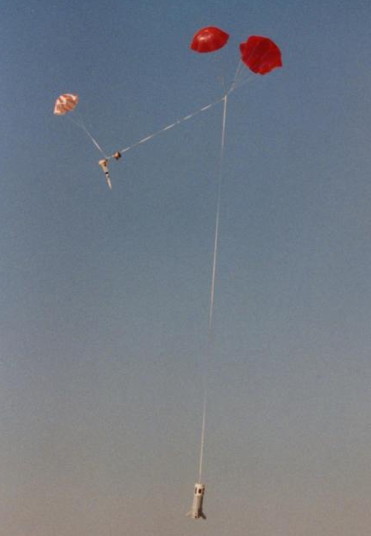
I use a second adhesive (along with the spray) to make for a very strong bond of the wrap to the body tube in the area that the fins attach. The idea is to REALLY securely bond the wrap to the body to hopefully avoid tearing the fin, along with a chunk of wrap, during hard landings (the parachute provided with the LJII kit...as well as most all larger Estes kits the past few years...is WAY TOO SMALL. I recommend making your own 30-36" chute from Mylar (or a lightweight fabric one you can find online) and recovering the body separate from the nosecone). I use "
Amazing Goop" Automotive adhesive available at automotive stores.
Shoe Goo and
Zap Goo seem to be pretty much the same stuff. They are very thick (and potentially messy) adhesives that bond incredibly well to just about anything. I figure anything that can bond metal to paint or hold the soles of my motorcycle boots on for 10 plus years of heavy use has got to have real holding power!
But you must clean up any mess made (and you WILL) with the stuff IMMEDIATELY (
Bestine, found at office supply stores, does a pretty good cleanup job without attacking plastic).
Clean both sides of the wrap with water and something like Dawn diswashing soap. A good wipedown afterwards with something like
Bestine wouln't hurt. Lay the wrap face up and with the "rear" edge facing you and cut off one corrugation from the far left edge of the wrap. You do this because the wrap is a little long. DON'T cut off a corrugation from the right edge as the seam of the wrap does not center under the tunnel cover (properly positioned, only one corrugation is "trapped" under the tunnel when wraped around the model. Align and dry wrap the corrugated wrap around the body tube and mark a rectangular area that measures about 1" wide and 4" long from the base of the body tube where the fins will mount. Use 2" Blue tape to hold one longitudinal edge of the wrap in place making sure the 1"x4" marked locations align directly under the fin locations of the wrap.
Now, get ready to work quickly. You are going to use both your spray adhesive and your Goo/Goop adhesive...and the Goo/Goop sets pretty quickly. "Swing" the wrap away from the tube using the Blue Tape as the hinge point. and apply a smooth liberal (maybe 1/64" thick or so) coating of your "Goop/Goo" adhesive to the 1"x4" areas. Quickly spray both the inside surface of the wrap and the exposed surface of the body tube with a moderately heavy coating of spray adhesive. Wait about 45 seconds to let the spray adhesive start to take a set and then "swing" the wrap back into contact with the tube. Act quickly and do this on one smooth motion, adhering the wrap from the Blue Tape "hinge" back around to the hinge. Everything should line up. Now lift the last-applied edge of the wrap and peel away the Blue Tape hinge and resecure the wrap.
Don't stop now! Take your 2" Blue Tape and, starting at the rear edge of the wrap, tightly wrap the corrugated wrap over the fin areas and work forward until the entire corrugated wrap is tightly wrapped with Blue Tape. Set aside and let cure for at least 12 hours.
The Blue Tape wrap accomplishes a couple of things. The tight wrap at the rear forces a very tight bond of the "Goop" to the wrap and body tube in the fin areas. Secondly, it forms a tight and uniform bond of the corrugations to the body tube without bonding gaps or voids. And third, it will hold the "gap" where the two ends of the wrap to lie flat and not "pucker" up (this pucker is caused by something called "caternary tension"). I suspect that by covering the entire wrap with Blue Tape you not only securely hold the wrap against the adhesive and body joint until the adhesive cures, but you also trap some of the volatiles against the plastic wrap for a longer period of time which may (theory only) slightly soften the plastic and cause it to set to the curve. Don't leave the tape overwrap on for more than a day or you will have difficulty removing it.
The Fins
Assemble the fins like you would any plastic kit (they are simple polystyrene so any liquid or tube glue will work just fine. Though I saw in earlier posts a recommendation to cut the ejector pads inside the fairing areas flush with the inside surface, I have found it not necessary...but it won't hurt if you want to cut them away. After the fins are assembled and the glue dried, wrap some 220 or so sandpaper around the SM section of the body and sand the root/fairing edges to the curve of the body and also so that you have nice flat and square edges around the periphery of the faring roots that will bond to the wrap corrugations.
You are going to use the "Goop/Goo" type cement again along with a solvent type cement intended for ABS plastic. I use Tenax or Plastic Weld...I think just about every recommendation on this thread covers those two. Apply a very liberal coating of the Goop/Goo all around the inside of the farings. Quickly wipe away any excess of of the stuff that gets on the outside of the part. Also try to wipe it away from the flat sanded edge. Position and secure the fin to the wrap and very liberally go around the joint where the root of the fairing touches the wrap with Tenax or Plastic Weld. Limit the application only to the joint but don't be skimpy. Secure in place with Blue Tape. Repeat this process for the remaining three fins. When the last fin is in place uses a few rubber bands to hold the fin/fairing assemblies tightly against the wrap. No GO BACK AROUND the fairing/skin joints with Tenax or Plastic Weld and set aside "upside down" (fins up and with no pressure on them other than the rubber bands)overnight.
The nice thing about "Goo" type cements is they always remain "flexible" and tough and resistant to "shock" type loads. As I said earlier, I used the stuff on my motorcycle boots years ago (and those boots are my everyday shoes!) and the bond is still going strong...let alone a metal badge on my car that has endured many years of weather, sun, carwashes and more.
Other "Gotchas"
Some may think that epoxy is the ultimate bonding answer but even "roughing up" the plastic-to-epoxy interface really doesn't create the bond you need.
Just because the fins stay on with a "tug test" (your fingers) doesn't mean they will stay on in shock loading cases (I think past posts prove this out).
Don't think you can "go back later" and clean up a glue or adhesive "oops." Clear it up the instant it occurs and you'll be far better off.
If you get a "pucker" of the corrugated wrap seam, DON'T think CA will get the pucker out. CA won't stick to the spray adhesive and all you will end up with is a worse pucker. If you have a pucker (even if you don't) glue the tunnel cover over the pucker with good plastic cement and (again) bind it down, front to rear, with Blue Tape overnight (it's better to do this before gluing the fins on).
I make no guarantees these methods will work for you. They have worked for me for years on other model projects.
Sorry about the length of this post but as I don't visit the various forums I figured I would post what I consider my most important tips for the Little Joe. Who knows when I'll be back? I am also happy answer any emails direct to me (particularly if you want to give me a tongue lashing)
[email protected]
John Pursley


")
![995571_1[5].jpg](https://proxy.imagearchive.com/ca0/ca075518a48916c24881de7520d5cde7.jpg)


.jpg")
.jpg")
.jpg")
.jpg")
.jpg")
.jpg")
.jpg")
.jpg")
.jpg")