Print her separately and apply as a second layer?
You are using an out of date browser. It may not display this or other websites correctly.
You should upgrade or use an alternative browser.
You should upgrade or use an alternative browser.
Brainlord's LPR SciFi Spacefighter build thread. (no heavy weapons)
- Thread starter Brainlord Mesomorph
- Start date


Help Support The Rocketry Forum:
This site may earn a commission from merchant affiliate
links, including eBay, Amazon, and others.
Brainlord Mesomorph
Well-Known Member
- Joined
- Apr 2, 2018
- Messages
- 266
- Reaction score
- 26
Print her separately and apply as a second layer?
Logically she'd be painted on top.
I'm still trying to figure out if I'm printing on the clear decal paper or the opaque white.. . both have advantages..
(maybe both) I'm going to have to do tests.....
Oh.Logically she'd be painted on top.
I'm still trying to figure out if I'm printing on the clear decal paper or the opaque white.. . both have advantages..
(maybe both) I'm going to have to do tests.....
Now that I look at the design again, I can see that it is going to be challenging with home-printed decals. My first thought would be white base coat, and then all the white parts of the design would be see-through on the decals. But in theory you could do everything with white-backed decals as well, and hide the base code completely.
Theres no obvious way I can think of to put the nose art on as a second layer, since it would need a combination of clear background and white parts. So you'll need another solution there. Is there a way to rotate the entire decal so she doesn't overlap the edge?
Brainlord Mesomorph
Well-Known Member
- Joined
- Apr 2, 2018
- Messages
- 266
- Reaction score
- 26
Oh.
Now that I look at the design again, I can see that it is going to be challenging with home-printed decals. My first thought would be white base coat, and then all the white parts of the design would be see-through on the decals. But in theory you could do everything with white-backed decals as well, and hide the base code completely.
Theres no obvious way I can think of to put the nose art on as a second layer, since it would need a combination of clear background and white parts. So you'll need another solution there. Is there a way to rotate the entire decal so she doesn't overlap the edge?
OK here's how I'll do this:
1. I print the wrap on the white opaque material
2. on the 2 parts w/ the nose art, print a white splotch in the exact spot and exact shape of the nose art.
In the printing industry this is called a "knock out" (I'm going to knock the nose art out of the underlying paint color) and yes, at a printshop if you happen to do that to a picture of a girl, jokes about "she's a knockout" continue, ad nauseam, until the job is out the door.
3. Finally print her on the clear material, and put that right over the knock out.
If I screw with the art a little bit, I'm sure I can give myself a point or two of tolerance so it won't have to be perfectly on top to work.
And I'll print out some practice pieces first, and experiment. (there'll be pics)
Cool. I'm just coming up to doing my own decals for the first time, so I got me some learnin' to do here.
Brainlord Mesomorph
Well-Known Member
- Joined
- Apr 2, 2018
- Messages
- 266
- Reaction score
- 26
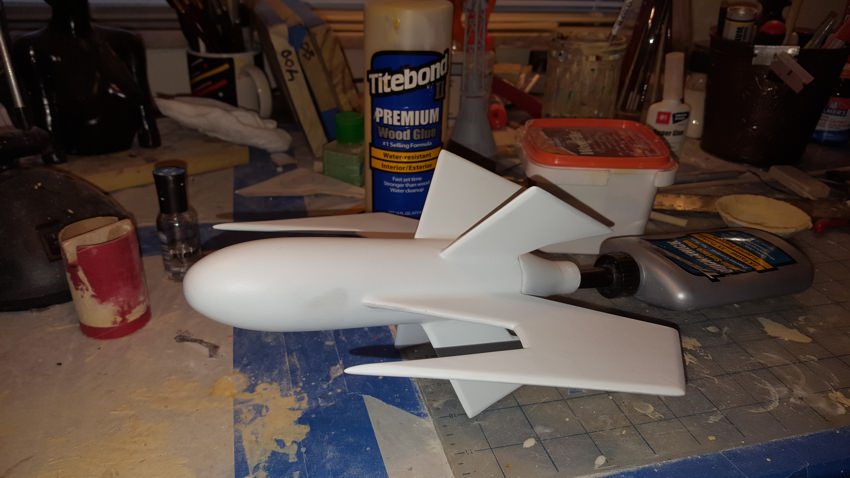
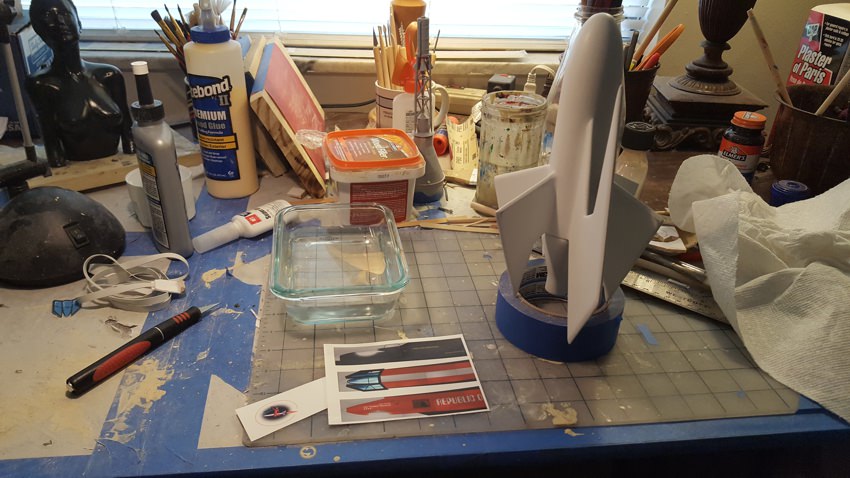
OK Back to construction:
Next was fillets. I like fillets, but given this was model of a ship, I was trying not to go overboard.
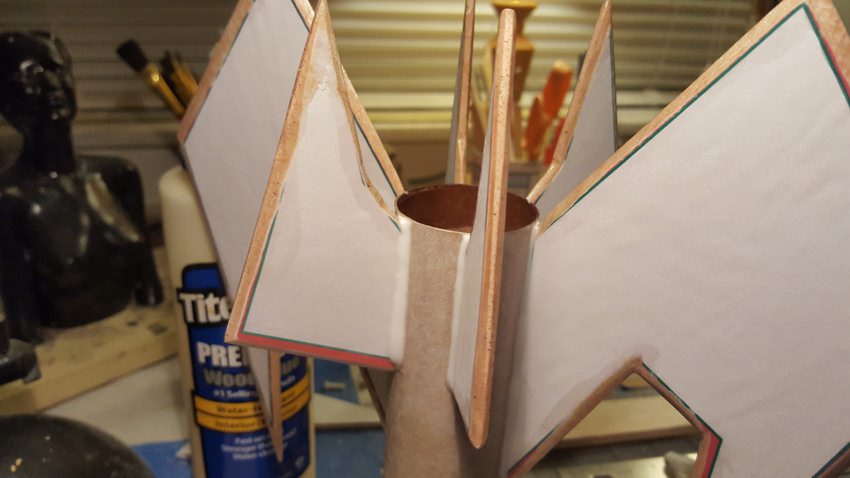
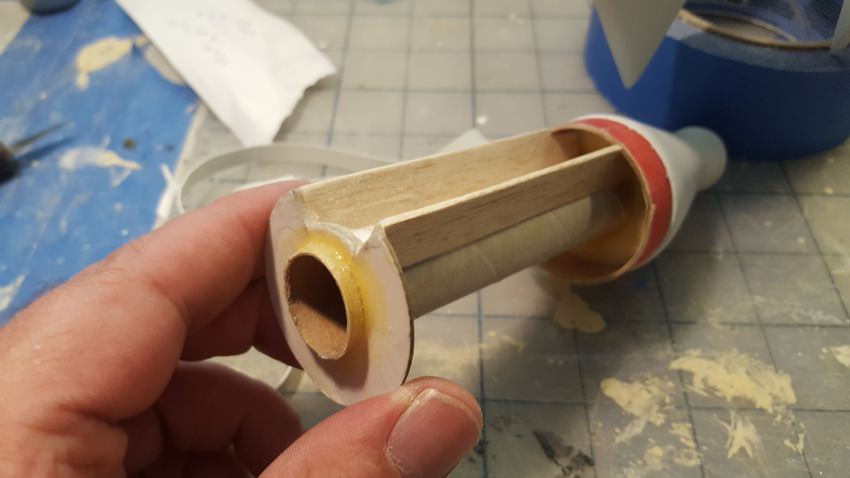
While they dried, I started with the CFW on the boattail:
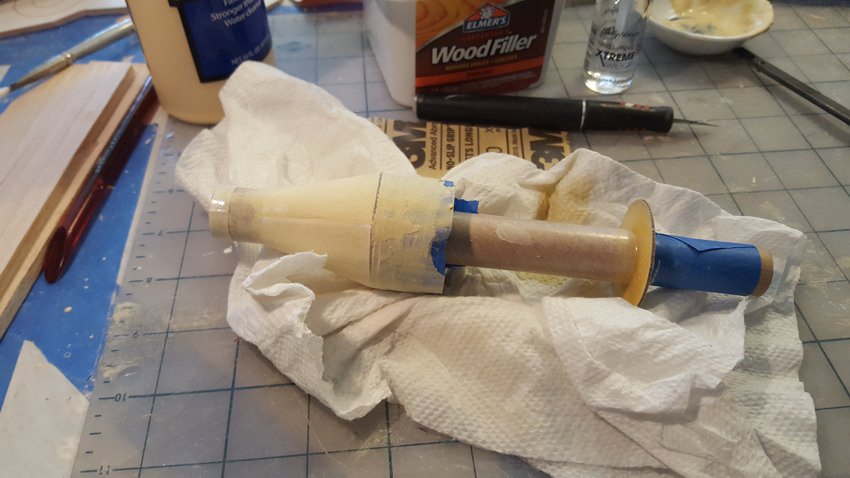
That's a paper ring covered in nail polish at the end of the tube. It needed reinforcement it was already starting to tear.
After a couple of coats of CWF and sanding
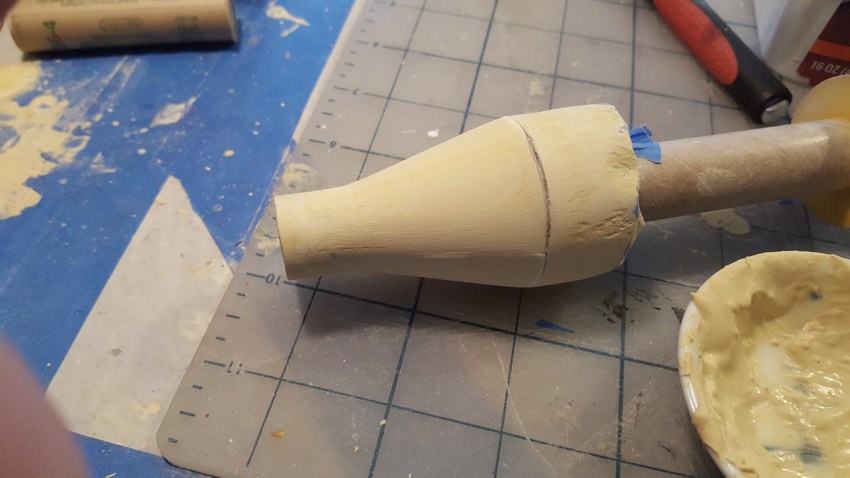
Next was fillets. I like fillets, but given this was model of a ship, I was trying not to go overboard.
While they dried, I started with the CFW on the boattail:
That's a paper ring covered in nail polish at the end of the tube. It needed reinforcement it was already starting to tear.
After a couple of coats of CWF and sanding
Brainlord Mesomorph
Well-Known Member
- Joined
- Apr 2, 2018
- Messages
- 266
- Reaction score
- 26
Now it seems I forgot to take pictures for a bit here... :blush: oops.
So I'll just type:
After fillets, the next step was a coat CFW all over the main body and fins.
I work with a soft brush, and go perpendicular to the tube spiraling. ( so 45 degrees the other way) and I put it on heavy around the nosecone seam and the fillets.
(visualize photo here)
Then I use 200 grit to sand, on the fins (and "wings") I work down to a surface that is about 50% paper and 50% percent CWF. That's the CWF filling in low spots that were made from slight wrinkling of the paper during lamination.
I put a piece of 200 grit around a 1/4" dowel and do the fillets, again down to half glue, half CWF.
I go very lightly on the tube, just to knock off the brush marks, I leave a nice coat of CWF on the tube.
Then a wipe with 400 to smooth the surface and you're ready for primer.
after Primer:
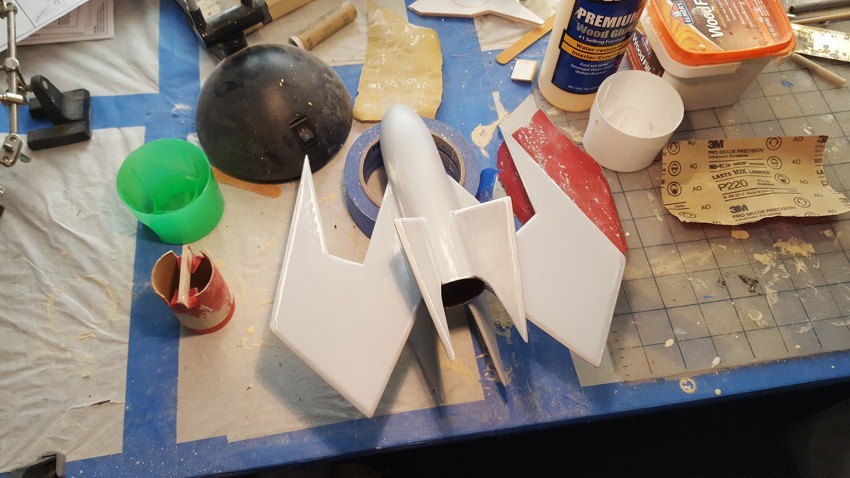
Actually that's betweem 2 coats, I ran out of white and did top coats in gray, that's why I' sanding down from gray to white there.
I think I did 4 maybe 5 coats of primer, I had some bad wrinkles around the front of one fin, and it took some work to totally obliterate the nosecone seam.
So I'll just type:
After fillets, the next step was a coat CFW all over the main body and fins.
I work with a soft brush, and go perpendicular to the tube spiraling. ( so 45 degrees the other way) and I put it on heavy around the nosecone seam and the fillets.
(visualize photo here)
Then I use 200 grit to sand, on the fins (and "wings") I work down to a surface that is about 50% paper and 50% percent CWF. That's the CWF filling in low spots that were made from slight wrinkling of the paper during lamination.
I put a piece of 200 grit around a 1/4" dowel and do the fillets, again down to half glue, half CWF.
I go very lightly on the tube, just to knock off the brush marks, I leave a nice coat of CWF on the tube.
Then a wipe with 400 to smooth the surface and you're ready for primer.
after Primer:
Actually that's betweem 2 coats, I ran out of white and did top coats in gray, that's why I' sanding down from gray to white there.
I think I did 4 maybe 5 coats of primer, I had some bad wrinkles around the front of one fin, and it took some work to totally obliterate the nosecone seam.
Brainlord Mesomorph
Well-Known Member
- Joined
- Apr 2, 2018
- Messages
- 266
- Reaction score
- 26
Now it was time to address the shock cord problem.
I had been imagining a typical Estes rubber band mounted in the aft of the main tube. But I realized that when the EC goes off the forward centering ring on the rear blow section would hit the shock cord mount on the way out. I was told that kevlar attached in the "combustion chamber" of the piston was the answer. But this thing weighs a ton and has ridiculous fin area, and that's just a recipe for zippering.
So I thought about cutting a small opening in the forward centering ring on the rear blow section, so it would fit around the SC mount. But that would violate the compression in the combustion chamber, and there would be no way making sure it stayed lined up during ejection.
But what if there was a channel that ran the length of the rear blow section, that fit around the SC mount? That would stay lined up. The SC could be stowed in that section. You could put wadding in the front of the channel it maintain pressure and protect the SC. It seams to me that this has to work.
But its never been done, to my knowledge, so that means I get to do static testing!") (my brother has volunteered his back yard, it wants to see it too) Quite frankly I'd like to see even a simple ejection sequence up close.
(my brother has volunteered his back yard, it wants to see it too) Quite frankly I'd like to see even a simple ejection sequence up close.
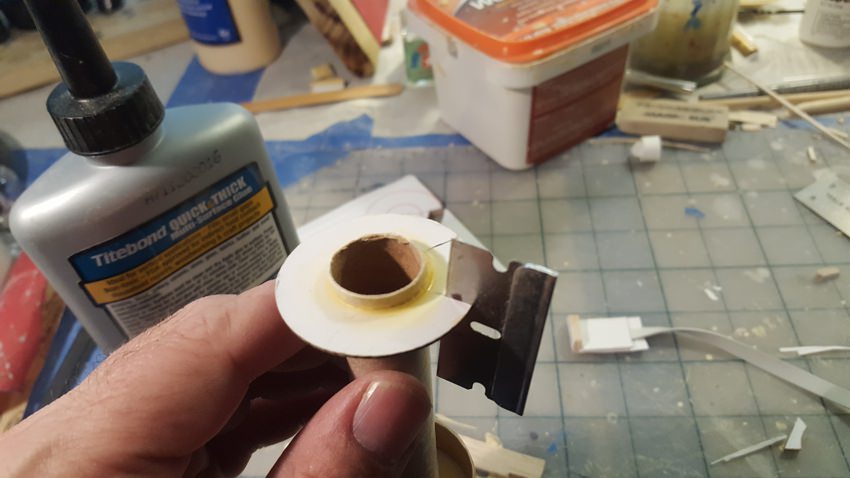
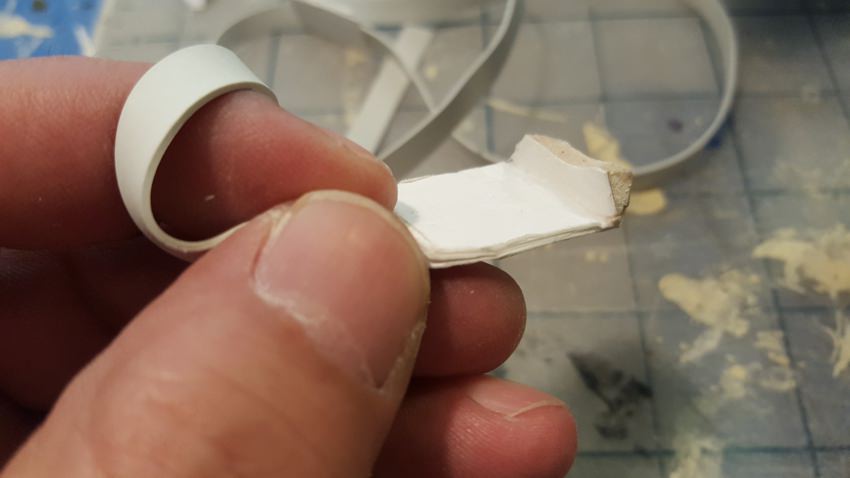
The SC mount itself isn't substantial enough for the channel to hold on to, so I'm putting a small balsa key in front of it. Is this a tongue-and-groove?, is this a rail system? I don't know the exact term for what I've done here, I'll call it a channel and a channel guide (but that's the thing on the TV remote).
So to make the channel guide I used one of my uncut balsa centering rings. It was aready laminated in paper and marked at the exact right size.
then marked the cut out on the forward centering ring

and cut it
Now I've gone and done it!
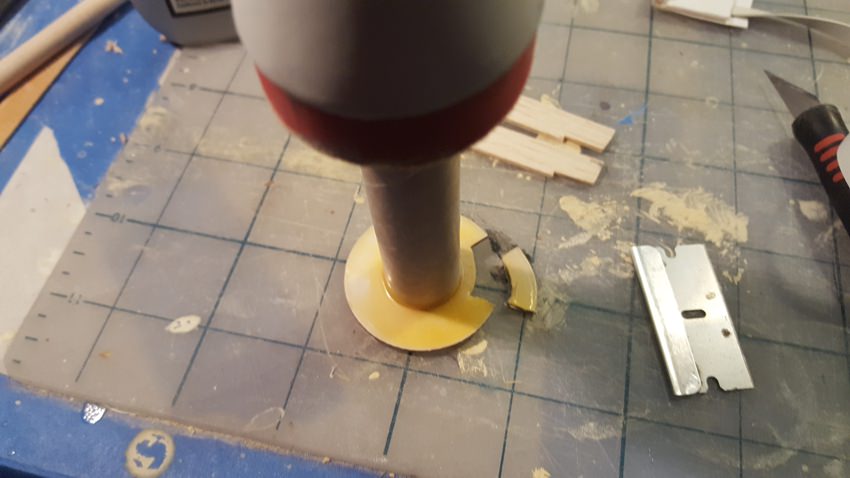
See the two balsa "walls" behind it that I just cut.
EDIT: D'Oh! now that I look at this pic, That piece I cut out would have made a perfect channel guide! (i threw it away)
Then added the walls, creating a channel
Mounted the channel guide to the SC mount
It fits:
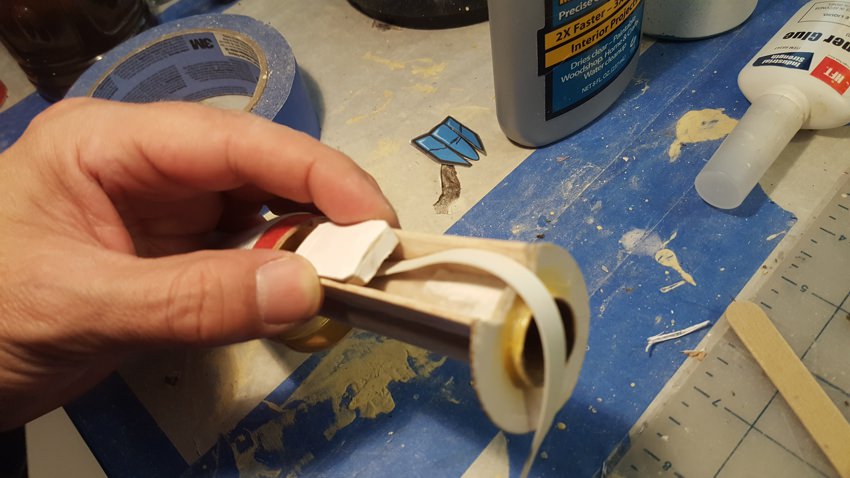
I've sanded it smooth, the action feels nice, I think it will work.
But I have to stop that now.
Because I still have to do the decal wrap and paint (top coat) and can't do that with the recovery system in the way.
So next is decals! (the fun part!)
I had been imagining a typical Estes rubber band mounted in the aft of the main tube. But I realized that when the EC goes off the forward centering ring on the rear blow section would hit the shock cord mount on the way out. I was told that kevlar attached in the "combustion chamber" of the piston was the answer. But this thing weighs a ton and has ridiculous fin area, and that's just a recipe for zippering.
So I thought about cutting a small opening in the forward centering ring on the rear blow section, so it would fit around the SC mount. But that would violate the compression in the combustion chamber, and there would be no way making sure it stayed lined up during ejection.
But what if there was a channel that ran the length of the rear blow section, that fit around the SC mount? That would stay lined up. The SC could be stowed in that section. You could put wadding in the front of the channel it maintain pressure and protect the SC. It seams to me that this has to work.
But its never been done, to my knowledge, so that means I get to do static testing!
(my brother has volunteered his back yard, it wants to see it too) Quite frankly I'd like to see even a simple ejection sequence up close.The SC mount itself isn't substantial enough for the channel to hold on to, so I'm putting a small balsa key in front of it. Is this a tongue-and-groove?, is this a rail system? I don't know the exact term for what I've done here, I'll call it a channel and a channel guide (but that's the thing on the TV remote).
So to make the channel guide I used one of my uncut balsa centering rings. It was aready laminated in paper and marked at the exact right size.
then marked the cut out on the forward centering ring
and cut it
Now I've gone and done it!
See the two balsa "walls" behind it that I just cut.
EDIT: D'Oh! now that I look at this pic, That piece I cut out would have made a perfect channel guide! (i threw it away)
Then added the walls, creating a channel
Mounted the channel guide to the SC mount
It fits:
I've sanded it smooth, the action feels nice, I think it will work.
But I have to stop that now.
Because I still have to do the decal wrap and paint (top coat) and can't do that with the recovery system in the way.
So next is decals! (the fun part!)
Nifty.
In places where you have balsa sliding against balsa, could be a good idea to apply a layer of medium CA and sand it smooth. Should give a nice slippery sliding surface, also a bit more durability. You shouldn't need to soak it in thin CA, just a surface coating of medium applied with q-tip I would think. Optional of course.
In places where you have balsa sliding against balsa, could be a good idea to apply a layer of medium CA and sand it smooth. Should give a nice slippery sliding surface, also a bit more durability. You shouldn't need to soak it in thin CA, just a surface coating of medium applied with q-tip I would think. Optional of course.
Good job mindsiming and implimenting a solution. You have to do that alot when building airplane like Oddrocs. Get out of traditional thinking, get outside the box. The rear eject is awesome. It would have been simpler just to go out the front but you went out the back to make it look marvelous, no nose cone separation to mess up the decals!
Brainlord Mesomorph
Well-Known Member
- Joined
- Apr 2, 2018
- Messages
- 266
- Reaction score
- 26
Brainlord Mesomorph
Well-Known Member
- Joined
- Apr 2, 2018
- Messages
- 266
- Reaction score
- 26
Ink jet printed decals are an amazing dichotomy.
From one angle they are complete freedom, and (finally) the ability to put absolutely anything you want on a rocket (or any other model). And at the same time, using them is very, very restrictive, because they dont work like the decals youre used to. They are not opaque. While you may not have realized it, every real decal youve used is opaque. So white letters over colored paint is not a problem, even color art over colored paint is not a problem.
Inkjet output is translucent. So putting a color decal over color paint in like trying to print in color on colored paper. It doesnt work, or it kind of works but only in very restrictive ways. So given this problem, you have a few (restrictive) options.
1. Black decals over colored rockets.
You can always run black over a color. But after you do a couple of rockets like that, you notice that thats the exact color scheme of the Crayola company. (black over every color) and your rockets look like crayons.
2. Color decals on white rockets.
A good answer, but also gets old after a while.
3. Trying to mix colors.
Putting blue decals on a yellow rocket will give you green! Also restrictive, and youll need good graphics software to previsualize the color mix.
4. Using opaque white decal paper.
Youll have to work exclusively in shapes you can cut out. Big thick boarder lines help, and say goodbye to any fades or airbrush effects. It can end up looking like a bunch of bumper stickers.
5. Designing in white areas on a colored paint job, and putting the art there.
This was the most flexible idea I had so far for mixing paint and decals.
6. Doing a full wrap.
Just paint it white and cover it completely. This does give you complete artistic freedom, but also is *the absolute most difficult to apply*, as I am just learning.
And boy am I learning.
I'll post more pics tonight. This build thread is about to become a huge tutorial on decal wraps.
I have a clean white model, 20 sheets of decal paper and a full decal wrap already drawn.
Now all I have to is figure out how to (EDIT: PRINT AND) apply these to the model in a way that does justice to all this artwork.
Brainlord Mesomorph
Well-Known Member
- Joined
- Apr 2, 2018
- Messages
- 266
- Reaction score
- 26
About the artwork:
Again this project was to see how far I could push these custom decals.
So I have made what must be some of most detailed decals that are possible. I worked at 1200 dpi because why not. (Traditional decals are printed with silkscreen technology which can’t get much higher than the equivalent of 100 dpi.)
I have a lot of experience in all of this. I’ve been drawing spaceships since I was 6, using CorelDraw since v 1.0 (1991) and doing 3d models and animation since POVRay (a program that rendered 3d art from scenes described in ascii text files!)
I did this: (I didn’t model that Enterprise but I did texture it)
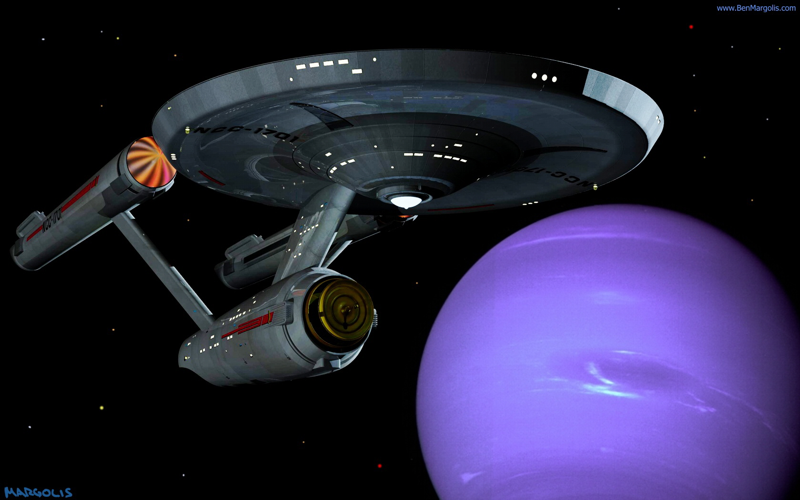
And I modeled and textured this:
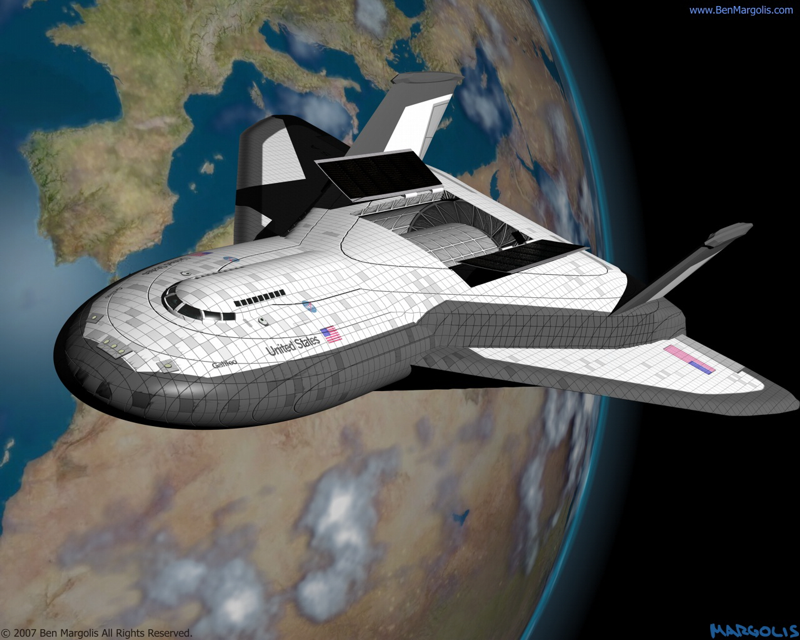
(really? I did those 11 years ago?!)
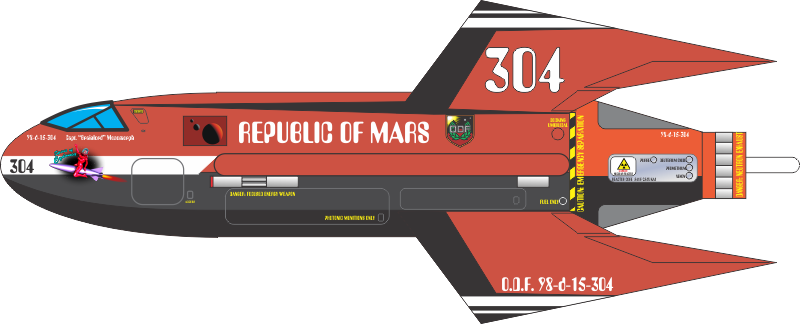
So when it was time to draw really high detail texture maps for these decals, I had a plan of action in mind and very high hopes for the result. I had refined the concept art to this:
And had drawn flat texture maps like this.
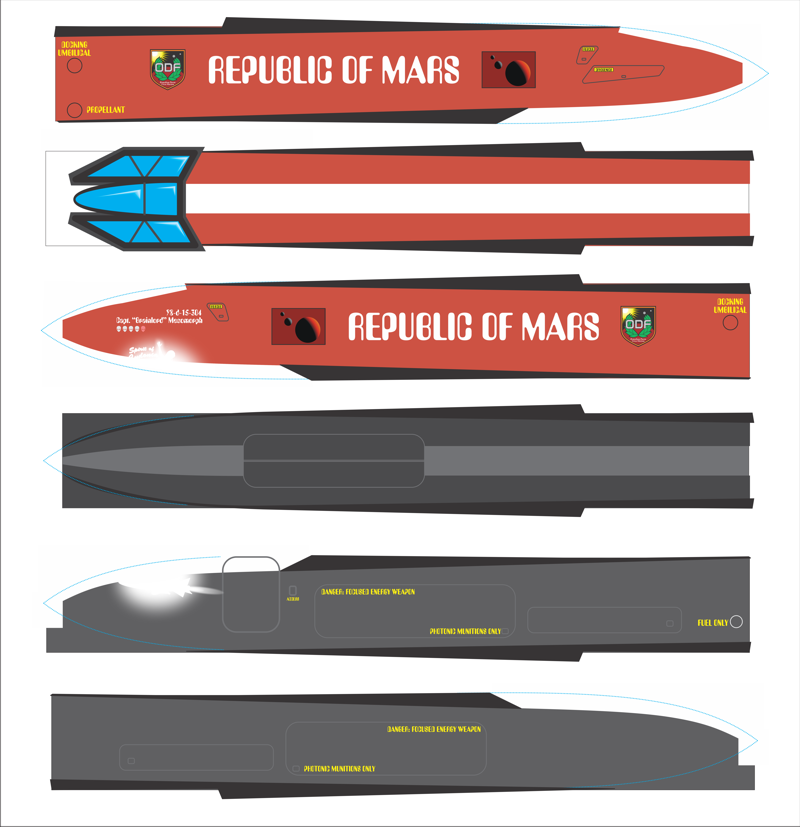
Now in 3d animation, a texture like this spaceship will have several layers. There will be a layer of color (paint) there will be another layer of metal paneling that you would sort of see through the paint. There would be a layer of dirt and weathering on top of the paint, and there might even be a layer of scratches that would actually remove the paint and make the metal paneling underneath clearly visible. Perhaps there would also be a layer of burn marks and battle damage. All these layers are mixed by the 3d animation app during rendering to create the texture of the ship.
It was my plan to create the same layers as I would for 3d animation. But then layer them in Photoshop (actually PhotoPaint) and print them as decals.
Now it turned out the paint chipping and scratches effects didn't really come across (in 3d modeling those thing react to light differently, in a decal I couldn't do that (yet).
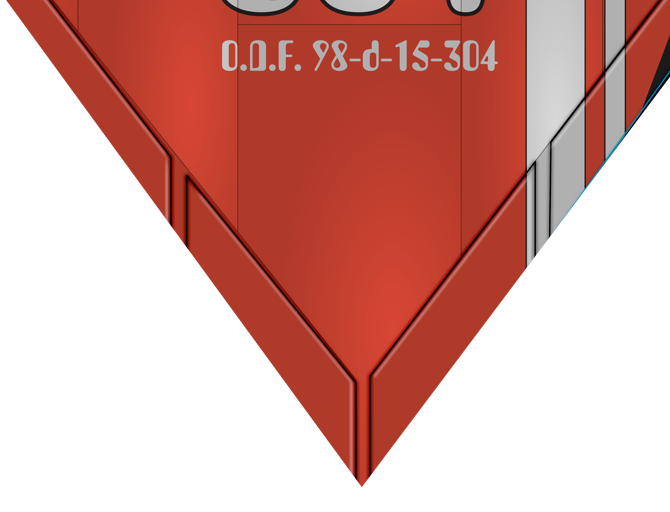
But the panels and shading effects worked beautifully:
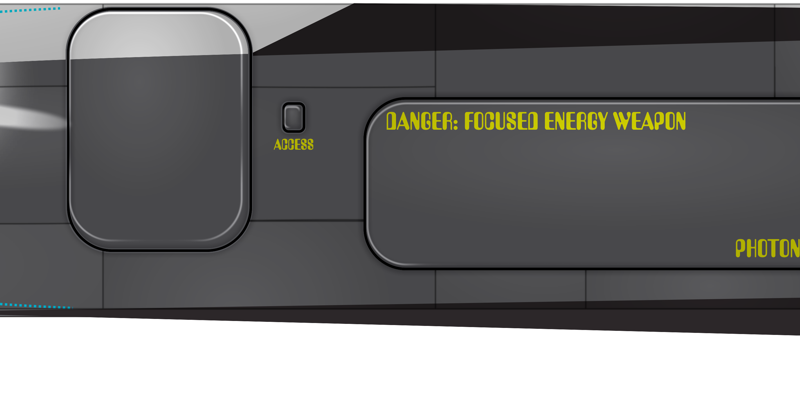
And at full resolution:


I'm totally psyched about these faux ailerons:
Again this project was to see how far I could push these custom decals.
So I have made what must be some of most detailed decals that are possible. I worked at 1200 dpi because why not. (Traditional decals are printed with silkscreen technology which can’t get much higher than the equivalent of 100 dpi.)
I have a lot of experience in all of this. I’ve been drawing spaceships since I was 6, using CorelDraw since v 1.0 (1991) and doing 3d models and animation since POVRay (a program that rendered 3d art from scenes described in ascii text files!)
I did this: (I didn’t model that Enterprise but I did texture it)
And I modeled and textured this:
(really? I did those 11 years ago?!)
So when it was time to draw really high detail texture maps for these decals, I had a plan of action in mind and very high hopes for the result. I had refined the concept art to this:
And had drawn flat texture maps like this.
Now in 3d animation, a texture like this spaceship will have several layers. There will be a layer of color (paint) there will be another layer of metal paneling that you would sort of see through the paint. There would be a layer of dirt and weathering on top of the paint, and there might even be a layer of scratches that would actually remove the paint and make the metal paneling underneath clearly visible. Perhaps there would also be a layer of burn marks and battle damage. All these layers are mixed by the 3d animation app during rendering to create the texture of the ship.
It was my plan to create the same layers as I would for 3d animation. But then layer them in Photoshop (actually PhotoPaint) and print them as decals.
Now it turned out the paint chipping and scratches effects didn't really come across (in 3d modeling those thing react to light differently, in a decal I couldn't do that (yet).
But the panels and shading effects worked beautifully:
And at full resolution:
I'm totally psyched about these faux ailerons:
Careful now, I might have to hire you do to the artwork for my next design.
Very cool stuff!
Very cool stuff!
Brainlord Mesomorph
Well-Known Member
- Joined
- Apr 2, 2018
- Messages
- 266
- Reaction score
- 26
(sigh) people wanted to know this too:
How to Decal Wrap an Ellipsoid nosecone:
At first I was Googling “How to map a texture to a sphere,” but that was getting me links on maps, or how to texture a 3d model (and I know all about that). But my Google-foo is unstoppable! Finally, “How to wrap paper abound a ball” got me in the right channel of information
Here’s a white paper for those who are interested:
Wrapping Spheres with Flat Paper https://pdfs.semanticscholar.org/88c8/b7100bea705f822e8ffc42933d3c9ec9ffec.pdf
That guy calls the sections “petals” (because in nature this is exactly the way a flower unwraps) and uses “k” for the number of petals. That paper goes on about spheres, but an ellipse is just a circle w/ two diameters (well, axes) so it translates nicely.
NOTE: the following is for ELLIPSOID nosecones ONLY.
(I have no idea about all the various pointier designs)
Practically, to create the shape, you need three numbers:
The width of the base of the petal (i.e. 1/k of the circumference of the rocket) the height of the petal (the length from the base of the nosecone to its apex, or 1/4 of the circumference of the ellipse of those dimensions) and the angle of the tip of the petal which will be 1/k of 360 degrees. You can calculate these numbers given the diameter of the rocket and the height of the nosecone. But as I learned later it’s better to just measure the finished rocket with extreme accuracy.
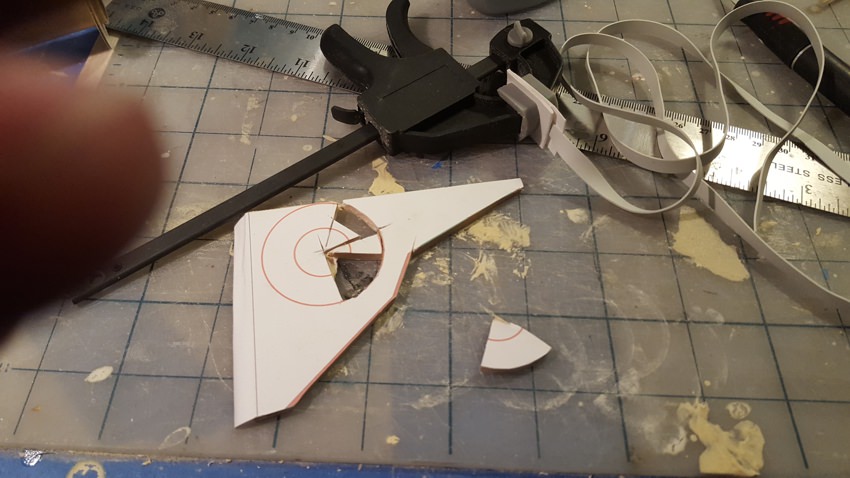
Plot this in your favorite vector illustration app, I use CorelDraw. (given K=6)
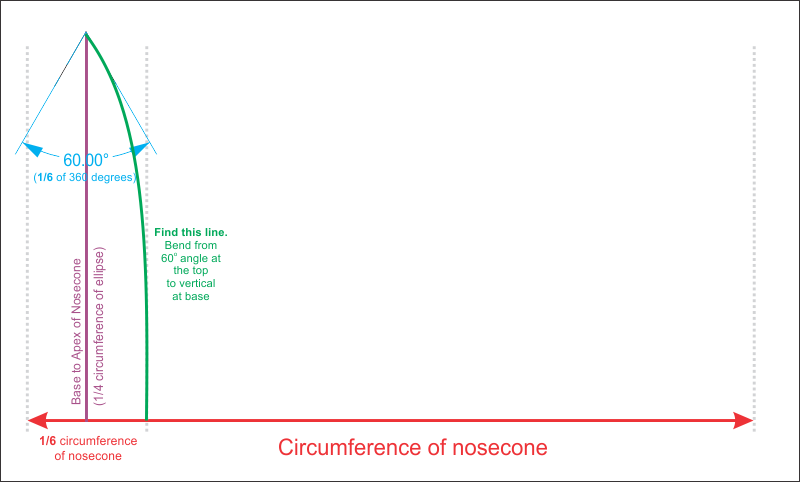
You just need to find that green line. I used Bezier curve.
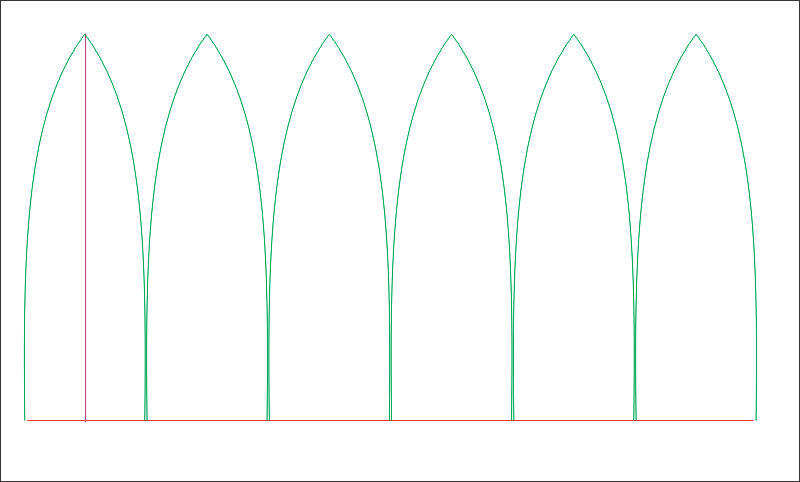
Now just duplicate that arc, to create k number of petals.
Checking the fit.
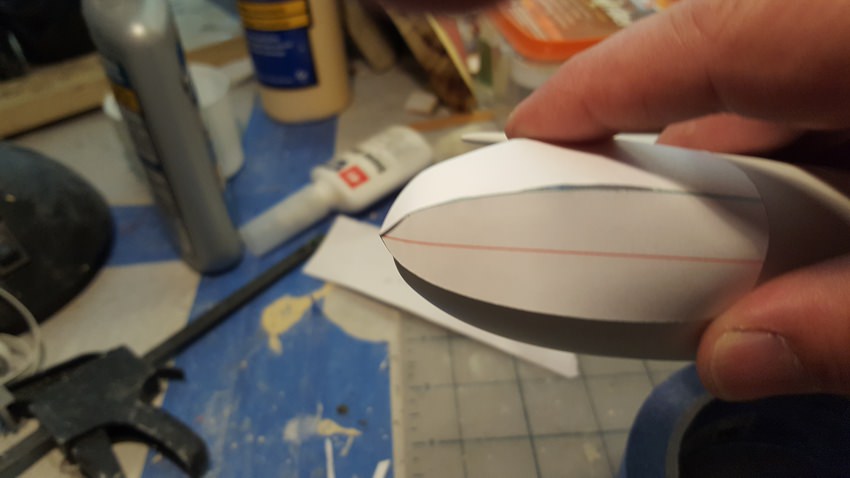
Note: That actually does not fit. Not well enough anyway, which we will get to shortly.
How to Decal Wrap an Ellipsoid nosecone:
At first I was Googling “How to map a texture to a sphere,” but that was getting me links on maps, or how to texture a 3d model (and I know all about that). But my Google-foo is unstoppable! Finally, “How to wrap paper abound a ball” got me in the right channel of information
Here’s a white paper for those who are interested:
Wrapping Spheres with Flat Paper https://pdfs.semanticscholar.org/88c8/b7100bea705f822e8ffc42933d3c9ec9ffec.pdf
That guy calls the sections “petals” (because in nature this is exactly the way a flower unwraps) and uses “k” for the number of petals. That paper goes on about spheres, but an ellipse is just a circle w/ two diameters (well, axes) so it translates nicely.
NOTE: the following is for ELLIPSOID nosecones ONLY.
(I have no idea about all the various pointier designs)
Practically, to create the shape, you need three numbers:
The width of the base of the petal (i.e. 1/k of the circumference of the rocket) the height of the petal (the length from the base of the nosecone to its apex, or 1/4 of the circumference of the ellipse of those dimensions) and the angle of the tip of the petal which will be 1/k of 360 degrees. You can calculate these numbers given the diameter of the rocket and the height of the nosecone. But as I learned later it’s better to just measure the finished rocket with extreme accuracy.
Plot this in your favorite vector illustration app, I use CorelDraw. (given K=6)
You just need to find that green line. I used Bezier curve.
Now just duplicate that arc, to create k number of petals.
Checking the fit.
Note: That actually does not fit. Not well enough anyway, which we will get to shortly.
Brainlord Mesomorph
Well-Known Member
- Joined
- Apr 2, 2018
- Messages
- 266
- Reaction score
- 26
Careful now, I might have to hire you do to the artwork for my next design.
Very cool stuff!
thx,
you can't afford me.
There is a site called DeviantArt.com.
There are a bunch of teenage 3d artists from all over the world who will do this kind of thing for the experience and between $5 and $50 depending on which country they're in.
Brainlord Mesomorph
Well-Known Member
- Joined
- Apr 2, 2018
- Messages
- 266
- Reaction score
- 26
I knew a couple of things about this material:
1: its "workablility" was inversely proportionate to its size. That is, small ones are easy to handle, but the bigger they get the harder they are to move, the more likely they are to wrinkle or tear.
2: This material stretches. Even just sliding off the paper it stretches. I tried to wrap a tube in roll marks once, and after three tries I just had to accept a 1/8" overlap.
Given that, I had decided that six strips that fit between the fins was a good idea.
Experiment 1.
So after three coats of flat white I was ready to try my first experiments, printed just the top half of three strips
and applied them:
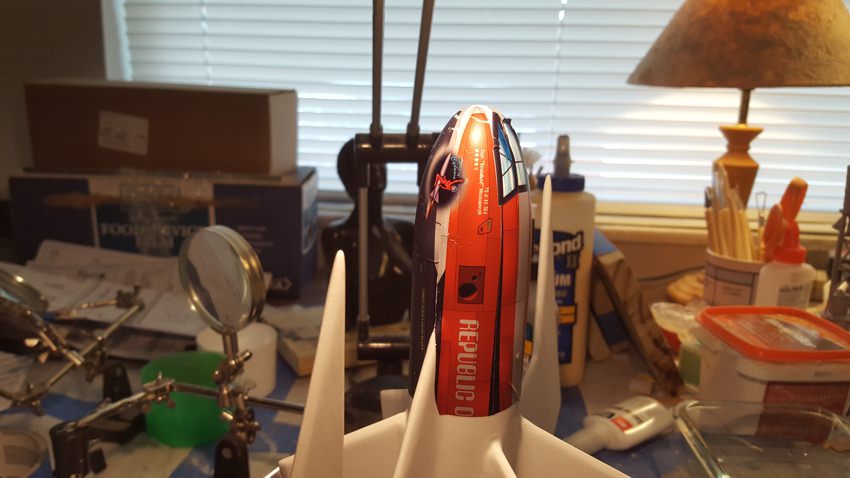
Yes its sucks. I knew it would suck. the questions were, Where would it suck? and How would it suck?
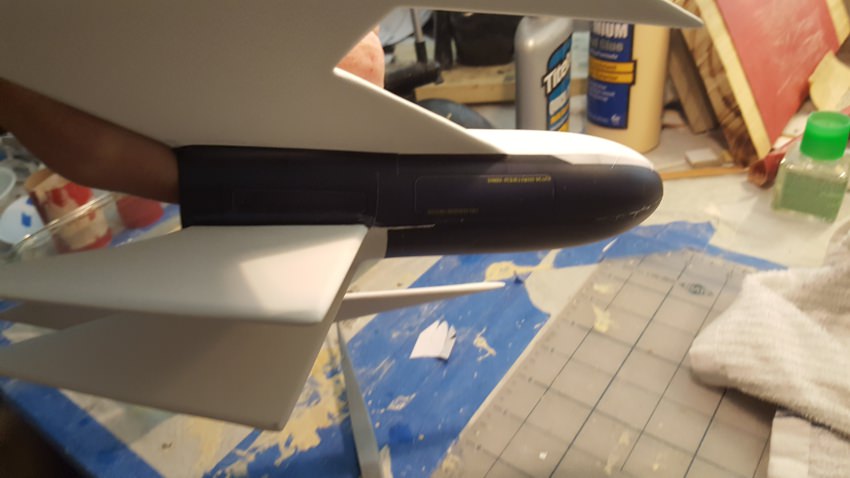
Lessons learned from Experiment 1:
Pro: The paneling effect was effective assuming it was applied correctly.
Con: Applying it correctly was almost impossible.
Getting it flat and straight was one problem. Getting it into position was another. Getting it flat and straight moves it so it isn't in position, by the time you get it back in position it is no longer flat and straight. and after a few tries, now its wrinkled and torn.
I pealed it all off and scrubbed the model down with a towel.
1: its "workablility" was inversely proportionate to its size. That is, small ones are easy to handle, but the bigger they get the harder they are to move, the more likely they are to wrinkle or tear.
2: This material stretches. Even just sliding off the paper it stretches. I tried to wrap a tube in roll marks once, and after three tries I just had to accept a 1/8" overlap.
Given that, I had decided that six strips that fit between the fins was a good idea.
Experiment 1.
So after three coats of flat white I was ready to try my first experiments, printed just the top half of three strips
and applied them:
Yes its sucks. I knew it would suck. the questions were, Where would it suck? and How would it suck?
Lessons learned from Experiment 1:
Pro: The paneling effect was effective assuming it was applied correctly.
Con: Applying it correctly was almost impossible.
Getting it flat and straight was one problem. Getting it into position was another. Getting it flat and straight moves it so it isn't in position, by the time you get it back in position it is no longer flat and straight. and after a few tries, now its wrinkled and torn.
I pealed it all off and scrubbed the model down with a towel.
rharshberger
Well-Known Member
One trick of DIY decals is the heavier the fixatif coats, the stiffer and easier to handle the de als are. My first ones were 2-3 light coats of Krylon Crystal Clear and applying them was a pain due to rolling and ease of tearing. Later I used 3-4 heavy coats and they are much easier to apply but the edges also show more.
Brainlord Mesomorph
Well-Known Member
- Joined
- Apr 2, 2018
- Messages
- 266
- Reaction score
- 26
One trick of DIY decals is the heavier the fixatif coats, the stiffer and easier to handle the de als are. My first ones were 2-3 light coats of Krylon Crystal Clear and applying them was a pain due to rolling and ease of tearing. Later I used 3-4 heavy coats and they are much easier to apply but the edges also show more.
You're right there.
I'm still trying to find balance there. Using Rusto Clear Enamel, was using glossy on other rockets, trying matte on this one.
Current levels are: three medium coats, 15 minutes apart, then 30 minutes plus before applying.
Gary Byrum
Overstable By Design
When I had a go with these homemade decals, the final word was selling what I had left to someone that wanted them. By the time you seal the ink, the whole decal is thicker than adhesive vinyl or paper applications. They looked obvious and I can't remember if I used a wet app or not. I had both, white and clear and only ever used the clear sheets. Once the decal dried I wasn't happy with the look so I started pealing it off. Much to my surprise, they came off without a hitch. These days, I'll whip out something in Corel Draw and print on regular copy paper. Clear coat that and cut to fit. These models all have paper applications. It's a group pic but the 3 in the center are the paper apps. 2 versions of the Orbital Transport Lab (DOM) and my failed Beldar. The point is, it's much easier to do and look great 5' away.

Brainlord Mesomorph
Well-Known Member
- Joined
- Apr 2, 2018
- Messages
- 266
- Reaction score
- 26
When I had a go with these homemade decals, the final word was selling what I had left to someone that wanted them. By the time you seal the ink, the whole decal is thicker than adhesive vinyl or paper applications. They looked obvious and I can't remember if I used a wet app or not. I had both, white and clear and only ever used the clear sheets. Once the decal dried I wasn't happy with the look so I started pealing it off. Much to my surprise, they came off without a hitch. These days, I'll whip out something in Corel Draw and print on regular copy paper. Clear coat that and cut to fit. These models all have paper applications. It's a group pic but the 3 in the center are the paper apps. 2 versions of the Orbital Transport Lab (DOM) and my failed Beldar. The point is, it's much easier to do and look great 5' away.
You bring up two interesting points:
Paper. God knows I have decades of experience gluing paper to things. It would have most of the same downsides as the opaque white decals. Seems to me it would be thicker and heavier. It will need just as much acrylic overcoat as decals plus adhesive. Be a lot easier to handle though.
And you mention "the 5 foot paint job" I'm well aware of that.
But, just to see if I could, I was trying for model train level details. An ILM quality model that would stand up to macro photography.
I am probably not going to get there. But I'm still aiming for better than 5 feet.
Gary Byrum
Overstable By Design
Apparently someone else discovered what we have attempted a long time ago. It's no wonder that real decals are screen printed. Not only are they super thin but they also have permanent inks and printing with white is not an issue. I really don't mind settling for reasonably acceptable substitutes. I bought a plotter for vinyl applications and I'll just print what I can. Keeps me happy in my corner of the sandbox.
Brainlord Mesomorph
Well-Known Member
- Joined
- Apr 2, 2018
- Messages
- 266
- Reaction score
- 26
Apparently someone else discovered what we have attempted a long time ago. It's no wonder that real decals are screen printed. Not only are they super thin but they also have permanent inks and printing with white is not an issue. I really don't mind settling for reasonably acceptable substitutes. I bought a plotter for vinyl applications and I'll just print what I can. Keeps me happy in my corner of the sandbox.
https://www.ebay.com/itm/Refurnbish...rmal-Water-Decal-Sticker-Printer/362315519483
Anyone want to halfsies on a $400 printer that does opaque color, including white?
Gary Byrum
Overstable By Design
I believe that's what the Sandman used. I bought some decals from him printed with one of those. Looked pretty darn good too. I didn't know at the time, that you're supposed to clear coat them before applying. He never said to do it. They tore very easily. But other than screen printing, that is the only other option I've ever heard about.https://www.ebay.com/itm/Refurnbish...rmal-Water-Decal-Sticker-Printer/362315519483
Anyone want to halfsies on a $400 printer that does opaque color, including white?
Charles_McG
Ciderwright
There are Okidata laser printers with white toner option. But not foil/Metallics like the Alps.
terryg
Well-Known Member
Sandman finally gave up on keeping the alps running. Just too old to be reliable.
Brainlord Mesomorph
Well-Known Member
- Joined
- Apr 2, 2018
- Messages
- 266
- Reaction score
- 26
OK even better:
These guys claim to do custom one-off actual screen printed decals
https://www.alps-printer.com/silkscreen_service.php?id=1&RCsid=ckprg66ljjtkff5dac4s0pqfk6
These guys claim to do custom one-off actual screen printed decals
https://www.alps-printer.com/silkscreen_service.php?id=1&RCsid=ckprg66ljjtkff5dac4s0pqfk6
modeltrains
Well-Known Member
- Joined
- Jun 29, 2011
- Messages
- 1,872
- Reaction score
- 758
Interesting experimental project, all the way from the shapes to the processes.
Brainlord Mesomorph
Well-Known Member
- Joined
- Apr 2, 2018
- Messages
- 266
- Reaction score
- 26
All right, I’m going to save myself a lot of typing and you a lot of reading, I was going to go through my decal wrapping experiments one-by-one. But that would be a waste of time.
So instead, just visualize a film montage scene; where I’m printing out decals, spraying them, cutting them, putting them on, frowning at them, taking a pic or two, and then peeling them off. Over and over again, I get a better at it, but the quality seems to plateau, well below an acceptable level.
The opaque white material has an opaque white edge that shows, especially at the nosecone seems and anywhere else it overlaps. Six petals are not enough for a BT60 Ellipsoid nosecone. The petals are wrinkling where they meet. Maybe 10, or 12 would work, but that just increases the number of white seams. You can color in the edges with a marker between cutting and soaking them. Then the edge isn’t white, but it’s still there.
EDIT: No! coloring in the edges before applying the decal, the ink comes off (and on to the model!) and leaves a dirty white edge.(still working on this....)
Furthermore, I realized something else, when you have sub-millimeter details in the artwork, a 2 mm mistake in applying them is HUGE!
I had noticed in the Estes catalogs, that the sci fi models these days were very, very low detail; just a colored blob represents a cockpit, and solid colored circles for windows. Now I know why. The less detail, the less accuracy you need in application.
I’m on like Experiment 9 or so. Around 7, I realized that the decals where too small.
While I had “guessitmated” that they would be bigger than the OR dimensions, I hadn’t really measured (it wasn’t necessary with previous decals). It turns out with CWF, primer and paint I had added 3/32” to the diameter, which adds over 1/4" to the circumference. Wrapping a piece of paper from the aft of the main tube to the apex of the nosecone was 1/2 an inch longer that I thought! (Did I cut the tube long?)
Anyway, I had to remeasure everything, and then go back to Corel, fix the size, and print the decals out again.
Now that I had ones that were the right size I could finally see the other problem I had.
Not only was everything the wrong size, they were also all the wrong shape!
This model is a very complex shape. More so even than it’s OR model. The fins are very thick, the “wings” run almost the length of the body tube, and there is almost no part of this thing that is a simple cylinder. By the time I added *six pairs of fillets*, this is a very complex compound shape. I had thought the differences between the virtual model and the real one would be minor enough and if you’re just doing normal decals that’s true. But not for a wrap (esp. one with gridlines like my paneling effect).
I *might* be able to do a full wrap of this thing *if* I had an accurate 3d model of its final shape, but I don’t.
So I’m giving up on the full wrap. At least for this one. You'd have to design the rocket for a wrap, long cylinders, simple shapes, a conical nosecone.
This weekend I’m going do a much more normal, two color paint job with lots of small clear and opaque decals. Especially for the body tube and nosecone.
I’m going to have to redo the artwork. Lose the paneling effect. Words will have to be in black. I’m still trying to decide if I should do the fin wraps (they worked) in opaque or paint them and decal them like the body tube.
Forget macro-photography, now I’ll be aiming for a two-foot paint job.
Gary Byrum
Overstable By Design
I can offer this one bit of input. To remedy the petal wrinkles, use a blow dryer to assist when mashing the edges. The heat allows "vinyl" to form to shape better. Maybe it'll work with this decal material.
Similar threads
- Replies
- 158
- Views
- 6K
- Replies
- 16
- Views
- 624