75mm minimum diameter build thred

The Rocketry Forum

Help Support The Rocketry Forum:

This site may earn a commission from merchant affiliate links, including eBay, Amazon, and others.

ewallace

Well-Known Member
Joined
Jan 18, 2009
Messages
207
Reaction score
0
I am building a 75mm minimum diameter rocket for MWP7 I just got done turning the nose cone up on my lathe and here are the dimensions
IMG_0754.jpg

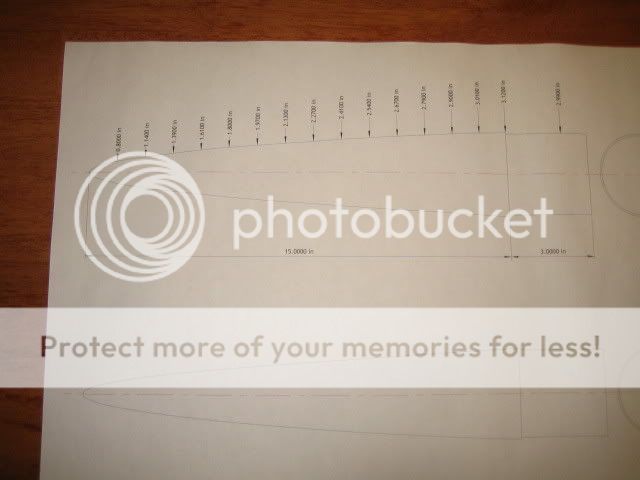
I got the nose cone drawing form Tfish

I plan on lay up the nose cone and 9" of the air frame as one peace of fiberglass so my tracker will work next week. I am planning on using the nose cone to hold the shock cord and parachutes and tracker. The rest of the rocket will be carbon fiber with 1/8" G10 fins with 2 layers of carbon 1/2 way to tip and 3/4 way to tip lay up. The launch plans are to fly at MWP7 on a Loki M1200 spit fire and stay under the 25,000 weaver.
 
good luck!

and make sure your finished nose cone is not warped
 
I have been working on the nose cone and fins
I turned up a plug for the nose cone and used a small 75mm motor for the first body tube and maid the nose cone and 8" of body tube in one piece 5 layes of glass for the nose cone and 4 layers of glass and one layer of 5.7 oz carbon for the body tube here are some pics

nose cone and mandrel with nose cone has been primed and sanded
IMG_0827.jpg


Nose cone and ebay
IMG_0826.jpg


Fins have been beavels and sanded with 20 grit then skufed up with a saw blade
IMG_0830.jpg
 
I love the idea of integrating the nose cone and a section of airframe.

Seems much simpler than making a two-part mold and then the nose cone. Did you have any problems de-molding the whole thing?
 
I love the idea of integrating the nose cone and a section of airframe.

Seems much simpler than making a two-part mold and then the nose cone. Did you have any problems de-molding the whole thing?

The motor case came out easy and the nose cone I had to put a bolt in the back and rope to pull it out. I have a 1 1/2" hole in my work bench ran the rope to the bolt threw the hole and put a small hydro jack in a looped I tied in the rope. With a little pressure from the jack the plug came out of the nose cone.

I ordered the 6000ns case today so I will be able to get to laying up the rest of the rocket next week.
 
laying it up 5 layers of 5.7oz carbon
layup75mm.jpg


and bagged up have not worked out all the wrinkles yet. I heat it up with a hair dryer and use my hands to smooth out the wrinkles.
vbagedlayup.jpg


should have one 25" and one 16" BT done in a couple hrs, hope to put the fins on and 1/3 2/3 tip to tip done tomorrow. I may try to fly it this weekend on a small motor to see if every thing works out and have a reference of altitude for siming before the M motor
 
So you'll be there? Cool. See you and the rocket Saturday.
 
a couple more pixs put the fins on and fillets
IMG_0863.jpg

IMG_0860.jpg

baged after hair dryer and working smooth
IMG_0859.jpg

all the parts layed out getting ready to tip to tip the fins
IMG_0864.jpg
 
I just got done laying the tip to tip carbon. I did 2 layers the first went 1/3 the way up the fins and layer 2 goes 2/3 up the fins. I got the tube built,got the fins attached and did the fellets and tip to tip in 24hrs so the epoxy would bond better. Here is a pic of the fin can in the vacuum bag.
IMG_0866.jpg
 
wow man. slick build...can't wait to see it finished...you going to paint it, or keep the carbon look?
 
I am going to paint the nose cone and leave the rest natural carbon :D
 
You launching this out of a tower? If so, make sure your external thrust ring on your motor case is the same outer diameter as the airframe. If it overhangs you will catch it on the guide rails of the tower and most likely end up with an off angle flight. At the very least wrap it with electrical tape so it is not a hard edge.
 
You launching this out of a tower? If so, make sure your external thrust ring on your motor case is the same outer diameter as the airframe. If it overhangs you will catch it on the guide rails of the tower and most likely end up with an off angle flight. At the very least wrap it with electrical tape so it is not a hard edge.


I will be launching out of a tower, thanks for the heads up with the thrust ring I am planning on turning it down to the diameter of the OD of the fin can.
 
I took the fin can out of the bag this morning and wet sanded it.

IMG_0872.jpg


In a couple days after the epoxy sets up fully I will wax the out side to give a glossier finish.
 
I maid a coupler this afternoon and started on the ebay I used 8 layers of carbon for the coupler and cut it to 7" then epoxyd the coupler 2.30" into the Body tube. I cut some carbon bulk plates out and epoxyed some G10 to hold the altimeters and battery. I plan on putting the altimeters on the sled tomorrow and painting the nose cone attaching the shock cord to the nose cone. Here are some pics of today's progress
IMG_0876.jpg

IMG_0879.jpg

IMG_0880.jpg

IMG_0877.jpg

IMG_0875.jpg
 
Back
Top