Altimeter Bay Build Thread

The Rocketry Forum

Help Support The Rocketry Forum:

This site may earn a commission from merchant affiliate links, including eBay, Amazon, and others.

blackbrandt

That Darn College Student
Joined
Mar 18, 2012
Messages
9,281
Reaction score
60
This is going to be my competition build thread for CWBullet's avionics bay competition.


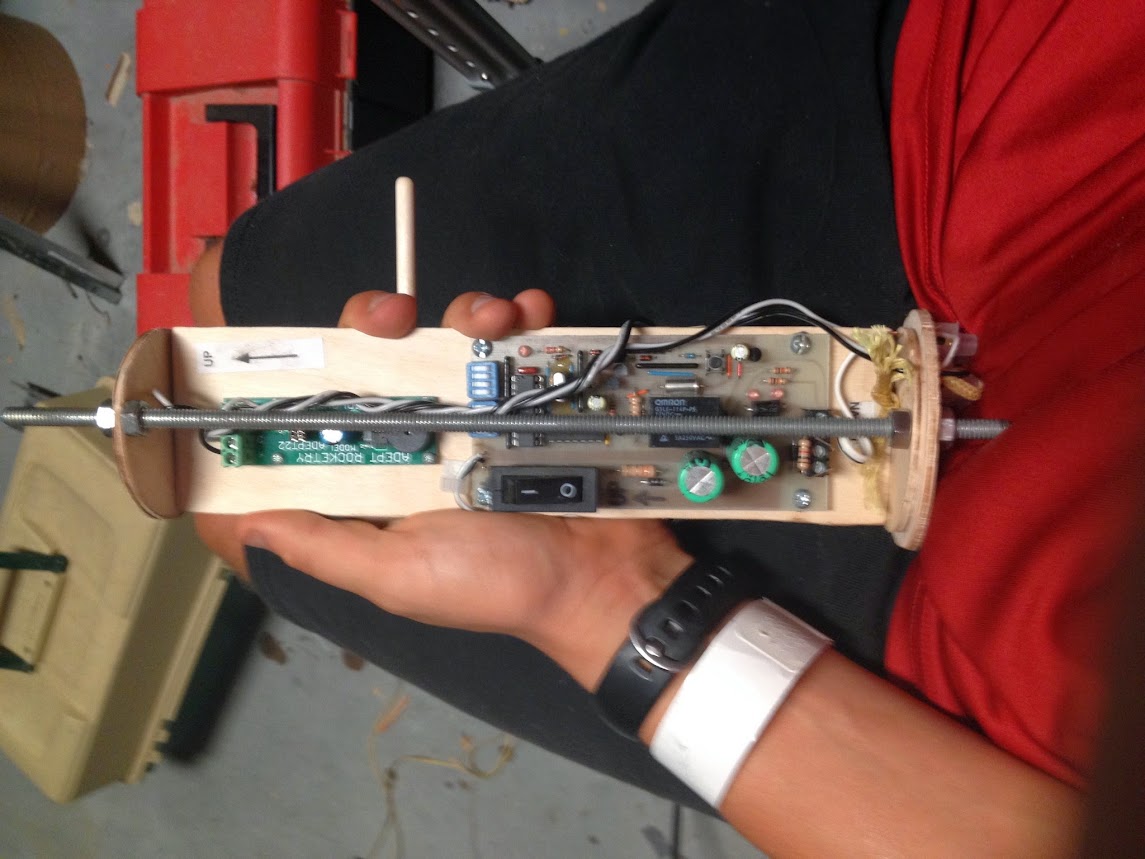
This is the interstage coupler of my avionics bay for my Crayon Insanity. It will hold a timer and an adept 22. The timer will fire a charge to separate the booster and sustainer, and the Adept will provide DD for the booster. The timer has a switch built in, and the Adept22 will be using a roller switch activated by a pull pin.


Pics...

Also, Please Remember to vote for this avionics bay!


https://www.rocketryforum.com/showthread.php?66264-AV-Bay-Contest-Poll
 
Last edited:
Sorry about that, my photo uploader stopped working...
:confused::

Oh Well, Got it working now.


Alright, here is the interstage coupler with switch band already glued on.
photo 1 (20).jpg


Then one of the bulkheads (actually a bulkhead from the old two stager that so many of you know about).
photo 2 (18).jpg


The altimeter sled.
photo 3 (13).jpg


One of the planned layouts...

photo 4 (8).jpg


And then the switches...

photo 5 (5).jpg
 
And some more photos:

Shifted some stuff:
photo 4 (9).jpg


Rounded the corner of a piece of dowel for the roller switch I am using:
photo 3 (14).jpg


Before and after:
photo 2 (19).jpg


Final layout (ignore the launch lug under the adept, it is there to support it while I look for that God-knows-how-small screw...)

photo 1 (21).jpg


Epoxied on the roller switch and a lug to guide the dowel in:
photo 5 (6).jpg


More tomorrow!!
 
Cool, I will definitely follow this. I will be building a alt. bay myself soon
 
So after building a new workbench for all of my epoxy work:

photo 1 (22).jpg


...and also cleaning up my workbench:
photo 5 (7).jpg


I started working on battery placement.
photo (4).jpg


I made these little boxes out of popsicle sticks, and fiberglassed them. These will be epoxied to the board.

photo 4 (10).jpg


photo 3 (15).jpg


photo 2 (20).jpg


I will epoxy these to the board, and then start wiring everything up.
 
Alright...

yesterday at I ran to radio shack an picked up some wires, terminal blocks, and a little buzzer. My plan is to hook the buzzer up to the timer, so I have audio confirmation of arming.
I will work on this tonight, so standby.
 
While I am working on the pics:
[video=youtube;jJ-8kUrT6y8]https://www.youtube.com/watch?v=jJ-8kUrT6y8[/video]

[video=youtube;BONxrxCd5Kk]https://www.youtube.com/watch?v=BONxrxCd5Kk[/video]


Connor, can I email you the pics and you post them? I am really busy and I need them posted.
 
Last edited:
here are the pics matt wanted me to post:

The test fit of the bulkhead: (A few drops of CA on top to attach other bulkhead)
View attachment 173383


Marking the location for the switch:
View attachment 173385

And transferring it to the body tube:
View attachment 173386


I drill out the hole:

View attachment 173387


Now I cut a hole for the other switch:

View attachment 173388


View attachment 173389


Test fit of all thread:

View attachment 173391


And Full stack:View attachment 173390


Descriptions above.
 
I will get a picture of the whole avionics bay tomorrow, just realized I never posted it.


Please remember to vote for this bay!
 
Awfully nice work going on there Matt..........
Keep it up................
That's going to be a complex bird for sure............

Teddy
 
Where is this av-bay contest thread? Having to finish before the end of the month would give me a neat motivation for my first :D
 
I just realized that the pics of the completely assembled bay were never posted:
RpPNpxIj5kikZEx7GyUEAicVqerhkE4GEl-0IgVKDJc=w644-h859-no


IMG_0404.JPG


IMG_0410.JPG
 
I think you need a threaded rod opposite of the one installed if the Kevlar loop is going to attach to a shock cord. When the force of deployment pulls on the Kevlar loop, I would expect the end caps to be bent a lot, if not break and tear off.

I would say test it by tying a 6' cord to the Kevlar loop and to something about 8' up. Then drop the bay. If it holds together after falling 6 feet and hitting the end of that cord, it may hold up in flight. A 10 or 12 foot cord would be a better test.
 
I am considering installing one (like a 6-32) for that exact purpose.
 
They will be held in with xip ties, the masking tape was for a demo.
 

Latest posts

Back
Top