- Joined
- Jan 17, 2009
- Messages
- 5,204
- Reaction score
- 1,547
Last October, I posted about converting a $1 "Halloween spider web bowl" into a nice Flying Saucer model. I flew one again a week ago, proving they actually work other times of the year too (I was bemused that some thought it was "too late" to get and convert one late last October as it's more of a great flying saucer than just a Holiday novelty)
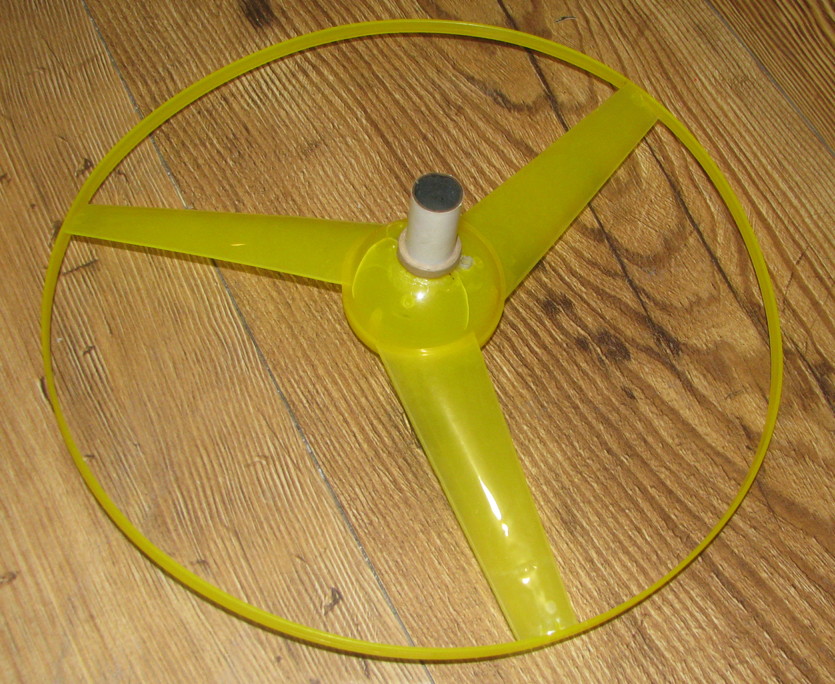
Well, for summer, Target has another item that is not hard to convert and flies GREAT. It is a $3 gyro-disc type helicopter. A handheld unit has a string you pull to make the copter spin up quickly, then it climbs up due to the thrust of the blades and inertia that the outer ring helps to enhance. It even has a red, green, and blue LED that lights up, nice for flying it at night.
Anyway, it is not hard to convert to fly on 18mm engines. I did it last year, so sorry, no step by step pics. Also, I am only now mentioning it since last year, by the time I converted one, Target had sold out, summer was over. I saw more today in Target so these are "back in season".
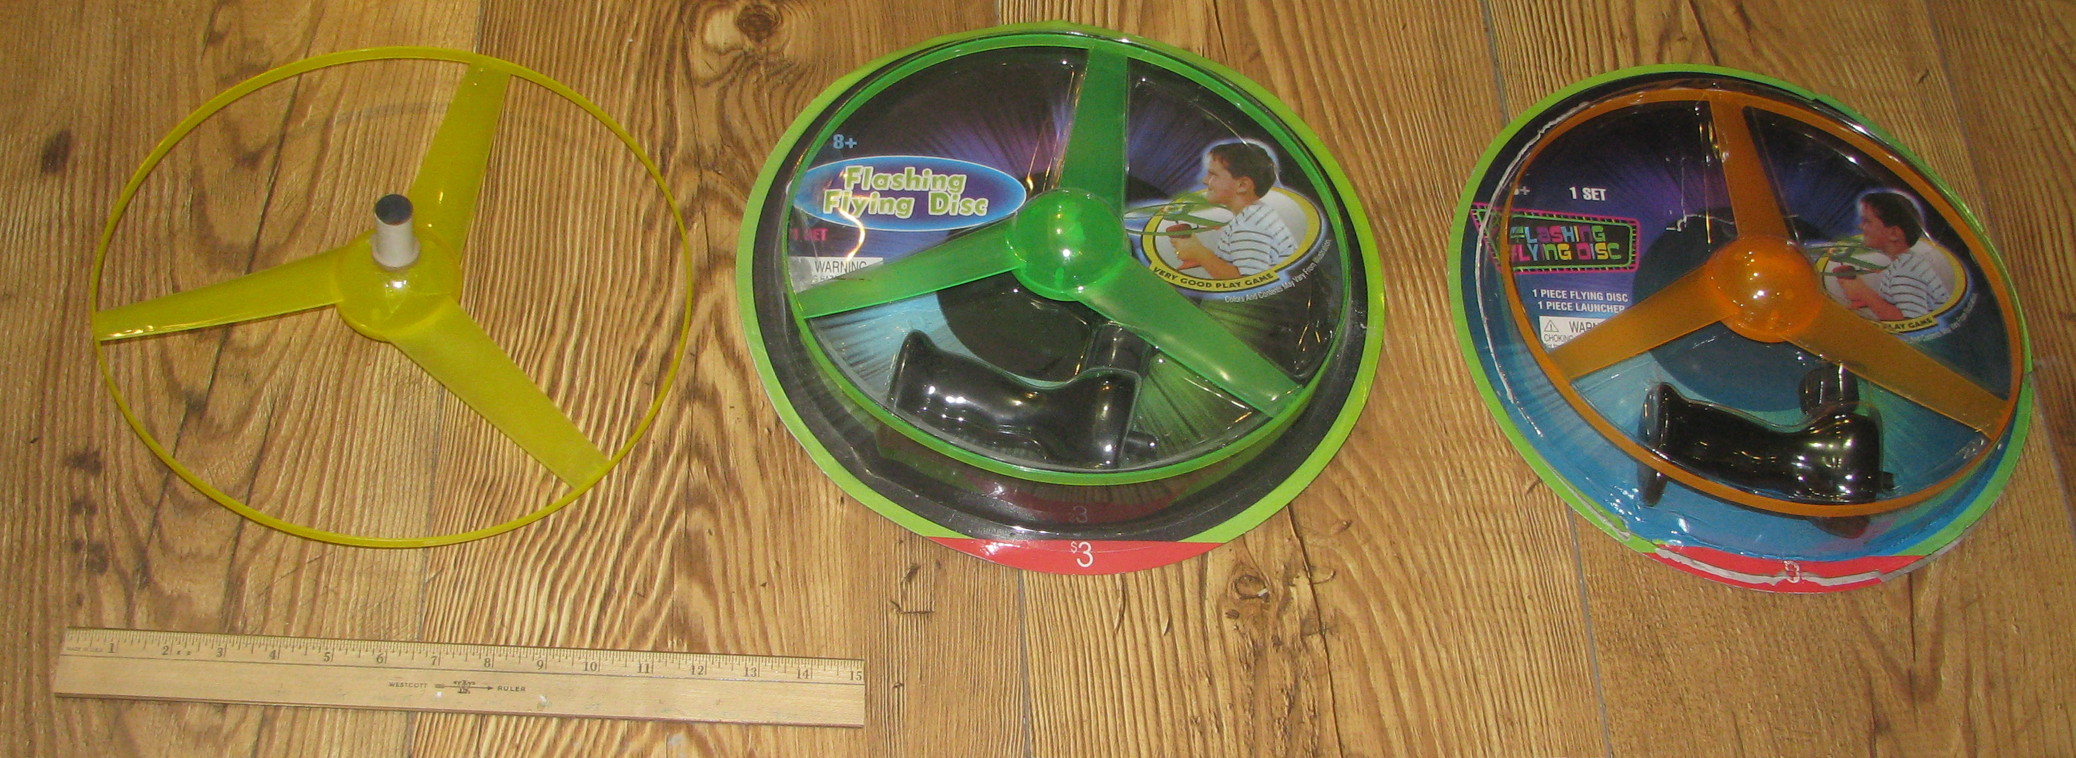
In the image below, the converted copter at left, unopened one I bought last year in middle, and this year's at right (put it back inside after opening, for the pic). The wooden ruler is 15" long.
First thing is to remove the lower disc (remove screws), and take out the LED assembly. Unfortunately the LED assembly sits in the middle so it can't be put back in for rocket flying at night, at least not without modifying it by cutting off the LED's, adding extension wires for them, and re-locating the LED's and battery/switch unit.
So, a hole needs to be drilled into the lower disc for the 18mm engine mount tube to fit. Fortunately I have a step-drill bit, got a set like this one at Harbor Freight a few years back.

So, I drilled a pilot hole in the center, something like 1/4", then used the step drill to enlarge the hole till it worked for an 18mm tube to fit.
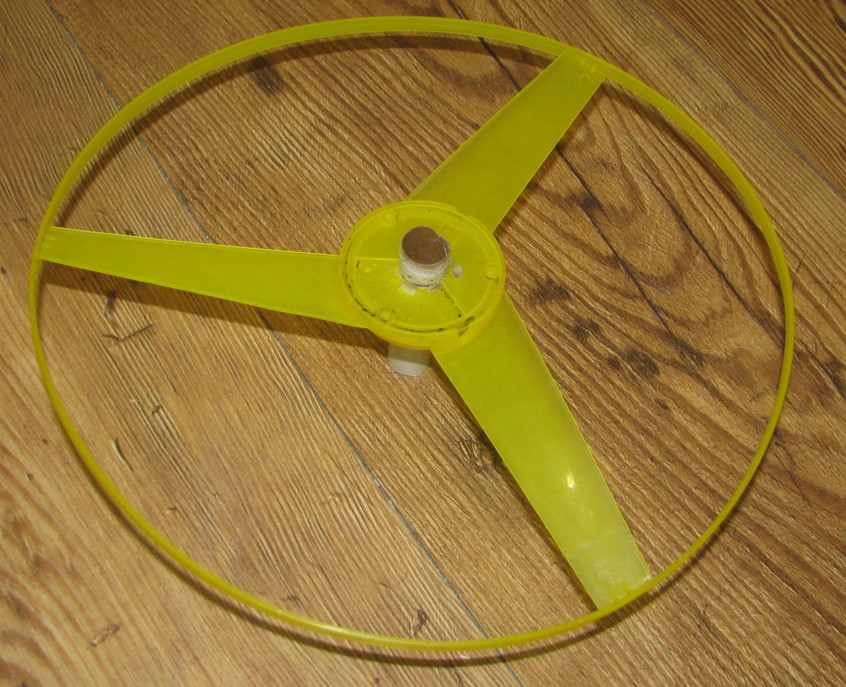
For the main copter assembly, drilled a pilot hole into the center of the curved dome, and again used the step drill. But I was a bit careless, the step drill caught and cracked the plastic, as can be seen in photos. But fortunately it was not too hard to fix, and once the engine mount was glued in with a centering ring on top, it was strong enough.
Also needed to drill a smaller hole, to allow a launch lug to be glued in.
The mount tube is 3.25" long, with a 3/4" length of tube coupler glued inside to act as a thrust ring, reinforcement for the tube, and give a bit of length for the ejection charge to fire and expand to reduce burning of the tube and lessen the chances of hot gases blowing back onto the plastic to cause melting.
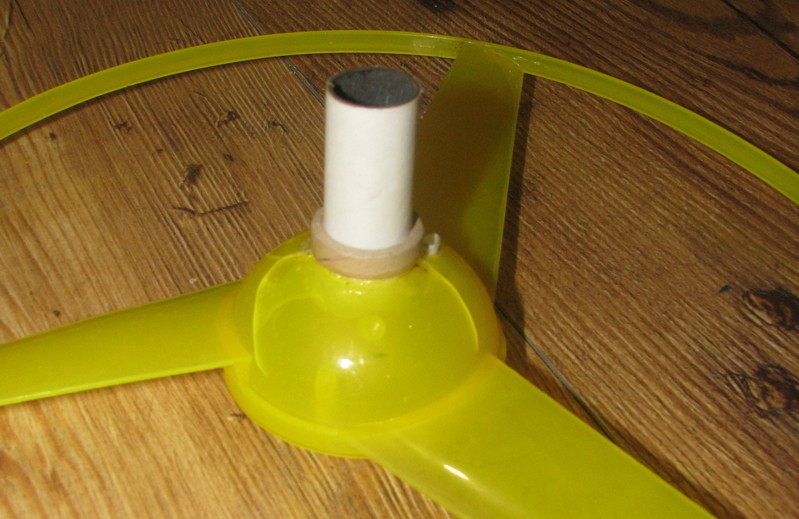
So, when it was time to glue the lower disc in place, the holes for the lug were aligned, then glued together using thick CA (I might have drilled for the lug after gluing, it's been a long time). The engine mount tube was glued in with thick CA, the rear 1/2" sticking out the back of the lower disc. I also added an 18mm to 24mm thick centering ring on top of the dome due to the crack damage, as a structural reinforcement. Next time I convert one, if I drill it without any damage (no cracking), then I won't use a ring.
Prepping for flight is as easy as for the Halloween Bowl. Put B6-0 or C6-0 into engine mount, apply a wrap of tape to secure the engine from falling out the back, and install ignitor. Put on pad, hook up clips, safely count down and launch. Enjoy. Recover. Repeat, repeat...
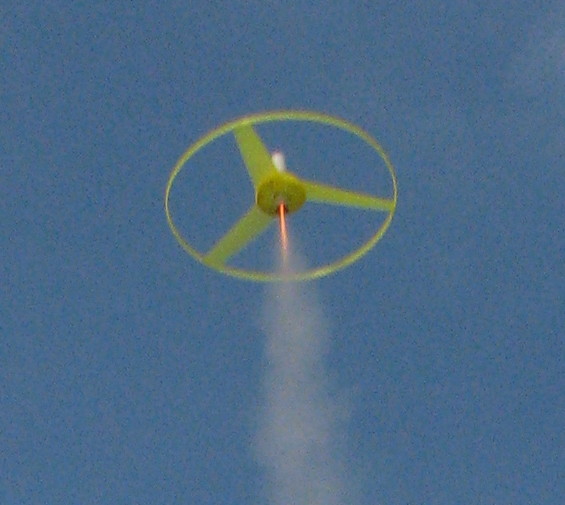
When it flies, it starts to spin almost immediately. The blades cause a lot of drag so it does not fly very high (I think of this as sort of like my Tasmanian Devil "Turbocharged"). When the engine burns out, unlike a flying saucer type, it keeps going up pretty well for awhile due to the inertia of the spinning model (the mass of the outer ring helps) causing the blades to produce lift to push it higher and higher. But the spin slows, so eventually it starts to descend, then stops rotating, then starts to rotate the other way, and soft-lands.
It Chad-stages very well. I did a C6-0 staged to C6-0 last week, it still kept close to vertical, unlike saucer types that weathercock easier.
I do not have any launch photos. Not yet anyway. Maybe soon. Or maybe someone will jump all over this, convert one, fly it, and post their own pics first, or even a video.
BTW - The one I got today, did not fit its manual launch handle assembly correctly. Way too tight of a friction fit, the ones from last year fit fine. It's supposed to slide easily. I put a 1/4" bit into a drill press, but left the press turned off. I carefully held the manual launch handle's rotary drive assembly along the sides using pliers, and by hand rotated the drill press to carefully drill the center hole to 1/4". After that, the fit was perfect, just like last year's. Now, if you convert for rocket flight, that will not matter. But if you want to have fun with it first, OR get another for kids (of all ages) to have fun with, that is a necessary modification.
- George Gassaway
Well, for summer, Target has another item that is not hard to convert and flies GREAT. It is a $3 gyro-disc type helicopter. A handheld unit has a string you pull to make the copter spin up quickly, then it climbs up due to the thrust of the blades and inertia that the outer ring helps to enhance. It even has a red, green, and blue LED that lights up, nice for flying it at night.
Anyway, it is not hard to convert to fly on 18mm engines. I did it last year, so sorry, no step by step pics. Also, I am only now mentioning it since last year, by the time I converted one, Target had sold out, summer was over. I saw more today in Target so these are "back in season".
In the image below, the converted copter at left, unopened one I bought last year in middle, and this year's at right (put it back inside after opening, for the pic). The wooden ruler is 15" long.
First thing is to remove the lower disc (remove screws), and take out the LED assembly. Unfortunately the LED assembly sits in the middle so it can't be put back in for rocket flying at night, at least not without modifying it by cutting off the LED's, adding extension wires for them, and re-locating the LED's and battery/switch unit.
So, a hole needs to be drilled into the lower disc for the 18mm engine mount tube to fit. Fortunately I have a step-drill bit, got a set like this one at Harbor Freight a few years back.
So, I drilled a pilot hole in the center, something like 1/4", then used the step drill to enlarge the hole till it worked for an 18mm tube to fit.
For the main copter assembly, drilled a pilot hole into the center of the curved dome, and again used the step drill. But I was a bit careless, the step drill caught and cracked the plastic, as can be seen in photos. But fortunately it was not too hard to fix, and once the engine mount was glued in with a centering ring on top, it was strong enough.
Also needed to drill a smaller hole, to allow a launch lug to be glued in.
The mount tube is 3.25" long, with a 3/4" length of tube coupler glued inside to act as a thrust ring, reinforcement for the tube, and give a bit of length for the ejection charge to fire and expand to reduce burning of the tube and lessen the chances of hot gases blowing back onto the plastic to cause melting.
So, when it was time to glue the lower disc in place, the holes for the lug were aligned, then glued together using thick CA (I might have drilled for the lug after gluing, it's been a long time). The engine mount tube was glued in with thick CA, the rear 1/2" sticking out the back of the lower disc. I also added an 18mm to 24mm thick centering ring on top of the dome due to the crack damage, as a structural reinforcement. Next time I convert one, if I drill it without any damage (no cracking), then I won't use a ring.
Prepping for flight is as easy as for the Halloween Bowl. Put B6-0 or C6-0 into engine mount, apply a wrap of tape to secure the engine from falling out the back, and install ignitor. Put on pad, hook up clips, safely count down and launch. Enjoy. Recover. Repeat, repeat...
When it flies, it starts to spin almost immediately. The blades cause a lot of drag so it does not fly very high (I think of this as sort of like my Tasmanian Devil "Turbocharged"). When the engine burns out, unlike a flying saucer type, it keeps going up pretty well for awhile due to the inertia of the spinning model (the mass of the outer ring helps) causing the blades to produce lift to push it higher and higher. But the spin slows, so eventually it starts to descend, then stops rotating, then starts to rotate the other way, and soft-lands.
It Chad-stages very well. I did a C6-0 staged to C6-0 last week, it still kept close to vertical, unlike saucer types that weathercock easier.
I do not have any launch photos. Not yet anyway. Maybe soon. Or maybe someone will jump all over this, convert one, fly it, and post their own pics first, or even a video.
BTW - The one I got today, did not fit its manual launch handle assembly correctly. Way too tight of a friction fit, the ones from last year fit fine. It's supposed to slide easily. I put a 1/4" bit into a drill press, but left the press turned off. I carefully held the manual launch handle's rotary drive assembly along the sides using pliers, and by hand rotated the drill press to carefully drill the center hole to 1/4". After that, the fit was perfect, just like last year's. Now, if you convert for rocket flight, that will not matter. But if you want to have fun with it first, OR get another for kids (of all ages) to have fun with, that is a necessary modification.
- George Gassaway
Last edited: