My first HPR build

The Rocketry Forum

Help Support The Rocketry Forum:

This site may earn a commission from merchant affiliate links, including eBay, Amazon, and others.

Salvage-1

Certified
Joined
Mar 17, 2012
Messages
2,688
Reaction score
41
I see articles in the magazines about HPR builds, and peoples first addiction to the new area, so, I thought I would start my own thread on here to further introduce myself and what i am getting myself into.

So..
After doing a lot of looking around the net, brochures, YouTube vids of flights, etc. I came up with a plan to create a modular rocket that could be used with 38mm and 54mm motors, and would be possibly light enough to send skyward with 29mm in an adapter.
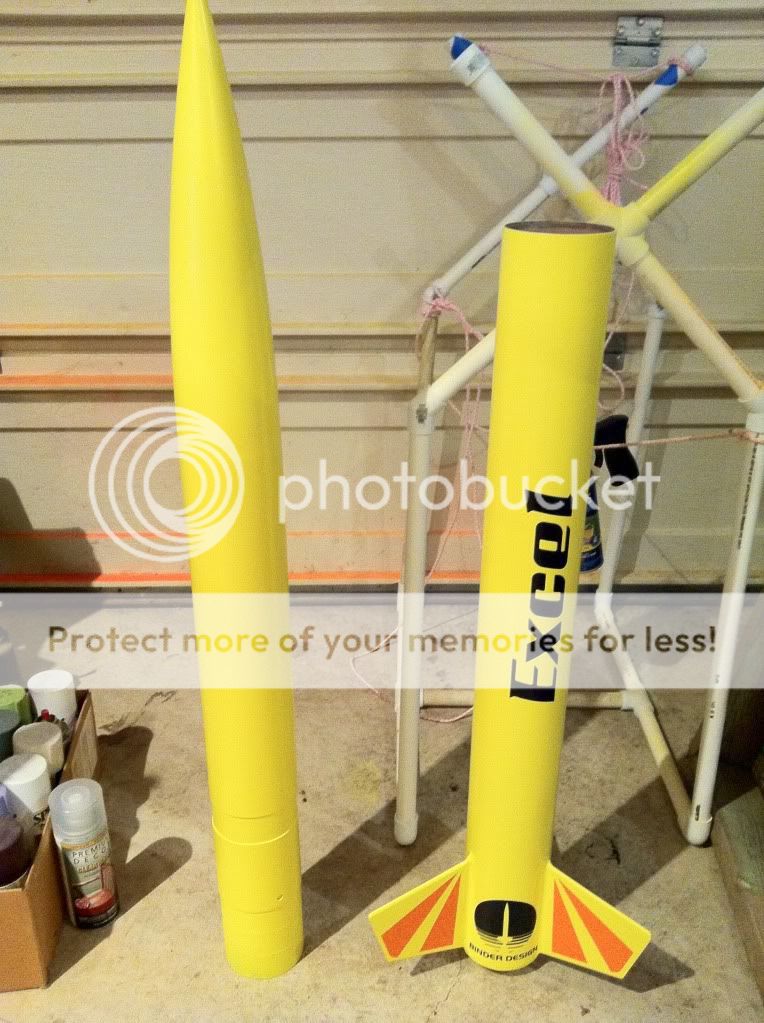
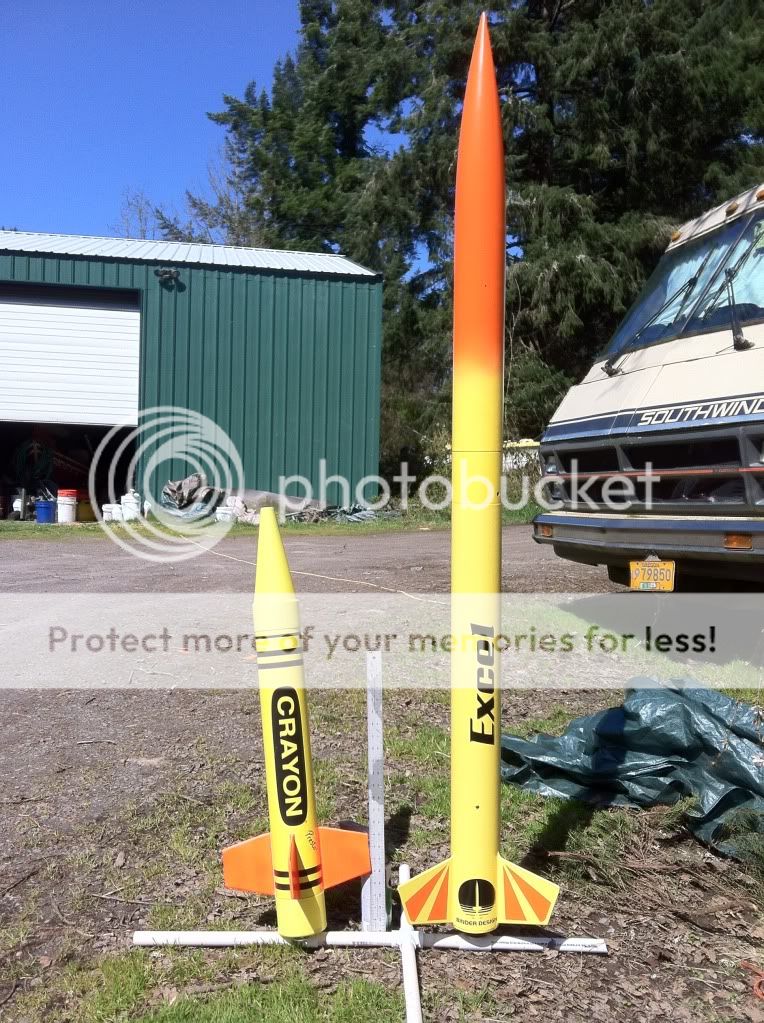
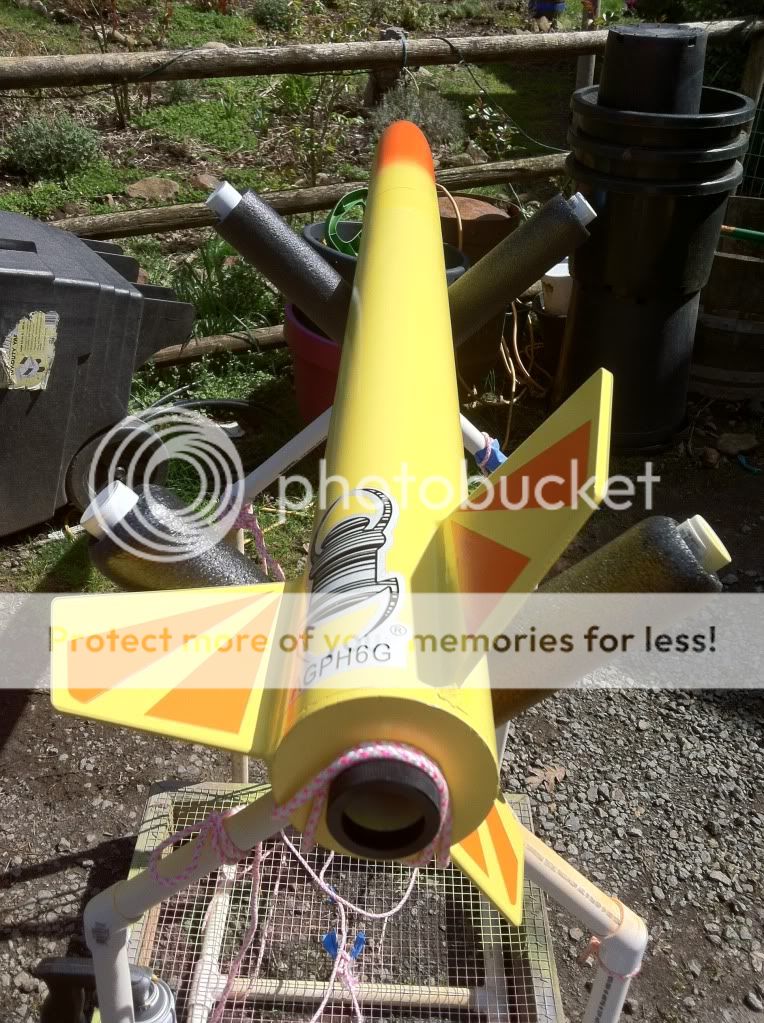
My choice was a Binder Design Excel Plus in 38mm, then when I have finished the main rocket, get another, a standard Excel in 54mm. The Excel Plus is basically the standard 4" Excel 3FNC with a dual deploy setup (payload bay and front body tube). Excel is 50" and the Plus is 71" so that gives you scale. Since both are available in 38" and 54" this means that with good planning and quality build, I will be able to use this in 4 possible configurations:
1 - Standard 50" Excel in 38mm
2 - Standard 50" Excel in 54mm
3 - Excel Plus in 38mm
4 - Excel Plus in 54mm
So, this would give me plenty of 'rockets' and room to play G through K. Some playing around with RockSim also told me that some high I's and a lot of K's may even boost this project to the 1m high and Mach 1 barriers, if the airframes last that long.

This is mostly going to be my sanity and build 'log', but feel free to chip in comments, I am positive that there are people on here with knowledge that I dont yet know that I need.
Also looking at flooding the thread with pics so show what I am up to.

Rob
 
Good choice. The BD Excel is one sexy beast! Do you plan on doing any re-enforcements. I have considered a 'glassing a BD Excel but I scratch built instead.

Have fun and take lotsa pics!

Alex
 
Here we go, a large ominous box from arrived. 4 days from order to delivery!!!

Taking it out and doing a parts check showed that everything was there. The quality of the fins and centering rings are excellent, no damage to any of the tubes, good to go for dry fit. The instructions from Binder are EXCELLENT! 6 pages of text and diagrams for the main rocket build, an extra sheet for motor retention and one more sheet for the construction of the AV bay.


Click for larger pic

Dry fitting took just about 30 mins from opening the box. This is a sturdy kit. Holes for TTW fins were already cut and just had to sand them a little to get better fin fit.

----

Next thing was to start work on the body tubes. I have a few cans of Sandable Sealer around the garage, so I just headed for that. I quickly found that it takes a few more passes with the spray and sand on this thing than it does with my Estes and Aerotechs, bigger tubes = deeper spirals. Anyhoo, started on this route, so i just keep on going. I realise that it may have been a lot faster to go with putty direct to the spirals, and I may do that on the next build.
5 coats and sands later, I am at the point where i NEED to do something else.
 
Last edited:
On to the fin can.
BD uses through the wall attachment on this kit, which means lots of areas where you can beef this little beastie up. I tacked the fins and rings onto the motor mount tube with a some wood glue to whilst the can was inside the body tube, using the fin slots already cut and the template on the back of the instruction manual. Everything went perfectly. I also realised that at this point I had to think about the options for motor retention, so, instead of fixing the MMT flush with the ass end of the rocket, I had it stick out 3/8" so that i could put an AeroPak on there.

Note that this kit used two centering rings and one thrust ring. The thrust ring is epoxied onto the back centering ring and is wider so that it can glue to the rear of the airframe and so pushes direct.

When everything had set it was time to slice out the rear of the fin slots so that i could slide the assembly out and start the 'beefing up'

click for larger pic

I didnt bother putting any aerofoil on the fins, just rounded off the rear edge and put a blunted 'blade' on the front. The 3/8" plywood fins are nice quality.. they sand well without fraying and take sealant and sanding well.
 
Last edited:
I'm suprised your not digging around in your local 'Salvage Yard' for parts for your extremely large HPR manned spacecraft project!...

sorry,couldn't resist.....that show was one of the things that instilled the love of Rockets for me growing up!
 
As long as you avoid the common urge to over-build, you should have no problem accomplishing your goal.

-Kevin
 
I'm suprised your not digging around in your local 'Salvage Yard' for parts for your extremely large HPR manned spacecraft project!...

sorry,couldn't resist.....that show was one of the things that instilled the love of Rockets for me growing up!

Yup my handle really does show what bracket i am aged into.:D I loved the show too, and have been looking for it recently without joy. Looks like you can get the pilot on youtube though! It was ahead of its time, and so got axed after the first season (oooh.. sounds like Firefly!!)
 
As long as you avoid the common urge to over-build, you should have no problem accomplishing your goal.

-Kevin

Ohhh yes... I know that one!! I have had fins break in the past, and all sorts of 'events' that lead back to application of more epoxy than you really need just to hold something on. Most people don't actually realize just how heavy cured epoxy weighs!! I have a wooden driftboat that I recently added epoxy and fiberglass bottom to... WOW I hadn't expected that much extra weight.

According to OpenRocket,this should weigh in about 64oz, Rockstim states 62oz. This is after I have added the "Mass Objects" of altimeter by actual weight, but leaving the programs to do their guesstimation of real weight based on each item, etc. Soooo.. adding things like epoxy, etc, tuning of chutes, shock cord lengths, primer, paint, sealant, extra fiddly bits, etc, I am aiming at this beast being in the ball park of 4.5lb
 
Last edited:
So, here is the fin assembly all bonded together with the MMT and the rings. I used this Goop stuff as its easy to work with and you can scrape off the extra stuff before it sets completely. Never had a problem with strength of it in the past, and had it on hand.


Whilst I was in the 'set time' between fin sections, I started to put together the ALT bay and get the shock cords finished. An overhand look was tied 1/3 way down each shock cord for chute quick link to go, and each end was triple folded, stitched, tied and epoxied into a nice loop. All connections will be with quick links. I am using the standard eye bolts that come with the kit, though I am shying towards installing small U bolts instead. At the moment the eyebolts have extra epoxy to keep them closed (like i really expect that to help!)


Click for larger pics
 
Last edited:
Click for larger pics

3/4" PV pipe is fantastic stuff to make modular jigs to hold stuff whilst it sets.
 
Last edited:
Fin assembly all set with extra epoxy 'flashing' cleaned off. Used a 1/2" dowel for the fillet channel. Found I had a urgent need for something to rest this baby on. Hmm, there's more 3/4" pipe!!

Click for larger pic
 
Last edited:
15 min epoxy was used to bond the rear of the airframe to the rear rings. This was left to set for 3 hours with clamps on. Strong bond was formed so I went on to filleting the fins. I had a tube of 2pt epoxy putty/clay and so pulled off an inch at a time, mix well and then rolled out a worm which I pushed into the V. Smoothed out semi well. I was suprised at the speed this stuff set at. Package stated 1 min mix, 8 mins work time, 1 hour to cure. It seemed more towards 4 min work time before the stuff was impossible to smooth. Doesnt give much time to thoroughly mix and form worm. Also realised that rolling the worm out on my cold marble tile didnt do much for the set up time.

Click for larger pic

After they had set up and cured overnight I attacked them with rough sandpaper to get those bumps and imperfections out. I HATE sanding. Let me tell you that now, if I were not such a cheapskate, I would pay for someone else to do the sanding, every bit, on every item in my house. Yup dislike it that much. Can't even convince the kids to sand the epoxy as mom states it 'wouldnt be good for their health' and 'that's the reason you wear that old respirator when you sand'..

Sanded to the point where I could see that the sandable sealer on the fins and body was starting to get scuffed, that's enough for me.
 
Last edited:
Finish of the epoxy clay was still rough with a few dips, so I mixed up some more 10 min epoxy resin and painted over the clay, extending slightly over the edges onto the airframe and fins.
Left this overnight and then attacked it with medium sandpaper wrapped around my handy 1/2" dowel. Smoothed out as much as i wanted, which involved filling those dips and getting a nice thin film of epoxy over the whole joint. There are still a couple of bumps, but, I aint that worried. Thing will be strong.

 
Last edited:
Now onto the AV bay.
This bay is made of two 6" connector tubes and a 4" section of airframe. Gives a nice long (12") interior. Each endcap is made of two bulkheads, one is larger than the other so when glued together, one sits inside the tube, and one sits flush against the end. Should give a great seal without need of anything else.
Rest of bay is quite standard, two all threads going the whole length with nuts on either end. I opted to epoxy the bottom nuts on permanently and use the wing nuts for the top. I added a couple of rubber washers to improve the seal. Couple of 1/2" end caps and a few Euro terminal strips and I had the ends looking ready for business. I set up one terminal block on the inside of each endcap, and one on the outside with the connecting wire running through the bulkhead, and then sealed. This means that i can disconnect the whole sled without removing the wires from the altimeter, which means i can pop the sled out and used it in any other 4" airframe. I also drilled a hole and installed the screw switch that was supplied with the kit. This is a good positive switch and comes with "arming" decal. I am planning on setting up a washer that will go between the screw head and the airframe and have a "remove before flight" tag on it.
 
Last edited:
Opted for a PerfectFlite Stratologger as altimeter and dual deploy. There are a few reasons that i went for this one;
1 - You can connect it to the computer and alter settings whilst this is still in the airframe.
2 - It is possible to test both continuity of output, and "FIRE" on both Drogue and Main outputs.
3 - Can alter all settings through the computer software. It also logs and you can plot graphs and work out velocity, etc, etc.
4 - Price!! ($80!)
5 - There is a header onto which you can add an external beeper or LED's. This, with the ability of the Stratologger to emit a 'Siren' will aid in finding my beastie when she comes back down. Found a 100dB piezo beeper that i will try with this.

Got my ducks all in a row and managed to set up a reasonably clean sled. The Stratologger connects to external switch for arming on pad, and then all appropriate leads go to the terminal blocks on the bulkheads. This means that I can 'pop the top' from the bay, unscrew two leads and the whole thing is accessible. I also purchased a USB lead and mounted it onto the sled. This means that I can access all the programming settings with my laptop when I in the field! I thought of installing the USB end flush with the inside of the airframe, just below one of the static portholes, but was worried about turbulence until I realized that the USB cable from the computer wouldnt fit through the hole anyhow.

At the moment, I am using a standard Duracell 9V for testing, and it provides enough amperage to light an X-Mas tree bulb for simulated deploy. I will probably change this for an Li battery later.

Click for larger pic
 
Last edited:
Took out the bottom section and started prepping it for paint. Got treated to Rustoleum Painters Touch sandable white primer. Two coats of that are currently drying. Tomorrow I will sand these back a little and then start with the heavier grey primer, build up a layer, sand, until I am happy.

Also sanded and prepped other airframe sections and nose, ready for primer.

So- thats where I currently am.
My thoughts were that I was going to get a Rouse-Tech 38/360 as I have done reloads in my 29/40-120 and liked the availability of those smaller motors through Apogee Components amongst other places. I now see that the prices on the Aerotech stuff is slowly creeping up.
Now, my thoughts are towards a Pro38 Level One/Two XL Hardware Package, which includes one 6 grain XL casing, one 3 grain casing, one XL spacer, two regular spacers and one delay tool. Cesaroni looks to be one of the easiest to reload too! $100 thrown down on that deal would give me all the hardware I could want in L1-L2 on the 38mm MMT. Same deal for 54mm would give me an awesome range of motors to use!


Click for larger pics
 
Last edited:
Got to put a couple of hours into the project today. Got the whole airframe covered in white primer and sanded the hell out of it. I hate sanding.

So... all equipment is now in there except the nomex for the parachutes and cord protection. Motor casings have been ordered (whoops.. fell for another rocket for the next project.. but.. that is another story). Went for the Lev1-2 Cesaroni pack. The pro38 3 grain case and 6xl case with all the spacers etc.
Rocket with everything in so far ..... 4lb 12oz. Still got a chance of keeping this under 5lb, which i dont think is too bad for 71" x 4" dual deploy. Any thoughts?

Click for larger pic
Aerotech Arreaux is there for scale
 
Now to comment on your comments..

Good choice. The BD Excel is one sexy beast! Do you plan on doing any re-enforcements. I have considered a 'glassing a BD Excel but I scratch built instead.

Have fun and take lotsa pics!

Alex

This one no.. the other part of the project (54mm Excel), yes. Will most probably at least glass the fins and part of airframe around motor mount. May glass the whole Excel airframe.
 
Bottom half painted, with decals, and a lacquer coat. Top section has base, will be doing the nose cone orange. The yellow is Rustoleum Painters Touch Sun Yellow, and yes it is that bright!

Nose cone is fixed onto the upper tube and the 'shoulder' has been filled, sanded, etc. You can hardly tell where the nose cone connects to the tube, makes the nose cone seem a lot bigger than it is! Plan is to have the whole top section eject from the altimeter bay pulling the chute out instead of pushing through.
 
Last edited:
The reason the top section took so long is due to a mismatch in paints. I failed to notice "Enamel" on the rustoleum american accents Glow Orange that I had painted the nose cone with. Everything looked excellent until the lacquer went on and then the whole orange section crackled like you wouldnt believe.
So.. the only choice was to get the sandpaper out. Cut the paint back to original primer and then started again. This time I DO have a compatible orange! and this time I am waiting 24 hours before the lacquer goes over anything.
 
I did not see this thread before, we were building the excel at the same time!

I also built mine with a strato logger. I found 750 milligrams of 4f worked great for each charge. I used it for my l2, L1 should be pretty easy, I used an h242 for the first flight , it got to 933 feet. An I233 got to 1610 feet, and my L2 on J381 went 3082 feet.

This is a very versatile rocket. Good luck!
 
Simply smashing. Superb. Most Excellent. Two thumbs up, 41/2 stars. :wink:

Right on, good man.

Alex
 
Back
Top