Hi, New to the forum

The Rocketry Forum

Help Support The Rocketry Forum:

This site may earn a commission from merchant affiliate links, including eBay, Amazon, and others.
Just thinking outside the box, for these big tubes with big deep spirals, why not just do a wrap with drawer liner self adhesive paper? Okay, you will have one tiny seam on one side, but seems like you could often fit this into the design.
You would need to cut out the attachments sites for fins and lug, but seems like a lot easier than fill and sand and fill and sand.

Always a possibility. I don't have much experience with the paper. My dad was a body man when it came to working on cars so sanding and filling is what I'm familiar with, but a paper wrap will definitely work. When I roll tubes for my little rockets now, I roll them the long way. I don't mind the seam, but I do smooth it out a bit before finishing. I also try to get the inner seam to line up with the outer when possible to keep the thickness consistent.

I think wrapping with glass is generally the same idea, the spirals are filled or covered automatically so there's no need to worry about them.

Your idea might actually be the perfect solution for a quicker build where the spirals don't show up on the final rocket. You could pretty well stick the paper and apply paint, possibly use a decal of some sort to hide the paper seam, and you're ready to fly. Perhaps vertical black stripes, one that meets the edge of the vertical seam? Like a redstone paint profile or something. Let's face it, paint jobs are mostly for looks. They can enhance performance but I think that's usually a secondary goal rather than the primary objective. People like beautiful rockets. Even when the paint serves a purpose (i.e. prevent rust on military hardware) we still find it stylized.
 
Just thinking outside the box, for these big tubes with big deep spirals, why not just do a wrap with drawer liner self adhesive paper? Okay, you will have one tiny seam on one side, but seems like you could often fit this into the design.
It's not that far outside the box really; that's what any vinyl wrap job does, e.g. Accur8 skins. It's one of nice things about using them: no spiral filling!

The seam is very subtle, barely visible at all. The main reason you see it is if you don't get the wrap on quite straight, and the design doesn't align perfectly. Of course, the printed vinyl has the fin locations marked for easy removal.

Apparently this post has become a recommendation that you go build at least one rocket using Accur8 skins, it's a lot of fun.
 
I use either a toothed rasp or 50 grit sandpaper to start and to make the heavy cuts (near the tip). Peter Alway shows the use of a Swiss Army knife sawblade for roughing in one of his books. I got half a dozen reciprocating-saw blades (on clearance sale), fastened them together to make a sort of coarse file. Smooth with 100 or 150 and finish with 220 or 320

White and yellow glues dry by evaporation, and foam isn't very permeable, so it takes a good while for that glue to dry completely when gluing layers together. Which is why I use epoxy. I haven't run into foam that didn't have a peel-able vapor barrier, so you may be using a different brand of foam than I have.

Small cones that won't be heavily stressed get a coat or two of epoxy for a hard surface. Larger cones get fiberglass-and-epoxy, then Bondo to fill irregularities. The shoulder is cut for a tight fit in a piece of coupler tube, which is epoxied in place to become the actual shoulder.

As for paint, I'm starting to use Chuck's (@cwbullet) idea. Fly 'em naked, and if they survive they've earned their paint. :) Considering the time and effort needed for a good paint job, or even a lousy one, making the rocket prove itself paintworthy seems a good idea.

Best -- Terry
 
Wow! I'm glad I tried this block again. Took her down to a fairly precise ogive, shaped the collar. I have some extra time this morning, so that's what I did. Tonight perhaps I'll smooth it out with 320grit (been doing the last bit of shaping with 150). I'm very happy with the results. And it came out lighter than I expected. With the wood block-up it's only 110g, and the block and hardware is 75-80 of that. Don't think I'll need to shed weight on the nose, but if I do, I can remove quite a bit very easily, haha. I'll have to get some 30 minute epoxy in town this weekend to put a durable outer layer on her. My smoothing should take it down even with the OD of my tube, and I'll need to add to the collar, I cut it a little too much, but epoxy should fix that as well. Super stoked about this. I'll post a pic when I get it smooth.
 
Always a possibility. I don't have much experience with the paper. My dad was a body man when it came to working on cars so sanding and filling is what I'm familiar with, but a paper wrap will definitely work. When I roll tubes for my little rockets now, I roll them the long way. I don't mind the seam, but I do smooth it out a bit before finishing. I also try to get the inner seam to line up with the outer when possible to keep the thickness consistent.

I think wrapping with glass is generally the same idea, the spirals are filled or covered automatically so there's no need to worry about them.

Your idea might actually be the perfect solution for a quicker build where the spirals don't show up on the final rocket. You could pretty well stick the paper and apply paint, possibly use a decal of some sort to hide the paper seam, and you're ready to fly. Perhaps vertical black stripes, one that meets the edge of the vertical seam? Like a redstone paint profile or something. Let's face it, paint jobs are mostly for looks. They can enhance performance but I think that's usually a secondary goal rather than the primary objective. People like beautiful rockets. Even when the paint serves a purpose (i.e. prevent rust on military hardware) we still find it stylized.
Regarding the “unseemliness” of the seam (sorry, it just came to me and I couldn’t resist), the classic narcissistic actor or actress line is telling the photographer to, “be sure to get my best side.” Competition scale rockets aside (where I suspect a visible seam would be a pretty hefty scoring hit, maybe not) something that covers spirals easily 360 degrees, at a cost of a thin seem that can only be seen from at or less than 180 degrees, and can be partially hidden by a fin or a launch lug or a longitudinal stripe seems to me a small price.

It is interesting how many proponents there are for papering fins, but papering the body tube doesn’t come often. Vinyl wraps are a cool variation on the same them, taking it up a notch in adding the color and the decals all is one swell foop. But for those of us not into fiberglassing (I am not a big epoxy fan anyway, I am white glue for paper to paper, yellow for paper to wood and wood to wood, and CA for sealing edges and permanently fixing dental floss joints—- a rarely used but incredibly strong joint) papering works really well.
 
I use either a toothed rasp or 50 grit sandpaper to start and to make the heavy cuts (near the tip). Peter Alway shows the use of a Swiss Army knife sawblade for roughing in one of his books. I got half a dozen reciprocating-saw blades (on clearance sale), fastened them together to make a sort of coarse file. Smooth with 100 or 150 and finish with 220 or 320

White and yellow glues dry by evaporation, and foam isn't very permeable, so it takes a good while for that glue to dry completely when gluing layers together. Which is why I use epoxy. I haven't run into foam that didn't have a peel-able vapor barrier, so you may be using a different brand of foam than I have.

Small cones that won't be heavily stressed get a coat or two of epoxy for a hard surface. Larger cones get fiberglass-and-epoxy, then Bondo to fill irregularities. The shoulder is cut for a tight fit in a piece of coupler tube, which is epoxied in place to become the actual shoulder.

As for paint, I'm starting to use Chuck's (@cwbullet) idea. Fly 'em naked, and if they survive they've earned their paint. :) Considering the time and effort needed for a good paint job, or even a lousy one, making the rocket prove itself paintworthy seems a good idea.

Best -- Terry

I echo the fly’em naked and let them earn the paint. I\
 
Might be my plan for this monster. Running the calcs today I might be able to launch it on a big F motor, but it's well inside of G territory for testing. If it ends up being my L1 then it will definitely have a paint job before the launch.
Added bonus. I picked a 3" cardboard tube from the junk pile at work today, so I have plenty of tube to add a payload section (electronics and such for later missions, or to weigh it down a bit for the L1 launch). Only problem is that it's a bigger wall thickness. The OD appears to be identical, so perhaps with some sanding I can bring it down to size, or perhaps even leave it a bit bulky and feather the lower end and match the nose to the larger OD. This is quickly turning into a very real project and I love it. It's been two years since I constructed a big rocket. Once I have a plan for the nose cone, then it's on.
Only thing left to decide is 29mm or 38mm for the motor. Are reloadable tubes the same size as the regular motors? I assume they are but I've never owned one before.
I put out now that I have NO desire to launch this for an L2 cert (she's too light), but that doesn't mean I won't at some point wonder about jamming a J motor in the rear end to see what kind of altitude and speed I get out of her.
 
Reloadables and SU/DMS are indeed the same diameter.

What altitudes are your sims estimating?

As far as motor mounts, they say "Its easy to adapt down, you cant adapt up".
That being said, building this as a versatile 29mm rocket is a good learning project.

Something I recommend to college kids that intend to use the dame rocket for L1 and L2 is to build so it flies just booster and nose for L1, then stick an ebay and payload section on for L2. That can keep it a little lower when it comes time for the J.

(Also if you fly around trees and are going over 2500 ft, a tracker is a good idea too)
 
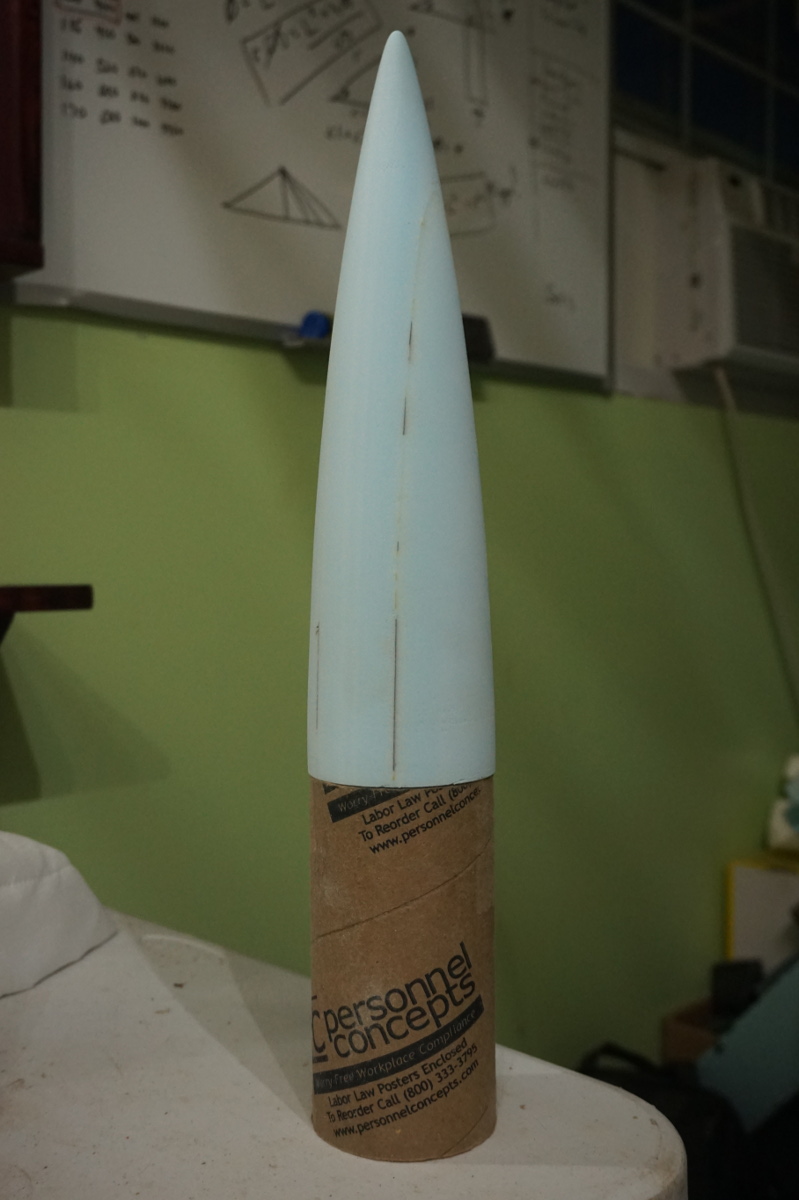
Success with the nose cose. Even after a rapid unplanned disassembly, and regluing (the wrong way), I finished with the 320 grit wash and removed the retaining screws from the bottom that were added to hold everything in place. She weighs in at 79 grams, lighter than a comparable PNC. Gave myself a little pat on the back and wanted to share with you guys.
80otu6m.jpg

The primary radius is about 54", and the tip radius is ~1/8", so it's pretty darn pointy. I don't like sharp tips...but that may be a discussion for another time. Can't hardly wait to get some epoxy to coat this little girl with to fill in all the tiny holes and make her shiny.
While I'm on that. Any suggestions for a better top coat? I know epoxy isn't necessarily the best, but if they have something at walmart that is fairly easy to apply and not too far outside the budget, all ears open. I don't know if they have micro-balloons. Are those exspensive? Would that be a better glaze? I may glass the whole rocket at some point, but not anytime in the near future. Just if I decide to go bigger on the motors and likely only if it seems absolutely necessary.
 
Reloadables and SU/DMS are indeed the same diameter.

What altitudes are your sims estimating?

As far as motor mounts, they say "Its easy to adapt down, you cant adapt up".
That being said, building this as a versatile 29mm rocket is a good learning project.

Something I recommend to college kids that intend to use the dame rocket for L1 and L2 is to build so it flies just booster and nose for L1, then stick an ebay and payload section on for L2. That can keep it a little lower when it comes time for the J.

(Also if you fly around trees and are going over 2500 ft, a tracker is a good idea too)

I did a quick cal in my head earlier, still not sure about the weight but it will probably come out right at 1kg or below with motor. Could be a high flight on an H, 2500-4000 feet maybe. Haven't run a proper calculation on it yet as I don't have all the information.
I like payload bays, but I won't want to get too complex for my L2 build on that front as it will have its own uses past L2, and I'm still tossing ideas about in my head. That whole rocket may end up being an upper stage at some point.
I definitely plan on having some tracking. L1 just seems like a good step for this build, so I'll likely add some ballast as needed to keep her closer to the Earth. That's one flight where it probably doesn't pay to mess around, even if the whole rocket costs next to nothing. With G motors I should be able to tune it to stay pretty low where I can fly it from my property on calm days.
 
Anything you put on the NC, be aware that many things will dissolve that foam. Test on a scrap first. (I'm talking about spray paints, etc.)
 
Anything you put on the NC, be aware that many things will dissolve that foam. Test on a scrap first. (I'm talking about spray paints, etc.)
Thanks and +1. I've used 2 part epoxy before with no issue, but anything new and unknown gets tested. Don't want to ruin the new cone after putting such work into it.
 
Been a long time lurker and promised myself that I would set up an account tonight. My hopes are to get an NAR membership sometime this year and go for my L1, but I've been fiddling with smaller rockets that I can simply go outside and launch. Don't worry, my "back yard" is a quarter section of property, so there's plenty of space, though many trees as well.

Anyway, there's a lot about me, but I want to focus on my current thing, LPR.

I've made several rockets over the years out of paper and small engines. I even built an L1-capable rocket a couple years ago from nothing but kraft paper, plywood, and lots of "special" glue to strengthen everything, but it eventually got destroyed before so much as a test launch.

Most recently, I made a little rocket, the Angry Pickle, out of a paper bag and some manilla paper. Flew great, but let's just say I would have been better off to roll a few more layers on the tube. It crinkled, so it sits on my shelf after its maiden flight the other day. At least I used up that last 1/2A motor that was laying around.

Now I'm looking at getting a kit, but none of the LPR kits excite me too much except for a little egg launcher from Apogee. It's called the Courier, I think. Adorable little rocket. But after pricing out some components, I'm leaning toward another scratch build. My cart is around $40 and includes a couple pre-slotted 33mm tubes, four nose cones, an engine mount for same, a parachute, some B motors (I think B6-4), 1/8" balsa sheet, and 1/4" launch lugs (for my home-made launch-pad). So that'll be a 40 dollar rocket including motors, and enough gear to make another BT-55 rocket on the cheap, just add another parachute and motor mount when I'm ready, essentially.

As much as I want my L1 cert (actually I want the L2), money is tight these days and I need to budget things out. I figure I can build another L1 piece by piece as money and time permit rather than rushing it, and in the meantime enjoy an occasional launch at home. I wonder how many HPR guys launch lots of tiny rockets as well. The trouble is that there aren't as many component options for small rockets without buying bundles of parts. For HPR stuff I can go to LOC or other places and get one tube, one this, one that, etc. Nose cones are limited on little rockets too, it seems. I made the Angry Pickle nose out of blue foam using my drill as a lathe, and then coated it with epoxy to toughen it up, but that's hardly an ideal solution.

Anyway, that's my LPR plans. The first one that I designed for this order is a mini version of my old L1 build in style. I might try to make a little Nike Smoke rocket with one of the conical nose cones in the pack, though the cone is on the short side I think. Designing my own kit just seems better suited for me than getting a pre-packaged "slap this together tonight and fly tomorrow" kit from a distributor.

Anyway, no real questions, just hoping something here stirs up a conversation. I'm new so I mainly want to meet some people here and talk about rocket things. My dream is to build and launch a sounding rocket at Black Rock someday, and I also just started a programming project to make my own flight simulator for hobby rocketry.
A few years ago I had simple contact form on my hobby website. It had a “math question” as a simple anti doam bot measure. Upon submit, the php file that processed the form from the html page would check the answer against a file with the answer in it. If it failed , the message was rejected.

Well, it is 6 years later and my site has gone through a couple of revisions. I wish I that match question php code back. I can’t find it.

Do you know of source for thst or how yo code it?

Any help appreciated!

...


Totally mis-posted this. I was trying to reply to someone talking about coding PHP. Doh!

Let me find the right post...
 
Last edited:
I may take a peek at some point. I'm coding the engine for mine in Godot Engine. These days I stick to HTML, PHP, etc for webpage stuff, tinker with Blender, and do most of my design in Godot. Haven't done much lower level stuff like C++ since I was in college, and I don't think I've ever coded in Java (though I assume it isn't much different from any other language). I did a little unity scripting, mostly guessing and letting the real coders do sanity checks, for the Kerbal modders when I had an idea of how to implement cool features. Mostly just do stuff on my own though. Too many ideas and not enough time, if I could hire my own dev team for my projects I would. I don't think there's anything I could really contribute to OR, it ticks all the boxes for what it's designed to do. My little pet project is basically just a 3D version of the same concept that could eventually let you see you simulated rocket take off, do cool paint jobs, and even become a fun video game at a certain point. Not sure where it's going but I'm basically making it for me.
A few years ago I had a simple contact form on my hobby website. It had a “math question” as a simple anti spam bot measure. Upon submit, the php file that processed the form from the html page would check the answer against a file with the answer in it. If it failed, the message was rejected.

Well, it is 6 years later and my site has gone through a couple of revisions. I wish I had that match question php code back. I can’t find it.

Do you know of source for that or how you code it?

Any help appreciated!
 
Well, even if I don't get a visible blue flame, it'll still be a spectacular flight. Also, QCC Explorer is currently my favorite OOP Estes kit! I love seeing them with paint schemes that differ from the package art. Here's mine that has coincidentally only flown on E30s:

View attachment 410447


Who or what is dragging the QCC Explorer at the end of the movie? A pooch?

Where is this? The rocket elegantly side-stepped the body of water near the landing site.
 
Back
Top