Cert 1 and 2: Jolly Logic Challenge

The Rocketry Forum

Help Support The Rocketry Forum:

This site may earn a commission from merchant affiliate links, including eBay, Amazon, and others.

FlyBy01

Well-Known Member
TRF Supporter
Joined
Mar 9, 2018
Messages
607
Reaction score
396
Location
Virginia
For those of you who are tired of Loc Goblins runaway now (dad joke of the day).
Since I'm not a millionaire and neither are my parents I am building what I think is the most cost effective rocket for both certifications.

Now John Beans the creator of the Jolly Logic Chute Release asked for the community to post all attempts for certification using his creation. So this thread is has started.

Goal 1: Build Loc Goblin
Goal 2: Fly Cert 1 on 29mm H182R
Goal 3: Study for Cert 2 test
Goal 4: Fly the Cert 2 using my 54mm gear
Goal 5: The journey to Certification 3
 
Goal 1: The build
From the far left of the body tube to the right is all standard Loc Goblin kit. From the fin side of the body tube to the left are the add-ons and 54mm motor gear.
Upgrades:
- 60" Ultra-X Parachute
- 18" Recon Recovery Nomex
- 30" Recon Recovery shock cord protector
- 54mm 1280 Aero Tech motor hardware
- 54mm motor adapter system 20200308_111847.jpeg
 
Blind nuts installed in motor retainers. I used JB weld for heat transfer purposes. Does it matter? Maybe, maybe not but it gave me a warm fuzzy. 20200308_111930.jpeg
 
Mocking up the MMA-system and mixing up the Rocket Poxy. Dyed it with neon yellow for fun. This is the first time using Rocket Poxy.20200308_112430.jpeg20200308_112632.jpeg20200308_112755.jpeg20200308_113020.jpeg
 
You will get much better adhesion on laser cut parts if you sand the brown stuff off.
All of the surfaces that were epoxied the lazer stuff was sanded off. I got lucky because I didn't know that, thank you.

I have some Bob Smith 30 min epoxy that I'm trying to use up and used it for the fin-can fillets. The Rocket Poxy that is seen is just squeeze out from fins being epoxied on.20200308_210147.jpeg
 
The really fun part is spreading that fincan by yourself over all four fins at once. Next time Ima gonna cut the slots all the way to the end, rather than just a slit in the center...
 
Fin-can installed.
Things that work:
- use gloves (should go without saying)
- acetone to clean up drips
- isopropyl alcohol is hard to get due to Coronavirus
- have a dowel rod ready with a popsicle stick tapped on
- a flat head screwdriver helps put cardboard back in place behind the fins
- use Rocket Poxy; the stuff just stays where you put it
20200310_193408.jpeg20200310_193243.jpeg20200310_193856.jpeg
 
Last edited:
Ditto, I always aim for a CR, and I now always back up the button point with an extra layer of 1/4" plywood.. I find it easier to hit a hidden 1/2" area than a 1/4" area!
 
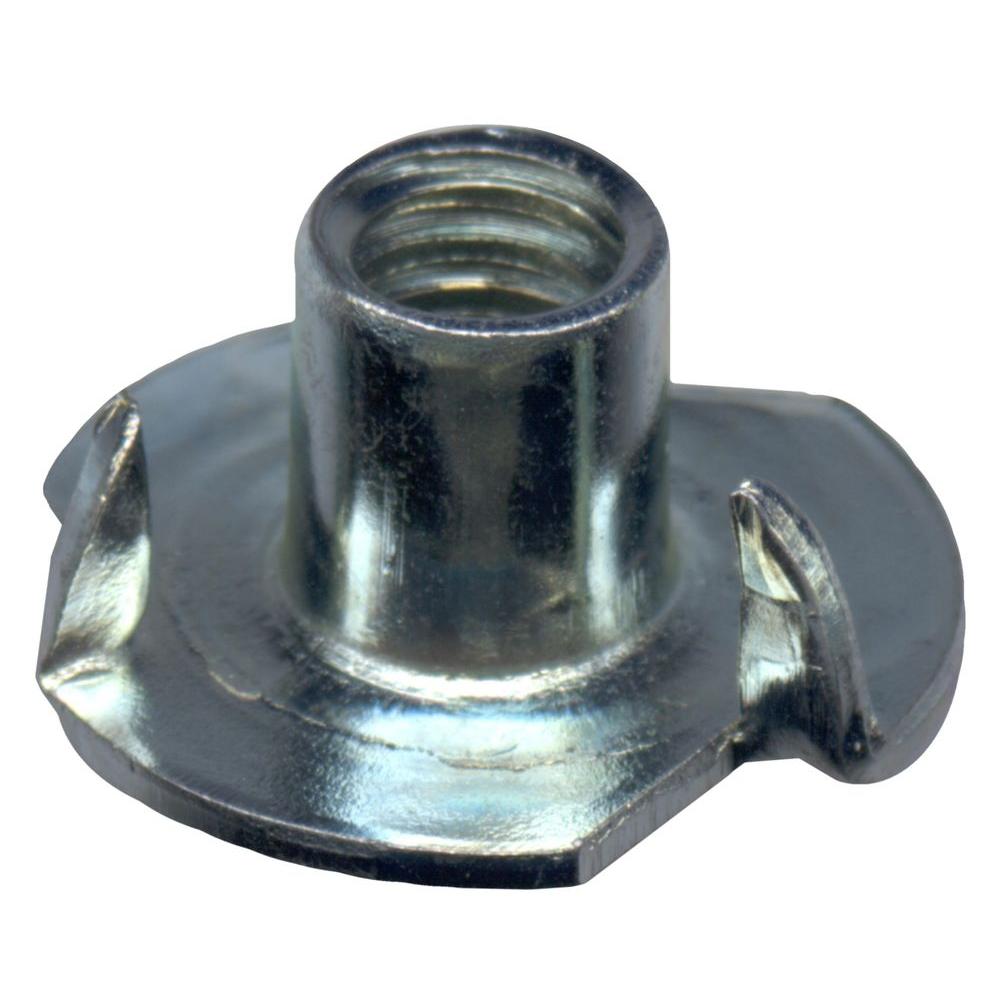
The rail buttons slide over the tee nuts and secure with the 6-32 screw.

I went to Lowes and bought Brad Tee Hole nuts in 6-32 thread.

Sanded the flat base for epoxy adhesion.

Drilled 1/8" in hole.

Used a q-tip to put CA on the area drilled to prevent cardboard separation.

Slowly increased hole size for nut, shaft to slide through.

Epoxied applied to nut base and inside the rocket.

I will post some photos tonight.

I think this is how Tim Van Milligan is doing his rail buttons. I'm not 100% but that's where the idea came from.
 
I came up with this solution as a work around to make the rail buttons replaceable. Also I needed a flush type solution for the fin-can to slide past.

Loc Precision directions say in a nut shell drill an undersized hole, put epoxy on the screw, screw the buttons in place, and place the buttons toward the ground to allow epoxy to flow with gravity.

Please post if there is a better way to do things I'm here to learn. I'm Tripoli Cert level 0 working towards Cert 1 and beyond.
 
Glue t-nuts in place inside the airframe (in conjunction with the fin can, at least on the lower position). Then you have full serviceability of the rail buttons. I usually just flip them over and put a fillet of epoxy around and over the flange.
everbilt-t-nuts-18861-64_1000.jpg
 
Mr. Flyboy,

go here, post #6 for the idea of adding a backer to the CRs where you intend to put a button
https://www.rocketryforum.com/threads/madcow-super-dx3-patriot-a-build-thread.140215/#post-1693819

(Yes, a shameless plug! :D )

What a few of us do, is put our button on with wood screws, typically a #4 or #6 x 1/2". We aim for the middle of a CR. Since blindly aiming for a 1/4" is hard, aiming your drill into a 1/2" is easier. the button can then be replaced with a new one, and a new screw. It's also going into some structure, rather than a glued-in face on the inside of the tube which some say isn't as strong. (not that this really is an issue..) We know where the CRs are going to be in the tube, as we've planned a head. I mark my tube with the place were I expect the thickened CRs are going to be, and I assemble & such. I drill my pilot holes once the MMT is installed. Some would argue, that you are adding more unneeded material (metal) to the rocket, and this will rob you of a foot or two altitude! :D

The way you did it, I assume you needed to sand a bit of a flat on the CRs to clear the back of the T-nuts. This method is not uncommon for buttons higher up on the tube,m or where there is uncertainty to where the upper CR is, exactly..
 
Rubber well nuts (aka Rawl nut) work too, simply drill proper size hole in airframe, if its cardboard, harden with CA and insert rubber expansion nut, with screw and railbutton and tighten until unable to pull it out, easy.s-l400.jpeg
 
Rubber well nuts (aka Rawl nut) work too, simply drill proper size hole in airframe, if its cardboard, harden with CA and insert rubber expansion nut, with screw and railbutton and tighten until unable to pull it out, easy.View attachment 408903
Good option. I use these especially on rebuilds and updates where you are replacing launch lugs and thus don't have access to the inside of the airframe.
 
Glue t-nuts in place inside the airframe (in conjunction with the fin can, at least on the lower position). Then you have full serviceability of the rail buttons. I usually just flip them over and put a fillet of epoxy around and over the flange.
everbilt-t-nuts-18861-64_1000.jpg
upload_2020-3-11_22-15-58.jpeg
I used these instead so I didn’t have to worry about the prongs.
 
Back
Top