PS II Inspired Black Brant V

The Rocketry Forum

Help Support The Rocketry Forum:

This site may earn a commission from merchant affiliate links, including eBay, Amazon, and others.

Bruiser

Well-Known Member
Joined
Jun 7, 2018
Messages
1,596
Reaction score
867
I have been contemplating my rocketry goals for 2020 and I have decided I want to give composite motors a try. I was thinking about level one but decided that would be like putting the cart before the horse.

I like the Estes PS II parts so I started looking at the diameters and lengths of nose cones to see what would match up best with some sort of scale rocket.

I ended up narrowing it down to the Black Brant rockets and after looking at the documentation available I was very attracted to the Black Brant VIII. It is a Black Brant Vc sitting on top of a Nike booster as depicted in Peter Alway's drawing
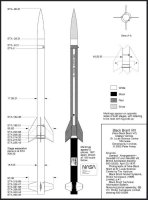
Black Brant VIII.JPG

At first I was thinking how awesome it would be to build this! Two stage, composite motors, air start, dual deploy, yep, yep, yep, oh boy! Then I came to my senses and realized that again, I needed to expand my skills while keep my goals attainable. My next thought was to just build the sustainer portion and call it a BB VIII like LOC does with their BBX. I actually started working on the nose cone https://www.rocketryforum.com/threads/psii-2-5-inch-nose-cone-mods.156566/ while debating building just the sustainer. In the end I decided to find something else because it would have haunted me that I just built the sustainer.

So I started looking around again at Black Brant rockets. As some of you know I have already built a Rocketarium Vb that I modified to a Vc https://www.rocketryforum.com/threads/black-brant-vc.154748/ so that awesome paint scheme was used up :)

So because I had already lengthened the nose cone and with the documentation I have I was left with this choice, a Black Brant Vb

Black Brant VB Med.jpg

So that is the plan at this time. I'm building a Black Brant VB using mostly PS II series parts (body tubes, couplers, nose cone, parachute, motor tube). It'll be 2.5 inches in diameter, almost 44 inches tall, and use 29 mm composites. The build photos will be coming.

Thanks,
-Bob
 
It's 1/6.9, almost 1/7th scale. I think that will work out nice for F and G motors. Oh and the sim says H motors too :)

-Bob
 
Just a quick review of the modifications done to the nose cone.

It is a Estes PS II 2.5 nose cone and it needed to be 1 inch longer. I also wanted to get rid of the slant and plastic lug for the harness attachment.

I started by cutting off the back of the shoulder and I drilled some holes to aid in bonding during the next step
Nose Cone Holes.jpg


Next I made a cardboard tube that fit inside the shoulder. It took quite a bit of sanding to the inside of the nose cone to make it uniform but eventually the tube slid in far enough that the front of the tube was forward of the step down. I mixed up some epoxy and glued the tube in place.
Nose Cone Inner Tube.jpg


Then came the task of cutting a coupler to fit over the tube that I made and butt up nice and tight to the nose cone shoulder. Once I was happy with the fit, it was also glued in place. I also glued in a 1 inch section of body tube to make the nose cone 1 inch longer.
Nose Cone Coupler Installed.jpg


After using a little Bondo spot putty to fill the slight gaps I primered the nose cone and am happy with the results. I have made the plywood ring and removable plate but have not glued them in yet. I still need to obtain a proper sized u-bolt and blind nuts. I am making a removable electronics bay as shown in this video by John Coker https://www.jcrocket.com/plastic-nose-mods.shtml
Nose Cone Primer.jpg

-Bob
 
I started working the motor mount next. Between my Dremel and sanding disk I made some ply centering rings. I debated about what to use for glue and after reading many threads I decided to go with wood glue. Here is the forward centering ring glued on. I wrapped the tube with a few layers of tape to help hold the ring in place while the glue dried.
Forward Centering Ring.jpg


Because of the step down at the fin can I am using two sets of centering rings. Two for the main body tube and two for the body tube in the fin can area. I installed the aft main centering ring next but forgot to take a picture. Then I installed the mount into the main body tube. Next I added a 1/8th piece of balsa to simulate the aft end of the rocket motor.
Aft Motor End Rear.jpg


Next I glued on a piece of ply to simulate the fin can flange, followed by the two centering rings for the fin can. The rear centering is positioned so the Estes 29mm retainer will fit perfectly.
Aft Centering Rings.jpg


And that is where I am now. I am still struggling with how I going to do the rear launch rail. I need to source a piece of nylon for me to try to make one. I just need to get that sorted out before I glue on the aft tube. I am actually thinking of gluing the fins on first, then adding the tube. Pluses and minuses both ways... Still need to make the fins too but I need to source some 1/32nd or 1/64th ply first. There's a hobby shop in El Paso that has it but it's about 90 miles away so I will get some on my next trip there. They also happen to be holding a PSII Nike Smoke that I paid for already. It was a Christmas gift to myself :)

Anyway, I in the meanwhile I can go ahead with applying cwf to the tube. I can also get started in the ejection baffle.

-Bob
 
It took me a few minutes to realize those are two different rockets :) One has UNITED STATES on it and the other has the more typical Bristol Aerospace

-Bob
 
Last edited:
Found these while looking at a video about Wallops. These are snips are of what I suspect is a Black Brant 5C

Looks like a forward mount
Black Brant 5 Wallops 2.JPG


The aft mount
Black Brant 5 Wallops 3.JPG

Black Brant 5 Wallops 1.JPG
Black Brant 5 Wallops 4.JPG


-Bob
 
Here is what I think the first rocket from post 7 would look like in color

BB5 US Snip.JPG

-Bob
 
I've changed my .ork file to reflect the above rocket. Mainly I added another section of body tube and I added another section of motor mount tube to help reduce the space inside the rocket.

BBV US Capture.JPG

It does bring up the stability question though. Would this be considered a tall, skinny rocket? How do you know how many calibers are needed?

-Bob
 
Nice build, looking forward to seeing how you do the fins! ;) Excellent pics. I highly recommend the Aerotech 29mm Hobbyline case and a crate of G64 reloads!
 
There was the Black Brant Va, Vb and Vc. The Va and the Vb had three fins while the Vc had four. The motor and fin can dimensions have never changed. The fins themselves are the same on all the models. At some point in time it became the Black Brant 5, probably when Magellan took over making the rockets.

Each rocket has a different payload so that changes. There are also different nose cone lengths and shapes. The forward and aft rail mounts changed over time.

The Black Brant V/5 was/is also used as a sustainer on different two and three stage rockets such as the Black Brant VIII, IX, X and XII. As far as I can tell, all the rockets used as sustainers had 4 fins.

-Bob
 
I've been working on the baffle. It's a different design than I have used before. Semroc has this style baffle available thru eRockets for up to a 225 body tube I believe. I was a little concerned that it may not work for larger size tubes so I did some research and found LOC Precision offers the same type of baffle system up for up to 7.5 inch diameter rockets.

My tube is Estes PSII series 2.5 inch and Estes doesn't seem to do baffles so I needed to make my own. After careful measuring I found that two ESTES PSII 29mm motor tubes would just squeeze into the 2.5 PSII coupler. The coupler is 4 inches long so using the highly calibrated TLAR method I cut the tubes to 3 inches. That will allow 1 inch between the end of the tube and the bulkhead for the gases to redirect themselves.

So there are two assemblies like the one on the right in this picture. I have already glued in one assembly into the coupler as shown on the left.

Baffle Apart.jpg


Next I was intending to install a screw eye into the top bulkhead but I could not source one locally. I do have one speeding to me as I type this but not wanting to wait I did glue in the second tube assembly. Once the eye arrives I'll get it installed and take another photo.

Btw, the bulkhead that you see is actually the aft (bottom) bulkhead so that is why it is coated with JB Weld.

-Bob
 
I get my screw eyes, eye bolts and U bolts from Home Depot. They have a variety of sizes.
Probably available at Lowe's as well. Haven't checked.
Have you considered thick wall cardboard airframes from Loc, Madcow, or eRockets?
Estes PS II airframes and nose cones are so limiting. And expensive.
Cheers.
 
I went to Home Depot and could find one. I was looking for the screw eye with a nut on it. Probably called a machine eye or such...

I don't think the PSII parts are too expensive compared to other thick wall tubing, maybe just a hair more. The nose cone are cheap though! The 2.5 nose cone is like 6 bucks. Now that I settled on a modelling a different rocket than I started with the nose cone that I added an inch to is now too long. I need a standard length but that is going top wait for now. Shipping is 11 bucks so it will wait until my next larger order. A nose cone is easy to swap out.

The biggest problem (not for me but for some people) would be that there are not any centering rings, baffles and such readily available. I make my own anyway, so that's not a big factor for me.

Last night I was thinking that if I had made this rocket from BT80 tubing maybe I could have work with Mr. Tim and gotten it into the Apogee Newsletter. I will definitely consider that on my next rocket.

-Bob
 
Nice workaround for the nosecone. I'm not sure I'd ever think to make a cardboard insert for a plastic cone, but you did a great job!

How's the fit of your built-up shoulder in the body tube?
 
The shoulder is great. It's not really built up though. The shoulder was extended by sliding (and gluing) on a one inch long piece of body tube.

It's just a little snug in the body tube right now with the primer on there. A little sanding and it'll be purrfect

-Bob
 
So rather than making the fins out of solid ply or balsa I decided to use both. Scale thickness ply would have been a little heavy and balsa not strong enough. They are 7/32nds at the root and 3/32nds at the tip.

I started off with a core of 1/32nd ply and I added some extra ply to make the tabs a little thicker. Then I added some balsa stringers which I sanded to achieve a taper. (PS, the center cores are all still tacked together in this photo to help keep them straight)
Fin With Ribs.jpg


Next step was to glue on a 1/32nd ply skin over the stringers
Fin Center Skin.jpg


Then I added balsa leading and trailing edges
Fins With Balsa.jpg


After a fair amount of sanding (but not too bad) I had one side finished.
Fin Finish Sanded.jpg


Next I separated this fin from the stack and added the fin tab doublers, stringers, ply skin, balsa leading and trailing edges and sanded the other side.

I have two done now and that reminded me of one of the benefits of a three fin rocket... There's only three fins :)

I am deciding if I am going to paper the leading edge and I am leaning toward yes.

-Bob
 
I've had to do some searching around.

There is this one that has a Black Brant 5 in it at around 4 minutes

This is the one I snipped those pictures from. They are at about 7:30 into the video

-Bob
 
I've been doing a little work on the BBVb. Most of it is just little stuff that eats up time.

My eye screw came in and it wasn't welded so I tacked it together with my welder. I installed it into the baffle. Both nuts got treated with some JB weld to keep them from loosening over time.
Baffle with Eye.jpg


I also papered the leading edge of the fins using Avery label paper and some thin CA to seal the edges
Fin Papered.jpg


I also added on the fin can and cut the fin slots
Fin Can Slots.jpg


Next I am going to work out how to attach the rail buttons to the airframe. I need a "wood screw" for the back one and a longer screw for the front. I also want to look for a "weld nut" for the forward one. I have a rather large t-nut now that I could modify but since I need to go get some screws I'll see what I can find.

-Bob
 
Back
Top