Sanding between 'finish' coats?

The Rocketry Forum

Help Support The Rocketry Forum:

This site may earn a commission from merchant affiliate links, including eBay, Amazon, and others.

Tom

Well-Known Member
TRF Supporter
Joined
Jun 4, 2019
Messages
275
Reaction score
59
I am working on yet another high flyer xl. Trying to get a 'showroom' finish on it.

It came out quite well very glossy and smooth not a hint of tube spiral. It's even hard to see the joiner section.

However in looking at it closer today I noted that the red did not completely cover the white base coat. There are a few spots where the white is coming through. It obviously needs another coat of the red. Does the nice shiny coat that is on there now need to be sanded before applying another coat?

ps; it has dried for over 48 hours now.
 
I am not an expert here but my experience is: sanding before the final heavy coat yields the smoothest results. I don't often do it, but when I do the results are noticeably better.
 
Use 600 grit or finer paper for between coat sanding.
If paper too rough, you are just starting over again.
Light sanding with extra fine paper.
Same method I use when restoring gun stocks in between coats of finishing oil
 
Thanks, that is exactly what I ended up doing. 600 grit wet sand. Finish came out great. Now for the fins ;)

Thought I had them prepped pretty well but blew it on painting them. Put it on too heavy and got a run on one of them. Others still show slight signs of wood grain. I sealed them, primed them (2 coats sanded between coats) and a coat of gloss black.

Sigh, looks like I have more sanding to do.
 
I learned how to paper fins with Neil's tutorial. I wouldn't do balsa any other way.

-Bob
 
Hmmn, I could have sworn it was a tutorial but you know how my memory is. It could have easily been in a build thread. Didn't you go over the process in your latest build, they one with the ring. See how my memory is?

Anyway, I am pretty sure I learned the technique I use from you because I think you're the only one that uses the Avery label paper.

-Bob
 
Hmmn, I could have sworn it was a tutorial but you know how my memory is. It could have easily been in a build thread. Didn't you go over the process in your latest build, they one with the ring. See how my memory is?
Well I've definitely gone over the process in a few threads, although I didn't think I did for that one. In any case, I am probably the one who has blathered on the most (at least, recently) about papering fins with label paper. So I guess it could have been me. One day I might write an actual tutorial, who knows. :)
 
I am working on yet another high flyer xl. Trying to get a 'showroom' finish on it.

It came out quite well very glossy and smooth not a hint of tube spiral. It's even hard to see the joiner section.

However in looking at it closer today I noted that the red did not completely cover the white base coat. There are a few spots where the white is coming through. It obviously needs another coat of the red. Does the nice shiny coat that is on there now need to be sanded before applying another coat?

ps; it has dried for over 48 hours now.

Doesn't need to be sanded if it is already smooth but read the instructions on the spray can about recoat window. With some paint (usually enamel) you have to either spray the next coat within an hour or wait about a week for it to cure.
 
Could you elaborate on the evolution please.
Three tweaks:
1) I now do one side at a time. That is, apply paper to one side, trim the whole thing, then do the other side.
2) Sanding off of the extra is mostly done with a piece of sandpaper (usually a fresh piece of 400 grit, although sometimes 220 if I'm in a hurry) wrapped around a pencil or something similar, using a diagonal sanding motion as shown:
Papering.jpg
The pencil moves simultaneously to the left and away.
3) Finishing sanding is done almost exclusively with 800 grit, including the edges after applying TBII. This minimizes chances of either (a) over-sanding the fin edges, or (b) scuffing the paper.
 
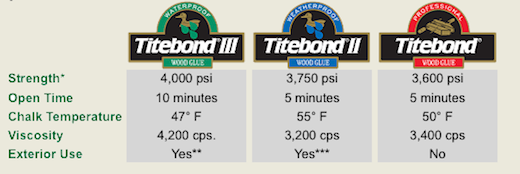
Tightbond has three types: Original, II (a.k.a. Premium), and III (a.k.a. Ultimate). It's tempting to think a higher number is always better, but they actually have different characteristics. I've looked over the manufacturer's own comparison chart and decided that Original is plenty strong enough and good enough in other ways for LP rocketry, while the advantages of the others don't justify the price difference.
titebond-chart.png

(Despite not being for outdoor use, other versions also from the manufacturer say Original is waterproof, so I surmise it's not for extended water exposure or submersion. Other manufacturer versions explain that "Chalk Temperature" is the minimum application temperature.)
 
Last edited:
Tightbond has three types: Original, II (a.k.a. Premium), and III (a.k.a. Ultimate). It's tempting to think a higher number is always better, but they actually have different characteristics. I've looked over the manufacturer's own comparison chart and decided that Original is plenty strong enough and good enough in other ways for LP rocketry, while the advantages of the others don't justify the price difference.
titebond-chart.png

(Despite not being for outdoor use, other versions also from the manufacturer say Original is waterproof, so I surmise it's not for extended water exposure or submersion. Other manufacturer versions explain that "Chalk Temperature" is the minimum application temperature.)
Don't forget Titebond No Run No Drip, super thick and works great for fillets on cardboard and wood rockets.
 
Yep, I too am enjoying the Quick and Thick on fillets. Good stuff...

-Bob
 
Nowadays that would be Quick and Thick:
View attachment 398003

That product is competing with Pledge/Future for most name changes.
+1. I think my last bottle of it was called Molding and Trim glue.
Don't forget Titebond No Run No Drip, super thick and works great for fillets on cardboard and wood rockets.
It changes names so often I can't keep up, but I still purchase at least two bottles everytime I run out.
 
Back
Top