What did you do rocket wise today?

The Rocketry Forum

Help Support The Rocketry Forum:

This site may earn a commission from merchant affiliate links, including eBay, Amazon, and others.
Found out that the NCR/Estes Pro Command Center Launch Controller needs (2) 7.2 volt, 6 cell 1.2Ah batteries that cost $20.00 each and they would need to have a charger, so I would end up with 75.00 more in it over what I paid for it. Sounds like I need to sell it on CL

Fleabay has 7.2V 3.8Ah NiMH batteries for $10 each, free shipping, US vendor.
 
Finished skinning and tested some paint combinations

The sketch vellum, with a coat of finish cure epoxy on the inside, is pretty tough and is (so far) wrinkle-resistant. I want to show off the joinery, so am trying a Tamiya transparent paint over Rustoleum automotive gloss enamel on vellum adhered to some scrap (mis-cut) centering rings.

20190701_202448.png 20190703_103341.png 20190703_144710.png
 
Last edited:
The controller is supposed to use NiCad batteries
NimH batteries are much better than the obsolete NiCads. You don't have to deplete the batteries before recharging, so no memory effect. Lion or Li-Po would be even better, but you would have to rig some system to hold it in place in the battery compartment since it would likely be smaller. And you need a pack with standard Tamiya plugs. If you have R/C gear you probably already have the compatible batteries and the charger.
Picked up a gently used Command Controller recently from a forum member and put in two new NimH battery packs. Used it at a launch 10 days ago. Worked great!
0703191401.jpg

I also sliced off a piece of the safety key so it would fit in the ignitor storage compartment. I always seem to lose those things:
0703191409.jpg
 
NimH batteries are much better than the obsolete NiCads. You don't have to deplete the batteries before recharging, so no memory effect. Lion or Li-Po would be even better, but you would have to rig some system to hold it in place in the battery compartment since it would likely be smaller. And you need a pack with standard Tamiya plugs. If you have R/C gear you probably already have the compatible batteries and the charger.
Picked up a gently used Command Controller recently from a forum member and put in two new NimH battery packs. Used it at a launch 10 days ago. Worked great!
View attachment 387699

I also sliced off a piece of the safety key so it would fit in the ignitor storage compartment. I always seem to lose those things:
View attachment 387702

Can you supply me with a link to where you bought the batteries? Thanks
 
Took delivery of 1 x replacement 30" Booster Tube for MAC 3" Scorpion... yay and the USPS gorillas didn't shag this one (thanks to Mikes packing skills) !

:)
 
Sanded. Sanded sanded and sanded. For some reason I really glopped some CWF on some fins last night.
 
Yesterday I spent 2 hours cutting everything to do a vacuum bag 3-layer, CF t2t job on my L3 project. Got the bag sized and prepped on the rocket. Then, at the last moment before I mixed the epoxy (crazy expensive Cotronics stuff), I decided to test my pump...blew the vacuum controller on startup. Mad about the controller, but glad I tested it before committing the epoxy.

This is a salvaged diaphragm pump and controller from a discarded piece of lab equipment (rotovap), so it had a hard life. Unfortunately, there is no option on this model to just make it run without a controller that I know of. Even if there was, they aren't designed to run continually at full speed for hours on end.
 
Rainy weather was great for preparing the ground for fireworks, but it's damping opportunities to paint. Hooked up recovery to the 4" Hot Bird instead. I'll be finalizing his weight and electronics mounting this weekend hopefully.

received_2368839113439218.jpeg
 
Tried to keep busy

Ran some parts for a BT50-based WAC Corporal and for the Pringles-can rocket -- mostly to use up the 1/16 ply taped to the spoil board on the CNC.

usinguptheplywood.png spideronboard2.png BT60WCfinsonboard.png spiderhanging.png assembingNC.png assmblingWCBT50fins.png

printed a tailcone for the WAC Corporal

3DPtailcone.png
 
Last edited:
I finished up the design and started printing my next project, "Wait I Changed My Mind" (it will be my second biggest rocket and the first to fly on a K). Staples apparently changed shipping tube suppliers since the last time I was there, so I had to adjust all the outside diameters on the printed parts by 60 thou.
 

Attachments

  • IMG_20190706_165157.jpg
    IMG_20190706_165157.jpg
    230.6 KB · Views: 62
  • WICMM_20190706.PNG
    WICMM_20190706.PNG
    448 KB · Views: 60
  • WICMM_OR v1.PNG
    WICMM_OR v1.PNG
    315.3 KB · Views: 68
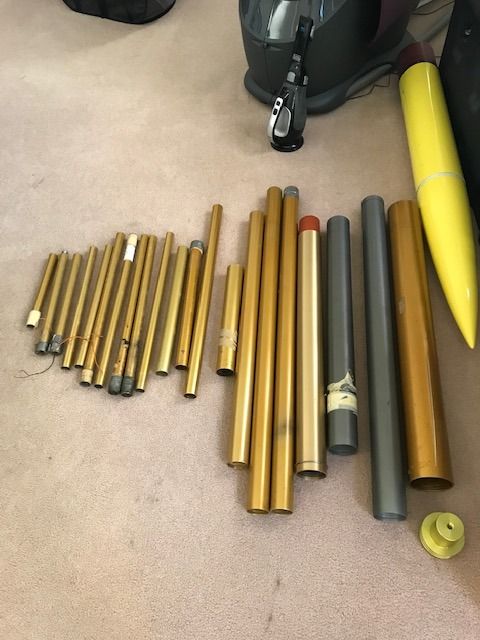
Picked up some Kosden and AMW cases for a song and a promise to build a couple of motors for the seller. He decided not to jump into research motors and passed these on to us:
Kosden%20and%20AMW%20cases.jpg


The 98mm has been cut down but the two grey AMW cases 76/6000 and 76/8000 are like new. One of the 54/4000 cases has been scorched, and another has been cut down, but the one in the middle is in good shape. I think I have finally convinced Sharon that we should part with the smaller 38 and 29mm stuff, we have a bunch of it, even some 24mm. I will collect it all together and post it up in a separate thread later.
 
Practiced composite lay-up on paper towel rolls. Short story: they call it practice for a reason.

Two packages delivered; a spool of PLA for the 3D printer and a LPR 2-stage Hydra Sandhawk from eRockets.
 
Ordered my motors for Tri-Cities Sod Blaster event on Labor Day weekend. Lots of Redline propellant headed my way!
 
Solidworks is telling me a) go to bed b) it really doesn't like circular patterns of mirrored features.

On the bright side, this looks really cool

upload_2019-7-6_23-1-2.png
 
Forgot to mention I went in for one of the US Space and Rocket center's build sessions for the 5000 rocket launch on July 16th (shudder)

They're at ~4570/5000 of constructed rockets

received_2383985911842131.jpeg
 
My youngest son building a Garbage Bag Parachute
I've tried to teach them that it's better to learn how to build things instead of clicking "Buy Now"
IMG_2190.jpg IMG_2191.jpg
 
Dry fit on another boring 8FNC

20190707_142906.png
20190707_142848.png

Slotting a Pringles can is a PITA.

I am not sure, yet, how I am going to get all 16 tabs into the slots on the centering rings.

Printed a centering ring/fin-alignment gimcrack/geegaw for the BT50 WAC Corporal.

20190707_132934.png
20190707_132907.png
 
Back
Top