Shipping tube rocket - seeking advice

The Rocketry Forum

Help Support The Rocketry Forum:

This site may earn a commission from merchant affiliate links, including eBay, Amazon, and others.

Joe Bruce

Well-Known Member
Joined
Mar 9, 2019
Messages
161
Reaction score
93
Hackground, the makerspace where my kids have been doing TARC, gave me a 3" by 8' 4" heavy-duty shipping tube that is used for shipping aluminum extrusion. It certainly looked like a rocket waiting to be made! My goals are a TALL rocket that will only fly as an HPR (the tube itself weighs nearly 4 pounds).

I've designed multiple LP and MP rockets, and built my L1 from a kit. Though I'm comfortable with rocket design (using OR), this shipping tube has some interesting challenges. I made my first coupler by cutting an 8" segment, taking a slice out vertically on the table saw, and epoxying the cut ends together. So that seems like it will work. I can cut 1/4" plywood bulkheads and CRs using a CNC machine at Hackground, and I will 3D print the 12" NC in ABS or PETG.

My trouble is basic layout. I'm designing for single- or dual-deployment, so I want to have enough room in the lower section for a 4 foot chute plus the Nomex, shock cord, quick links, etc. I would prefer to be able to access the recovery hardware, but I can only reach maybe 10" into the tube, so a 20" motor tube would limit the booster section to 30". That seems like it would leave 10" for the chute, but 4" will be taken up by the electronics bay (or payload coupler since the ebay will be empty at first).

Would it be stupid to use plastic rivets to have a two-segment booster section? Perhaps a 26" booster plus an 18" drogue/main chute compartment with an 8" coupler? I'm a little concerned about the friction from the 3mm thick shipping tube -- that's a thick coupler. But this whole project is "non-standard" tube sizes...

Any suggestions? Should I just skip my dream of changing the recovery hardware and just have the shock cord permanently tied to the forward CR eye bolt? The rocket will likely fly several times a year. I just got my L1 so I have no idea how long the tubular nylon shock cord will hold up.

Enough rambling. Any help is appreciated...
 
Rivets are great!

Sounds like you've got a plan. Just put it together like you would a kit and you may have an L2 rocket in the works, thick couplers, long heavy rocket (you're basically describing the L2 rocket of one of my fellow club officers)

Just be aware of more CP shift on longer rockets (ditch the calibers and aim for 10-12% of rocket length between cg/cp)
 
Just be aware of more CP shift on longer rockets (ditch the calibers and aim for 10-12% of rocket length between cg/cp)

Glad I asked, that's a new concept to me. I'll double-check my OR model (I'd rather be stable by design than add tons of dead weight to the NC, though maybe that's my LPR/MPR background speaking).

So a two-piece booster section held together by rivets through the lower section / upper section coupler should work fine? I believe that's what I see on "big stuff" like Rail Dawg's R rocket (to pick an extreme example ;)).
 
If you like, you could harden the coupler around the holes by soaking with thin CA, and thread them; it sounds like you've got enough thickness. Then you get to use steel screws instead of plastic rivets. But I'm sure it's not important.
 
You could also glue in one side of the coupler and just rivet one side

Yeah, I didn't say that, but that's what I'm planning. Epoxy one side and rivet the other.

If you like, you could harden the coupler around the holes by soaking with thin CA, and thread them; it sounds like you've got enough thickness. Then you get to use steel screws instead of plastic rivets.

Thanks for the suggestion. I wasn't sure the cardboard would be strong enough to thread. But I've definitely been CA-hardening every hole I make in my HPRs. Well, this is only #2, but I'll have my daughter do the same in her (Jr.) L1. I'll have to see how well the rivets work through the 6mm of cardboard thickness (tube + coupler).
 
Interesting project! All of my toobers are stubbies so I'm afraid I'm not much help.:cool:
 
Got a nice box 'o parts from Apogee today, so the 17" x 38 mm motor tube is ready, as is a 3D printed centering ring prototype to get the dimensions down before I head to the CNC machine. I'm also 3D printing a coupler bulkhead prototype to get those dimensions down as well.

Of course, I discovered that my coupler isn't quite round, with a 1.5 mm variance. That's the problem with clamping up a sliced tube to let the epoxy set, I guess. Most of them will be rounded out due to the round bulkheads that will get stuffed in them. I hope.

I also see that the little plastic rivets might not reach far enough; however, I used 1/4" screw-in rivets from Home Depot for my 4" Patriot to hold the NC on, so I might use more of those to connect the two booster tube sections together. Those rivets are plenty long (and look silly on my Patriot, but it was that, skip the launch, or try to hold the NC on with tape).

I'll snap some pics when I have more of the "kit" together. So far just a 17" motor tube, a 23" booster tube with fin slots, one couplers, and two more couplers-to-be. Here's the single deployment (w/ JLCR) option on an AT I280 Dark Matter.

ShipStorm_OR_20190627.jpg
 
What's the difference between a "screw-in rivet" and a screw?

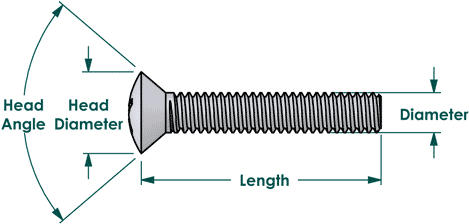
Anyhow, I'm only guessing that CA hardening will make the cardboard threadable. On third thought, though, you could also make a hole that will take a pressed-in nut and epoxy the nut in place. If you want. I still wouldn't think it's really be important. In my head I see countersinking the outside of the tube and using oval head screws, which would give a nice low profile look that's arguably smoother than flat heads.
machine-screw-phillips-oval-dimensions1.gif
 
What's the difference between a "screw-in rivet" and a screw?

Yeah, good point. Thanks for the suggestions, a weld nut would definitely work. Threading the CA'ed hole might work, I'm just a little leery (haven't tried that before).
 
You can certainly use T-nuts or Weld-Nuts epoxied inside the coupler to provide you with a strong thread, if you’re uneasy about threading the CA’d holes. Just snip the prongs off of T-Nuts, if you like.

Msrk
 
If all goes to plan this will be a 6' 9" rocket. I'm planning a 21' lower shock cord (roughly 3x overall length) plus a 14' upper shock cord for dual deployment (eventually). Both are 1/2" tubular nylon (Strapworks). The 4' main chute will be attached to a loop in the shock cord at 15-16' from the booster section.

Given the two-part booster section, am I going to have to worry about things getting caught on that 3mm thick coupler? Given how tight the diameter is, I can't have the coupler reach the forward CR (no room for the welded eye bolt), so there is room for things to migrate down into or below the coupler during thrust.

Will separation just pull the chute out? I can smooth the coupler edges to prevent anything from being caught, but I'm curious whether anyone has experience here. Do I need to build some sort of baffle to keep things forward of the lower coupler?

FYI, everything dry fit nicely except for one CR that we had to re-cut on the CNC. The machine must have skipped or something, as there was one "off-centering" ring. Motor mount is drying now, can't wait to finish the booster!
 
For the coupler, you can epoxy nuts to the inside that your steel screws go into. Detailed instructions at OneBadHawk's website. He's talking fiberglass rockets, but same premise holds true.

To keep your laundry from sliding back just make an extra centering ring. Glue it near enough to the top of the tube to allow your packed chute and it should keep it from sliding aft under thrust. Just make sure the center hole won't let your chute bundle slide through or you'll have an unexpected drogue-less flight.

And just use wood glue. Epoxy just adds weight on cardboard and wood builds.
 
For the coupler, you can epoxy nuts to the inside that your steel screws go into. Detailed instructions at OneBadHawk's website.

Thanks for the link, Kyle! OneBadHawk's web site had a couple interesting tricks I hadn't seen before.

To keep your laundry from sliding back just make an extra centering ring. Glue it near enough to the top of the tube to allow your packed chute and it should keep it from sliding aft under thrust. Just make sure the center hole won't let your chute bundle slide through or you'll have an unexpected drogue-less flight.

Sounds like a job for my slightly off-center CR (1mm variance on a 77-to-38mm CR). Hopefully it is still "clean" in my workshop trash can (no epoxy)!

And just use wood glue. Epoxy just adds weight on cardboard and wood builds.

I've read this before (including in a Sport Rocketry article), and read that TB2's bond strength is in the same ballpark as BSI epoxy -- both in the neighborhood of 4000 psi. But then I also read horror stories of body tubes warping and such with both TB2 and carpenter's glue? At least "conventional wisdom" seems to be epoxy for HPR, but "conventional wisdom" isn't always correct now, is it? :D
 
In my head I see countersinking the outside of the tube and using oval head screws, which would give a nice low profile look that's arguably smoother than flat heads.

Okay, back home from vacation for the 4th. I'm liking the rounded-head screw idea for holding the two booster segments together. What size screw should I be shooting for? I've used both 8-32 and 6-32 for motor retention -- is that a good size or do I need something stronger?

I've read 2-56 nylon screws are good for shear pins (once this baby goes DD), and that I should have one more rivet (or screw) than shear pin. So can I do 3x 2-56 shear pins and 4x 6-32 screws to secure the e-bay to the main chute section and to secure the two halves of the booster section?

Per a Darkstar build thread here on TRF, I'm going with #10 rods, etc. for the e-bay. And I'm using closed (cast) eye bolts all around. I don't have a lot of experience choosing materials, so I'm just copying what I see in various threads / kits and hoping that it all holds together!

Adding a little rocket porn -- motor tube (aft CR not epoxied yet) and lower segment of booster section. Motor tube is now installed / curing along with two more couplers, fin can will hopefully go together tomorrow night. Making this thing smooth will be a bear.
ShipStorm-MotorTube.jpg
 
fin can will hopefully go together tomorrow night. Making this thing smooth will be a bear.
Is that in the intended assembly order, i.e. install fins then make smooth? I suggest the other way around: fill and sand the tube while you don't have fins in the way. But maybe I'm stating the incredibly obvious.
 
I suggest the other way around: fill and sand the tube while you don't have fins in the way. But maybe I'm stating the incredibly obvious.

Honestly, I didn't realize that was an option! I assumed the fins wouldn't bond correctly to the tube, just to the filler. It is obviously easier to make it smooth without fins attached! ;)
 
Well, if might be for the best to sand the fin areas clear, where the tube will be covered anyway. But between and above them, no reason not to do it first.
 
Honestly, I didn't realize that was an option! I assumed the fins wouldn't bond correctly to the tube, just to the filler. It is obviously easier to make it smooth without fins attached! ;)
Wood glue will bond right through CWF, so no problems finishing the tube with sandpaper and CWF. I am not sure about epoxy and CWF.

You definitely don’t want to paint or prime any surfaces exact surfaces where you want for adhesives.

This doesn’t mean you can never prime or paint before gluing, it can be done if you mask off the local areas where your glue will go.

For complex builds like Estes Outlander this can be helpful.

https://archive.rocketreviews.com/reviews/all/est_outlander.shtml
 

Attachments

  • 5018FB5A-AC00-4EA8-9332-E291535E4177.jpeg
    5018FB5A-AC00-4EA8-9332-E291535E4177.jpeg
    34.6 KB · Views: 54
Thanks for the advice!

EDIT: Any advice on sizing of screws to hold the two halves of the booster section together? Not sure what effect the 3mm thick tubing has on sizing of shear pins and screws (normal plastic rivets aren't an option due to the 6mm total wall thickness of tube + coupler).
 
You say you like the oval head idea. The smallest oval heads I think you're likely to find in a hardware store are #6. (They're what's used for outlet and wall switch cover plates.) I suspect that three or four of those would do just fine.

From here on, take this with a shaker of salt, as I haven't done this before. It seems to me that the rule of more removable rivets (i.e. fixed fasteners) than shear pins (i.e. breakable fasteners) must be based on both being plastic. When the fixed fasteners are steel, I figure you can probably forget about that.

Two would allow for rocking in the joint. Maybe it matters and maybe not, but I personally would not feel comfortable with just two and will always use three or more.

One also needs to consider the force on each fastener, not for the sake of the steel screws but to be sure they won't cause a little crushing around the holes. In your case, since both the tube and coupler are so thick, I wouldn't worry about it. And if you're reinforcing the the holes with thin CA then so much the better.

My totally unqualified conclusion: three #6 steel screws should do just fine. Four of them would give you some margin of comfort. A ring of a dozen oval heads would be stylish.
 
A ring of a dozen oval heads would be stylish.

LOL, agreed! But I think I'll stick with 4 to match the number of fins (lined up with them). I'm already struggling enough with this scratch build, half-wishing I'd just used commercial tubes. All from thinking, "Wow, that 8 foot tube looks like a rocket!" ;)

Hopefully I'll pull it together by 7/20 to fly on the I280DM coming tomorrow!
 
@jqavins Thanks again for the suggestions. 6-32 weld nuts and oval head screws, plus 2-56 nylon screws, coming from McMaster Carr and SAE tap & die set coming tomorrow. I'll try tapping the CA-reinforced holes first, and drill the holes wider and use weld nuts if I'm not happy with the strength.

Also, filled and sanded the tubes before the fins were installed. I probably should have filled/sanded the fins, too -- they are just sanded 1/4" ply. Fin can was built with 5-minute epoxy, external fin fillets with 30-minute epoxy with glass microspheres. Last fillets are drying now, then time to sand off the drips. That's what happens when you do a set and then go to bed or go to work, I guess.
ShipStorm_filletsDrying.jpg
After one failed 3D print and some temperature testing, I finally got my Hatchbox PETG to cooperate and have printed and assembled the 4-piece, 15-inch 1:5 ogive nose cone. Based on suggestions elsewhere on TRF, I went with 1.6mm walls and 40% zig-zag infill. Much like the super-heavy shipping tube, the NC is heavy duty.
ShipStorm_noseCone.jpg
That is now sanded/filled, and will be sanded/filled/sanded again before it sees primer. I'm planning to drill all of the holes before priming and painting, except perhaps the holes for the rail buttons. I have found that the paint tends to collect and drip around any protrusions.

Clock is ticking with just over a week until the next MDRA launch! My kids' (junior) L1 cert rockets get priority in the paint booth (building simultaneously in the workshop wasn't a conflict other than table space), so we'll see whether it is done in time. Sure to be a fun launch regardless!
 
Learned a lot through this build, and launched it successfully on July 20, 1969 + 50 years! Here's the unfinished rocket.
TTJ7_Unfinished.jpg
That was then primed...
TTJ7_Primed.jpg
...and painted (glare from the light makes the yellow nose cone look white).
TTJ7_FullLength.jpg
Here's a closer view of the lower half.
TTJ7_LowerHalf.jpg
The pan head screws aren't installed in this picture, but I was inspired by @jqavins and did a ring of 8 screws to secure the two pieces of the booster section. The vent holes (3) are drilled for the altimeter bay but it flew empty. The shock cord was installed in the main chute section, but it was otherwise empty and flew single deployment (motor ejection) with a JLCR at 500 feet.

I learned a LOVE for taps. That thick-walled cardboard, strengthened by thin CA, seems to tap really well. There are no nuts for any of those pieces: the booster section 6-32 machine screw holes (8) are tapped, the altimeter bay forward side is held by tapped 6-32 screw holes (4), and the nose cone is secured by 3 2-56 nylon screws (a.k.a. shear pins). We even ended up fixing some motor retention issues (misaligned 6-32 t-nuts) by tapping new 8-32 holes in the aft CR. LOVE tapping, thanks so much for the suggestion!

I'll have to post more detail on the altimeter bay (based on Crazy Jim's Darkstar build thread) and the nose cone (adjustable nose cone weight system, not that any nose cone weight was needed). For now, I'll close this long thread with the launch pics. Thanks again for all the great advice getting this 8' shipping tube converted to a 6' 9" rocket -- I'm sure it'll take a J if I want to go there.
KevinKeiraL1Cert_20190720_0170.jpg
KevinKeiraL1Cert_20190720_0165.jpg KevinKeiraL1Cert_20190720_0172.jpg
 
That came out really well, I would never have guessed it was a shipping tube to begin with. How high was the sim? Did you end up changing motors and not using the I280 DM? What are you next plans for this rocket?
 
@mbeels Thanks! Good eye, I didn't mention the motor but it obviously wasn't a Dark Matter. :)

I'm really happy with the rocket, but a little concerned with how loose the booster-to-ebay coupler was, so I decided to keep it lower. I flew on an H195NBT, which sims to 973 feet. We were rushing to get the kids' Jr. L1 certification flights in before heading to a friend's Moon Landing party, so I forgot to swap the Alt1 to my rocket. By eye, I would believe the sim.

The I280DM sims to about 3,000 feet. With more time on my hands, I plan to correct the loose coupling (too aggressive with the sander) and then fly it on the I280. It that goes well, either DD or a "J" (L2 cert) is next for this rocket. Gotta build my EggTimer Quantum for DD, and gotta study for my L2.

Out of curiosity, were you the King Kraken that ended up in the tree during Red Glare XX? Love the look of the King Krakens, and regardless of which one, congrats on your L1! Great event to do it at -- my first HPR launch, and it was... inspiring!
 
Sounds like a good day for rocketry, with the Jr Level 1 flights and a Moon Landing Party, what a way to celebrate!

Yup, thanks! That was me, I was lucky to get that one back. I like the look of those rockets as well, and it was fun to build something slightly different. It was also my first HPR launch, quite impressive. Did you do your level 1 with MDRA? I'm already thinking about what I want to bring next year.
 
Yes, I joined MDRA after RG20 and bought HPR kits for myself and my kids. After 3 years doing TARC, we were all ready to try something bigger! ;)

I flew my L1 on a Madcow Patriot in June, and my son and daughter flew their (Jr.) L1s on July 20th.

My daughter took a picture of you retrieving your rocket from the tree and sent it to their TARC mentor. Their TARC team has "put the tree in rocketry" for years. ;) So glad you got yours back!

I'm hoping to get this Taller Than Joe 7 rocket up on an I280 at either ESL 252 or 253 -- things are a bit hectic with our son heading to WVU in less than 2 weeks!
 
My daughter took a picture of you retrieving your rocket from the tree and sent it to their TARC mentor. Their TARC team has "put the tree in rocketry" for years. ;) So glad you got yours back!

That's a good quote! If you happen to have access to that photo, I'd be interested in seeing it. With that many rockets going up, I guess it isn't surprising that one landed in those trees, but yes, I'm glad I got it back.

It seems like a good family activity, glad to hear that your son and daughter are into it as well. My son is only 4, but he enjoys spectating and helping me sand sometimes.

I'm planning on getting back down for ESL 253, I hope to launch the King Kraken on an I with dual deploy, but I still have some ground testing to do. Perhaps I'll see you down there, but I can imagine that sending a son off to University takes a lot of planning and energy.
 
Glad you got it into the air! Here are two pictures of my "Shipping Tube Express". This is a heavy walled 3" tube, and will be my L2 attempt. Should tip the scales at 7-8 lbs with motor.20180927_193243.jpg received_694735334312132.jpeg
 

Latest posts

Back
Top