Black Powder charge

The Rocketry Forum

Help Support The Rocketry Forum:

This site may earn a commission from merchant affiliate links, including eBay, Amazon, and others.
Just remember to pack barf in the extra space in the vial, and cut off the hinge and thumb tab on the vial. Alternately, remove the top altogether and seal with tape. I use the supplied tops, makes for a very reliable ignition chamber. I wrap tape around the vial and cap to keep it all in place during flight.
 
For my 38mm rocket, I cut a cross slit in the lid of the vial, inserted the igniter in the lid then hot melted the igniter in place, used the appropriate amount of 4F closed the lid taped it to the thread of the electronics bay, I used primary + backup on the main and drouge. It was a VERY tight fit, but when I recovered the rocket the cups were intact with no adverse burn marks on the laundry.
 
Last edited:
Got it.

Bought the 1/2" PVC caps today. I assume you fasten them to the bulkhead with a countersunk fastener through the cap. They are surprisingly light! I should have the 2g vials on Monday, depending on what Amazon calls 'Two Day Delivery' so I will wait until then just to make certain everything is going to fit correctly before I go drilling holes.

Good call, thanks for the tip!

coupler-2.jpg


Since we are on the subject of things going 'bang' in the sky, any suggestions on mounting switches in the switch band? I like the rotary switches. I don't trust sliding switches under g-loads.
 
This is a great thread; lots of great info here. Thanks to everyone who has contributed.

I have a LOC IV that will fly in the stock configuration, as well as a stretched HP/dual-deploy version with an instrument bay coupler and forward bay extension.

I have a couple questions:

  • I was impressed with the top down/bottom up BP burn pattern video. Using centrifugal-style plastic vials with relatively small BP quantities do you think that top down/bottom up BP burn makes a difference? I would like to avoid blowing still-burning powder around for obvious reasons.
  • Could top down even be accomplished with a capped centrifugal-style plastic vial? How would you pack the BP and seal it?
  • I wonder if a small aluminum 'deflector plate' (below - pardon the crude drawing, but you get the concept) would be a good idea? I ask because, while the pressure will quickly equalize, it would seem to me that the initial blast directly against the BT could deform it enough to increase the friction fit of the BT/Coupler, as well as contribute to the wear & tear on the BT.
    • blast-plate.jpg

Hi Curtis,

As with most things, there are many ways to do this. One method that I have used with considerable success is to use centrifuge vials (either 2.0 or 4.0 ml, depending on the size of the rocket) which are supported by CPVC tubing. You drill a small hole in the bottom of the tube, insert your match from the top, seal the bottom with blue tack, put in the black powder and tamp it down with a disposable earplug. The black powder completely surrounds the match and is tamped down, so you get complete combustion.

Here are pics from my L3 build (already flight-tested)

IMG_7333.JPG IMG_7334.JPG IMG_7337.JPG


The tubing supports the centrifuge tube and all the pressure is directed out the end. The centrifuge tubes don't even break after use.

I got the original idea from https://www.rocketryforum.com/threads/dual-deployment-charge-cups.49878/#post-489288

Here are links to my implementation for my 3" scratch build:
https://www.rocketryforum.com/threads/3”-frequent-flyer-build.150065/#post-1848402
https://www.rocketryforum.com/threads/3”-frequent-flyer-build.150065/#post-1849833

The one downside is that the CPVC tubes take up a lot of room, which may be a problem for smaller builds.
 
I make all mine from cardboard coat hanger tubes, wire them to plugin (never had one fail to light)
Plug end with 1/4" slices.
You can make a large charge by gluing on a piece of 3/8" cpvc pipe.Plug%20for%20chg%20cup.jpegWiring%20chg%20cups.jpegOS%20chg%20cup.jpeg
 
Great ideas, guys! Thanks!

I imagine that if one was to lead the leads directly through a sealed hole in the bottom of the cup the blast would probably blow the postertack directly into the instrument bay, along with combustion gases, etc?

I like the idea of using disposable ear plugs to compress & hold the charge powder, as they are continuously tying to expand, and getting jostled if you build them before hand should have no effect.

Because my rocket is relatively small I am trying to keep weight down so I might just route directly through a sealed hole, but have you ever had issues with corrosion on the contacts of your connector blocks? As an aside, I saw something on, interestingly enough, the restoration of a Messerschmidt ME-108 Taifun and the Germans used screw-down connector blocks for all their wiring (which was tinned but not terminated). A little thing they would do is add a small blob of solder at the end of the wires, so that even if the screw came loose the blob of solder would retain it in the connector block. I just thought that was a clever approach to a simplistic application.

Some preliminary numbers indicate I will be using charges of less than a gram, so I am waiting to see if I will even need a support tube, though I should have plenty of room. The vials should be here today.

Thanks for the great input, guys!
 
Never had a problem with terminal block corrosion. If you're really worried about corrosion, either run your ematches directly to the flight computer or put your terminal strips INSIDE the ebay.

In industry, we either use naked wire or crimped ferrules when wiring to the types of terminal strips that we use.
2 reasons why we don't tin crimp connections:
1) If you tin the ends of your wires with solder, over time, vibration or any working of the wires will wear away the softer solder and you will get loose connections.
2) The solder makes a spot where any working of the wire will, over time, break the strands of the wire. 1 tiny strand of a 24g wire is enough to get continuity and make things work, but it won't carry enough current to run the computer AND fire a deployment charge.
 
Great ideas, guys! Thanks!

I imagine that if one was to lead the leads directly through a sealed hole in the bottom of the cup the blast would probably blow the postertack directly into the instrument bay, along with combustion gases, etc?

I like the idea of using disposable ear plugs to compress & hold the charge powder, as they are continuously tying to expand, and getting jostled if you build them before hand should have no effect.

Because my rocket is relatively small I am trying to keep weight down so I might just route directly through a sealed hole, but have you ever had issues with corrosion on the contacts of your connector blocks? As an aside, I saw something on, interestingly enough, the restoration of a Messerschmidt ME-108 Taifun and the Germans used screw-down connector blocks for all their wiring (which was tinned but not terminated). A little thing they would do is add a small blob of solder at the end of the wires, so that even if the screw came loose the blob of solder would retain it in the connector block. I just thought that was a clever approach to a simplistic application.

Some preliminary numbers indicate I will be using charges of less than a gram, so I am waiting to see if I will even need a support tube, though I should have plenty of room. The vials should be here today.

Thanks for the great input, guys!

Hi Curtis,
The wire for the match comes out the bottom corner of the charge container and then to an external connector block, so any escaping gas does not go into the instrument bay. The wires that go through the bulkhead to the connector block are sealed with some silicon to keep anything out of the electronics. I have not yet (was going to say never, but never say never) had anything get past the bulkhead into the electronics.
You do get some BP residue on the connector blocks, but I haven’t had any connection issues. That said, I only generally fly a rocket 4-5 times before I retire it. At any rate, connector blocks are pretty cheap so I would just swap it out for a new one if it looked questionable.
I will also add that I posted this method just to give you an idea of how you can work with the centrifuge tubes — it works for me. But guys like @tfish have “been there, done that” and I highly respect their experience and judgment, so you can’t go wrong following their advice either.
In fact, assuming I have a successful L3 attempt on the 10th, my next project is to scratch build something that will go supersonic on an I or J, and I’ll probably use Tony’s approach just to save space in what is going to be a small airframe.
Best of luck on your cert!
 
Never had a problem with terminal block corrosion. If you're really worried about corrosion, either run your ematches directly to the flight computer or put your terminal strips INSIDE the ebay.

In industry, we either use naked wire or crimped ferrules when wiring to the types of terminal strips that we use.
2 reasons why we don't tin crimp connections:
1) If you tin the ends of your wires with solder, over time, vibration or any working of the wires will wear away the softer solder and you will get loose connections.
2) The solder makes a spot where any working of the wire will, over time, break the strands of the wire. 1 tiny strand of a 24g wire is enough to get continuity and make things work, but it won't carry enough current to run the computer AND fire a deployment charge.
I had small terminal blocks on the ends of my av bays. Too much cleaning and occasionally had no continuity. Once I went with the 2-pin connector, no more issues.
 
Thanks, Bill, I appreciate it!

As they say, there is more than one way to skin a cat (my cat, on the other hand, would insist there are none), and I am thinking that as long as the initial event is pressurizing, rather than de-pressurizing the charge (and blowing still-burning powder into the open) and you're not sending projectile pieces into your laundry, etc., there are probably a number of good ways to do this - all of them solid approaches.

I find the top-down vs. bottom-up burn pattern makes sense; much as solid rocket fuel burns aggressively under compression but much less so in the open air it makes sense to keep the charge under compression until it can all go more or less, at once. The difference between a 'pop' and a 'flash.'

I used to work for an air ambulance service at one time, and some regular 'customers' were burn unit-bound people who insisted on throwing a Red Solo cup full of gasoline on bonfires, the resulting burn would blow still-igniting gasoline back onto the source. The difference between top-down and bottom-up burning has reminded me of that. Bottom up = bad.
 
Never had a problem with terminal block corrosion. If you're really worried about corrosion, either run your ematches directly to the flight computer or put your terminal strips INSIDE the ebay.

In industry, we either use naked wire or crimped ferrules when wiring to the types of terminal strips that we use.
2 reasons why we don't tin crimp connections:
1) If you tin the ends of your wires with solder, over time, vibration or any working of the wires will wear away the softer solder and you will get loose connections.

BUT... the connection only needs to last a time frame of minutes to maybe an hour in an AV bay. I check the connections before closing it up for flight. I do like the crimped ferrules but haven't found the kind I like in small quantities and cheap enough. (The European type, & the crimp tool is expensive) I don't need a box of 10 different kinds...
I have this kind of terminal, 4 contactsterminal1.png
Not this kind, if that makes any other differenceterminal2.png


2) The solder makes a spot where any working of the wire will, over time, break the strands of the wire. 1 tiny strand of a 24g wire is enough to get continuity and make things work, but it won't carry enough current to run the computer AND fire a deployment charge.
 
The white strip kind is what I'm talking about, as it's used most often in our rockets.

To me it's an issue of safety with best practice and overall system longevity. I've seen WAY too many strange things happen that shouldn't have ever been possible in military and civilian aviation and maritime electrical/electronics in the last 30 years. Best practices are a way to mitigate failure modes and ensure reliability and longevity. When it comes to dual deploy rocketry, that means safety.

Do what you want, I'm not here to convert anyone.

I would actually like to use amphenol plugs but they cost too much...lol I use redundancy though, motor ejection and the altimeter. Worse case the drogue comes out only, at least it wont streamline in and core sample someones eyes.
 
Think "fountain" vs. "mortar tube" . . .

I get that but a layer of masking tape does not hold enough pressure to make any noticeable difference...set up two on the ground one with the match on top and one under the powder, set em off and look, I defy you to see any difference, but making fire and smoke is fun!!!
 
I get that but a layer of masking tape does not hold enough pressure to make any noticeable difference...set up two on the ground one with the match on top and one under the powder, set em off and look, I defy you to see any difference, but making fire and smoke is fun!!!

Tony Alcocer (@tfish) already ran a series of tests which clearly showed a significant difference.
 
here's a couple of videos...they are not my videos..
placement of the match appears to make a difference..
https://www.rocketryforum.com/threads/black-powder-charge.142926/page-2#post-1767827

The electrical tape I use on top of my vinyl charge holders is only there to hold things in place. I'm not trying to hold in air or pressurize it. The shape of the charge holder and the placement of the match are what I feel are important..

Tony
 
The first video is showing an 8 gram charge with the ematch at the bottom of the charge canister...
[video=youtube;4UWoBhwvuWs]

This next video is with the ematch on top of the charge.
[video=youtube;xW810k5AySQ]

Tony


Watch the 1st video on YouTube and slow it down to .25 speed. With the E-Match under the BP, you can clearly see unburned powder being ejected upward, in a Black column, lessening the effectiveness of the Ejection Charge.
 
I make all mine from cardboard coat hanger tubes, wire them to plugin (never had one fail to light)
Plug end with 1/4" slices.
You can make a large charge by gluing on a piece of 3/8" cpvc pipe.View attachment 381270View attachment 381271View attachment 381272
I load my charge tubes with igniter in the bottom. Load your BP.
I use a dowel and I cram as much dog barf in the tube until it is packed tight to the top. That works great in those 1/2" or 3/8" tubes I use.
Once the tube is packed tight. I fold elec tape over the top. Then fold another 90 deg from the 1st, like a cross when you look down it. Then wrap elec tape around the top several times.
It will blow that chute and nose right off. Most the time it blows that "coat hanger" tube in half. That tells me the top is sealed good enough.
 
The following 2 videos are borrowed from Mendal....Rocket Junkies
The first video is showing an 8 gram charge with the ematch at the bottom of the charge canister...
[video=youtube;4UWoBhwvuWs]

This next video is with the ematch on top of the charge.
[video=youtube;xW810k5AySQ]

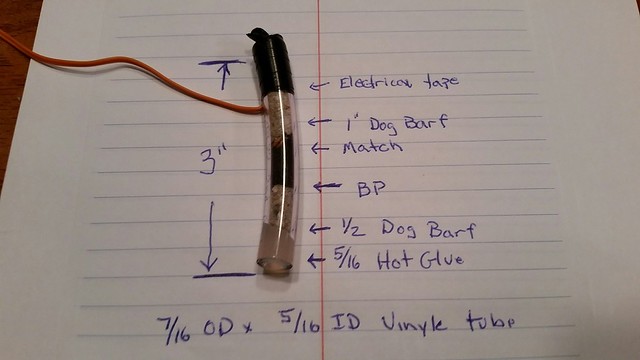
Below is a photo that shows how I've recently been doing my high altitude charges holders. It's a take off from the Jim Jarvis method.
https://www.rocketryfiles.com/files/Technicalarticles/Jim_Jarvis_Highaltitude_deployment_2013.pdf

They are not sealed at top. That tape just holds the ematch wire in place...
38662685092_0ba0a2c998_z.jpg

switching from my normal latex tubing charge of 1.3g for a 3" rocket I now use 0.4 grams in a 3" rocket.

some things that affect charges.
Container shape and orientation, ematch placement and confinement or lack of.

Also note, switching to a baffle will reduce the amount of gasses produced by the charge.

As always,,, ground test. once you find what works for you. Don't change it. If you change anything..ground test again!

Tony

Excellent! Thank you.
 
The advice I will give is try to screw-in the charge containers on a bulkhead to press fit the plastic canisters into them. On very small DD rockets with Estes "type" tubes, it's hard to do that and I had a free "micro centrifuge" canister just wired to the altimeter blow the wall out of the rocket at apogee. Just a canister epoxied on an ematch facing "up" and stuffed down into a rocket for apogee deployment The rocket came apart, the drogue came out and I'm a "high main deploy chute guy". Depending on the launchsite, I like to blow the main as high as safely possible (depending on the venue) to allow it to deploy and give a good descent. If I have to walk farther fine. At one launch a fellow flyer gave me his massive four wheeler with automatic transmission (though I know how to drive a manual) to recover a 10k DD launch that landed quite a distance away. I had a GPS fix on the rocket coming down so I knew where to go!

Oh, "the rocket that blew out the wall." I let it sit it a corner for a couple of years, was going to put it in a burn pile but decided to see if I could fix it. The fins weren't broken for cry'in out loud! Sheeeeeoooooottt!, I cleaned up the burst out hole with a knife, took a long dowel rod with sandpaper wrapped around it to sand around the hole inside, got an Estes tube coupler and shoved it down to plug the hole internally after laying epoxy internally around the hole, laid down fiberglass mat on the surface, epoxied, did a pile of sanding and did a meticulous repainting, one can't tell where the blowout is. I've flown that rocket a lot and it's still flyable years later.

On spiral wound fiberglass rockets, I used free canisters for the BP on the ematches and t'aint nothing is going to blow through those walls.

At 4 inch "glass" diameter and above, it's better to mount BP canister holsters on the bulkheads and nothing gets trashed on deployment. Make sure there is enough kevlar mat to shield the downward blast force on the apogee chute. Once I learned that, I had no trouble.

If you can mount deployment canisters on the bulkheads on smaller diameter rockets that's great. I had a machinist rocket flier/fuel mixer friend, expert at a metal lathe turn me some perfect canister holders for a few of my small projects. I don't know how he got the the bottom end on the cans but it might have had something to do with "welding".

I fondly remember this local TRA prefect at a launch (a level 3 mind you, the guy that turned the canisters I reference above) ranting on the descent of a rocket where it was obvious the main chute was burned through on the P. A. microphone

"We're Tripoli, we DON'T need spill holes 'cause we got BURNHOLES!" I thought that was so funny because at the time, we were against NAR and proud to be renegades! The rockets usually were recovered with no damage. Peace has been made between both groups and fine with me. I maintain both memberships.

I don't care how experienced one is, one is going to get a burn hole in a pricey parachute if they fly enough! I have a tendency to buy chutes with no or small spill holes as I would eventually burn a hole at "sometime" that would give a faster descent!!

No matter how careful one is, it happens no matter what. Hopefully one gets an intact rocket back! Happened to me a few times.

Kurt TRA 10384 NAR 11583
 
Last edited:
I have been reworking some old nomograms I made some years back. I will post them here for posterity. Due to the size of most peoples printers, I ended up making two different charts one for large diameter and one for small diameter rockets.
The idea behind this is the ability to refer on paper to a calculation method.
Since I have redone this, it is possible to provide copies with custom isopleths.

Pretty awesome tools. Took me a (few) minute(s) to figure out how the powder charge got to be independent of diameter, but I went back to pv=nrt and reversed the rectal-cranial inversion I had going on.

I did notice that the 29mm mark on the small diameter chart appears to be at 1.41 inches, not 1.14 inches. Not that it matters functionally.
I will look at the software that generates the diameter. It has been a few years, but if anyone is interested in the software I can post it here.
 
Last edited:
Here is the latest Nomograms for both large and small diameter rockets. As it turned out the reference tick had the wrong value in it. Thanks for the catch!
 

Attachments

  • Large Diameter Ejection Charge Nomogram.pdf
    161.4 KB · Views: 0
  • Small Diameter Ejection Charge Nomogram.pdf
    159.4 KB · Views: 0
Here is the source code if anyone wants it...
just remove the .txt extension.
 

Attachments

  • Large Diameter Ejection Charge Nomogram.py.txt
    6.1 KB · Views: 0
  • Small Diameter Ejection Charge Nomogram.py.txt
    6.4 KB · Views: 0
Back
Top