Applying Monokote or Ultracote Heat Shrink Film to rockets

The Rocketry Forum

Help Support The Rocketry Forum:

This site may earn a commission from merchant affiliate links, including eBay, Amazon, and others.
I did my LOC Goblin in Ultracote.

Also has Jack Hydrazine air-foiled rail guides.View attachment 372452 View attachment 372453

YES!!!!

Goblins are great candidates for film!!!

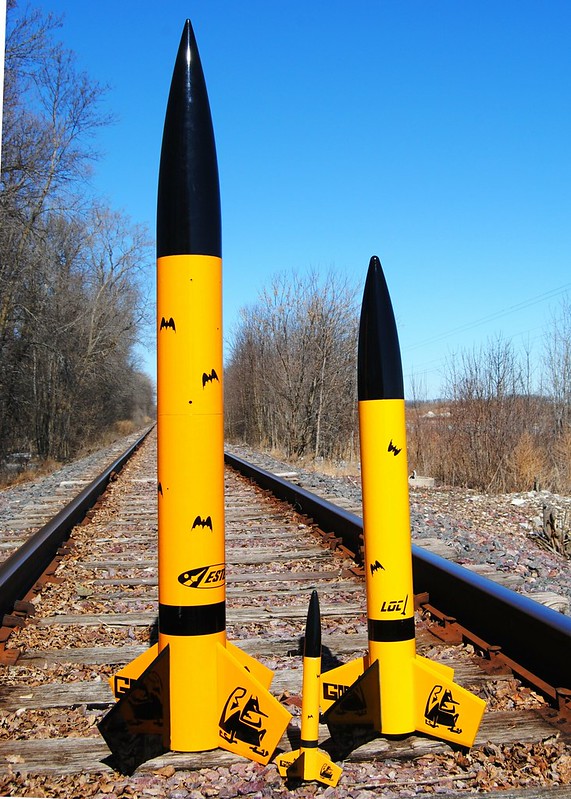
Here's my (mostly film covered) Goblin collection:

39968619405_f8a9af19a4_c.jpg


Left to Right: Ultracote covered 5.5" modified Loc Big Cletus (build thread: https://www.rocketryforum.com/threads/loc-big-cletus-upscale-goblin-quick-build.47770/ ), Semroc Retro Repro BT-55 original (painted), and on the right the film covered Loc 4" Goblin (killer rocket; thread here: https://www.rocketryforum.com/threads/loc-goblin-thread.145083/)

I posted some more info on covering rockets in film in those two threads (Jan 2013, March 2018)...feel free to jump in and share yours, Jonathan!!!
 
Last edited:
Ditto to what Eric said. Oracover/Ultracote seems to be the go to film covering for most of the airplane builders in our area in the last few years. It has been available in Europe for as long as I can remember. Monokote seems to have changed slightly in that time making it a little harder to work with and less "sticky" than it used to be IMHO. ( I'm wondering if the origin of the manufacturing/materials of Monokote didn't change at some point.)

Ultracote does seem to be easier to layer possibly due to its larger heat range. I haven't used the chrome Ultracote yet but have ordered three rolls for testing. Hoping it works as well as Monokote.

Monokote is definitely shinier and slightly lighter but the weight difference is negligible in the projects i use it on.

As Eric mentioned there are plenty of film coverings out there and also pre painted, self adhesive, shrinkable fabric coverings applied with irons and heat guns in the same way to get a scale type aircraft finish without painting.
I received 3 rolls of chrome Ultracote yesterday. I can't wait to try it to see how well I can control it. I still have some chrome Monokote, so my first tests will be to gauge the shrinkage characterists of Ultracote in comparison with Monokote. Once I see that, I should be ready to go. I have a Mach1 Daedalus that might be a candidate as my next all chrome rocket. Time will tell. It all depends upon how much sanding I'm willing to endure. ;)

BTW, I do like the stronger tubes that the Ultracote is wound upon.
 
An important aspect of applying Monokote, or Ultracote, or any of the heat shrink coverings, is the quality of the iron.

The best covering iron that I have found is the Coverite 21st Century Sealing Iron.
https://www.towerhobbies.com/cgi-bin/wti0001p?&I=LXB361&P=ML

This iron has a temperature setting (on a dial; not digital) rather than a "High/Low" setting. Also, there is a temperature guide on the box, for what temperatures to set for different coverings.

The Coverite iron is not cheap. Some irons are as low as $20; the Coverite iron is about $45. But it is the only iron I use, because the Coverite iron lets me achieve better tacking prior to final heat shrinking.
I have a coverite iron too. I use my IR thermometer though to verify the temperature set.
 
I received 3 rolls of chrome Ultracote yesterday. I can't wait to try it to see how well I can control it. I still have some chrome Monokote, so my first tests will be to gauge the shrinkage characterists of Ultracote in comparison with Monokote.

Where did you source the chrome Ultracote film?
I've read this thread with interest, and the impossible to replicate chrome finish may be what finally pushes me over the edge and order the supplies.

I do have one more Q though, see below.
For fillets, I focus on internal fillets as Joe describes. I usually do a small external fillet of 5 or 15 minute epoxy. It dries clear, blends in with the surrounding covering, and seals any gaps without any additional need for painting, touch ups, etc.

Is that the only solution for applying external fillets with plastic wraps/covers?
I am thinking the epoxy may not be binding particularly well to the plastic, making the fillets mostly cosmetic?
What about cutting out wrapped surfaces on the airframe where the epoxy would be binding, and preserving the structural purpose of the external fillets? Has anyone done that?

TIA,
a
 
Where did you source the chrome Ultracote film?
I've read this thread with interest, and the impossible to replicate chrome finish may be what finally pushes me over the edge and order the supplies.

I do have one more Q though, see below.


Is that the only solution for applying external fillets with plastic wraps/covers?
I am thinking the epoxy may not be binding particularly well to the plastic, making the fillets mostly cosmetic?
What about cutting out wrapped surfaces on the airframe where the epoxy would be binding, and preserving the structural purpose of the external fillets? Has anyone done that?

TIA,
a
That's how I did it when I built my LOC Ultimate. The fillets just barely catch the edge of the Monokote and hold it down while still being structural. Worked out really well. Pretty sure I posted pics in my build thread...
 
Any hobby shop that uses Horizon Hobby as a distributor should be able to get the Chrome Ultracote for you. Since Hobbico went out of business most remaining shops will probably have to go to Horizon to survive. Horizon is the US distributor for Hangar Nine (Ultracote). They are also online It's Horizon "Hobby" not "Hobbies" when you search.

If you are covering a rocket that already has fillets I usually cut small pieces and cover the fillets by themselves first, with the covering slightly extending on the fin and body tube. Then cover right up to the edge of the fillet, overlapping the fillet covering, when covering the fin and the tube. This helps keep the small pieces in place. It's tedious but can be done.

The Coverite iron is very good. Use a sock to prevent scratching on films. I use it without a sock on Stits covering (shrinkable fabric) on airplanes and the temperature dial is amazingly accurate on my iron. When using a sock you will need to dial up the temp slightly.
 
Updating post #20. Since the discussion about filleting, covering fillets, etc., thought it would be a good time to repost this comparison. Unfortunately, when TRF went through its "Upgrade", it killed all the links to the photos and took away the ability to edit/fix the links. So here they are again...

I had a good opportunity to exhibit a few different ways to skin a cat, or Magg, recently. Minie Maggs have long been a personal favorite...it was my third high power rocket back in the day, we drag race them all the time, and they're versatile enough to be flown as a BIG rocket at a little Class 1 (under 3.3lbs) launch, and tough enough to handle big I's and J's all day long. So when the downscales and upscale were released, I was all in!

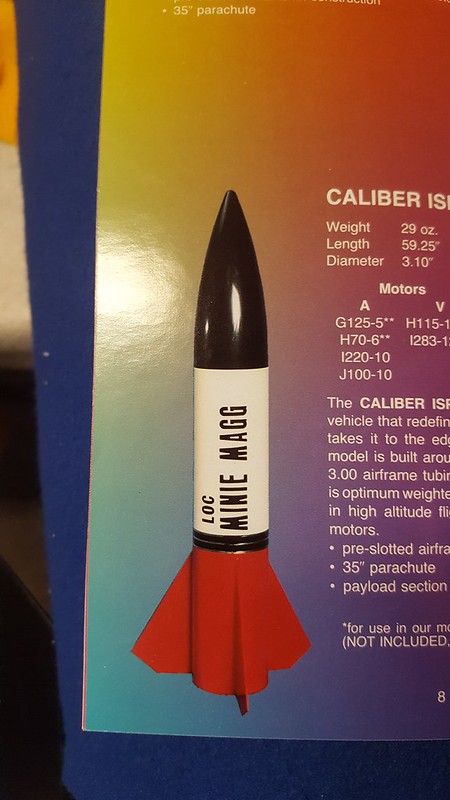
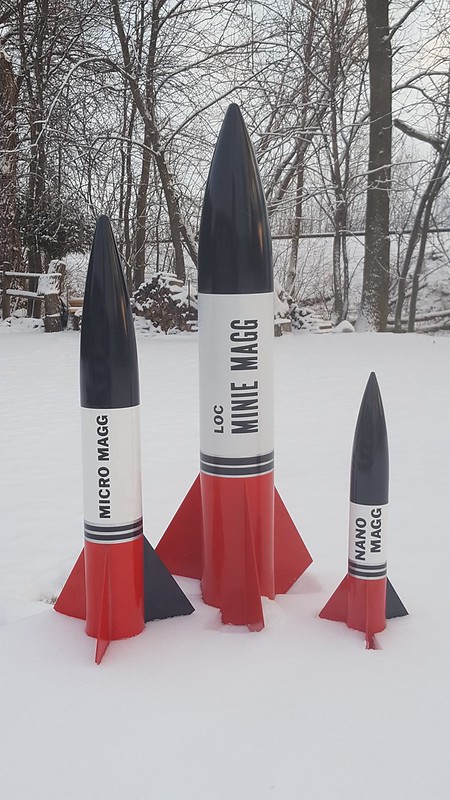
The scheme we're modeling for the Magg Project is the 1989 Loc Catalog scheme; somewhat of a traditional, bold colored, retro scheme. Regardless of the path, the goal is to make all three Maggs resemble the following trim:

25204378108_c090bbf78c_c.jpg


Minie Magg: Painted

I'll start with the original: the Minie Magg. This particular Magg was a rescue from another long-time rocketeer. It was built quick, stock kit, no frills, launch lugs, and a lawn dart on the first flight. So it's a rebuild from the forward centering ring, up. Cut it off clean, added a new tube, faired and filled. I'll spare you photos of the step as most people know how to prime and paint a rocket (and that's not the focus of this thread). Considering the three color scheme, with two colors being on the airframe, the filling, priming, painting took a period of 1.5 weeks of on and off "work". Completed photo later in this post....

Micro Magg: Covered Pre-Construction

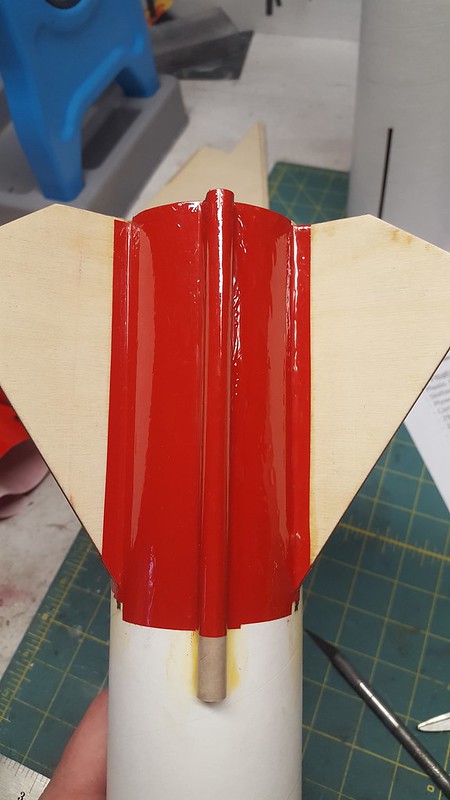
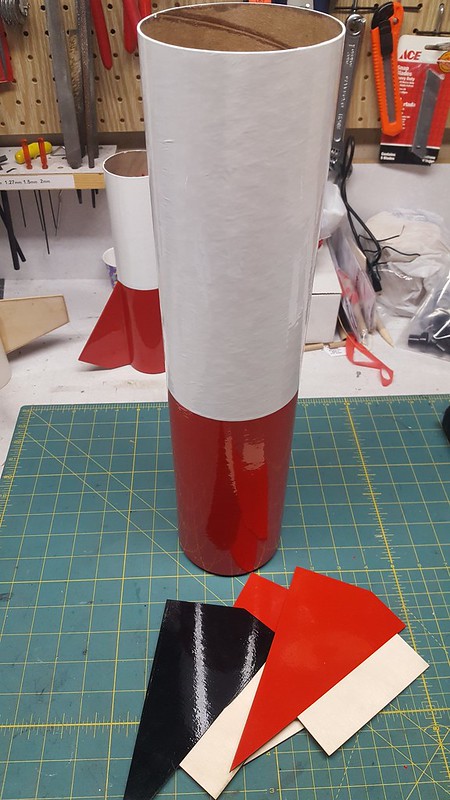
Next up is the 4" diameter Micro Magg. This is covered with Monokote using the technique documented in the initial post: covering the rocket prior to assembly. I used 8 pieces of Monokote film to cover this Magg; pieces as follow:

-1 piece White Airframe Top
-1 piece Red Airframe Bottom
-4 pieces Red fin sides
-2 pieces Black fin sides
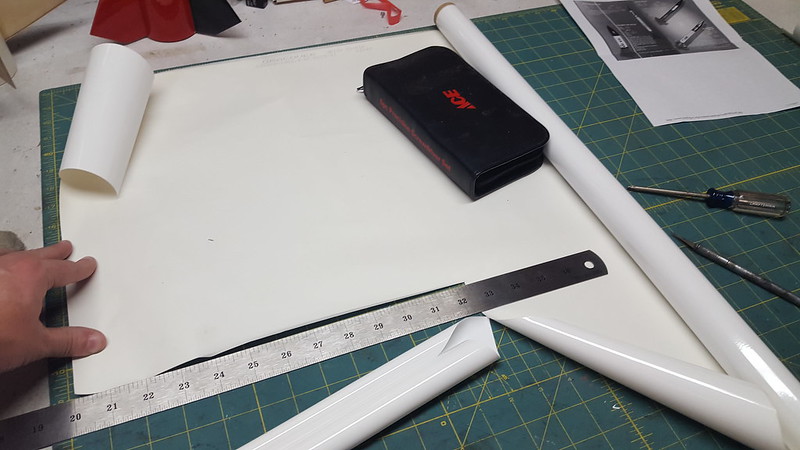


My preferred method, cutting and covering took roughly 1.25 hours. Nosecone was primed and painted black (at the same time priming and painting the Minie and Nano nosecones). All covered and ready for assembly:


Nano Magg: Covered Post-Construction

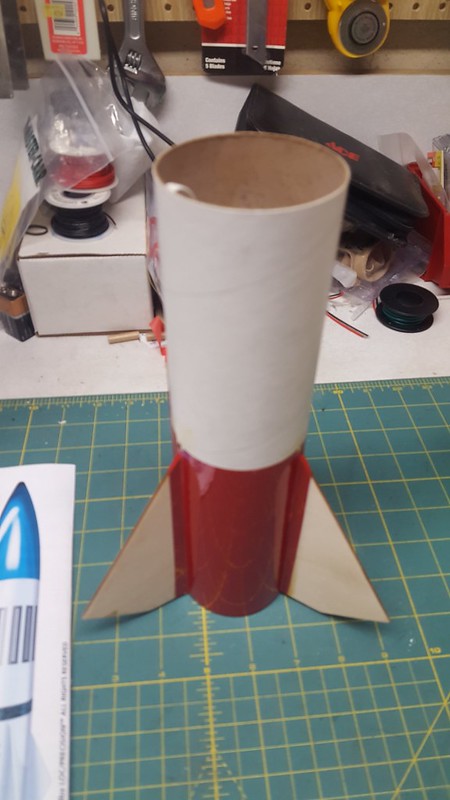
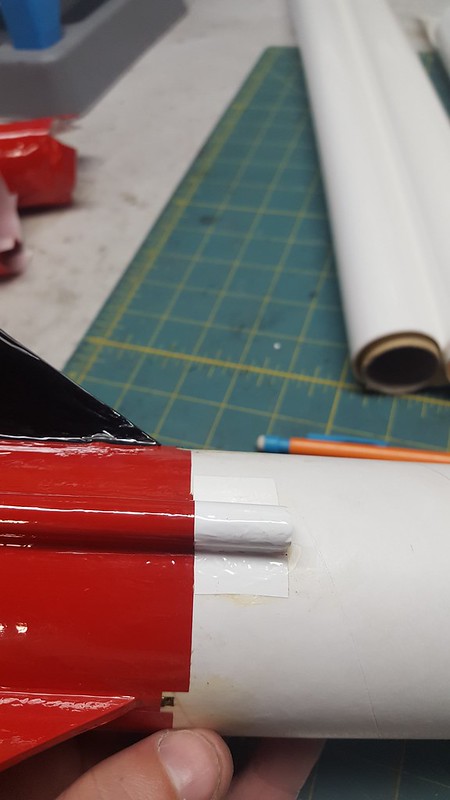
The smallest in the family is the Nano Magg, at 2.56" in diameter. I built this one quickly in a hotel room while traveling for work...a fun little critter! I'd normally paint rockets that are already assembled, but Derek asked, so I'll attempt it. I covered this like one would cover a built-up R/C aircraft, covering the joints first, then the larger bays.

Thin strips are cut to cover the fin-to-airframe joint. They are applied using a hot iron.
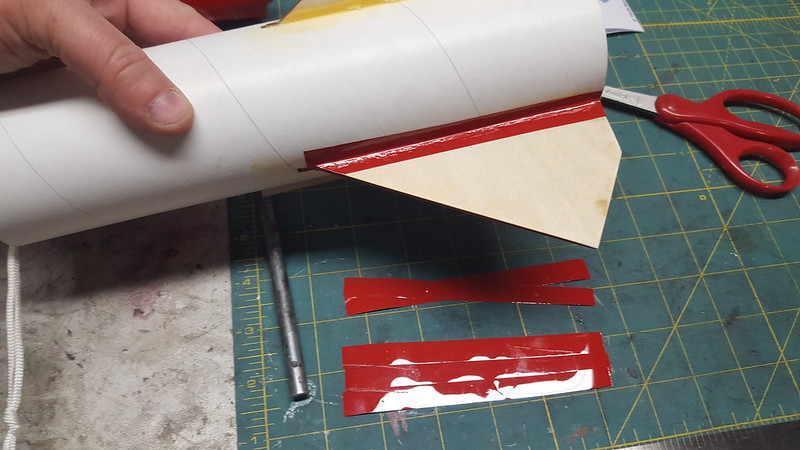


A strip is also cut and ironed in place for the launch lug...easier to cover individually than try to do the area between the fins and over the lug all in one piece.
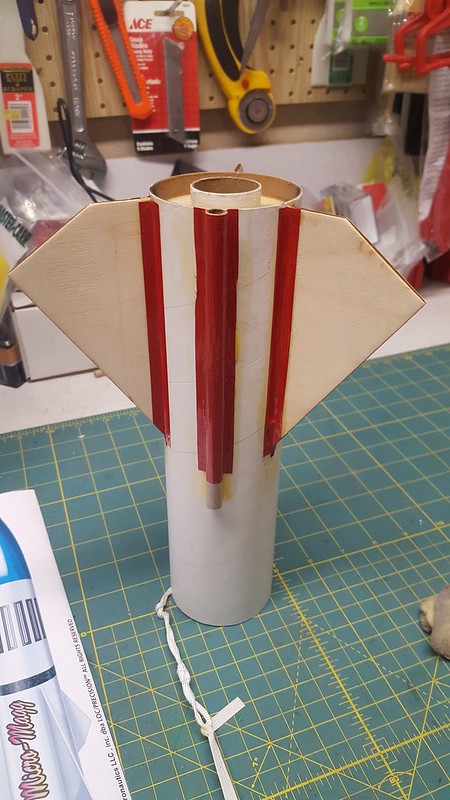


So far we're at 7 pieces of film applied.

Next, the area between the fins is covered. 2 pieces that surround the launch lug....
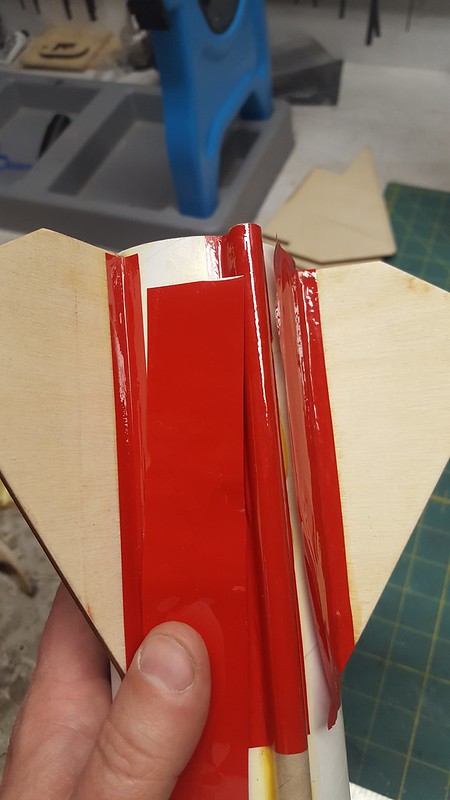


25204376928_f155ffd229_c.jpg


...and 2 pieces between the lugless sided fins.
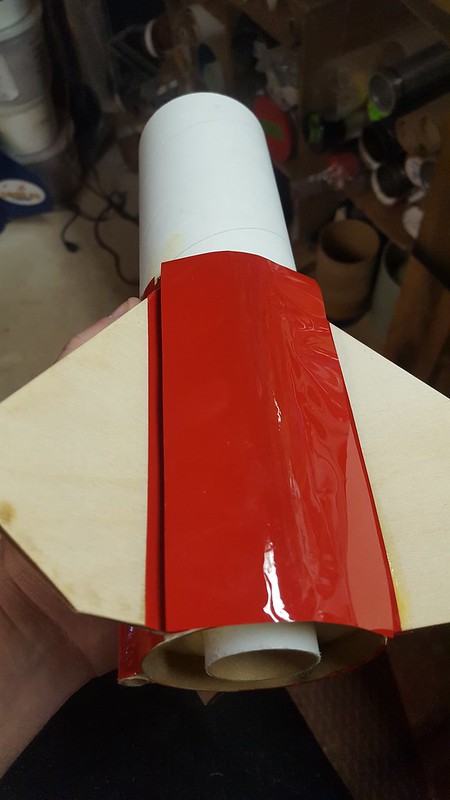


The red on the lower part of the airframe is now complete.

25204377528_f023f8b974_c.jpg


The fins are covered in red and black....another 6 pieces of covering: one for each side of each fin. Sorry, no photos of this step.

Then on to the white covering, starting with a small piece that's applied over the lug.

38360997124_a184cdf200_c.jpg


One more piece is applied; a wrap of white on the top half of the airframe.

Covering the Nano after assembly used 19 pieces of Monokote covering. Not prohibitively difficult, but certainly more work than covering first, assembling after.

Summary

All three rockets had their nosecones primed and painted black; all three had the few decals applied after covering or painting.

The 5.5" Minie Magg was painted; taking a little over a week of on and off work. Surface prep took more time here, as there was a bit of filling and sanding to get a nice surface finish.

The 2.6" Nano Magg was covered after assembly, just like if it were to be painted. It took the most work of the three rockets in comparison. Comparative Decision: I'd rather paint a Magg than cover it following assembly.

The 4" Micro Magg was covered before assembly; different than most rocket people would do for adding color to their rocket. Comparative Decision: this method took the least amount of time and work for the three rocket comparison. I'd rather cover a rocket pre-assembly than paint a rocket. I'd MUCH rather cover a rocket before assembly rather than covering it after assembly.

Final Result of the Magg Trio:

38361005564_7e6d8d300d_c.jpg
 
Covering the Nano after assembly used 19 pieces of Monokote covering. Not prohibitively difficult, but certainly more work than covering first, assembling after.[...]
Comparative Decision: this method took the least amount of time and work for the three rocket comparison. I'd rather cover a rocket pre-assembly than paint a rocket. I'd MUCH rather cover a rocket before assembly rather than covering it after assembly.

Eric,
Thanks for sharing your experience and recommendations.
What glues do you find working best with plastic shrink-wrap film?
CA? Epoxy? Plastruct Plastic Weld? Something else?

Thanks,
a
 
keep in mind that metallic paints and coverings retard any radio signals if you are using radio tracking
 
Eric,
Thanks for sharing your experience and recommendations.
What glues do you find working best with plastic shrink-wrap film?
CA? Epoxy? Plastruct Plastic Weld? Something else?

Thanks,
a

I have never found anything that sticks very well to Monokote.

Generally, to cover a part with Monokote and then glue it, you have to leave a portion uncovered. Or go back and cut away Monokote, for a wood-on-wood bond.
 
Eric,
Thanks for sharing your experience and recommendations.
What glues do you find working best with plastic shrink-wrap film?
CA? Epoxy? Plastruct Plastic Weld? Something else?

Thanks,
a

Sorry I missed this earlier! Seconding what Crawf56 says!

I have never found anything that sticks very well to Monokote.

Generally, to cover a part with Monokote and then glue it, you have to leave a portion uncovered. Or go back and cut away Monokote, for a wood-on-wood bond.

Absolutely; thanks for chiming in!

In most cases, if I apply any glue to Monokote, it is purely for sealing and/or aesthetics...I generally use 5 or 15 minute epoxy. As a precaution, I generally scuff the covered surface to be bonded anyway...just to break the sheen and provide a bit more surface area for the epoxy to stick to.

If I'm looking for a structural bond, as Craw states, the Monokote gets trimmed away from the area to be bonded.

As an example, for gluing in fins, I put my faith in the bond at the root edge (to the motor mount tube), and the body tube-to-fin joint. If in doubt, fillet internally. Exterior fillets are cosmetic only...unless trimming away the film prior to bonding as mentioned previously.

:)
 
Duuuuuuuddddeee

Sorry for the necro-bump but where has this thread been all my life????

Because of this thread I shared this with the Notre Dame rocket team as an alternative to painting their full scale rocket this year. You know that metallic gold that the golden domers love to see is going to look MUCH better in Monokote rather than anything you're getting out of a rattle can. Thanks for posting all of this Eric. This is a great help and I have got to try this stuff on my own projects.
 
Also, as an update. Horizon Hobby bought up most of Great Planes Distributing, which included Top Flite who make Monokote. So Monokote is still available along side Ultracote. Most shops would be dealing with Horizon Hobby as a distributor/supplier, as they're now the very biggest in North America.
 
Duuuuuuuddddeee

Sorry for the necro-bump but where has this thread been all my life????

Because of this thread I shared this with the Notre Dame rocket team as an alternative to painting their full scale rocket this year. You know that metallic gold that the golden domers love to see is going to look MUCH better in Monokote rather than anything you're getting out of a rattle can. Thanks for posting all of this Eric. This is a great help and I have got to try this stuff on my own projects.
Not to worry, this one is well worth bringing back to the top occasionally.
 
A real neat trick is to glass an airframe and while the resin is still wet fabricate a tube of Monocote and slip it over the body. Hit it with a head gun and it will squeeze the excess out the ends and give you a beautiful surface. Looks almost like it was vacuum bagged.
 
A real neat trick is to glass an airframe and while the resin is still wet fabricate a tube of Monocote and slip it over the body. Hit it with a head gun and it will squeeze the excess out the ends and give you a beautiful surface. Looks almost like it was vacuum bagged.

MIND.
BLOWN.
 
A real neat trick is to glass an airframe and while the resin is still wet fabricate a tube of Monocote and slip it over the body.

As in sticking monokote to itself to make a tube juuuuust big enough to slide over the green glassed tube?
 
Yeah ok Al you can't post something like that and not provide an instructional video and/or pics dude.
 
Yeah ok Al you can't post something like that and not provide an instructional video and/or pics dude.
I did a search through YouTube and there are no videos on using a sealing fabric like monokote on a rocket, so it's time for one of you guys to make a YouTube video on how you do it.
 
Monokote is officially discontinued, but Ultracote is still available, I actually use a lot of a material nicknamed "china-cote" that can be obtained from Hobby King and a number of ebay suppliers, plus other places.

For me, it works as well as Monokote did. Faintly different in a couple of ways, but cheaper than Monokote. Have only used it on airplanes so far, but it will work on rockets.
 
It figures that Monokote would have died and Ultracote survive in the Hobbico bankruptcy and subsequent acquisition by Horizon. I'm still mad that Hobbico bought Coverite then killed off Micafilm.... but that's been a long time now. Of course with Solarfilm out of business in the UK, there's no supplier of Micafilm/Fibafilm anymore anyway. *sigh*
 
Prompted by a request by DeeRoc in the Viper Family thread, here's a quick "How To" apply model aircraft Heat Shrink film in rocketry applications in video format. Most commonly, you find Monokote (Top Flite) and Ultracote (Hangar 9); both work well though apply and shrink a bit differently than one-another. I use both; again they both work great albeit differently; there are a few other less common options out there as well.

I did not invent this technique, nor do I pretend to know it all.:cool: I have been covering r/c planes and consequently rockets for the last 20+ years. Personally, I find covering paper/wood rockets significantly easier and faster than the more traditional filling, sanding, priming, and painting. Almost exclusively, I cover Loc rockets instead of painting them.

One added benefit is that a properly shrunk film adds strength to the airframe/structure while adding very little weight. Paint generally weighs more and adds no strength to the object.

This is an uncut, unedited, impromptu documentation of the covering process. It ain't pretty, but hopefully it's informative. If anything, it's convinced me to begin an exercise program again!:shock:

Covering a Tube

Step 1: Prep airframe, Determine length and circumference, cut film
[video]https://drive.google.com/file/d/0B-C7O4hoFPXpWVd4MUtOa1dJdE0/view?usp=sharing[/video]

Step 2: Peel backing, wrap around airframe
[video]https://drive.google.com/file/d/0B-C7O4hoFPXpcU45a1BYbm5sZFk/view?usp=sharing[/video]

Step 3: Tack
[video]https://drive.google.com/file/d/0B-C7O4hoFPXpVWhadW13OWZucnc/view?usp=sharing[/video]

Step 4: Finish tacking. Seal the seam!
[video]https://drive.google.com/file/d/0B-C7O4hoFPXpMVNzZEpKdG5XbEU/view?usp=sharing[/video]

Step 5: Shrink (using Heat Gun) Note: it is possible to cover a tube without using the Heat Gun. It is more difficult, time consuming, and produces less stellar results, in my opinion.
[video]https://drive.google.com/file/d/0B-C7O4hoFPXpZW1rTWpob1c2SUE/view?usp=sharing[/video]

Step 6: Finish shrinking using the Heat Gun, Iron down the surface, Iron the tube ends
[video]https://drive.google.com/file/d/0B-C7O4hoFPXpYW9vb3lZdnJOU1E/view?usp=sharing[/video]

Step 7: Trim Ends, Holes
[video]https://drive.google.com/file/d/0B-C7O4hoFPXpUC1Fd2VDRE1OUXc/view?usp=sharing[/video]

That's it! Though I didn't rush, that tube was completed in 3 songs on the Radio, or about 20 minutes. Adding trim, mult-colors, etc. adds to time and complexity, but is still relatively easier than masking and painting. I enjoy painting as much as I enjoy covering; the intention here is to simply provide folks with an alternative method of adding color and shine to their rocket projects. Enjoy!
Updated Hyperlinks below:

Covering a Tube

Step 1: Prep airframe, Determine length and circumference, cut film
https://drive.google.com/file/d/0B-C7O4hoFPXpWVd4MUtOa1dJdE0/view?usp=sharing

Step 2: Peel backing, wrap around airframe
https://drive.google.com/file/d/0B-C7O4hoFPXpcU45a1BYbm5sZFk/view?usp=sharing

Step 3: Tack
https://drive.google.com/file/d/0B-C7O4hoFPXpVWhadW13OWZucnc/view?usp=sharing

Step 4: Finish tacking. Seal the seam!
https://drive.google.com/file/d/0B-C7O4hoFPXpMVNzZEpKdG5XbEU/view?usp=sharing

Step 5: Shrink (using Heat Gun) Note: it is possible to cover a tube without using the Heat Gun. It is more difficult, time consuming, and produces less stellar results, in my opinion.
https://drive.google.com/file/d/0B-C7O4hoFPXpZW1rTWpob1c2SUE/view?usp=sharing

Step 6: Finish shrinking using the Heat Gun, Iron down the surface, Iron the tube ends
https://drive.google.com/file/d/0B-C7O4hoFPXpYW9vb3lZdnJOU1E/view?usp=sharing

Step 7: Trim Ends, Holes
https://drive.google.com/file/d/0B-C7O4hoFPXpUC1Fd2VDRE1OUXc/view?
usp=sharing
 
Back
Top