I think lack of airfoil on the main wing, and airfoiling on the canard is part of the problem.
As I said, canard designs need for the canard to stall first, and main wing stall last. I think your is having the main wing stall before the canard sometimes, yet perhaps the canard stall other times depending on the angle or attack and airspeed. No airfoiling always stalls before an airfoil does. Oddly enough, if your canard was say half (or 2/3) of its current area but twice (or 1.5 times) as much angle of incidence, it would tend to stall the canard more easily due to the higher angle of attack (incidence). While the higher angle of incidence would make the canard create more lift. Compare the canard size/area of a couple of well known old B/G's, the Mini-Dactyl and the Delta-Katt. Pretty small canards with a lot of incidence.
Delta Katt: note fuselage angle to wing, canard is straight (zero incidence) to the fuselage, the pop-pod was mounted parallel to the wing. This pic from a 2.9X scale-up article:
https://www.rocketreviews.com/scratch-groovy-katt-by-geof-givens.html
Mini-Dactyl: it also had the same sort of fuselage set-up as the Delta-Katt, though the pod was parallel to the fuselage not the wing. If this was scaled up for C size or lager, it might have some problems with pitching up on boost unless it was built to roll (easy way is to angle the pod "crooked" in yaw about 3 degrees, causing a roll on boost without messing up glide trim like rudder trim for boost would.
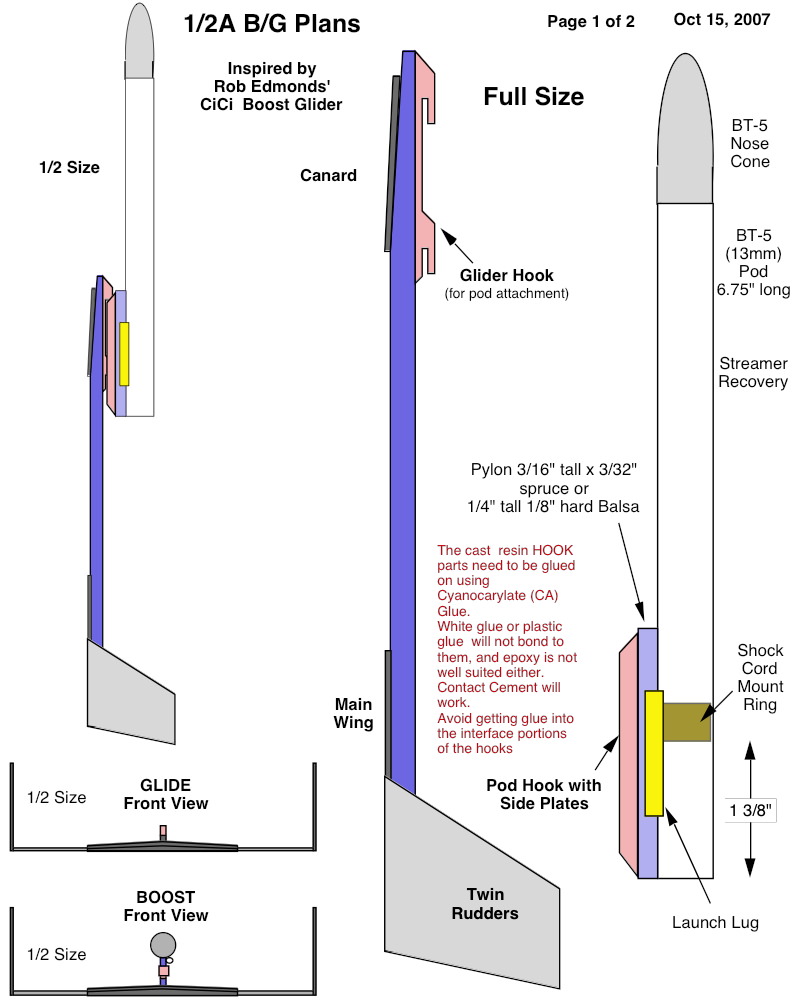
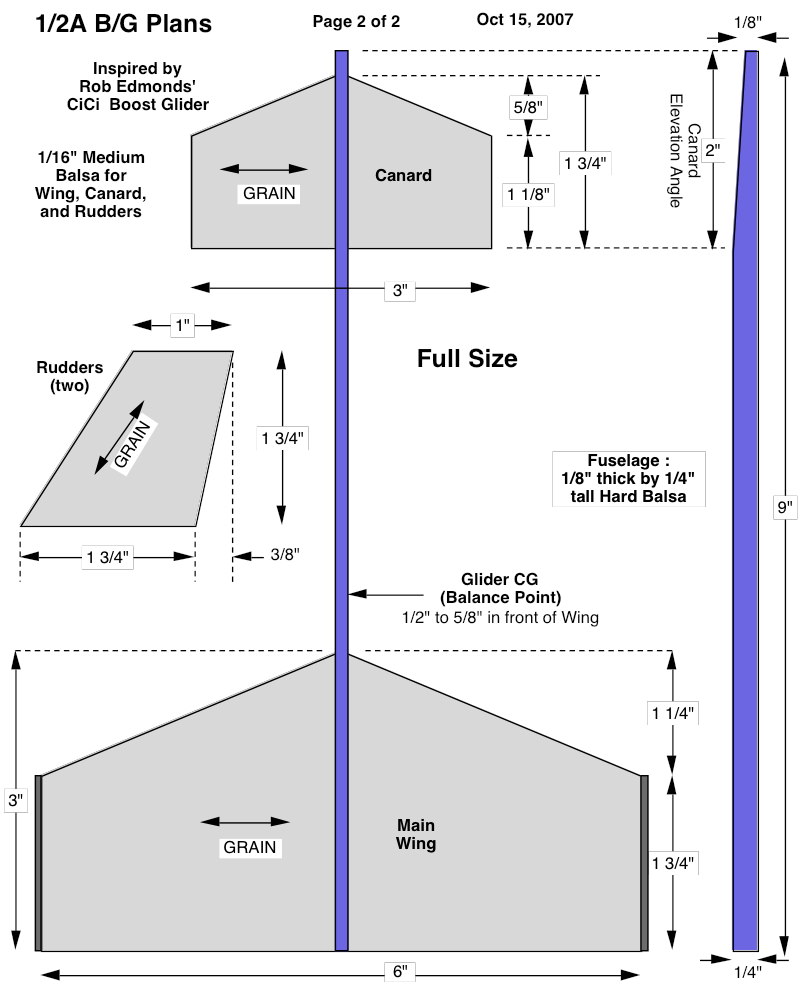
PLANS from JimZ's site (The above is from part of the instructions):
https://www.spacemodeling.org/jimz/km-6.htm
BTW - Aerodynamic scaling related to "Reynolds Number", is that the smaller an aerodynamic surface is, the less effective it is (smaller = lower Reynolds Number). Because air molecules are a constant size, if air was instead small particles of rock, full size planes would fly thru sand while smaller models fly thru gravel and smaller thru pea gravel, and really tiny models fly thru "boulders", in a relative sense of size. That is a wild oversimplification of course (no plane could "fly" thru sand) but a way to get across the idea of air molecules of constant size vs how the airflow behaves with smaller and smaller models . Suffice to say that the smaller size of a canard will tend for it to stall sooner than a larger one, everything else being equal.
https://en.wikipedia.org/wiki/Reynolds_number
Also, don't give the canard an airfoil, round it only. And try to do what you can to sand some airfoiling into the main wing. Even if it's pretty much rounding the leading edge and sanding a crude taper into the UPPER part of the trailing edge (don't taper the underside of the trailing edge).
Another thing to try would be to add a turbulator strip at 25% of the main wing chord (on top of the wing, not bottom). That "trips" the boundary layer early, causing it to remain attached longer at higher angles of attack than without it. I have used turbulator strips n some of my R/C sailplanes and a few R/C rocket boosted gliders to reduce/solve tip-stall problems (wingtip on one side stalling, causing the glider to veer to one side and begin a dive rather than stall straight ahead like a well behaved R/C model should. This alone might solve your problem right now. Vinyl tape about 3/32" - 1/8" across would be about right. I say vinyl, like electrical tape or repair tape, since that would be about the right thickness, thinner tape would not work as well. Needs to be thick enough to have a significant "bump" to trip the boundary layer. The image below is for a more advanced full size airfoil and shows the turbulator farther back than 25%, but 25% generally works well for our size of models.


") Probably woulda been OK at 3.0 (less noseweight) or 4.0 degrees (more noseweight)
Probably woulda been OK at 3.0 (less noseweight) or 4.0 degrees (more noseweight)