Alcubierre Build Thread

The Rocketry Forum

Help Support The Rocketry Forum:

This site may earn a commission from merchant affiliate links, including eBay, Amazon, and others.
The dorsal and ventral fins were constructed of three pieces of 1/8" balsa, like so:
Fins-1.jpg

Although it's hard to tell from that picture, these came out really good. My technique in constructing multi-piece curved fins has gotten *much* better. It occurred to me, while looking at them, that they're remarkably similar to the fins/pylons on the Avalon. This rocket makes a good companion to that one; it they were in a catalog they'd be on the same page. :)

These fins came out *so* nice that I was actually afraid to paper them, for fear of ruining them.

Ah, who am I kidding.
Fins-2.jpg

I vowed not to yammer on about papering in this thread, but I will at least say that these are probably the best papered fins I've done. My technique continues to improve, particularly with regard to sanding/trimming the edges of the paper.

Oh, the paper does not go to the top because these fins were purposely cut too tall. When the rocket is in a more advanced stage of construction, I'll see exactly how tall they need to be and them trim/sand them down to fit. The key is for them to make a nice joint with the ring.

I won't bother to write out all my stupid details of what I did differently/better in constructing and papering these fins unless requested to, because honestly I have no idea if anyone cares about such minutiae.
 
Very similar indeed, as noted above. I'll have to consciously make sure to do things differently in the future, although that shape really is perfect for this particular rocket.
 
I make a lot of these too Neil. These 2 & 3 part fins used to be a bit of a problem at first until I mastered getting them right. It's one thing to get them glued flat, but making sure you have those glue joints butt perfect. Titebond or not, uneven butts cause a weak spot. You have an advantage to yours though. Your papering skills are great. I'm not too good at papering. Seems simple enough though. Here are some samples of multi piece fins I did in the past for your viewing pleasure. #4 in this pic is a 6 piece construction with 2 of those pieces being the main fin. The rest of the pieces on the leading and trailing edge are lamination's. Just wanted to share.

Rockets Model (1).jpg
 
I make a lot of these too Neil. These 2 & 3 part fins used to be a bit of a problem at first until I mastered getting them right. It's one thing to get them glued flat, but making sure you have those glue joints butt perfect. Titebond or not, uneven butts cause a weak spot.
Too true, although if all the pieces include some root edge, the butt joints are not so important. Certainly the papering helps.

Here are some samples of multi piece fins I did in the past for your viewing pleasure.
I think I recognize all of those except the two-stage fins (#3)...

What I did better with the fins this time (construction-wise) was getting the curves to blend very smoothly, so that in the finished fins you pretty much cannot tell where the pieces start and end (especially after seams are hidden by the paper.) Key was to cut the fins roughly and slightly large, then glue together, and then sand to final shape. Also a bit of CWF on the edges where one fin joins the other, and you get a perfectly smooth curve. A few other small details as well.

This is my third rocket with fins like this (Biohazard and Avalon being the others); I'm definitely getting better at it and learning what to look out for.
 
My half-rings relaxed a bit more than I really wanted them to, and required more force than expected to push them back into shape. And so, with some trepidation, I re-wet them with Windex and put them back on the form, where they will live for a while.
rings-again.JPG

I don't know if this will help anything, but I don't think it can hurt either. I could work with them as-is, but it would be preferable for them to adhere to the original target diameter of 5". My work on the wings is now stopped until I determine what the final shape of these guys is gonna be.
 
My half-rings relaxed a bit more than I really wanted them to, and required more force than expected to push them back into shape. And so, with some trepidation, I re-wet them with Windex and put them back on the form, where they will live for a while.
View attachment 363260

I don't know if this will help anything, but I don't think it can hurt either. I could work with them as-is, but it would be preferable for them to adhere to the original target diameter of 5". My work on the wings is now stopped until I determine what the final shape of these guys is gonna be.

Is the ring going to be attached as two pieces or a single piece? If a single piece, I wonder if two externals loops of dental floss or other thread, one at the forward end and one at the tail end, would help keep the shape. If tight enough, would likely sink into the wood and could easily be covered by CWF or sanding sealer.
 
It's two pieces, I don't think there's going to be any way to tie them like that. I'll see how they look when they come off the form tomorrow. Maybe I'll just need to keep them on the forum until it's time to paint or attach them or whatever.

If I had a *very slightly* smaller diameter form, I'd put them on that to over-curve them and then let them relax into the desired shape, but of course I don't have that.

Lol. Please do leave them on the forum - we’ll watch them for you...

As for sizing of forms, that just means you didn’t make the rocket BIG enough.. [emoji12]
 
Let's see how this weekend went!
Weekend-results-2.jpg
Sincere thank you to the forum for watching my ring pieces. After spending the weekend clamped up, they pulled in just a bit, now sitting at 5 1/8". From there I could pull them to 5" if I wanted to, or maybe I won't push my luck and will just go to 5 1/16" (yeah, every 1/16' matters here). I think I will basically store them clamped up for now; that'll be fine until it's time to paint them I think.

Before the weekend I primered some stuff:
Weekend-results-1.jpg

I build those little stands for the pods out of a few pieces of scrap wood. Now I have some more sanding to do.
 
This is the first one of these I have ever made:
finjig .JPG

As I had feared, I found cutting the foam board to be quite annoying, and hard to do accurately. I got good slots for the fins, but the round hole in the middle is not particularly precise. I think it'll work OK, but still... how do you make accurate cuts like that in foamboard?
 
The round hole is pretty irrelevant. Although you could try the nail/string trick. (Nail in the center, string around it and the xacto)

Ooh, or an xacto blade in a compass, that'd be cool to
 
Cut inside the line slightly to create a slightly too snug of a fit. Then sand the cut until you get a proper fit. I usually use a 1/2" sandpaper dowel I make, or you can Dremel it out using slow speed. THEN I cut the slots for the fins. You could use an OLFA circle cutter if you have one of those also.
 
I did the slots first just because I figured I'd start with the easy part. Cutting the circle first almost certainly would have been better.
 
The dorsal and ventral fins were constructed of three pieces of 1/8" balsa, like so:
[...] I will at least say that these are probably the best papered fins I've done. My technique continues to improve, particularly with regard to sanding/trimming the edges of the paper. [...]
I won't bother to write out all my stupid details of what I did differently/better in constructing and papering these fins unless requested to [...]
OK. I'll bite. Summary? I'm using white glue & printer paper and it seems OK.

View attachment 363487
After spending the weekend clamped up, they pulled in just a bit, now sitting at 5 1/8". [...]
If you were to do another, how about making a semi-ring greater than a semi-circle (like 4/3 pi) and cutting off the ends?
 
I was going to suggest coating them with CA after they dried. That always stiffens up a body tube enough so that when you cut it in half, it doesn't change it's shape. Put some on while they're clamped, and put more on after you un-clamp them. Might be wise to keep them retained to the exact curvature while they're drying though.
 
OK. I'll bite. Summary? I'm using white glue & printer paper and it seems OK.
I use Avery label paper, general technique documented here. Adjustments I made this time which made a notable difference include:
1) Before papering, I coated the skinny points of the fins with some TBII then sanded smooth. This strengthened those areas enough to make them more secure during the sanding/trimming process. It also provides a smoother surface (after sanding of course) for the label paper to grip to.
2) I did only one side of the fin at a time. I realized that I wasn't actually gaining anything from doing both at once, and it was a little easier to manage the trimming process with only one side at a time.
3) Used 400 grit wrapped around a Sharpie to do my sanding/trimming, instead of my finger. I'm gonna make myself a sanding dowel to do this in the future.
4) Used a diagonal sanding motion. In the past I've run the sandpaper parallel to the fin edge, which works but takes a while, and it's easy to lose focus when it finally get to sand through. Sanding perpendicularly, on the other hand, is *too* effective... it sands through the paper so fast that you almost invariably end up sanding some of the balsa underneath (not so much an issue if using a sanding block on a straight fin edge, but I'm mostly dealing with curves). A diagonal motion ended up striking the perfect balance.

The evidence in how well this all worked is shown in the pictures. Unlike some previous attempts, I was able to get the paper clean to the sharpest point of the fin. In the past I've usually over-sanded somewhat and exposed some of the wood at the point.

If you were to do another, how about making a semi-ring greater than a semi-circle (like 4/3 pi) and cutting off the ends?
Here's how I know that won't work: although I didn't write about it, one of my two half-rings was actually salvaged from a complete 360 degree (or shall I say 2-pi :)) ring I had experimented with in the past. That ring stayed in tact for several months before I cut it in half, and even after all that time spent as a full ring it still relaxed a bit afterwards.

A reasonable conclusion here is that I've asked the balsa to curve just a bit more than it wants to, and two laminated layers is not *quite* enough to hold it in position. Three laminated layers of 1/32" balsa would probably have worked better here.

I was going to suggest coating them with CA after they dried. That always stiffens up a body tube enough so that when you cut it in half, it doesn't change it's shape. Put some on while they're clamped, and put more on after you un-clamp them. Might be wise to keep them retained to the exact curvature while they're drying though.
I'm not confident that a surface coating of CA will do very much, but it can't hurt to try. I'll apply some to the outside while it's clamped to the form, not sure how I'll do the inside. It might be good to really soak it in thin CA, but there's exactly zero chance that stuff won't end up in many places I don't want it, and the wood will end up glued to something else.

Ultimately it's not that big a deal. The shape it's holding is close enough to what I need that it won't harm the finished model in any significant way.
 
I don't have anything meaningful to add other than to let you know that I for one am watching and enjoying this thread. Your builds are way cool, Neil.

s6
 
Some fins found there way onto the body tube today. First the little front strakes:
Fins-on-3.jpg
Getting a good visual alignment on these was tough because they're so short. I think they're good.

Next, I got to use my fin alignment guide to mount the dorsal and ventral fins:
Fins-on-1.jpg
The rectangular thing on the right is a little placeholder I made to fit into the slot for the wing to make sure I had the whole everything aligned properly (there's one on the other side too.

The guide worked pretty well, although I ran into a small problem:
Fins-on-2.jpg
The left placeholder, when inside the BT slot, did not align well with the slot in the fin guide. So either the guide bad or the fin wing slot is slightly out of position. I'll have to figure that out and fix whichever one is wrong. I have time for that, it'll be a while before the wings go on.

I didn't stick the guide to far onto the fin; didn't seem necessary.
 
@niel_w: when it comes to foam core guides, here is the process I have found that gives me the roundest cuts: (This is after I have cut the fin slots, and for 4f designs, I cut opposing fins in a single action through the BT circle)

Do the square first to give room for glue on the jig
then, I slice fingers in the remaining arch, which makes cutting arc that much easier.

oh: and remember to cut with a new blade in several passes (can you suck eggs grandma? )

One other thing to watch is the angle of the blade, so you don't end up with a circle or fin slots that are different sizes on either side of the jig...

Handy tip I found was if you cut the fin slots too wide, and you can add layers of masking tape to the inside edge of the fin slot in the jig if it is too loose.

2018-10-10_11-58-53.838.png
 
Thanks for the tips. Maybe I'll try to cut another one, this time with a confirmed new blade (might have been guilty of milking an older blade when I cut my last one).

I'll be the problem I'm having is more likely due to inaccurate slot on the rocket, but I'll see how it goes with a new and (hopefully) better fin guide.
 
I use Avery label paper, general technique documented here. Adjustments I made this time which made a notable difference include: [...] The evidence in how well this all worked is shown in the pictures. [...]

Here's how I know that won't work: although I didn't write about it, one of my two half-rings was actually salvaged from a complete 360 degree (or shall I say 2-pi :)) ring I had experimented with in the past. That ring stayed in tact for several months before I cut it in half, and even after all that time spent as a full ring it still relaxed a bit afterwards.
Nice! Thanks for the papering details!
Re: half-rings: Oh, OK. I suppose there's curving smaller than the target radius and have it relax to the correct one?

@niel_w: when it comes to foam core guides, here is the process I have found that gives me the roundest cuts: [...]
Neat! An alternative would be to cut hexagons or octagons.
 
Re: half-rings: Oh, OK. I suppose there's curving smaller than the target radius and have it relax to the correct one?
If I had such a form of the exact correct size then yes, that would presumably work.
Neat! An alternative would be to cut hexagons or octagons.
Hmm, also a good idea, easier than trying to cut a curve. Possibly I am headed towards a series of experiments cutting foamboard... :)
 
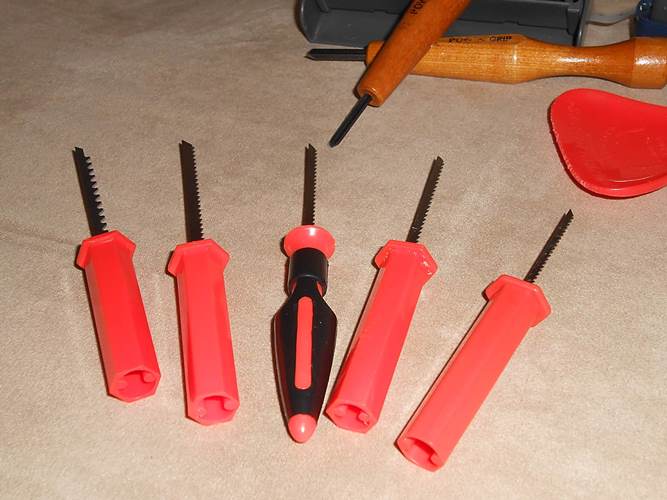
Neil, I haven't done this, but I'm interested in trying it out on a piece of scrap. If you have one of those tiny single handled pumpkin carving saws, you might be able to get a half decent curve cut done.
 
If you have one of those tiny single handled pumpkin carving saws,

This is one of those NOR-AM things again, isn't it...

I am trying to think of an Australian equivalent tool that would never exist over there...

"If you have a set of left handed kangaroo boxing gloves..."
 
Neil, I haven't done this, but I'm interested in trying it out on a piece of scrap. If you have one of those tiny single handled pumpkin carving saws, you might be able to get a half decent curve cut done.
Interesting idea! I have a zillion of those little guys, will give one a try. The question is whether sawing will work on the soft foam core. That's the part that gave me the most trouble with my probably-not-quite-sharp-enough blade.

For snrkl and any others that don't know what Gary is talking about:
tools-4.jpg
 
Back
Top