Madcow Cowabunga Mammoth build

The Rocketry Forum

Help Support The Rocketry Forum:

This site may earn a commission from merchant affiliate links, including eBay, Amazon, and others.
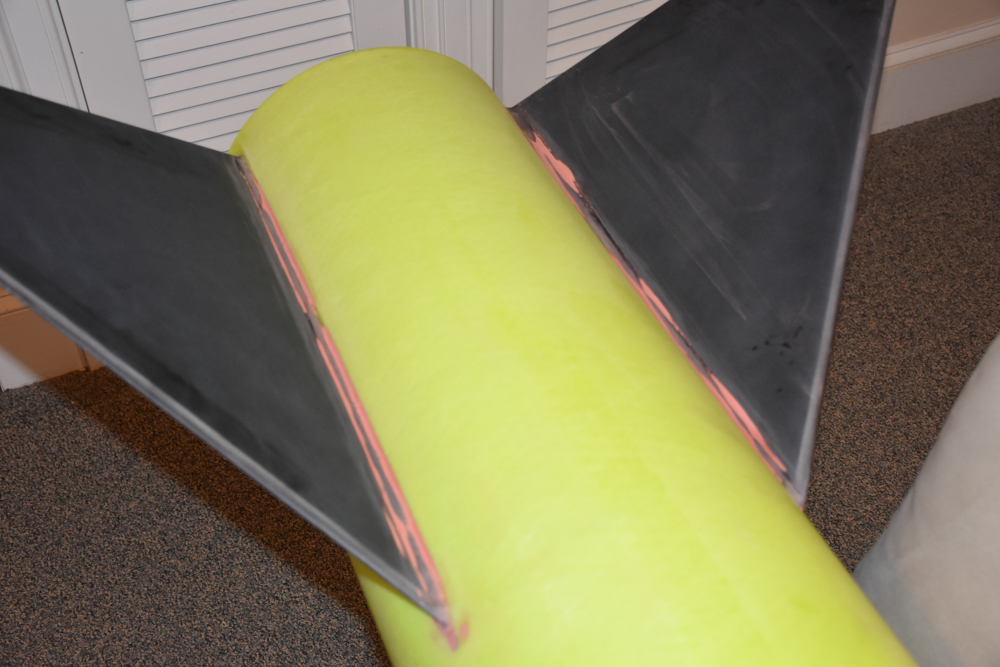
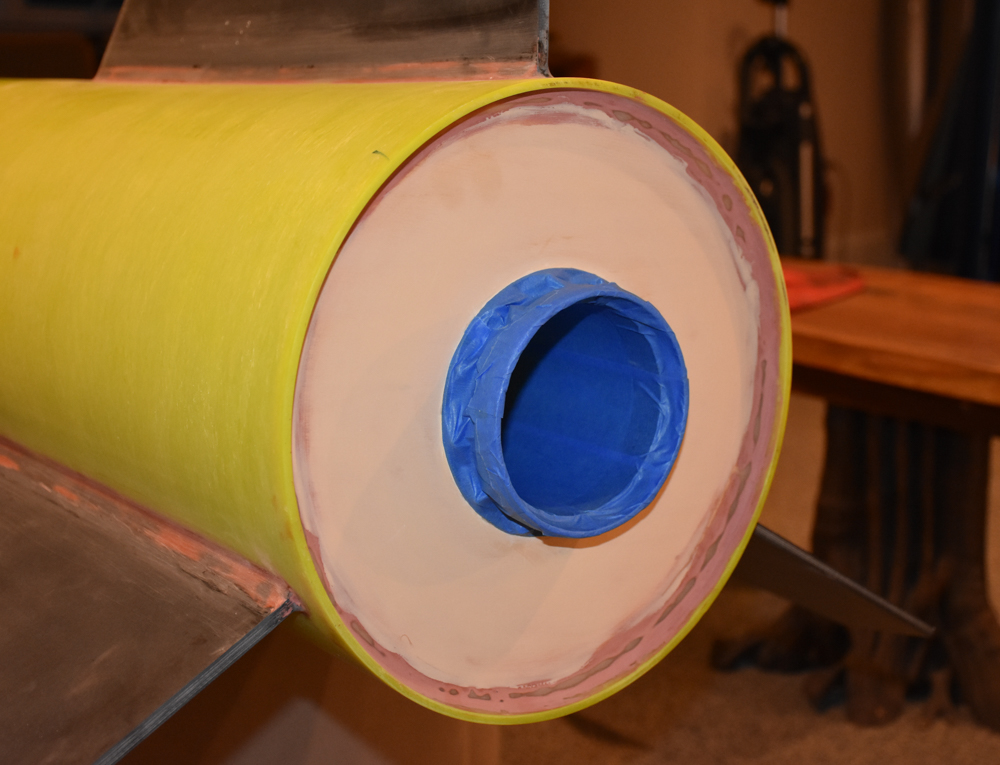
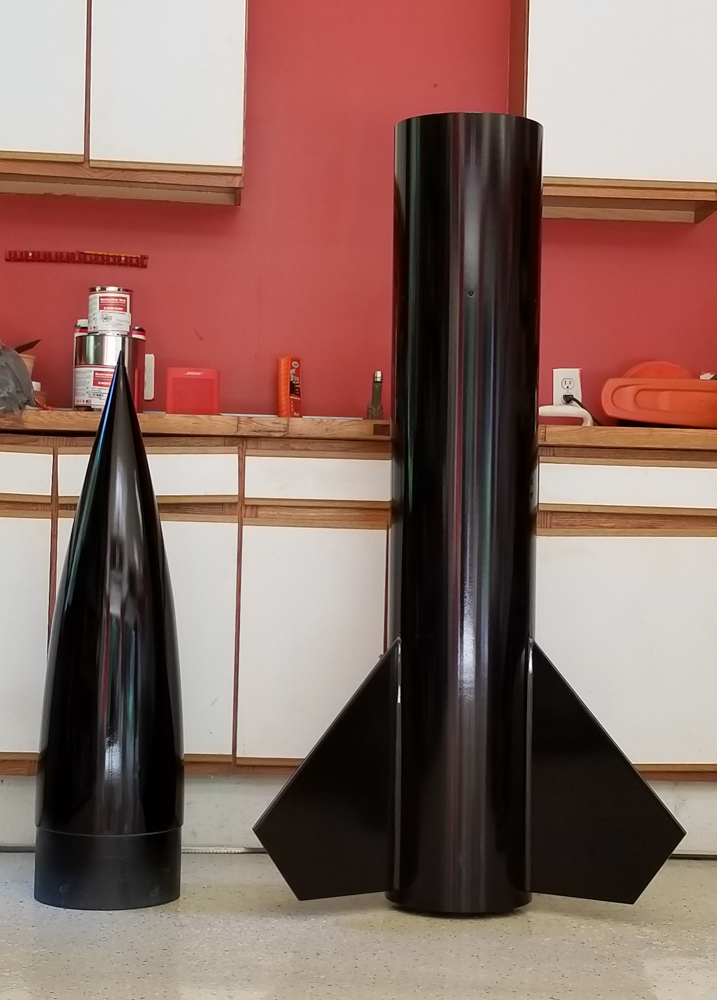
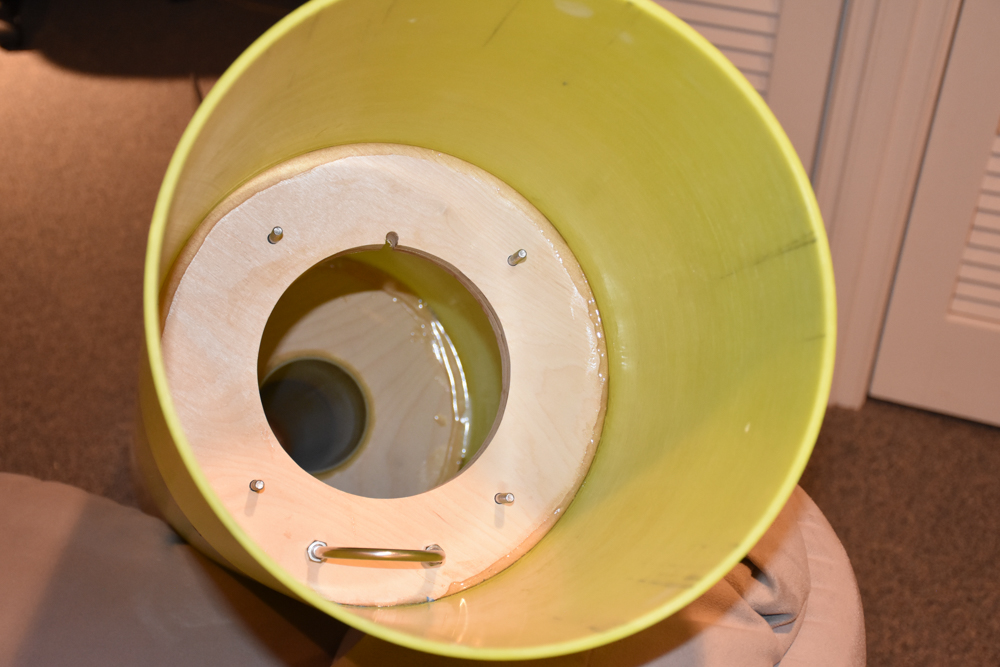
Cannon mounting ring installed in the airframe with epoxy and six countersunk #10 x 2" stainless screws.
43346890532_22b2565fb9_o.jpg

43346890752_c519b6e3c5_o.jpg


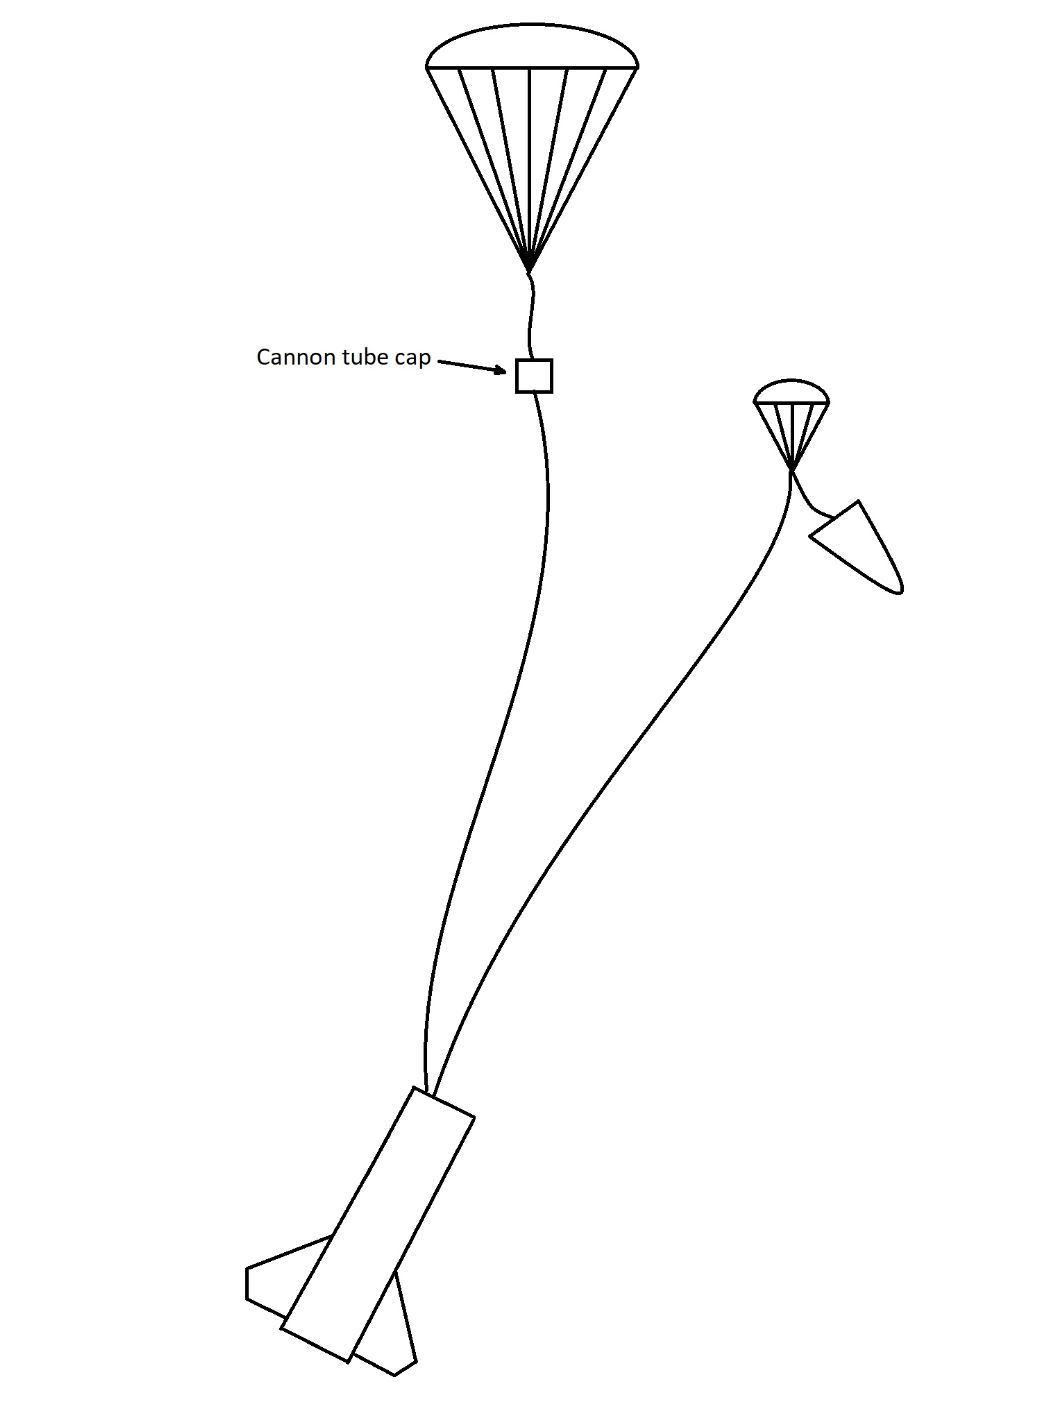
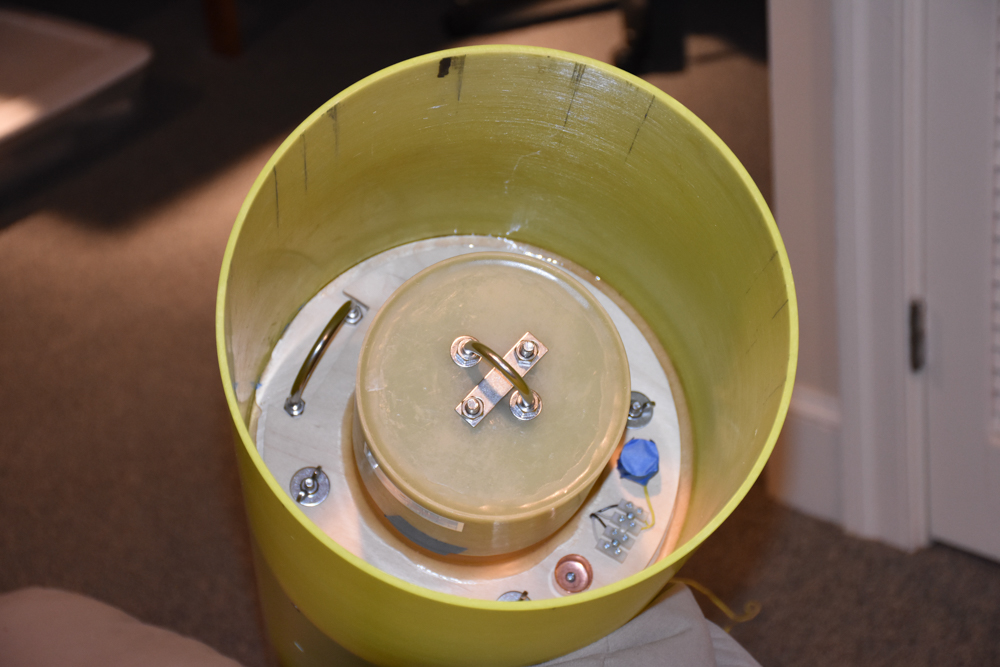
And here it is with a 3 gram charge loaded for an apogee deployment test tomorrow. I don't know if that will be the correct amount of powder. Just a guess, we'll see how it goes. Since I'm not testing the main deployment yet there is nothing in the cannon tube and I don't have any shear pins in the cannon cap so it's just held in place with some tape for now. I'll try to video the deployment tests.
43346891582_b84fe1c32d_o.jpg
 
I did some deployment ground tests today.
Apogee test . . . success
Main test . . . FAIL!

I did the apogee test with a 30" drogue chute on a 25 ft harness and 3 grams of powder and it looked good to me so that what I will go with.

Then I did the main deployment test with a 120" Fruitychutes Iris chute and a 30 ft harness. The volume of the cannon tube is smaller so first I tried it with 2 gram of powder. The cannon cap flew about 5 feet but the chute stayed in the cannon tube. So I tried it again with 2.5 grams of powder. This time the cap shot about 10 feet but the chute still stayed in the cannon tube! The cap did pull the shroud lines out but not the canopy which stayed burrito wrapped on the cannon tube. The shroud lines are 10 ft long.

The main chute is a snug fit in the 6" tube but not too tight. I have used the same chute with my 6" Formula 150 several times with no problems. I'd rather not use a smaller chute if I can avoid it. The sim descent with the 120" chute is 15 fps.

Here are the videos:
Apogee test:


Main test:
 
No I didn't use a D bag. For the main test I had not tethered the Nomex blanket to the harness. Now I'm wondering if I had attached the Nomex to the harness near the cap if the cap would have pulled the main out of the cannon tube. I may try that next although that seems like a risky solution even if it works on a ground test. I'm also thinking out maybe using a pilot chute attached to the cap to pull out the main. But I think the pilot chute would need to be larger than the drogue to be effective.
 
I would back off on the apogee amount. Looks like it stressed the cord, and that will occur even more so when one end is not butted against the ground. Maybe try 2.5g primary with the known good 3g as back-up?
 
I was thinking the same thing. I'll do a 2.5g apogee ground test.

I just finished prepping for another main deployment test tomorrow. I changed 3 things:
1) Folded the 120" chute differently so it is a little longer but not as thick. So now it fits a little more loosely in the cannon tube.
2) Tied the Nomex blanket to the harness 18" from the cap.
3) Attached a 30" pilot chute to the cap.

I wish now that I had made the cannon tube 2" longer. I could have done that if I had installed the U-bolt on the nose slightly off-center. As it is now there is less than 2" of clearance between the nose bulkhead U-bolt and the cannon cap U-bolt, because they are both centered.
 
Great build. question do you put BP in charge holders before you attach cannon in rocket? Just thinking about the safety of reaching into tube with BP. It looks like you need to hook up switch wire before installing cannon.
 
Great build. question do you put BP in charge holders before you attach cannon in rocket? Just thinking about the safety of reaching into tube with BP. It looks like you need to hook up switch wire before installing cannon.

Yes all charge canisters are loaded before installing cannon into the airframe. The sequence will be:
1) Load main charge canisters in aft endcap
2) Bolt aft endcap onto cannon tube
3) Pack main chute into cannon and attach to inner cap U bolt
4) Attach forward cap with shear pins
5) Load apogee charge canisters
6) Verify switches are in off position then connect switch wires
7) Install cannon assembly into airframe and secure with wingnuts
8) Attach main harness to cannon cap and mounting ring
9) Attach drogue harness to nosecone and mounting ring
10) Pack drogue chute and connect to harness
11) Install nosecone and shear pins
 
Last edited:
The main deployment test that I did this morning was successful. I will do an identical test one more time just to be sure that I'm not going to have any problems.
 
This is how it will look during descent under main:


42401547845_0e5390d5d4_o.jpg
Just looked at this thread.
I'm surprised nobody has mentioned this, but sooner or later you will get tangling between the drogue and main. The rocket *will* be hanging below the drogue and the main will hit it.Might go 1 flight, might go 100 flights before you have problems.
Otherwise, looks like a great build and a great way to fly an M on a smaller field like the one I launch from near Camden, SC.

I have had an in depth discussion with Ted Chernok on that subject and we believe that we have minimized the risk of chute entanglement. By keeping the drogue small, the booster will not be "hanging below" the drogue during drogue descent. If done correctly the nose and booster should mostly hang in an upside down V configuration below the drogue. And if the drogue descent speed is high enough then the booster will descend in a more horizontal attitude rather than pointing up at the drogue. I want to keep drogue descent speed up around 90 fps so I will only be using a 24" drogue. There is always still a chance that the main will get entangled in the drogue, but that can happen with any dual deploy recovery that has drogue and main chutes.

Another thing that we did was make the main harness long enough that the end of the harness where the main chute attaches will be higher that the top of the drogue chute when the main opens. So if there is spinning during descent under main and the two harnesses get entangled, it won't be a problem.
 
Carefully watch the video from the first flight, adjust as necessary. Once the main is open, you shouldn't have any problems.
 
You are right of course that this design has more risk of chute entanglement that a normal dual deploy setup, due to the fact that the main deployment will always be firing more or less in the general direction of the drogue. Where in a traditional dual deploy configuration the payload section would normally be pointing away from the drogue when the main is deployed.
 
I did another identical 2.5 g main deployment test that was successful. Then I also did an apogee deployment test with 2.5 g as recommended by Bat-mite. And it looks like 2.5 g is still plenty of powder for apogee charges. In fact it looks like I could still use even less but I like to err on the side of deployment charges that are a little too energetic rather than a little too weak, so I'll go with 2.5 g for primary and 3 g for backup for apogee.

Here is the 2.5 g apogee test:
 
I ordered the paint for this rocket from TCP Global. The paint job will be Restoration Shop Jet Black lacquer with an intercoat of House of Kolor red Ice Pearls, then 3 or 4 coats of clear lacquer. Should be about like this:
HOKIP03.jpg
 
I am currently finishing my first rocket with automotive paints. I am using finish 1 acrylic enamels sprayed out of an Iwata RG3L gun. I am having a little bit of issues with drips. If I just sand them out and buff with 2500 grit and use a polishing compound on top of that followed by a urethane clear coat would that get me a high gloss and saturated finish like what you get?

Thanks,
Matthew

If you getting drips or runs then you are probably either holding the gun too close or not moving it fast enough. The only way to deal with drips and runs is to sand them as much as you have to get rid of them and then spray another coat. You would need to sand drips with more grit, like probably 400 grit. 2500 grit wouldn't do it. If you just sand drips without spraying another coat then they are going to be visible when you are done. Depends how much perfection you are shooting for.

Be careful with that catalyzed urethane, it is very toxic. Especially for you lungs but it can also be absorbed through your skin. To be safe you need a full body suit and a fresh air system when spraying urethane. That's why I only use lacquer.
 
I finished working on the fillets yesterday. First some Bondo putty sanded with 220 grit to shape the fillets and even out some low spots. Then a thin coat of Bob Smith 30 minute epoxy, and I have perfect fillets!
43504631282_8bba8046b0_o.jpg

42646464065_c494de260c_o.jpg
 
I finished up a few final tasks before I can start painting:
- Drilled holes into the forward and aft centering rings for the rail buttons
- Put a coat of thinned CWF on the plywood aft centering ring and sanded it with 220 grit
- Masked the nosecone shoulder, inside of airframe, and motor retainer
- Removed the 6 screws from the cannon mounting ring an plugged the holes with little wads of paper towel

Now I'm ready to spray primer.

43595058072_cef0b9f957_o.jpg
 
I am currently finishing my first rocket with automotive paints. I am using finish 1 acrylic enamels sprayed out of an Iwata RG3L gun. I am having a little bit of issues with drips. If I just sand them out and buff with 2500 grit and use a polishing compound on top of that followed by a urethane clear coat would that get me a high gloss and saturated finish like what you get?

Thanks,
Matthew

Hi Matthew,

When you get drips and you sand them, you will get a denuded patch of paint around the drip, until you remove the drip. Leaving a bare patch in the paint. This premature baldness is preventable tho.

Here’s how. I use the equivalent of bondo (automotive filler) and put a thin coat around the drip. Then mask around the bondo. Then sand. This allows you to have an even removal of material, and you remove the drip and bondo until you have a smooth surface, which does not require an entire new coat, or patch job.

Cheers
 
Thanks for the help! I have just bitten the bullet and sanded the drips and re-coated it. I will do that the next time I paint if I get drips. My goal is to eliminate them in the first place. I still have to go through with a buffer and polishing and wax, but I think this looks really good
 
Last edited:
Very nice, but why are you posting pictures of your rocket on my build thread?
 
I would say he really is impressed with your paint jobs and was looking for help. So he showed you how his turned out. Just like the rest of the posts where flyers have asked you questions.
 
I sanded the primer with 400 grit then waited for good rocket painting weather. So yesterday and today I did some painting.
I sprayed:
3 coats of gloss black lacquer
1 red Ice Pearl intercoat
5 coats of clear lacquer

31122361178_51074425e8_o.jpg


Normal pearl or flake is made of acrylic but House of Kolor Ice Pearl is made of glass flakes and is extremely sparkly in sunlight. The red gives the rocket a black cherry color but is hard to show in photos.

Next step: Wet sand with 1000 grit then 2000 grit.
 
Beautiful paint job, Nathan. Do you sand between coats and if so what grits do you prefer?
 
Your paint jobs never disappoint. Do you have a launch date in mind for this beast?

Thanks, I have a lot of wet sanding and polishing to do before it's ready to fly. I plan to fly it at MDRA after they move back to their Higgs Farm site which will be either November or December. The initial flight will be on a CTI 75mm L1115 which sims at around 4100 ft.

I also plan to fly it at Battlepark (Tripoli Central Virginia) sometime this season.

Before I can fly it anywhere I need to get my cargo trailer in shape because this rocket is too big to fit in the bed of my F350. My trailer hasn't been on the road in a long time and is currently used for storage and has an expired safety inspection. So I have some work to do.
 
Back
Top