Speedweiser, King of Speed

The Rocketry Forum

Help Support The Rocketry Forum:

This site may earn a commission from merchant affiliate links, including eBay, Amazon, and others.

GiachiG aka Typico

Well-Known Member
Joined
May 4, 2009
Messages
60
Reaction score
0
Hi!!

as suggested i start to write about my new project in this forum..
about me, i'm an italian rocket enthusiast, i started with rockets in 2004 and got L1 in 2006.
last year i tryed to achive L2 in Spain but problems with recovery sistem caused the total destruction of the rocket

and now, little presentation of the project

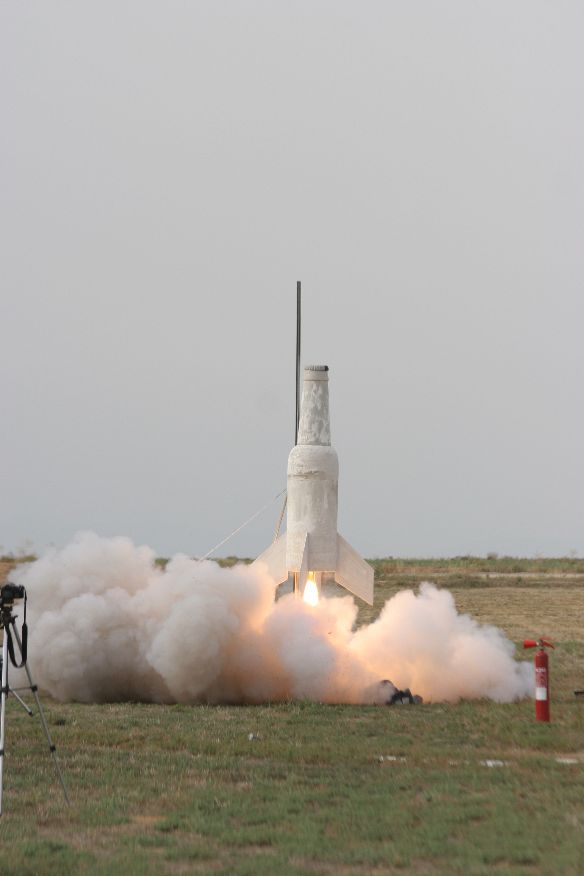
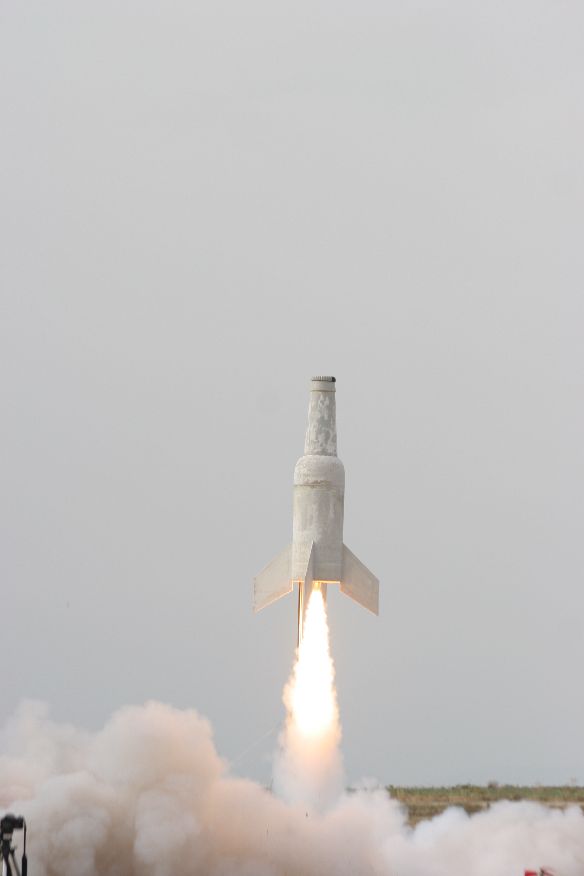
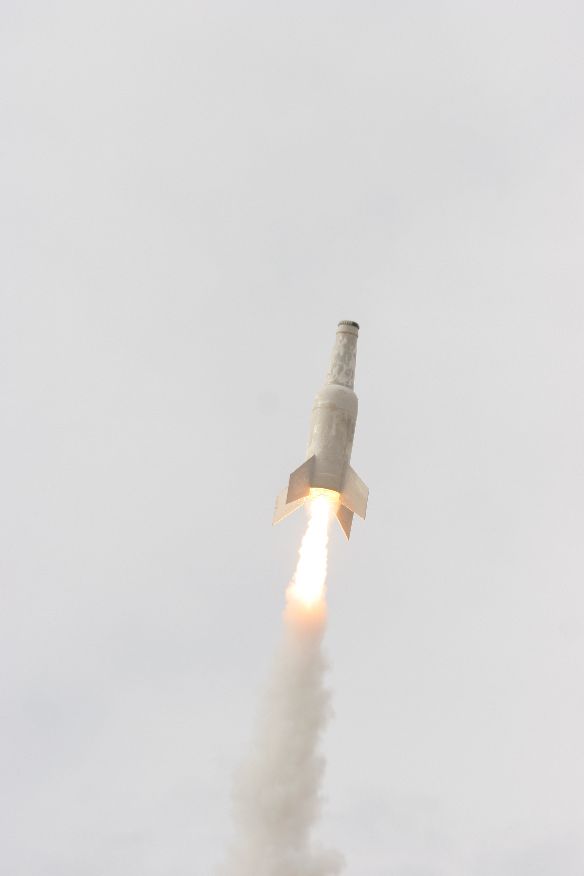
this is the new version of a rocket that have flew in 2008 in Spain, yes, the one that had problems... the rocket were completly destroyed after climbing without any chute, from 400mt

this rocket is not properly a rocket, it's an upscale of a Budweiser bottle, that's the why of it's name

weight and dimension? around 20kg ready for flight and 230cm tall!!!

the rocket were not painted, the painting were planned for the winter but...

now few photos of the old bottle, the motor were a K700...

DSCN5580.JPG


DSCN5582.JPG


img_4281_516.jpg


img_4282_129.jpg


img_4286_199.jpg
 
for this new version i radically changed the construction approach

firs of all i started building every piece with rinoceros...
bottle-one.jpg


with the help of the software i can carrect errors before start the construction and this cut more construction times

and i added 4 boosters to increase thrust time and obviously quote

more views and details
barre.jpg

in this you can see the 4 unaligned boosters on the back and the coupler that join the 2 parts of the rocket

join.jpg

this is another view

the L slides match with 3 notch in the tube inside the "neck" of the bottle, this make the transport easyer and also in this zone there will be the electronics bay

and now the image of the entire rocket
render2.jpg
 
Nice pic and (too short) write-up in the May-June Extreme Rocketry
magazine.

Good to see more details! Keep'em coming...
 
Last edited:
and now some pictures of the construction.. at the moment i have finished to shape the fins and prepared the coupler thet join neck/body

Foto0185.jpg

all the tubes

Foto0197.jpg

fins are made with low cost material, 6mm pine...

Foto0200.jpg

some cut detail, good job:D

Foto0203.jpg

and references points... this make easyer the next step
I did not had to measure anymore;)

then i started to cut all the pieces for the fins
Foto0209.jpg

all numbered to avoid confusion

Foto0205.jpg


at the end everyting combines perfectly... all the fins are perfectly idem
Foto0217.jpg


to lighten the structure i then used styrofoam
Foto0225.jpg


shaped and trimmed
Foto0227.jpg


a larger view
Foto0229.jpg
 
more details, every piece is measured by eye and cut by hand... eheheh

Foto0243.jpg


now some pics of the gluing of the styrofoam in place...
to do tis i used the vaccum tecnique, this ensured perfect join of the 2 faces with the core material
Foto0253.jpg


Foto0254.jpg


the sistem is very easy, a bag, a fridge motor and tubes...


when resin has cured, i started to sand the airfoil shape
Foto0271.jpg


and shaped the airfoil i added balsa to edges
Foto0284.jpg

this material will be sanded to approx 45°

pieces trimmed and ready to sand
Foto0305.jpg


to make faster the sanding i cut out some balsa with a knife.. then i sanded to desired angle
Foto0315.jpg


sanded just one face..
Foto0316.jpg


and the job done
Foto0317.jpg
 
now images of the coupler

i first draw the shape of the rail and draw it again in the coupler...
with the dremel i then cut it
Foto0259.jpg


Foto0260.jpg


Foto0292.jpg


with the coupler ready took measures to place the notch in the "neck" tube..
the 3 things are made by styrene tube, set in place with cyano and then filled with resin to increase strenght.. i'm planning to change material with something more resistent but is not very necessary
Foto0263.jpg


and the coupler slides perfectly...
Foto0265.jpg


tomorrow more photos...
 
It's interesting to see the details of a huge build that's more than just an 'upscale' of typical mid- or small-high power techniques. Great post!
 
all composites are arrived!!! glass and carbon, 10kg of resin and other stuff :D:D

next days i will work on the fins

but now, i drew some new details in shoulder section of the bottle
things like altimeter and pyro-release..

take a look, it's been funny to add details to the altimeter...
from now, in my next projects i can add it in seconds!!

Ebay.jpg


Ebay%20side.jpg


Pyro.jpg


stay tuned!!!:dark:
 
Typico: you are really kicking with this build!

Do you plan to internally reinforce the L-shaped notch? I'm afraid the brittle phenolic could not handle it in the long term... just add a square of glass or a thin ply layer.

I see you got into vacuum bagging, how is it? is it user-friendly or not? does it require a big workshop or things like that?

I've always been interested in it but never got the nuts to start!

About canted motor mount tubes: ask in here!

thanks, thanks, thanks, to all!!!!:):)

for you Box, yes the coupler would be reinforced... i'm posting the photos right now...

the vacuum is an easy tecnique, i done it with few spare parts laying in my workshop, tubes are regular 5mm air lines and the T deviations are garden irrigation parts
bags are common thick plastic bags, i use it at work and the cost is nearly zero.. i heard about bags that costs 6€ :eyepop: useless for my user-friendly approach to it

the pump is a common fridge motor, works well but the force is low, I tryed to connect 3 bags but the resulting downpressure were to low and I then done just 2 fins at time

obviously things can be maked better but for a fast and cheap start it don't really need mote than this!!!!!!

space depends on what are you building, it need no more than the space of the piece, the pump is not so big and tubes can be handled easily

for better results there are lots of things you can buy, this was my first try and i'm happy of the results!!!

:p
 
to make the coupler stronger and ensure it a long work life, I added a core-layer of depron-like material, 8mm thick... internally there would be 3 layers of 160gr/m glass.

to do this I firs cut the styrofoam and i had to gave it a round(more or less) shape
Foto0295.jpg


then i trimmed it to precise measure by several trying...

Foto0297.jpg


when got the right measure i started to resin the internal of the coupler and pushed the foam in place..


to keep the shape of the loose edges i then thinked to slide the coupler in a piece of tube....

and to extract it easily once resin has cured i wrapped a piece of plastic bag outside the coupler.

Foto0298.jpg


Foto0302.jpg


this is the piece once extracted
Foto0307.jpg


at this point i had to mill the notch a little...

Foto0312.jpg


now it's more stronger than before and with glass it's strenght would increase incredibly
 
Last edited:
hi..

the entire thing is slowing down cause of tendon inflammation(hope it's correct) on one hand
the pain is low but overstress it is not good...

few days of relax and i'll be back with tons of photos!!!!

i'm drawing and changing stuff on the 3d model for the moment

i'm drawing also the canted motors tubes and i have a doubt, pointing them forward the CG can be dangerous???

the central motor burns for less than boosters do and the balance point it's too near the bottom to angle the motors on it....

i knew canted motors were to be pointed between CG and CP but what happends if force is applyed forward the CG??
i kinda think no big problems can happend cause rocket is moving when boosters fires and also the distance from CG and where the tubes will poin is not that far...
a little rotation can happend but those HUGE fins may handle it...
also there must be a misfire to get the problem otherwise nothing change in flight path...

is it completly wrong???

bye!!!


Most people don't cant their motor tubes at all. As long as your rocket has a high pitch moment of inertia, you should be fine, especially since you're already moving.

Canting your motors at all towards the CG away from vertical will reduce the lever arm, and thereby the tendency of the rocket to pitch should a motor misfire.
 
here again with more photos

in these days i couldn't wait fot the pain at the hand so i continued doing stuff over stuff...

i also changed something on the drawings couse there were errors...

so let's start with the sdescription
my plot-man it's too slow so i had to do all the work by me... I joined thousands of sheets of paper for the bigger rings!!!
Foto0324.jpg


and every piece took place in wood sheet
Foto0325.jpg


i then write on every piece it's code...
Foto0327.jpg


a little printout of the wole project is helpfull when pieces are that much...
Foto0329.jpg


the art of borrow :)
Foto0331.jpg


every piece it's now ready to "wear it's drawing"
Foto0330.jpg


Foto0332.jpg


i don't use glue, so all the drawings are held in place by the masking tape.. this mean that i have to start to cut from inside of the piece :rolleyes:
Foto0337.jpg


and once the hole it's cut, i just start with the external lines
this it the contour of the cap, this precise cut mean 20 minutes or so of work
Foto0333.jpg


Foto0334.jpg


Foto0335.jpg


i'm very satisfyed of this cut!!!!!:roll::roll:

pieces must be cut precisely to ensure a perfect fit of all the parts...
Foto0339.jpg


some other details
Foto0344.jpg


those are parts of the shoulder of the bottle
Foto0346.jpg


if cut is precise, the sanding phase it's shorter than a breath... ehehe
Foto0348.jpg


and a big ring, notice all the changes to the drawing...
Foto0345.jpg
 
with all the pieces cut, i started to dry-fit everithing
every piece fit it's place... this is very satisfying!!:cool:

photos talks better!
Foto0355.jpg


Foto0364.jpg


Foto0365.jpg
 
cause a rocket it's not just centering rings, i had to cut also tubes...

this are the canted boosters, everyting it's be drawn with rhinoceros ad then, with the proper command, i printed the exterior of the tubes

this helps alot to find the right cut angle... doing this job without the help of a pc it's impossible i think... the result is perfect

but let's see something
Foto0371.jpg


Foto0372.jpg


i started by wrapping the printout around the tubes and fixing is with masking tape..

after this, with the help of a sharp blade, i cut out the unwanted portions of paper
Foto0374.jpg


Foto0369.jpg


to cut the tubes i usually use dremel with normal cut disks..
at the end i tryed the fit... absolutly perfect, i didn't expected a job like this!!!

Foto0376.jpg


today's photos are about construction.. i started to glue the neck and it's ready to be laminated!!!
 
firsts pieces together!!

i started with the neck because this part is the easyest and also it don't need anithing else inside

i glued rings and roads, to glue the lower level of roads in precise way i drawn allignement guides onto the upper ring.. then some cyano and job it's done!

Foto0378.jpg


Foto0377.jpg


Foto0379.jpg


i also glued the bolts of the 3 shelfs inside the neck, and after this i covered everithing with a sort of cardboard... it's very light and flexible
nothing is structural.. just first and last rings, all the job is done by glass cloth.

Foto0384.jpg


Foto0386.jpg


Foto0387.jpg


here are photos of the shoulder section, i lightly glued pieces, it's just for shape and not structural.. you can also see the ebay
it's just a try for the moment, i'm drawing it with program to check for space
Foto0388.jpg


Foto0389.jpg


and this is the ejction charge holder... there is a tube and 3 rings under the foam.. i use it to place ejection charges upper the chute without wires lying around

Foto0385.jpg


enough for today...
 
I don't know how to express how beautiful that work is. You, sir, are quite the craftsman!
Reed
 
Do they still have "Shop Class" in high school anymore, or just encounter groups? I think they all fired the shop teachers and hired p-sycologists.
 
In my high school you could take a class and travel to another high school and learn how to fix cars. That's as good as it got, though. I wish we had had a woodworking class, as I would have jumped on that in a second.
Reed
 
are you asking me about the shop class??

i did not got the meaning, my english i very poor....
if i got it, this is not a group work, just me and my patience :p

now i will post some new photos!!! work is going fast, most of the time i have dirt and resin on my hands and i can't make photos... so please understand if there are not many photos....
 
Last edited:
here we are.. firsts assembly are done, all the portions are glued
there are 6 different assembly to work on

-Fins
-Body
-Shoulder
-Neck
-Couplers
-Cap

for the moment the neck is the nearest to be finished

the coupler section is been redrew to better work on wirings in the future

fins are coming, the first is ready, it's hard like rock, no way to flex it in any direction
there are 2 layers of 160gr/sqr mt glass, a stripe of 200gr/sqr mt carbon between the layers above and another ply of 80gr/sqr mt glass for a better finish

in the images there is also the ebay, i glued it in place this morning..

and the canted mmt ready for a glass cloth

Foto0390.jpg


Foto0391.jpg


Foto0392.jpg


Foto0393.jpg


Foto0396.jpg


Foto0398.jpg


Foto0399.jpg


Foto0400.jpg


Foto0402.jpg


Foto0404.jpg


Foto0405.jpg


Foto0406.jpg
 
We were wondering were and how you learned to be so skilled.

Wood craft is not taught in schools in the US any longer.
 
We were wondering were and how you learned to be so skilled.

Wood craft is not taught in schools in the US any longer.

I know this all too well. As a woodworker this breaks my heart.

Does anybody realize that woodworking is THE number two hobby in this country. The only hobby that beats it is gardening.

Of course degrees of expertise vary a great deal.

I guess if you mow your lawn you can be considered a "gardener" and if you've built a birdhouse you're a "woodworker".

OK, back to the flying beer bottle.

Very nice work too!
 
We were wondering were and how you learned to be so skilled.

Wood craft is not taught in schools in the US any longer.

ahahah, no school or course of anything, just trying :)

the biggest advantage i take is to look at others jobs, for example, gboxwood is my point of reference.. most of the thing i do cames from he's posts
so if i have to do something difficult i first study how others do it!!

obviously you need good hands and eye.. otherwise success is not what you get :rolleyes: :rolleyes:

the firs piece of anything i do, it's always the worse, everything cames next, i know how to do it good!!

tomorrow the continue of the post... (maybe)
 
A few things dear friend:

1. wonderful!

2. great job!

3. well done!

4. what the heck of a workshop! it's huge!

5. pretty clean cuts on those rings, they turned out great!

6. don't leave the print shop without the prints!

7. aahhh those canted tubes, I'd rather skip on them! the project will be already expensive to fly, are you really sure you want a 5 motor cluster with 4 K250???

8. you're flattering me!

Keep up the good work!!!
 
Back
Top