Neutronium95
Well-Known Member
- Joined
- Jan 17, 2010
- Messages
- 1,075
- Reaction score
- 1,563
For most impulse classes, there's only one motor at a time that is really optimal. When the H13 was announced, a few quick and dirty sims showed that it was capable of achieving significantly greater altitudes than the H160 that @Adrian A used to set the then current record, despite giving up about 100Ns of impulse.
Some preliminary sims said that 17,000 feet might be possible, but I wasn't sure.
At LDRS last year, my friend Bryan Krause flew a submin H13 to almost 15,000 feet. I'm not sure exactly why, but he didn't get the official record.
A few months later, at Ur Nuts, @flyguy614 set an official record of 15,257 feet. His rocket was a quick build a few days before, and it took a turn out of the tower, so I knew there was easily some room for improvement.
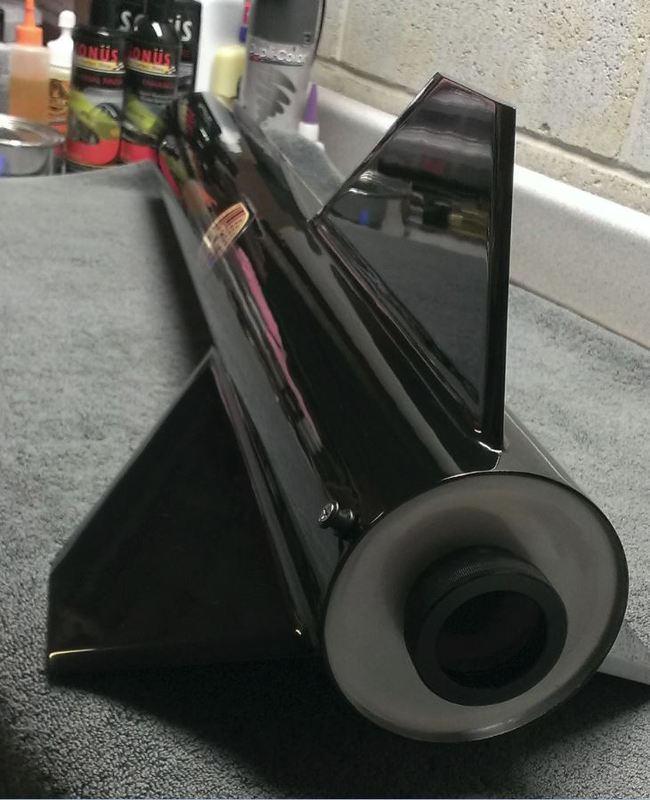
When I was at the December ROC launch, I impulse bought a no thrust ring H13 from AMW and started working on a design. The basic concept was very simple; glue fins directly to the motor case, glue the avbay to the top of the motor, have the nosecone fit over that, and stuff the parachute into the nosecone. Deploying the main at apogee would mean a long walk, but you sometimes have to sacrifice things on the altar of performance.
I initially tried to lay up a fiberglass nosecone on a 3D printed plug, but ran into difficulty with removing it. I know that the problems I encountered are solvable, but I was on a tight deadline, since I wanted to launch at the January TRAPHX launch. So I decided to simplify things and just 3D print the nosecone. It would be more fragile than fiberglass, but I was confident that it would work on the way up, and needed a quick solution.
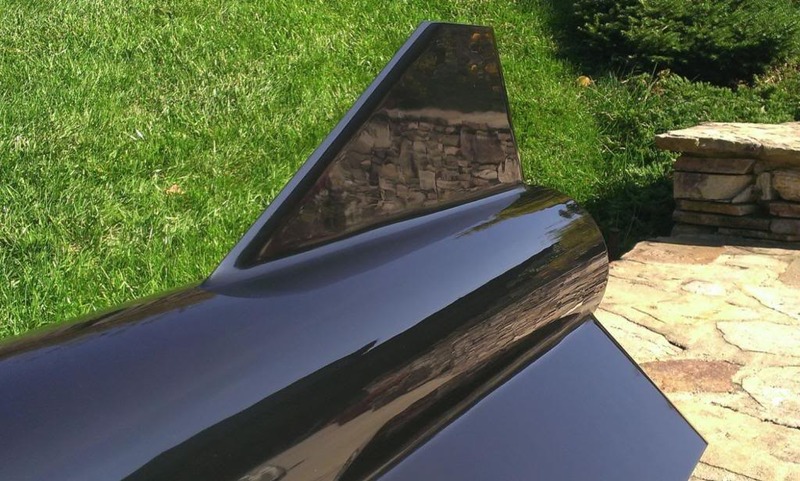
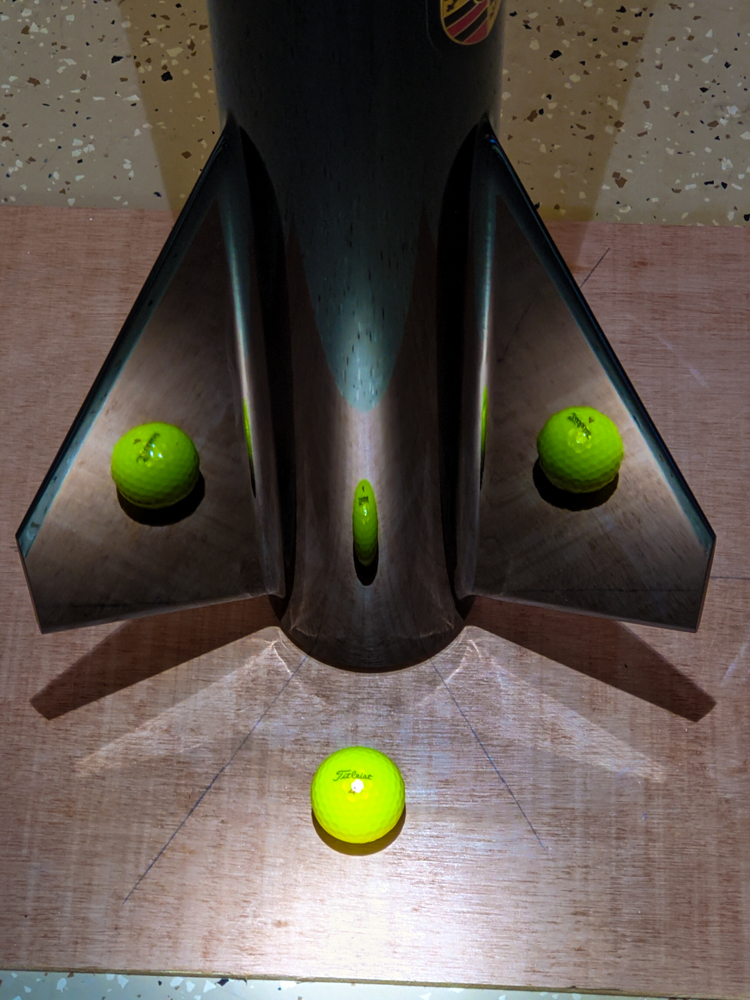
I decided to add a tailcone to help reduce drag. Tailcones typically reduce stability by reducing base drag, but you can claw a lot of that back by moving the fins back onto the tailcone. To get the fins cut out with the right root edge contour to conform to the tailcone, I opted to have @REK cut them out of a piece of 1mm carbon fiber plate on a CNC router. They came out great. The 6" square of material yielded enough material for 3 sets of fins. I did a quick and dirty bevel on the fins with a simple jig, two rulers clamped half an inch apart. I also printed a very chunky fin alignment jig. It worked great, and I wish that style would scale up better.


I tacked and filleted the fins on with JB Weld. I used a 3/8" PTFE ball on a piece of threaded rod to shape the fillets. There were a few ugly spots that probably could have been avoided, but it was late at night and I was tired when I did the fillets. I also found that 6mm Tamiya masking tape worked great for taping off the fillets on this small rocket.
The electronics onboard were an Altus Metrum EasyMini, and a LL Electronics XLF-6v rdf beacon. The Easymini was mounted between two bulkheads, and the battery and magnetic switch were slid in between the threaded rods, and in flight were further secured with a few wraps of electrical tape around the whole assembly. The bottom bulkhead was a thick 3D printed part, with cutouts to allow the Easymini to be seated into it. The 2-56 threaded rods were screwed into captive nuts in the bulkhead. I think that the pause to install the nuts mid print caused a ridge to form on the cutout for the EasyMini, so it ended up being a press fit. I also had to shave down the speaker on the EasyMini, and grind off about an eighth of an inch on the Featherweight magnetic switch in order to make that part fit. I also charged the battery, and then snipped the connector off and soldered it directly to the switch to remove the unneeded volume of wires and connectors. In hindsight, a 24mm Raven avbay would have made this whole assembly much less of a headache, at the cost of maybe a quarter inch extra length. Unfortunately I had given away my Raven and they weren't available.


For recovery, I initially planned on using a 9" thin mill parachute from Top Fight Recovery, but eventually pivoted to a 12" Heavy Duty mylar parachute from ASP to save volume. I chose the Heavy Duty version because H13 rockets can arc over a lot during boost, leading to a very high horizontal velocity at apogee.
To try to combat the arcing over and get a straighter boost than previous H13 flights, I decided to build a 10 foot tall tower to get a higher tower exit velocity and hopefully a straighter boost. I figured out a design using 3/4" electrical conduit and some laser cut steel plates from Send Cut Send. Unfortunately, Fedex turned the 2 day shipping into 9 day shipping, so I had to scramble and 3D print replacements for the plates at the last minute, and discovered that for some reason the tower bound up on the rocket in the 10 foot configuration. Fortunately the 5 foot version worked, so I just went with that.

I was in a massive time crunch, so the only finishing work I had time for was sanding the majority of the layer lines off of the nosecone, and then spraying a few coats of clear coat on the rocket they day I drove out to the launch. I also gave it a quick sanding with some 1200 grit right before the launch, but I don't think that did much. It still looked pretty good.

At the launch, I met up with Bryan Krause, Tom (@T34zac ), and Duncan (@cyborg ). Bryan had an absolutely gorgeous H13 min diameter rocket, with an absolutely immaculate finish; and Tom and Duncan provided a ton of help with recovery. Bryan and I decided to drag race our H13 rockets, and they both took off pretty straight. From there the adventure started, but after 5 hours, a failed two stage launch, climbing halfway up a mountain, and 20 minutes of walking in circles we found the rocket. Unfortunately the nosecone broke in half at one of the layer lines, so it won't be eligible for the official Tripoli H altitude record.
Brian's H rocket is the purple one in the back.

Liftoff and recovery pics, mine is the one on the left, I won the drag race:


The final flight altitude was 17755 feet. The Easymini summary says 17770 feet, but that looks like an anomaly from deployment.

I have some ideas on how to improve the overall design. First, a better surface finish will probably help a lot. Those take time and attention to detail, so that'll be a bit of a challenge for me. I also need a stronger nosecone. I'm not sure if I need to go to fiberglass, or if I'll be able to fix it by changing print filament, settings, and part orientation. Also take the time to ground test, there's a possibility that the nosecone was broken by the ejection charge, and I erred on slightly too big since I didn't have time to do a ground test, and was concerned about breaking the nosecone during an ejection test. Finally, an Altus Metrum Telemini would both save space in the avbay, making that much easier, and eliminate the shock cord mounted tracker, giving back a lot of volume in the nosecone. I don't know if I'll be able to make it out, but NSL is looking very tempting with a 7600 foot ASL launch site and a 52,000 foot waiver. I've also heard that @AeroTech is developing a longer version of the H13. Putting all that together, I think that it might be possible to get the H record above 20k feet.
EasyMini data file is attached.
Some preliminary sims said that 17,000 feet might be possible, but I wasn't sure.
At LDRS last year, my friend Bryan Krause flew a submin H13 to almost 15,000 feet. I'm not sure exactly why, but he didn't get the official record.
A few months later, at Ur Nuts, @flyguy614 set an official record of 15,257 feet. His rocket was a quick build a few days before, and it took a turn out of the tower, so I knew there was easily some room for improvement.
When I was at the December ROC launch, I impulse bought a no thrust ring H13 from AMW and started working on a design. The basic concept was very simple; glue fins directly to the motor case, glue the avbay to the top of the motor, have the nosecone fit over that, and stuff the parachute into the nosecone. Deploying the main at apogee would mean a long walk, but you sometimes have to sacrifice things on the altar of performance.
I initially tried to lay up a fiberglass nosecone on a 3D printed plug, but ran into difficulty with removing it. I know that the problems I encountered are solvable, but I was on a tight deadline, since I wanted to launch at the January TRAPHX launch. So I decided to simplify things and just 3D print the nosecone. It would be more fragile than fiberglass, but I was confident that it would work on the way up, and needed a quick solution.
I decided to add a tailcone to help reduce drag. Tailcones typically reduce stability by reducing base drag, but you can claw a lot of that back by moving the fins back onto the tailcone. To get the fins cut out with the right root edge contour to conform to the tailcone, I opted to have @REK cut them out of a piece of 1mm carbon fiber plate on a CNC router. They came out great. The 6" square of material yielded enough material for 3 sets of fins. I did a quick and dirty bevel on the fins with a simple jig, two rulers clamped half an inch apart. I also printed a very chunky fin alignment jig. It worked great, and I wish that style would scale up better.
I tacked and filleted the fins on with JB Weld. I used a 3/8" PTFE ball on a piece of threaded rod to shape the fillets. There were a few ugly spots that probably could have been avoided, but it was late at night and I was tired when I did the fillets. I also found that 6mm Tamiya masking tape worked great for taping off the fillets on this small rocket.
The electronics onboard were an Altus Metrum EasyMini, and a LL Electronics XLF-6v rdf beacon. The Easymini was mounted between two bulkheads, and the battery and magnetic switch were slid in between the threaded rods, and in flight were further secured with a few wraps of electrical tape around the whole assembly. The bottom bulkhead was a thick 3D printed part, with cutouts to allow the Easymini to be seated into it. The 2-56 threaded rods were screwed into captive nuts in the bulkhead. I think that the pause to install the nuts mid print caused a ridge to form on the cutout for the EasyMini, so it ended up being a press fit. I also had to shave down the speaker on the EasyMini, and grind off about an eighth of an inch on the Featherweight magnetic switch in order to make that part fit. I also charged the battery, and then snipped the connector off and soldered it directly to the switch to remove the unneeded volume of wires and connectors. In hindsight, a 24mm Raven avbay would have made this whole assembly much less of a headache, at the cost of maybe a quarter inch extra length. Unfortunately I had given away my Raven and they weren't available.
For recovery, I initially planned on using a 9" thin mill parachute from Top Fight Recovery, but eventually pivoted to a 12" Heavy Duty mylar parachute from ASP to save volume. I chose the Heavy Duty version because H13 rockets can arc over a lot during boost, leading to a very high horizontal velocity at apogee.
To try to combat the arcing over and get a straighter boost than previous H13 flights, I decided to build a 10 foot tall tower to get a higher tower exit velocity and hopefully a straighter boost. I figured out a design using 3/4" electrical conduit and some laser cut steel plates from Send Cut Send. Unfortunately, Fedex turned the 2 day shipping into 9 day shipping, so I had to scramble and 3D print replacements for the plates at the last minute, and discovered that for some reason the tower bound up on the rocket in the 10 foot configuration. Fortunately the 5 foot version worked, so I just went with that.
I was in a massive time crunch, so the only finishing work I had time for was sanding the majority of the layer lines off of the nosecone, and then spraying a few coats of clear coat on the rocket they day I drove out to the launch. I also gave it a quick sanding with some 1200 grit right before the launch, but I don't think that did much. It still looked pretty good.
At the launch, I met up with Bryan Krause, Tom (@T34zac ), and Duncan (@cyborg ). Bryan had an absolutely gorgeous H13 min diameter rocket, with an absolutely immaculate finish; and Tom and Duncan provided a ton of help with recovery. Bryan and I decided to drag race our H13 rockets, and they both took off pretty straight. From there the adventure started, but after 5 hours, a failed two stage launch, climbing halfway up a mountain, and 20 minutes of walking in circles we found the rocket. Unfortunately the nosecone broke in half at one of the layer lines, so it won't be eligible for the official Tripoli H altitude record.
Brian's H rocket is the purple one in the back.
Liftoff and recovery pics, mine is the one on the left, I won the drag race:
The final flight altitude was 17755 feet. The Easymini summary says 17770 feet, but that looks like an anomaly from deployment.
I have some ideas on how to improve the overall design. First, a better surface finish will probably help a lot. Those take time and attention to detail, so that'll be a bit of a challenge for me. I also need a stronger nosecone. I'm not sure if I need to go to fiberglass, or if I'll be able to fix it by changing print filament, settings, and part orientation. Also take the time to ground test, there's a possibility that the nosecone was broken by the ejection charge, and I erred on slightly too big since I didn't have time to do a ground test, and was concerned about breaking the nosecone during an ejection test. Finally, an Altus Metrum Telemini would both save space in the avbay, making that much easier, and eliminate the shock cord mounted tracker, giving back a lot of volume in the nosecone. I don't know if I'll be able to make it out, but NSL is looking very tempting with a 7600 foot ASL launch site and a 52,000 foot waiver. I've also heard that @AeroTech is developing a longer version of the H13. Putting all that together, I think that it might be possible to get the H record above 20k feet.
EasyMini data file is attached.
Attachments
Last edited: