First HPR Build - Wildman Punisher 3

The Rocketry Forum

Help Support The Rocketry Forum:

This site may earn a commission from merchant affiliate links, including eBay, Amazon, and others.
You look to be on a good course for the build. I would suggest not getting too bogged down in making everything too precise or optimal...

Thank you for the response and the counsel. :)

The switch band not only transfers the the thrust load at lift off, it also transfers the drogue charge separation pressure away from your upper shear pins.

With HED deploy the switch is the way to go, convention DD with a riveted or bolted upper then it is not needed

Yup... I "see" it now. The switch band transfers the thrust across the the seems from the booster tube to the NC, and since the avbay/coupler is bonded to it, the band transfers the reactive load from the avbay/coupler wanting to stay put on launch and thus removing the thrust load from the shear pins. Yup... and again at drogue sep.... prevents transfer of reactive force of ejection charge from transferring to the NC pins.... Yep, as I said, I don't know how I missed it.

Definitely using the band now... :)
 
Thank you for the response and the counsel. :)


Yup... I "see" it now. The switch band transfers the thrust across the the seems from the booster tube to the NC, and since the avbay/coupler is bonded to it, the band transfers the reactive load from the avbay/coupler wanting to stay put on launch and thus removing the thrust load from the shear pins. Yup... and again at drogue sep.... prevents transfer of reactive force of ejection charge from transferring to the NC pins.... Yep, as I said, I don't know how I missed it.

Definitely using the band now... :)
It’s good that you are exploring different ways to skin the cat, that’s how things improve across the hobby for all of us, but sometimes the old tried and true ways are still the best. Good luck with your build and your flight, I am sure you will be successful at both
 
It’s good that you are exploring different ways to skin the cat, that’s how things improve across the hobby for all of us, but sometimes the old tried and true ways are still the best. Good luck with your build and your flight, I am sure you will be successful at both
I'd agree. Usually if I'm learning something or building some new-to- me kit, I default to following the instructions or doing what others normally do. I feel the more you stray from the usual, the more uncertainties and chances for things to go wrong (this is coming from someone who loves doing unusual designs). HP can be less forgiving when things go wrong.

After I've done things the usual way, I'll often then try other methods, but always with safety in mind.

You've chosen a great first hp kit...you're going to have a blast with it!
 
About measuring black powder, I gave up on using a scale years ago, tough with small measurements in the field. I use medicine measuring spoons Measuring Spoons Medicine I still have a .1 gram scale but stopped using it.

The specific gravity is almost exactly 1 for 4F black powder (1cc = 1 gram) plus I dont try and doing anything more accurate than .25 gram increments. If I calculate say 1.6 grams, I would just measure out 1 .75 cc in the spoon. Works well for pouring the charge into whatever you are using to hold it.

I gave an amazon link but they have these at most drug stores.

Mike K
 
Last edited by a moderator:
I don't use grams or weight to measure my BP charges. I've got hundreds of the 2cc vials AT ships ejection charges in. I load 5 - 10 each with 1, 1.25, 1.5, 1.75, and 2cc and throw them in my range box. Bulk powder stays stored at home. Each of my av-bays have written on the coupler tube, how many cc of BP is needed for that end of the av-bay for that rocket as determined by ground tests and flight adjustments. I just grab the vials that add up to the right amount of BP needed and load the charge cups. No measuring needed at the field.
 
About measuring black powder, I gave up on using a scale years ago, tough with small measurements in the field. I use medicine measuring spoons Measuring Spoons Medicine I still have a .1 gram scale but stopped using it.

The specific gravity is almost exactly 1 for 4F black powder (1cc = 1 gram) plus I dont try and doing anything more accurate than .25 gram increments. If I calculate say 1.6 grams, I would just measure out 1 .75 cc in the spoon. Works well for pouring the charge into whatever you are using to hold it.

I gave an amazon link but they have these at most drug stores.

Mike K

I've been meaning to switch over to measuring by volume. My Half Cat Rocketry cable cutters came with some small 3D printed scoops that make getting the correct amount of powder a breeze, just scoop and shake level. Someday I'll print some scoops that match my commonly used charge sizes.
 
Last edited by a moderator:
About measuring black powder, I gave up on using a scale years ago, tough with small measurements in the field. I use medicine measuring spoons Measuring Spoons Medicine I still have a .1 gram scale but stopped using it.

The specific gravity is almost exactly 1 for 4F black powder (1cc = 1 gram) plus I dont try and doing anything more accurate than .25 gram increments. If I calculate say 1.6 grams, I would just measure out 1 .75 cc in the spoon. Works well for pouring the charge into whatever you are using to hold it.

I gave an amazon link but they have these at most drug stores.

Mike K
These are great to use to measure black powder.
 
I don't use grams or weight to measure my BP charges. I've got hundreds of the 2cc vials AT ships ejection charges in. I load 5 - 10 each with 1, 1.25, 1.5, 1.75, and 2cc and throw them in my range box. Bulk powder stays stored at home. Each of my av-bays have written on the coupler tube, how many cc of BP is needed for that end of the av-bay for that rocket as determined by ground tests and flight adjustments. I just grab the vials that add up to the right amount of BP needed and load the charge cups. No measuring needed at the field.
That is what I do. Pre-measure the BP and put them into vials.
I fly smaller DD rockets so do 0.4, 0.6, 0.8 & 1.2 gram vials so no measuring at the field.
 
I use measuring spoons for dash, pinch, and smidgeon. They work our to almost 0.25, 0.5, and 1 gram. I believe I got them at Walmart for $2.
 
That is what I do. Pre-measure the BP and put them into vials.
I fly smaller DD rockets so do 0.4, 0.6, 0.8 & 1.2 gram vials so no measuring at the field.
Most of mine are HPR DD so 0.25 steps works great for me. Actually, if I need over one 2cc vial, I usually go by 0.5 cc (1/4 vial) increments. No reason to measure finer than that since the packing and taping of the charge wells aren't consistent enough to make that worth while.
 
Centering Rings - Vents and Notches - #2
(Drilling & Completion)

2022-12-05 15.09.22.jpg2022-12-05 15.15.18.jpg

2022-12-05 15.21.34.jpg2022-12-05 15.25.38.jpg

2022-12-05 15.27.57.jpg2022-12-05 15.30.19.jpg

2022-12-05 15.45.36.jpg2022-12-05 15.47.28.jpg


Vents are aligned to each other and are out of the way of creating internal fin and ring fillets.
Front ring notches oppose each other by 180 degrees and are located outside the fin/fillet zone.
 
Last edited:
Made a "rat-killin" run today... (aka: doing chores/running errands for you all non-Southerners.)

** Purchased materials to make special tools to make additional techniques possible.
  1. Making internal sanding tool x 2; One is FLEXIBLE with a 2.75" closed-cell foam mandrel on a PVC handle.
  2. The other tool is made from PVC and is 2.75" OD, rigid. Between the 2, I should be able to sand internally with consistent and FAST results.
  3. Sandpaper bonds to sanding mandrels with 3M 77 spray.
  4. Constructed a tool that will allow me to do internal fillets through the rear that should deposit exactly what I want in precisely the spot I want... with good delivery control regardless of viscosity.
  5. Figured out how to use a 2" PVC coupler to back/buck the air frame internal wall when drilling holes through air frame.... Coupler goes in.... wedges go in from either end and cross under the coupler to wedge it true and secure against the reverse sides of the through holes.
  6. Got some fresh wide and narrow 3M "Sharp Line" Blue masking tape for the external fillets.
  7. Making a tool to pull external fillets that won't be "wonky" if you don't keep the pull tool at a constant angle.
** Got my latest hardware in from McMaster-Carr.... mostly av-bay stuff, but some bench stock and tools.
** Made a "run-through" of the construction notes I drafted yesterday to proof them, add and refine steps.

Should be ready to ACTUALLY build tomorrow.

Pictures coming... :cool:
 
Last edited:
Filleting Tool - IF it works like I think it will, and after I get the production process settled, I may well put together a SET of fillet pull tools in a range of radii from say 1/4" - 1" by eighths?

Perhaps a master set with as many different radii as I can stuff in the range... Gotta buy bags of the materials anyway. Just need to design/build the tooling/jigs to make it fast and consistent from tool to tool.

20221207_143430[1].jpg20221207_143459[1].jpg
Left: 3-piece set of 4-40 taps, pen vise with drill bit for 4-40, filleting tool.

Right: Pulling a fillet against my space bar. Using a sphere means that it will pull the same regardless of the angle to hold it (assuming you keep the 4-40 threaded rod out of the adhesive.


20221207_144255[1].jpg

I can make a bunch more of them. Just need a drill jig so I can run them through the drill press to drill AND tap them faster.
 
Last edited:
Internal Air Frame Sanding Tool - 3" air frame vs. big hands.... To get a complete and consistent sanding of the inside of the air frame requires a TOOL!

2022-12-07 17.54.30.jpg2022-12-07 17.55.59.jpg
LEFT: Just a few PVC parts. But add some 3MM 77 Spray adhesive and top-quality 3M wet/dry 220 paper and you get the tool at RIGHT. It's not glued yet, so I can use a handle longer than 24" if I want/need to do so. The sandpaper rolls right up on the coupler, sticks, stays put, and the bushing needed no modification beyond truing it up with a sanding block with 220 grit wet/dry. There was some molding flash and plastic sag just back from the edges. Got that cleaned up.

2022-12-07 17.56.46.jpg2022-12-07 17.56.53.jpg
LEFT: The OD of the 2" coupler is just under 2.75" or so. Undersized for the 3" frame. But as long as you are paying attention, it works marvelously. RIGHT: I only put a 24" handle on it for now, and the Punisher 3 is pretty short.I can reach all I NEED to reach from the back. But I CAN also sand for the forward Rail Button PEM nut from fwd end of the tube.

Very happy with this tool!
 
Drilling Backer, PVC cylindrical, 2.92" OD, sacrificial - Fiber wound fiberglass tubing blows out badly if you do not take measures to mitigate the damage.
I am using a backer made from PVC Pipe 2-1/2 in. x 20 ft. SDR-21 (CL 200). Finding PVC in 2-1/2" is tough, but I happened to have a 20' stick for pneumatic antenna launcher barrels.

It came out NICE! And works REALLY well!

2022-12-07 18.49.18.jpg2022-12-07 18.48.01.jpg
LEFT: A 3" long (nominal) piece of "PVC Pipe 2-1/2 in. x 20 ft. SDR-21 (CL 200) Bell End". PVC in 2-1/2" is tough to find and expensive, but I had a 20' stick on-hand to make barrels for pneumatic antenna launchers. RIGHT: Backer is inserted into the air frame under/centered where I need to drill the rear rail button PEM hole. Not that there is NO daylight anywhere near the center of the proposed hole.

2022-12-07 18.48.09.jpg

Backer is held FIRMLY in place by using to small pieces of wooden dowel rod opposing the drilling side. Works fantastic! Need to refine the shims a bit.... I think I will use a TWO each, 36-48" dowel rods of the right diameter, and put them in from opposing ends of the backer to make sure it is tight and square with the air frame center line. When it gets "too many" holes drilled in it, I will just replace it with a new piece.

Couple more tools to go....
 
Flexible Head Cylindrical Sanding Tool - Sometimes you MIGHT want/need a sanding tool with a FLEXIBLE and slightly conforming head.

2022-12-07 19.37.58.jpg2022-12-07 19.38.18.jpg

LEFT: Pipe insulation is 1" nominal pipe size with a 1/2" wall. It is about 2.4" OD when the paper is installed. Pipe insulation is glued to the 1" SCH 40 PVC tube (24" also) with 3M 77 Adhesive Spray. RIGHT: I didn't custom cut the 220 wet/dry sheet to size, so I just bent the extra over and under a bit to keep it off the material. As long as you keep the handle parallel to the air frame center line, You will be sanding on the flat side of the cylinder in full lengthwise contact with the tube.

One more tool to make and I will officially be out of excuses NOT to build. :cool:

NOTE: IF I can find some way to mount this 2-1/2" line pipe section on a handle, I'll use the larger 2.92" OD as the internal sanding tool for the majority of the work.
 
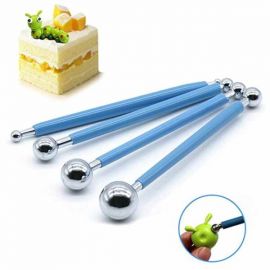
fondant ball set
FCFfuVO.jpg
 
fondant ball set
FCFfuVO.jpg

Mine aren't that pretty anymore, I have used them a lot. I find that I primarily use both ends of the second largest one, don't use the smaller two at all, and the largest one for large rockets or when the fillet needs to be large.

My pusher/puller for internal fillets is 2' dowel with an 18mm motor case on one end. It used to be 3 feet with a 24mm on the other end.
 
While I cannot possibly make cheap Chinese tools as cheaply as the Chinese, I will still be making my own.
I prefer the Delrin (acetal) over stainless steel for the ball ends. I think the acetal sheds the adhesive better and makes a smoother pull. And I can get them in so many more diameters/radii. I'll have to do some testing I'm sure. Not a big fan of the large diameter handle either.... or the silicone sleeve.

I "get" cheap.... but I prefer to have a tool that "fits" me. I'm not just using these on the fins.

I THOUGHT that I would NOT like the "all-thread" as a handle, but I find that the threads provide grip and are not uncomfortable. And I THOUGHT the small 4-40 diameter would bother me. It does not. I actually think having the smaller diameter and less interruption on the back end of the sphere is "better". I have a lot more visibility. This will come in handy for internal fillets with a reach. Also less chance that I will get material around the ball and onto the handle. And I can just dump them into pretty much whatever solvent concoction I want for cleanup.

Currently using an aluminum 4-40 because that's what I ordered for something else and I had it around spare. With use, I thing I will prefer the 4-40 over larger, BUT the aluminum is just a tad flexible for a pull where you need to "reach" very far. I will likely change the handle material to something else.... ideally 316 or 304L stainless, but not likely due to cost.

FYI - I am a student of the tools and process of creating. I often get greater enjoyment from the production than I do the product. :)
 
How much sanding do you need to do on the inside of the airframe? Normally you'd just expect to scuff up the area around the fin fillets and centering rings plus maybe a bit to get parts to fit. Usually it's easier to sand the OD of anything that doesn't fit inside though.
 
How much sanding do you need to do on the inside of the airframe? Normally you'd just expect to scuff up the area around the fin fillets and centering rings plus maybe a bit to get parts to fit. Usually it's easier to sand the OD of anything that doesn't fit inside though.

So far?

# A ring inside the location of the fwd CR to catch the ring and provide a good fillet bonding area fwd & aft of the CR.
# Same thing for the rear CR...
# Both fwd and aft rail button locations for the PEM nut contacts and fillets
# Inside the avbay for all the PEMs I'm using as backers/sheer plates for the pins.

IMO, it's not really a matter of the amount of sanding required, but doing so in a manner that provides a consistent result to encourage the best bond possible. I'm shooting for the smallest bond volumes that provide the required strength in the bond's location and purpose.
I don't think that is really possible 10+ inches inside a 3" tube without a proper tool.... Not for me anyway. ;)

I make these tools once and I have them for the next air frame. :)
I am making the internal fin fillets on this one more like the web of an i-beam, than an angled "fillet". It takes more time on a 3FC can because you have to cure them with the fins "flat". Same as if I used dams on the sides of the fins and filled on both sides.... but I don't need the dams and get a better bond to the air frame. Should be a really solid connection between the MT and air frame, and what better piece to do it than the fins we are trying to keep attached. :)

At least that was my thought process... 😅
 
So far?

# A ring inside the location of the fwd CR to catch the ring and provide a good fillet bonding area fwd & aft of the CR.
# Same thing for the rear CR...
# Both fwd and aft rail button locations for the PEM nut contacts and fillets
# Inside the avbay for all the PEMs I'm using as backers/sheer plates for the pins.

IMO, it's not really a matter of the amount of sanding required, but doing so in a manner that provides a consistent result to encourage the best bond possible. I'm shooting for the smallest bond volumes that provide the required strength in the bond's location and purpose.
I don't think that is really possible 10+ inches inside a 3" tube without a proper tool.... Not for me anyway. ;)
I can usually get 10" in with my hands, but I have small hands. My family calls then my spider monkey super powers. :D Do you have a tool planned for getting a minimum amount of epoxy into the right places deep in the airframe? I'm neater than average with epoxy but I still end up just kind of goobering stuff in when it's way in there.
I make these tools once and I have them for the next air frame. :)
I am making the internal fin fillets on this one more like the web of an i-beam, than an angled "fillet". It takes more time on a 3FC can because you have to cure them with the fins "flat". Same as if I used dams on the sides of the fins and filled on both sides.... but I don't need the dams and get a better bond to the air frame. Should be a really solid connection between the MT and air frame, and what better piece to do it than the fins we are trying to keep attached. :)

At least that was my thought process... 😅
I don't really follow the description, but I'm sure a picture will be worth a thousand words when you get them done.
 
I can usually get 10" in with my hands, but I have small hands. My family calls then my spider monkey super powers. :D Do you have a tool planned for getting a minimum amount of epoxy into the right places deep in the airframe? I'm neater than average with epoxy but I still end up just kind of goobering stuff in when it's way in there.

I don't really follow the description, but I'm sure a picture will be worth a thousand words when you get them done.
🤣😂🤣😂🤣😂 The image of a spider monkey in PPE wet sanding a rocket just came to mind....

Unfortunately, I suffer from FHFF Syndrome..... "Fat Hands, Fat Fingers Syndrome";)

Yes, yes I do. Funny you should mention it, but I am rolling some ideas in my head right now for at least three more tools...
1) A series of tools designed to precision apply epoxy in the right place, in the right volume, and in the case of fillets, closer to final shape to reduce tooling.
2) Tool/tools designed to "wet out" the area a bond is going to occupy as a prerequisite step to application of the bonding volume. I've seen too many epoxy joints with voids in them due to the bonding surfaces not being wetted out with the bonding adhesive FIRST. I got to "see" most of them AFTER a failure. Which is why I insisted that all composite work coming out of my shop be inspected for voids. A little brush would work, but brushes really add air to the mix.

3) Air bubbles suck.... voids where you don't want them suck in general. I am going to build a small, dedicated, vac chamber for bench use that I can use to degas all my adhesives.

If my ONLY contribution to HPR before I "go" is to reduce the frequency of "goobering" epoxy into place, I will consider it a monumental accomplishment. :D:cool:

It's actually pretty astonishing how "blunt object"-like the tools are in the composite industry. Considering how long we have been doing it, we should be further along. :)

Yes.... the pictures will clear things up, I am sure. My darling bride HATES it when I start trying to verbally explain stuff of a spatial nature. ;)
 
Yes.... the pictures will clear things up, I am sure. My darling bride HATES it when I start trying to verbally explain stuff of a spatial nature. ;)
My wife may have once said in frustration: "No don't draw me a sketch! I never understand your sketches!" :D 😬

[edit] I should add that my wife has very many fine qualities, but we have completely different ways of absorbing information.
 
Last edited:
The fondant balls are nice, but they aren't very big. I've mae tools similar to the OP's for larger radius fillets, and they've worked great for that purpose.
That's funny, because I am actually leaning the other way... :)

I am trying to figure out ways to use smaller than the "average" fillet radii most folks use.

I am using the Delrin because it doesn't need lubricant and they are available in sooooo many more diameters. I can tailor the radius of a filleted bond to exactly the minimum required radius.

This SHOULD result in a significant reduction in overall adhesive volume used.... and thus less "dead" weight.
 
My wife may have once said in frustration: "No don't draw me a sketch! I never understand your sketches!" :D 😬

[edit] I should add that my wife has very many fine qualities, but we have completely different ways of absorbing information.
I have had that PRECISE conversation!!

😂🤣
Yep.... she is linear like me, likes most all the things I like, and is very.... VERY smart.
But we speak completely different "engineering languages".
 
Back
Top