AeroDagger Cranked Arrow Build

The Rocketry Forum

Help Support The Rocketry Forum:

This site may earn a commission from merchant affiliate links, including eBay, Amazon, and others.
So, basically, the Angle of Attack, influenced by the Angle of Incidence of a Horizontal Stabilizer ( conventional "Stab" or a Canard ), determines what the Glider "sees", as being "upright".

What happens on a Delta planform, zero-dihedral, "flying wing" ( without any Horizontal Stabilizer) and symmetrical, vertical Rudder(s) that are above and below the Wing ? ( Think a fuselage-less Delta-Katt, without a Canard )

I am assuming that some type of "Elevator Flap" would be necessary . . .

Dave F.

View attachment 441797

View attachment 441798

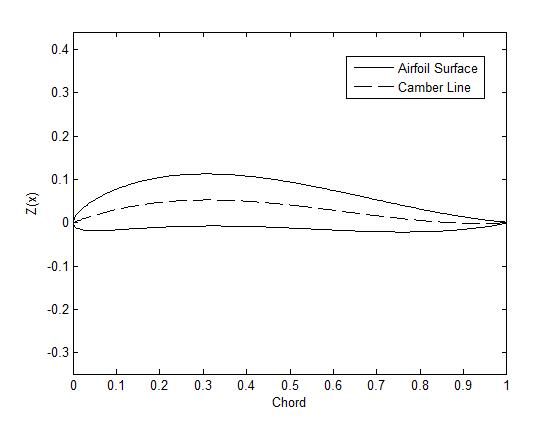
Yes, you need to balance the lift of the wing longitudinally with either a down force on an aft tail or an up force on a lifting canard to keep the nose pitched up in an attitude where the wing generates lift. Flying wings with no moveable control surfaces would require a special non-symmetric airfoil to trim for flight, ie trailing edge reflex is required to cancel out the pitching moment.

The fuselage stick on that particular delta-katt, according to the plans, has the incidence of the canard relative to the wing fixed to ensure you have a trimmed and balanced condition, they are not both at the same incidence angle. If you toss is upside down it will loop nose down until it uprights itself or hits the ground.
https://plans.rocketshoppe.com/mpc/mpc3-0930/mpc3-0930.htm
 
Flying wings with no moveable control surfaces would require a special non-symmetric airfoil to trim for flight, ie trailing edge reflex is required to cancel out the pitching moment.
Is this why the old Estes Nighthawk requires that unusual airfoil? IIRC it's beveled "down" (thinner) toward the leading edge and "up" on the underside trailing edge.

nighthawk airfoil.jpg


nighthawk wing.jpg
 
Is this why the old Estes Nighthawk requires that unusual airfoil? IIRC it's beveled "down" (thinner) toward the leading edge and "up" on the underside trailing edge.

View attachment 441849


View attachment 441850

Yes, essentially the mean camber line, the average of the upper and lower airfoil surface has a slight change in curve at the trailing edge. Here is another example of a reflex trailing edge, from the Wikipedia page on camber,

Reflex_camber_line.jpg


I think some of the confusion as to how does a glider "know" which way is up, is that folks are confusing the lateral directional stability of roll and yaw with longitudinal stability for pitch. When inverted, the glider won't roll over along the axis, it is basically flying inverted at the top of a loop, it will continue to fly in the loop until it pulls out at the bottom of the loop. The wing dihedral really has nothing to do with pitch attitude control, that is more for roll & yaw. Granted there are some coupled modes where these all interact, so this is just a very simplified explanation.
 
Last edited:
Is this why the old Estes Nighthawk requires that unusual airfoil? IIRC it's beveled "down" (thinner) toward the leading edge and "up" on the underside trailing edge.

View attachment 441849

Eric,

Very interesting . . . I had forgotten all about the "special airfoil" used on the Astron Nighthawk . . . Great memory !

See steps #9 - #10 :

1607621558067.png

Dave F.
 

Attachments

  • estK-34.pdf
    629 KB · Views: 16
Eric,

Very interesting . . . I had forgotten all about the "special airfoil" used on the Astron Nighthawk . . . Great memory !

See steps #9 - #10 :

View attachment 441856

Dave F.
Saw the catalog picture when I was 13 and fell in love with it. It was the first glider I ever built and was a defining moment for me. Been a rocket/boost glider fanatic ever since (though I took a many decades break in between).
 
Just an update.:

Flight Report

Finally got to maiden the AeroDagger, and it never became more apparent that trimming tosses can only get things in the ballpark — launching a glider is the only accurate way to get an idea of how balanced it is and how it performs.

Results:

> Since this was in part an experiment to ascertain that swept wings like deltas don't require any dihedral angle, I'm happy to confirm that it was absolutely stable and glided with no hint of roll problems, even in the day's 5 - 7 mph breezes.

> It flew “right side up” consistently on both the initial two trial flights (1/4A3-2T and 1/23-2T, which were under-powered) and a subsequent A10-3T flight (more on that below).

> The flat plate wing didn't disintegrate under the A10-3T boost and there were no visible stress cracks or fractures visible on the "stick and tissue" main wing. (Huge sigh of relief).

> The glider as trimmed was nose heavy. Since there’s no way to reduce the weight up front any further, I elected to install a pair of trim tabs to the canards, giving them a negative 18° pitch to help raise the nose. While I admit there might be a danger of causing the glider to loop under power, it’s been my experience that with canard gliders it’s far less likely to do so than putting in too much incidence on the stab of a “traditional” glider, even if it’s only a degree or two. I also have the launch CG set so that it falls right above the canard wings, negating any pitching moment tendency during boost. At any rate, adding trim tabs has far less extreme effects than increasing the angle of the canard wing itself. Thankfully all launches have been vertical and straight thus far.

Trim tab-1.JPG

Trim tab-2.JPG


> Anyway, I made a subsequent flight on an A10-3T, and while it boosted higher and posted a better 39-second flight time, it’s now has a moderate stall, which hurt performance and time in the air a lot.

I intend to remove the small bit of tail weight on its aft end, and will try to reduce the trim tab angle, maybe set it to 15° and see what happens.
 
Last edited:
Great looking boost glider and it sounds like you nearly have everything resolved.

Excellent work!
Thanks Tom, appreciate that! Getting close, just need a little bit of fiddling to get it dialed in nicely. Makes a great little sport flyer for small fields.
 
...The flat plate wing didn't disintegrate under the A10-3T boost and there were no visible stress cracks or fractures visible on the "stick and tissue" main wing. (Huge sigh of relief).🤫

Looks like your Aluminum tape downstream of the engine exhaust did the trick as a heat shield, great idea!
 
Looks like your Aluminum tape downstream of the engine exhaust did the trick as a heat shield, great idea!
It might even have helped hold everything together under boost. Couldn't be happier with the initial flights. Will keep tinkering to fine tune things.

Just need to be super careful not to do anything that will get it hung up on the rod. I've had other gliders get their wings totally fried when that happens, since there's no air rushing by to carry the heat away.
 
Just need to be super careful not to do anything that will get it hung up on the rod. I've had other gliders get their wings totally fried when that happens, since there's no air rushing by to carry the heat away.

Eric,

You might consider using a small "rail" or "C-Rail" ( if you can find it ), as "rod whip" can cause Launch Lugs to bind on the rod.

The Estes "C-Rail" can be cloned by taking a 3/8" X 3/8" X .0625" wall Square Aluminum Tube and having a 1/8" ( .125" ) wide slot milled into it.

Personally, I would go with a 1/2" X 1/2" X .0625" wall Square Aluminum Tube, with a 1/8" ( .125" ) slot milled into it.

Dave F.
 

Attachments

  • C-RAIL - 1.jpg
    C-RAIL - 1.jpg
    140.9 KB · Views: 6
Last edited:
Glad you got a chance to test fly her. would be great to see some launch pics nnext flight?:goodjob:
 
Last edited:
Had the launch controller in one hand and stopwatch in the other, so unfortunately I found myself short a set of hands to aim a cell or camera. ☹

Eric,

Was the 39 second duration with the stall, or without ?

If it was with the stall, I expect your glider is capable of making much longer flights.

It will be interesting to see how it reacts in a thermal, too !

Dave F.
 
Had the launch controller in one hand and the stopwatch in the other. Unfortunately that meant being short a hand to hold/aim a camera.

Had the launch controller in one hand and the stopwatch in the other. Unfortunately that meant being short a hand to hold/aim a camera. :(
 
Last edited:
Update:

Had a chance to do another trimming flight. The trim tab angle is still a bit too much so the glider is still stalling a bit (nose-light/tail heavy condition). I’m going to reduce the negative angle to 3° and retest when weather conditions permit.

Did my best to get the launch and flight on video but I wasn’t able to track it. It went straight into the sun and I lost it till just a few seconds before it landed. I’ve never had luck getting glider flights on video, and this was no exception — they just move too fast, and the relatively small size of the AeroDagger only compounded the problem. The video is crappy with no glide footage, but at least it’s proof of launch and flightworthiness (3rd flight and still no shred or noticeable damage, so I’m happy about that).

Would a small digital videocam be easier and better at being able to see my target and keep it in view than the regular still picture camera I’m using? Advice/Opinions welcome.

View attachment AeroDagger launch 3.mp4
 
Had a chance to do another trimming flight. The trim tab angle is still a bit too much so the glider is still stalling a bit (nose-light/tail heavy condition). I’m going to reduce the negative angle to 3° and retest when weather conditions permit.

Hi, Eric !

I have a thought . . .

In my experience, Wing Loading seems to have a noticeable effect on trimming. To wit, the lighter the Wing Loading, the more "finicky" the glider is to trim. That might be a factor here.

Dave F.
 
Update:

LOST

Reset the canards with the trim tabs set at 3°. That was the magic angle and it repeated several perfectly ideal and stable glides when hand-tossed. Maybe too perfect.

Today was a low-wind day so I decided to do a final test flight. I didn’t realize just how final that flight would be.

I set the pad up with a 5° tilt to the west, away from the direction of the sun, and launched on an A10-3T. Unfortunately it once again stubbornly headed east, directly into the sun’s glare, where I lost it. Although the pop pod landed almost at my feet, two sets of eyes were never able to track and locate the glider in the sky. It simply went up…and never came down. Between us, we searched 35 acres of grassy field without finding a trace. Maybe a case of being trimmed too well, so it was probably caught by the wind and carried away, either out of the park or into a tree.
 
Last edited:
I couldn't just give up on this one; I really like how the see-through "skeletal" construction makes it unique from anything else in my glider fleet, so I decided to build a replacement before the temps get too cold to dope the tissue outdoors.
 
( 1 ) I set the pad up with a 5° tilt to the west, away from the direction of the sun, and launched on an A10-3T. Unfortunately it once again stubbornly headed east, directly into the sun’s glare, where I lost it.
( 2 ) I couldn't just give up on this one; I really like how the see-through "skeletal" construction makes it unique from anything else in my glider fleet, so I decided to build a replacement before the temps get too cold to dope the tissue outdoors.

Eric,

( 1 ) The "tilt-back" was likely the result of weather-cocking . . . Thoughts ?

( 2 ) Looking forward to seeing the build and a successful flight !

MERRY CHRISTMAS !

Dave F.
 
Eric,

( 1 ) The "tilt-back" was likely the result of weather-cocking . . . Thoughts ?

( 2 ) Looking forward to seeing the build and a successful flight !

MERRY CHRISTMAS !

Dave F.
Winds were low, 4 - 6mph IIRC, so a possibility, though I waited till there was dead air before lighting it up. I suppose winds at ground level aren't necessarily the same higher up though.
 
Just completed the most painstakingly time-consuming…yet oddly satisfying…part of the build. Took a while to make sure all the joints butted up exactly and tightly to form the self-supporting pyramidal shapes that make the wing deceptively stronger than it looks.

Discovered this time around that the plastic sheet protector that the template is in will, unfortunately, adhere very well to CA. 😬
No problems with wood glue, but I strengthened the joints with thin CA and wasn’t happy to discover that this plastic isn’t the same as the one used in sandwich bags, which won’t stick to CA.

That’s okay, I cut most of it away, and it spawned a thought: if I decide to do an upscale, it might be cool to purposely use the transparent sheets to “paper” the balsa frame and make the skeletal framework clearly visible. Marginally heavier than tissue, but it shouldn’t make that much of a difference, since it would have more wing area to provide lift.

Main wing build 3.JPG
 
Last edited:
That’s okay, I cut most of it away, and it spawned a thought: if I decide to do an upscale, it might be cool to purposely use the transparent sheets to “paper” the balsa frame and make the skeletal framework clearly visible.

As a thought, a future upscale might incorporate RC . . . No more "flyaways" !

Dave F.
 
Things have progressed slowly since I couldn’t dope and tissue the flight surfaces outside because the weather has been obstinately uncooperative (oddly enough for winter, it's been too humid). I finally had a few days of warmer temps and got the tissuing done, though it wrinkled and puckered badly even after I had shrunk the tissue taut and put down 3 coats of dope over it. Never had that problem before — thankfully a hairdryer set on low fixed the problem.

IMG_7386.JPG


I extended the front of the fuselage an inch and moved the canard wing closer to the forward edge, the assumption being that the canard’s increased distance from the glider’s fulcrum (CG point) will make it more effective at lifting the nose without having to increase the angle of the canard.

IMG_7400.JPG
 
Last edited:
Update

Finished up the replacement build and waiting for a single-digit wind day to do some hand trimming. Doesn’t look like it’ll happen any time soon though according to the forecasts — a shame since the weather has been unusually warm and dry. Of course that’s just the first step, as the initial test flight should show how much effect the small changes will make. Very likely that will have to wait for Spring.

Aero rebuild.jpg
 
Latest Update 10/7/22

Well, Spring came and went without an opportunity for a test flight, but trimming tosses still show a nose-heavy tendency, so I added trim tabs to this latest revised version like I did with the earlier versions. I set it as close to 3° as I could get it.

Trim tab-3 latest.JPG
 
Test Flight 10/10/22

Ideal test flying conditions. Clear, 48°F, winds 2 – 4mph.

Success! Nice flat glide and early morning lack of thermals meant I recovered it unscathed. It may have taken awhile but now that I debugged things and have a successful design, I can finally wrap up this long-running project.

Apologies for the poor vid quality, had to digitally zoom way in to keep the glider visible.

 
Last edited:
Back
Top