Joshua F Thomas
Well-Known Member
- Joined
- Jun 4, 2019
- Messages
- 664
- Reaction score
- 342
I'm looking to get into clustered rockets. I knew from discussions with others, and The Handbook of Model Rocketry, that I was going to need a 12v launch controller capable of delivering large amperage quickly. Having some electronic skill, I decided to build my own.
I have to give appreciation to forum user Micromeister for sharing his own controller build in this thread, as I used it as a general starting point, and for various Radioshack parts numbers. Yes, you can still order them! The Igniter Continuity Tests by J. R. Brohm was also helpful for me to determine safe ranges of current for continuity tests. I ended up doing my own tests to find that limit, but having a source that agreed was quite helpful.
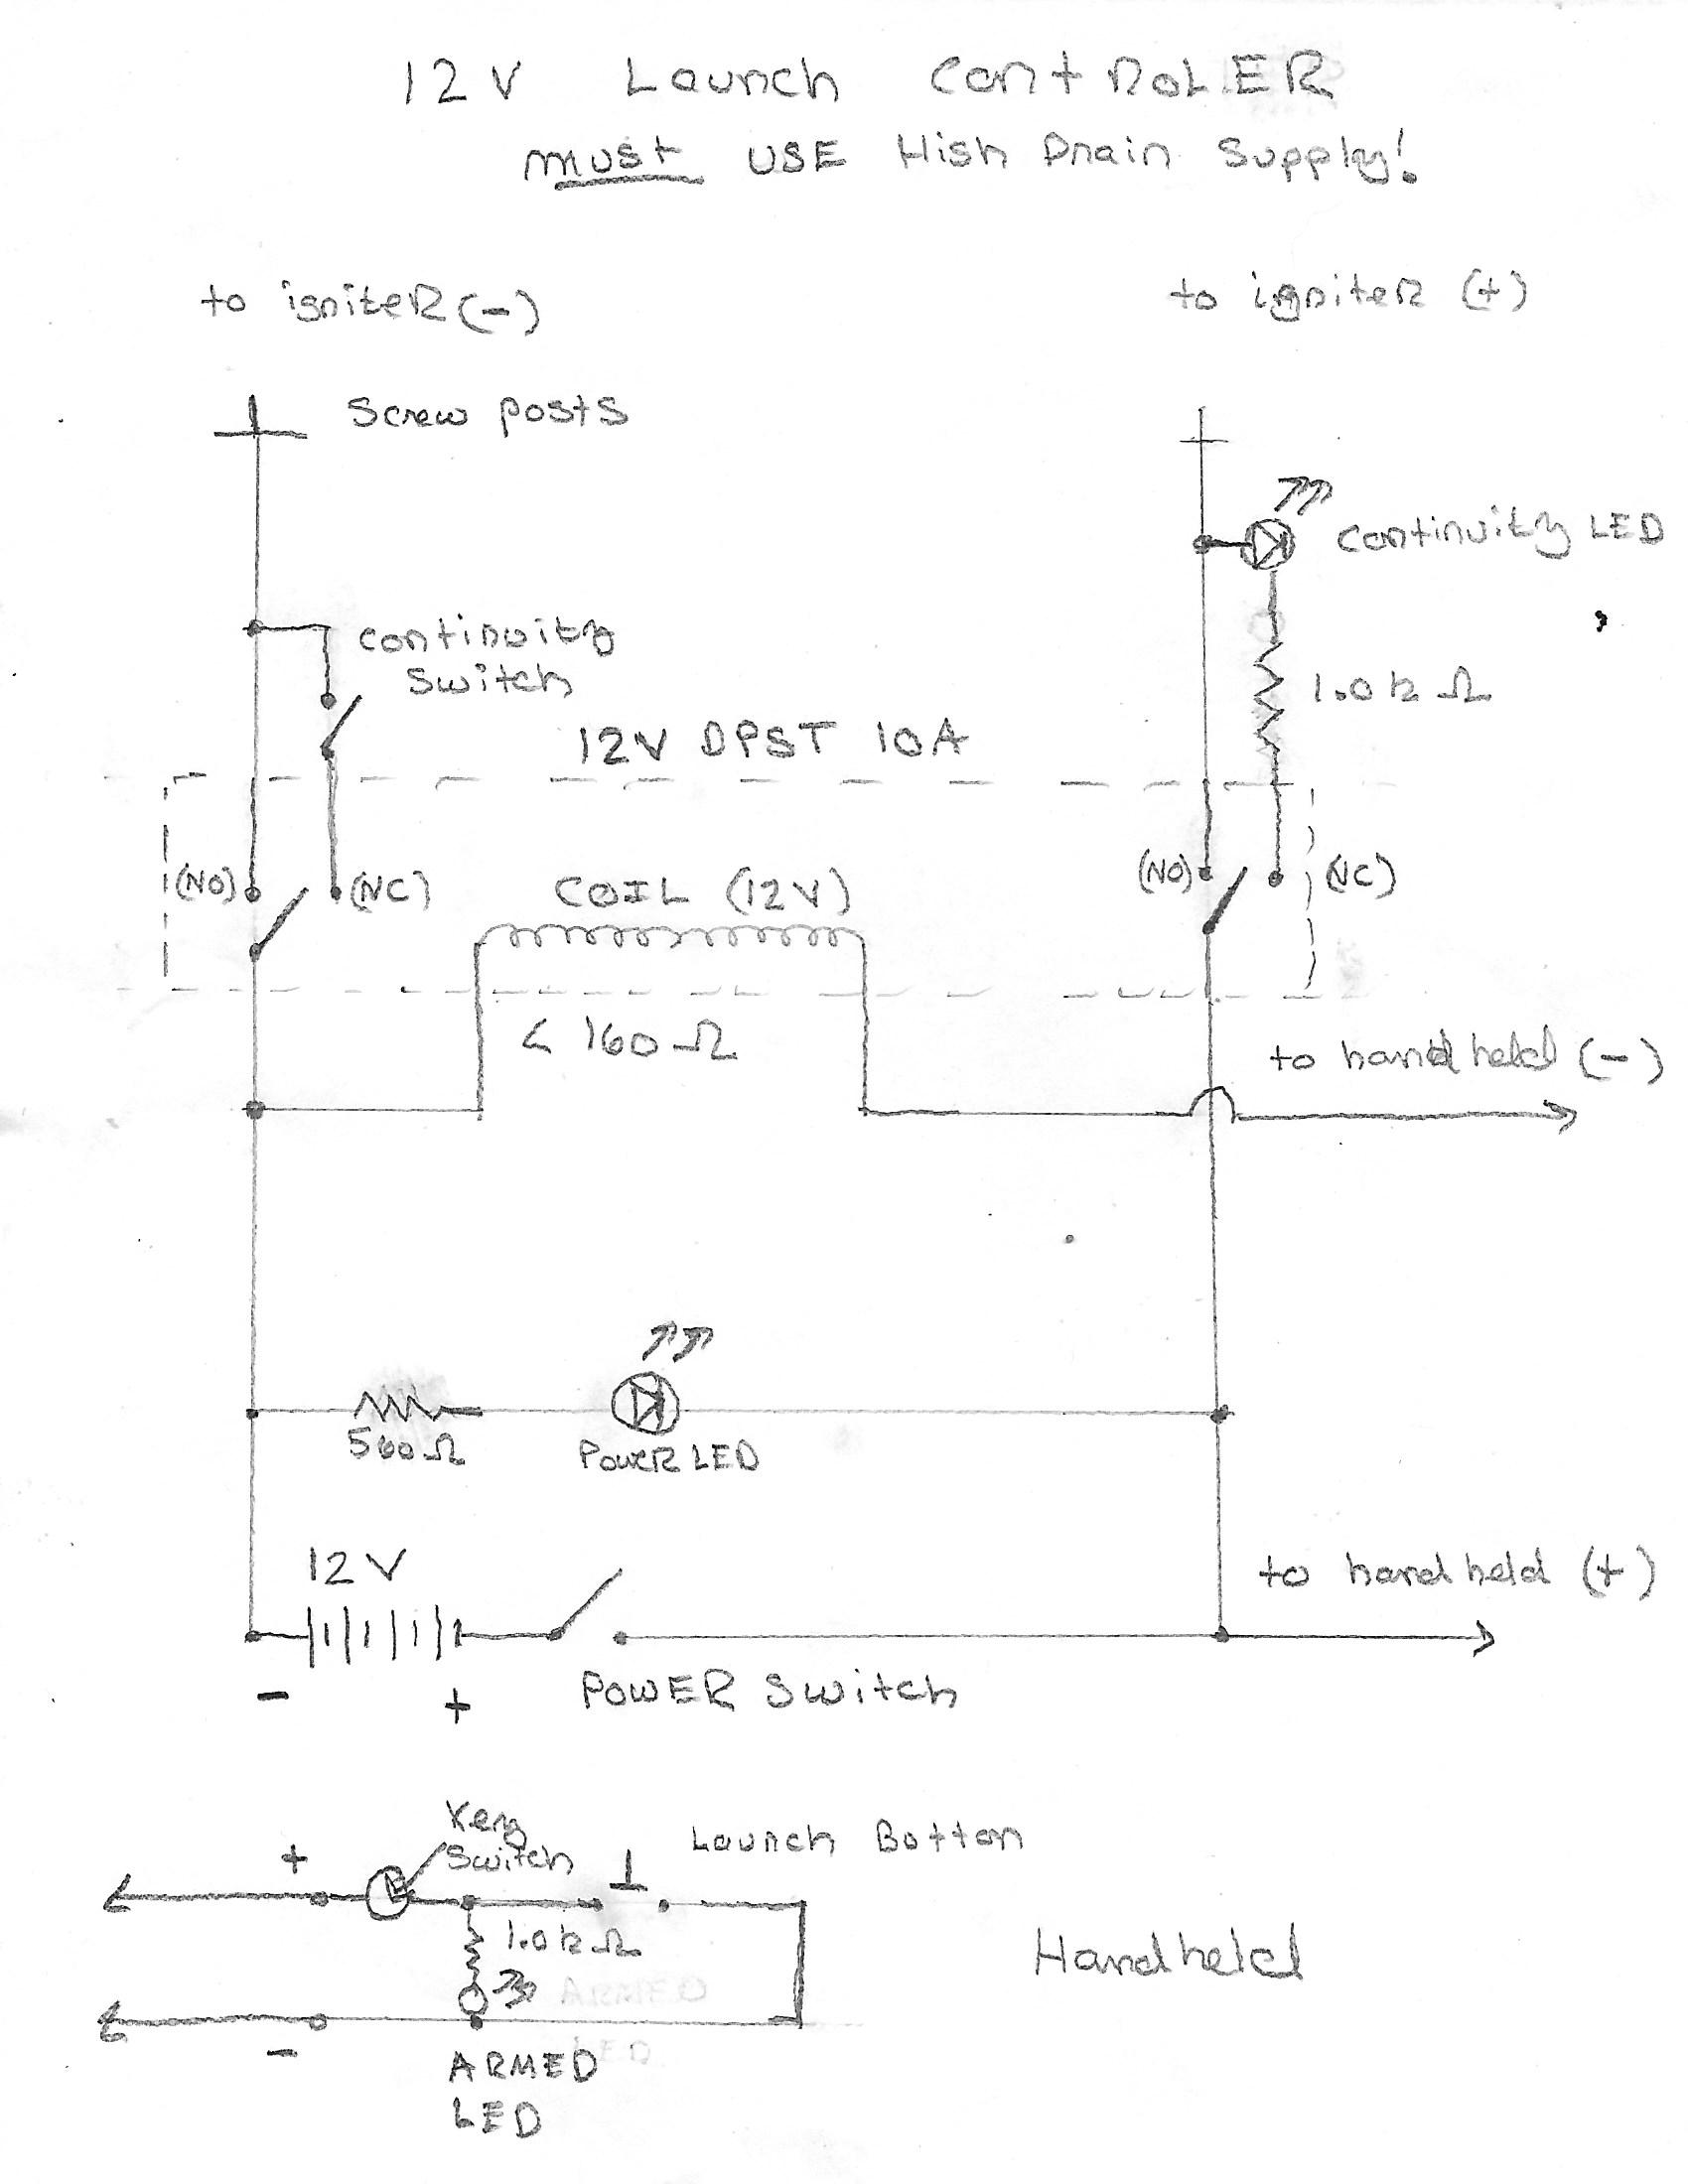
My build uses a power delivery box positioned close to the pad, drawing from a 12V sealed lead-acid battery of motorcycle size (any high-drain 12V source should work in theory), and a hand-held box with extension wires for launch activation. Power is delivered via a 12V relay. 14 AWG wire is used everywhere except for where LEDs are used, and there I used 22g just for ease of wiring. Wire from power delivery box to hand-held is 50 feet of 18g lamp cord. Microclips are used for the igniter leads. I'm building clip whips whips that can handle up to 4 igniters each, which should be enough for all my needs for quite a while.
The power delivery box has an on/off switch with indicator LED and continuity test switch with LED. I used a regular on-off and not a momentary for the continuity simply because I got multiple of the same switch when ordering, and it keeps the look clean. Having the continuity stay "on" even for prolonged periods is a low risk; total current draw is approx 10 mA via the LED. At that draw the igniters do not ever go off. I let several different ones run for hours, and they never even got warm. Brohm's testing also confirms this - you need closer to 100 mA for any of the igniter types in common use to go off. With both LEDs on the box draws about 20 mA, only 1/2 of that through the igniter.
The hand-held box has a tube-key arming switch. I paid a bunch for this switch - almost $15 - but I really like the way it looks and acts. It has a solid positive feel, and can not be removed in the armed position. It gives a highly authentic "I'm about to launch a rocket" feel. Another indicator LED is used to indicate the hand-held is receiving power and that the switch is in the armed position. Launch is a standard momentary pushbutton.
I have not had a chance to test this in the field yet; hoping for this tomorrow! About 3/4 of the way through this build I also realized that high-powered rechargeable batteries may also work and fit into the 7" x 4" x 2" power box. I would need close to or slightly better than 12 volts, and high-drain. After some research, it looks like 26650 sized Lithium Iron Phosphate (LFP) batteries will work. They are 3.3v each (x4 = 13.2v) and can handle large current delivery for short periods. Standard 3.7v lithium batteries don't add up well, you either get 11.1v or 14.8v. If I go this route I'm going to wire another switch to allow me to choose between external or internal batteries.
Photos below; any feedback or questions welcome. This was a fun build.


I have to give appreciation to forum user Micromeister for sharing his own controller build in this thread, as I used it as a general starting point, and for various Radioshack parts numbers. Yes, you can still order them! The Igniter Continuity Tests by J. R. Brohm was also helpful for me to determine safe ranges of current for continuity tests. I ended up doing my own tests to find that limit, but having a source that agreed was quite helpful.
My build uses a power delivery box positioned close to the pad, drawing from a 12V sealed lead-acid battery of motorcycle size (any high-drain 12V source should work in theory), and a hand-held box with extension wires for launch activation. Power is delivered via a 12V relay. 14 AWG wire is used everywhere except for where LEDs are used, and there I used 22g just for ease of wiring. Wire from power delivery box to hand-held is 50 feet of 18g lamp cord. Microclips are used for the igniter leads. I'm building clip whips whips that can handle up to 4 igniters each, which should be enough for all my needs for quite a while.
The power delivery box has an on/off switch with indicator LED and continuity test switch with LED. I used a regular on-off and not a momentary for the continuity simply because I got multiple of the same switch when ordering, and it keeps the look clean. Having the continuity stay "on" even for prolonged periods is a low risk; total current draw is approx 10 mA via the LED. At that draw the igniters do not ever go off. I let several different ones run for hours, and they never even got warm. Brohm's testing also confirms this - you need closer to 100 mA for any of the igniter types in common use to go off. With both LEDs on the box draws about 20 mA, only 1/2 of that through the igniter.
The hand-held box has a tube-key arming switch. I paid a bunch for this switch - almost $15 - but I really like the way it looks and acts. It has a solid positive feel, and can not be removed in the armed position. It gives a highly authentic "I'm about to launch a rocket" feel. Another indicator LED is used to indicate the hand-held is receiving power and that the switch is in the armed position. Launch is a standard momentary pushbutton.
I have not had a chance to test this in the field yet; hoping for this tomorrow! About 3/4 of the way through this build I also realized that high-powered rechargeable batteries may also work and fit into the 7" x 4" x 2" power box. I would need close to or slightly better than 12 volts, and high-drain. After some research, it looks like 26650 sized Lithium Iron Phosphate (LFP) batteries will work. They are 3.3v each (x4 = 13.2v) and can handle large current delivery for short periods. Standard 3.7v lithium batteries don't add up well, you either get 11.1v or 14.8v. If I go this route I'm going to wire another switch to allow me to choose between external or internal batteries.
Photos below; any feedback or questions welcome. This was a fun build.