Level 2: Binder Fusion Build Thread

The Rocketry Forum

Help Support The Rocketry Forum:

This site may earn a commission from merchant affiliate links, including eBay, Amazon, and others.

markfsanderson

Model Rocketry Returnee ...
TRF Supporter
Joined
Mar 15, 2017
Messages
159
Reaction score
41
Location
New Baltimore, VA
Greetings!,
Even before I earned my NAR Level One in Hondo, TX with my 4" LOC Goblin I selected and purchased a Binder Fusion for my NAR Level Two. I've never done a complete build thread, so here is my attempt. Although I'm a fairly experienced aero-modeler, Rocketry is still something novel and I've much to learn. Feel free to let loose with feedback!
My first impression of the Fusion was - wow! This is how a kit is supposed to be delivered. May of the annoying things like guide rail lines and etc are already done for you. The materials are first rate, included are CP/CG decals as well as a complete decal wrap. This leaves only priming and the lower 25% or so to paint. Very nice. The instructions are very clear and there are details that I'll point out later that convince me that Scott certainly knows a thing or two about designing rockets and deploying them as kits. Again, very impressive.
IMG_0001.JPG
The Fusions box it came in, packed very nicely - just like everything else - well done.
I hope to soon have this rocket complete displaying nicely next to my 4" LOC Goblin that I used to earn my NAR Level One.
Instructions, fin guides and CG/CP decals are first rate.
Ready to go!
Let's do this. . .
Glued the blind nuts, used oil in the threads to ensure glue wouldn't stick there. 30 minute epoxy on the eye nuts and bolts.
More of the same
Ditto.

More to come!

Mark!
 
Last edited:
Day two is for building the 54mm motor tube, and gluing it into the 3.9" booster while aligning it with the fins. I might get to sanding the fins today . . . not sure. I noticed something today that convinced me that Mr. Binder knows something about creating rocket kits. I'll note it below. Amazing how such small details can make a big difference. Wow.
IMG_0015.JPG
IMG_0016.JPG
IMG_0017.JPG
Do you see it yet? What I'm about to rave about? It's in the details . . . wonderful!

IMG_0018.JPG
IMG_0019.JPG
IMG_0015.JPG

Look at the fins on the aft portion that interfaces with the interior aft CR. Notice that it has a bevel cut into it? I'm new at this, but this is the first time I've ever run in to a manufacturer that knew that I'd have a healthy sized glue bead and beveled the fins ahead of time to make assembly just that much easier. Well done, Mr. Binder - details do matter. Perhaps to you old timers this is nothing new or special, but I thought it worth mentioning.

IMG_2307.jpg
IMG_2309.jpg
Finishing up on the aft, oiled the screws and blind-nuts to keep glue from sticking and put glue er.bead around the CR's perimeter. Finished up by mixing some isopropyl w/the glue and 'painted it onto the CR and the main tube's interior for strength and fire resistance as recommended.

Great build so far . . . now it's on to finish up the fore interior of the tub e as soon as the glue sets and then the fins. I bought an inexpensive Ryobi stationary belt sander for just this purpose . . . we'll see how it works tomorrow.

Mark!
 
Last edited:
Thanks for sharing your pictures with us. Is the fin alignment jig that you pictured before very stiff or a single piece of paper to glue to another piece of material?
 
Thanks for sharing your pictures with us. Is the fin alignment jig that you pictured before very stiff or a single piece of paper to glue to another piece of material?
It'll be a piece of paper that you can glue to another piece of material... I recommend foam core as it doesn't have a "grain" like cardboard does (which makes it easier to cut (as long as you have a new blade)).

Are you going to cut the hole for the Go-Pro camera to peer out from, or are you going to hold off on that? In my conversations with Scott, he told me that he designed it that way because (paraphrased with direct quote) look down videos "have been done to death". Personally, for mine, I plan on not doing it. I'll likely make a Cineroc-like periscope for a look down version... Perhaps a second camera could be used for a horizontal view.
 
Last edited:
It'll be a piece of paper that you can glue to another piece of material... I recommend foam core as it doesn't have a "grain" like cardboard does (which makes it easier to cut (as long as you have a new blade)).

Are you going to cut the hole for the Go-Pro camera to peer out from, or are you going to hold off on that? In my conversations with Scott, he told me that he designed it that way because (paraphrased with direct quote) look down videos "have been done to death". Personally, for mine, I plan on not doing it. I'll likely make a Cineroc-like periscope for a look down version... Perhaps a second camera could be used for a horizontal view.

K'Tesh,
Great idea with the foam! Rubber cement or (?) to bond the paper to the foam and roll out the excess with a PVC pipe or similar? I'm going to use the Go-Pro approach, and I agree the look-down video is pretty common. I might copy your idea and install look down camera as well.
My initial thoughts at this point is to keep things very simple and stick to a single deploy for my actual Level Two and then roll in the cameras, dual deploy and dual deploy w/backup (Level Three Practice) as time goes on. I fly from an old WW2 training base in Hondo, TX and we've got plenty of room for a 1200 meter altitude flight . . . though I'd love to keep it lower. I believe Scott recommends a 36" chute for single deploy. I'm assuming all I have to do is use rivets on the upper payload (the main chutes original location) and stuff the 36" parachute into the lower section, remove the unneeded hardware and go for it.

Mark!
 
Just to be "that guy"...
This isn't a Binder rocket...
It is an SBR rocket.
Very similar in so many ways and for good reason. Buy a Binder and you will see what I mean. ;)

But either way, it does look to be a nice kit. Nice size too. I've had my eyes on the Fusion as well as the Horizon and Diablo.
Your build is looking good so far.
How the heck can that thing fly on a G80?! Keep it light and fly it on the AT I170G. Should be a cool flight.

I did my L2 on a Binder Tyrannosaur and went full blown redundant dual deploy with GPS tracking, on the AT J315. Second flight was on a K600. Nice motor.

And...
If you are in Texas, it shouldn't be 1500 meters, it should be nearly a mile. :D

Good luck on your cert flight.
 
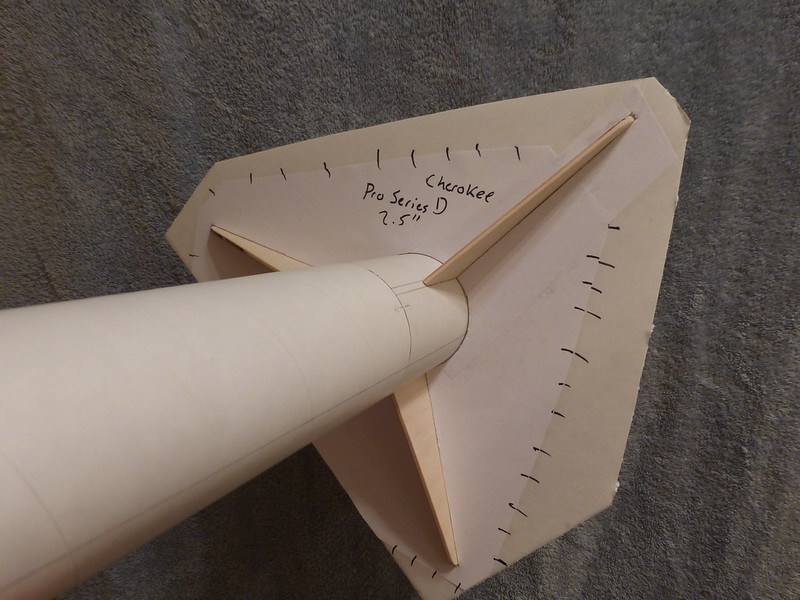
And now on to the fin work . . . getting the guide mounted onto a piece of dense foam wasn't too much trouble. I didn't cut it very well against the grain. I wonder if it would be better to use a bit larger piece of foam? My initial thought was to keep it small to make it easy to work with.

IMG_0022.JPG IMG_0023.JPG IMG_0024.JPG IMG_0025.JPG IMG_0026.JPG IMG_0027.JPG IMG_2312.jpg IMG_2313.jpg IMG_2314.jpg IMG_2315.jpg

K'Tesh, nice idea about the foam and Elmers glue stick - it works great!

Mark!
 
Last edited:
The cheap Ryobi belt sander ($150 @ Home Depot) seems to work just fine. Got everything lined up and ready. Some 15 minute glue, wait 45 minutes - next! Have two more yet to do . . . Ito m used a sheet of wax paper with a tube sized hole cut in it to keep things clean and neat. Works great!

Mark

IMG_2319.jpg IMG_2320.jpg IMG_2321.jpg IMG_2323.jpg IMG_2330.jpg IMG_2325.jpg IMG_2329.jpg IMG_2330.jpg IMG_2331.jpg IMG_2332.jpg
 
Last edited:
And now on to the fin work . . . getting the guide mounted onto a piece of dense foam wasn't too much trouble. I didn't cut it very well against the grain. I wonder if it would be better to use a bit larger piece of foam? My initial thought was to keep it small to make it easy to work with.

View attachment 387376 View attachment 387377 View attachment 387378 View attachment 387379 View attachment 387380 View attachment 387381 View attachment 387382 View attachment 387383 View attachment 387384 View attachment 387385

K'Tesh, nice idea about the foam and elmers glue stick - it works great!

Mark!
I usually use 1/4" paperbacked foam board from craft stores even on rockets up to 8". The fin guide is really there to keep the fins perpendicular to the axis or the body tube, the fin slots on TTW are what keeps the fins root edges parrallel to the axis. I cut out the fin slots on the guide so the whole thin slips over the BT and the fins.
 
Just to be "that guy"...
This isn't a Binder rocket...
It is an SBR rocket....

And...
If you are in Texas, it shouldn't be 1500 meters, it should be nearly a mile. :D

Good luck on your cert flight.

Is that like Binder/Binder Tomato/Tomato (insert alternate pronunciations at will)? Here in Texas we can do both Metric and English . . . Seriously, since I'm an engineer and wife is from the Philippines I've had to learn how to 'think' in metric - esp conversions. And we measure travel not in mileage but in hours . . . "How far away is x? Well, that's about 3 hours away" would the proper parlance. Thanks for the good luck . . . I'll need it!

Mark!
 
Last edited:
Absolutely not, BSD rocketry (founded by Scott Binder of now SBR), was sold a couple of times becoming Binder Design Rocketry which is now owned by Mike Fisher, SBR/Fusion Rockets is a new company by Scott Binder.
 
Absolutely not, BSD rocketry (founded by Scott Binder of now SBR), was sold a couple of times becoming Binder Design Rocketry which is now owned by Mike Fisher, SBR/Fusion Rockets is a new company by Scott Binder.
I apologize, my attempts at off-brand humor never seem to work well on the forums. I'm aware of the history.. Sarcasm, no matter how well executed, never seems to work very well on the internet . . .

Mark!
 
I apologize, my attempts at off-brand humor never seem to work well on the forums. I'm aware of the history.. Sarcasm, no matter how well executed, never seems to work very well on the internet . . .

Mark!
Comedy is best live and "in the moment", the internet takes half of that away, which is why memes seem to be so popular, they give a visual to the joke.
 
And to move on past my comedic flops, here are some pictures showing what I'm doing with the fin fillets. I decided to use Rocket Poxy on these. I had never used it before, but decided to give it shot. I think it turned pretty well. Applying fillets and paint has never been my strong suite; so here is the prep and the first fin results for your viewing pleasure or amusement!


Yeah, I know . . . no tape on the fins to keep epoxy where its' supposed to be. Will do that for the next two fins. Not too bad for a mid-skilled builder, RocketPoxy worked out fairly well. I did follow the instructions to the letter n and that seemed to help. I had read mixed opinions on RP here and elsewhere. I used a 3/4" ISO soaked tongue depressor to apply it and a 1" large ISO soaked tongue depressor to do the actual fillet. So far, so good. Not perfect, but better than I've done before.

Mark!
 
Last edited:
While your solution has worked for you this time... Like Rich said, 1/4" thick foamcore slotted to allow the fins to pass through (if not completely, partially) is what we typically use. It's cheaper, and does the job. For kits that don't include the SBR-like fin guide, you can go to the use a fin alignment guide downloaded from payloadbay.com and create one.

Below is one of mine... However, in the photo below, I hadn't notched the guide at the tube/fin joint yet (to prevent gluing the guide to the body tube accidentally).

15592981811_6c3f6af2e3_c.jpg


Again, the fins don't need to be able to pass through the guide, they just need to be held in place by the guide. It also helps to make a notation on the guide of the body tube diameter, and the fin width. You can reuse them as long as they are serviceable, and knowing if the notch is for a 1/8" or a 3/32" fin can be helpful. I use these on all my builds now, including my LPR kits. I started doing it because the one of the fins on my L1 scratchbuild slumped, unnoticed, before the epoxy set. So, now they're not at nice clean 120 degree angles.
 
Last edited:
I'll do that next time on large builds - great idea! I blindly follow\ed the directions, and it seemed to turn out well. I do have the Estes fin alignment guide which I have used with 5 or six LPR builds - works very nice. Thanks for the tip on the website, I'm familiar with payloadbay as well . . . very nice! I'll have more build pictures soon. So far my SBR Fusion is building very nicely . . .

Mark!
 
Last edited:
Here is the rest of my work on the fins/fin can. Doesn't look too bad, probably the best work I've done . . . I'm certainly not a particularly talented modeler, for sure. I can see some minor glitches. The most annoying part of this was not the glue or setting up the alignment guide. It was the glassine coming up with the blue tape that I used. Not sure how to get around that - perhaps use a hair dryer to warm up the blue-tape adhesive? Not sure

Mark!

 
And now for a quick look at the CAM1 Action Camera (GoPro) and Altimeter bay. Very cool design, very light weight. Not too much to it, it assembled without any sanding or fitting on my part. Just glue, then epoxy envelope as suggested by the instructions and I'm done.

Mark

 
About the glassine, you can always try to reduce the tack of the tape by applying it to your forehead. The oils in your skin will reduce the stickiness.
 
Mark. Looking good! I’m curious how you’re going to mount the electronics sled in the rocket. I’ve recently finished a SBR Horizon and kinda of ‘winged it’ on the sled mounting. The Horizon isn’t set up for dual deploy stock so the instruction didn’t have many details on it.

Do the instructions for your Fusion show how to mount it?

Thanks,
John

John,
Ironically enough, my first flight will be using single deployment - dual deploy will come after my successful Level 2 qualification flight. But yes, it comes with full instructions on how to set up both single and dual deploy. I'll go over the installation in future posts. Thanks for the complement!

Mark!
 
Last edited:
John,
Attached is a picture of the SBR Fusion in assembled but incomplete state. Also a quick video describing how the CAM1 fits in the rocket.

Mark

Assembled for effect, but nowhere near complete - my SBR Fusion. Look nice.

Sorry about the amateurish video quality, it gets the point across - I hope!

Mark!
 

Latest posts

Back
Top