What did you do rocket wise today?

The Rocketry Forum

Help Support The Rocketry Forum:

This site may earn a commission from merchant affiliate links, including eBay, Amazon, and others.
Had one of those only happens once in couple years....perfect flying day! NO WIND.

Flew my Punisher & top stage testing of Nike-Apache....flawless, perfect see all events flights!
And tomorrow should be the same.
Maiden flight of my Estes v2 had one of those.. the rocket landed 1.5m from the pad.. I had the "nearest the pin" for a few launches till another member landed his OVER the launch rail (NC / chute on one side of the sawhorse, fin can over the other...)
 
I worked on this yesterday. I'm always tinkering with things in my rocket hobby. I jump from one thing to another. Some of my rockets only get started, then I'll set them aside, Others never get finished. Like this one, I've had sitting around for over a year. I want to try the chute release from jolly logic in it.
 

Attachments

  • IMG_3419.JPG
    IMG_3419.JPG
    156.2 KB · Views: 87
I worked on this yesterday. I'm always tinkering with things in my rocket hobby. I jump from one thing to another. Some of my rockets only get started, then I'll set them aside, Others never get finished. Like this one, I've had sitting around for over a year. I want to try the chute release from jolly logic in it.

Love the boat tail, too.
 
Love the boat tail, too.
It's nothing special watheyak, Just that Estes BT-60 parabolic nose cone cut to fit a spiral ring retainer. I've been kind of upset lately. I made a kit up for Chuck (one of the mods.) So I go out to cut a 24 mm. retainer for it and my lath quite working. With pulling these sleeves you sure can get carried away with it. I've been looking at the loc. Nose cones and, I'm thinking it might be possible to do this with there nose cones and body tubes.
 
Finished assembly on my 2” Frenzy. Just waiting on the weather to improve so I can do my ejection testing and start painting it. I was hoping to maiden it this coming weekend, but I’ll wait to properly test and paint it. Hopefully next month!

127E1D00-17F0-43BC-919C-C518F88F80A1.jpeg
 
Neil beat you to it.

NARTS just stuffed the envelope upside down.

Yeah, got to remember to refresh the page before I post..and not to have multiple browser windows open to the same page... and also not to be in such a hurry to demonstrate a very meagre wit...

181007_133818.png

Put my cheap boroscope up the motor tube in the Moonbat, to get a look at the inside of the baffle. Its dirty, but scraping the surface with the camera, it looks like its just soot and unburnt BP. The foil appears to be intact.

Tried to use the right angle attachment to get a view of the ports at the bottom of the cone, but it performed exactly as well as one would expect a $20 (including shipping from China) Banggood special to perform. Which is to say, it is slightly amazing that it works at all.

(what the baffle looked like before it was installed).

20180404_124019-png.342122
 
Finished assembly on my 2” Frenzy. Just waiting on the weather to improve so I can do my ejection testing and start painting it. I was hoping to maiden it this coming weekend, but I’ll wait to properly test and paint it. Hopefully next month!

View attachment 363439
Did you epoxy fill between the forward and aft C/R's?
 
Did you epoxy fill between the forward and aft C/R's?

I used US Composites epoxy on the middle centering ring, as it is thinner and easier to inject with a syringe than RocketPoxy is, so it doesnt show up well in the photo. As for the black band forward of the front fins, I placed the bead of rocketpoxy too far aft, so that band is the result of the epoxy being pushed forward when I inserted the motor mount assembly. Same at the rear, I placed a bead of epoxy around the airframe and motor mount, then slid the ring on over it until the centering ring is flush against the aft fins.
 
I got started building my launch rail setup, which actually will work for my rod-launched rockets, also!
Tyler I was thinking the very same thing with one of these. I pulled one off my house and thought now that would make a good launch pad set up. Kool!
 
Applied spot putty to the repaired chipped fillets on Long Tom. Also packed the parachutes and charges.
With signed test in hand, I'm ready to fly for L2 this Saturday at HARA's North Alabama Returns to Flight launch.


It's nothing special watheyak, Just that Estes BT-60 parabolic nose cone cut to fit a spiral ring retainer. I've been kind of upset lately. I made a kit up for Chuck (one of the mods.) So I go out to cut a 24 mm. retainer for it and my lath quite working. With pulling these sleeves you sure can get carried away with it. I've been looking at the loc. Nose cones and, I'm thinking it might be possible to do this with there nose cones and body tubes.

LOC cones do make good boattails! (Just.......make sure you prep the surface properly so the epoxy doesn't chip at the edges....)

Boattail finished.jpg
 
LOC cones do make good boattails! (Just.......make sure you prep the surface properly so the epoxy doesn't chip at the edges....)
Ya, But you sure could have done a better job aligning those forward fins Nytrunner. Ha. I had to look twice. That's a good looking rocket.

I did get some clear coat on this rocket today. I had a bunch of red flake left over from a motorcycle build a few years back I thought I'd use on it. Now I've got all the internals to build.
 

Attachments

  • IMG_3427.JPG
    IMG_3427.JPG
    83.9 KB · Views: 73
Did a repair job on The Tack (a saucer designed by Steely-Eyed aka Brett S.), the original mini-CD had broken so the rocket was no longer flyable. Its a particularly tough build with an extensive materials list:
1x mini-CD
1x 1.0" section of BT20
1x BT20 to BT60 centering ring
1x 1.0" section 1/8" launch lug
1x Estes Yankee nosecone P/N 070323

To build, open up center hole in mini-cd to .75" and then create a notch on edge of hole for launch lug(create notch in centering ring as well for LL). Glue centering ring to bottom of 1" long BT20, glue nosecone to top of 1" BT20. Glue launch lug to side of BT20 (making sure to line it up with notch in CR). After glue has dried, using epoxy (I like the Loctite Plastic 5min epoxy) put a bead of glue around top of CR, then slide mini-CD over nosecone and seat firmly on top of CR, clamp mini-CD to CR until epoxy is cured. Pick the 18mm of your choice and fly it!

Other rocketry stuff for the day:
primed my daughters Semroc Yung'Un's Nuke (thanks to the rocketeer formerly known as DixonTJ aka someone else on TRF now;)), it was one of his giveaways to young rocketeers.
Built a 220 Swift (and did a OR file for it, so I can upscale it to BT20, 50,55,60,70,80, and T300), I also scanned and created .svg files for decals for the eventual upscales.
Painted 3 fins orange on the Super Neon (that's been built for a year) and then couldn't find the pink paint for the NC and other 3 fins...oops used it all on my daughters 3" pink crayon rocket.The Tack pic1.jpg The Tack pic2.jpg
Neatened up the build area...before the wife kills me...
 
Stripped the paint off my BlackFly's airframe. I did not like how the semi-translucent blue, Over white base, turned out. Hoping a metallic silver base will give the blue a softer tone. Stripped and repainted the NC a few days ago. I also prepped the NC with adhesion promoter which I believe helped the paint job come out much better this time around.
 
After having quite a few days of rainy, wet and cold weather...
We are having a wonderful afternoon for putting down some paint.
Used up the little bit of gray primer I had to prime the replaced fin on the Centuri Spirit of America.
Got the black on the fins of my Hi-Flyer XL.
Tried one more time to black on the Bullet Boob Bertha.
If I have time, I'll wet sand down my InFlight Goblin and lay down the Yellow, and get the nose cone in black.
Stupid Fruit fly's are thicker than a horses main out today. They are getting in the paint. But I ain't complainin.
But they get all over me while I'm outside and come in on me.
EDIT:
Had time to paint the nose cone on the Goblin, but there wasn't enough primer on the rest to do a good job of sanding. I broke through everywhere. So I'll have to wait until Santa (Hopefully) brings me some primer. I need about 20 cans for what I have sitting here now waiting for primer.
I have a bunch of things all wet sanded and waiting for Gloss White, but I don't have any. So Santa (hopefully) will bring me some of that too.
 
Last edited:
I'm far enough on the launch tower that I am convinced it is going to work. Here is the CAD rendering of all parts. The orange parts are nut holders and drill guides, and were 3D printed. The steel parts were all done by a laser cutting service. There is nothing revolutionary in the design. I was able to refine a few things by getting an up close look at some nice towers at Airfest the last couple years.

I've also attached the CAD file in .step format for anyone interested. If you view the file, forgive my ham-handed method of creating things...I'm self taught, and it shows.

Honestly, if you want something similar to this you should just buy the one Chris from APE sells...WAY less work, and unless you get a screaming deal on laser cutting as I did, probably cheaper too. I like to make things, and am generally a glutton for punishment, so I went for a ground up tower.


Attachments

  • Tower.step
    1.2 MB · Views: 30
Last edited:
I'm slogging through some horrible work today, reviewing proposals for the NIH. Whenever I finish a review, I reward myself with a little rocket-related activity (masking my daughter's rocket for painting, sanding a fin alignment jig, etc.)

So I just ordered a nose cone sled and some hardware from Cris @ lab rat rocketry (above). Doing what I can to help pay for that launch tower.
 
Assembled a few motors for the TCR launch this weekend, and in the process discovered that I think I accidentally threw out one of my 54mm seal disks at the last launch... guess I need to buy a new one!
 
4D553AB0-AB3B-48F1-BDED-DB7BCE6B7578.png 20A7B90B-7C2A-4F46-A7EB-6416262CA7C5.jpeg
Mentored the UTC SEDS 2018 team today. They learned the crazy Jim method of chute packing and ribbon folding shock cord. Also stopped some silly sim errors. They and the professor are going to Bayboro, NC this weekend. Prof is attempting an L-2. They were thrilled after packing their first multistage MD rocket.
 
I'm far enough on the launch tower that I am convinced it is going to work. Here is the CAD rendering of all parts. The orange parts are nut holders and drill guides, and were 3D printed. The steel parts were all done by a laser cutting service. There is nothing revolutionary in the design. I was able to refine a few things by getting an up close look at some nice towers at Airfest the last couple years.

I've also attached the CAD file in .step format for anyone interested. If you view the file, forgive my ham-handed method of creating things...I'm self taught, and it shows.

Honestly, if you want something similar to this you should just buy the one Chris from APE sells...WAY less work, and unless you get a screaming deal on laser cutting as I did, probably cheaper too. I like to make things, and am generally a glutton for punishment, so I went for a ground up tower.

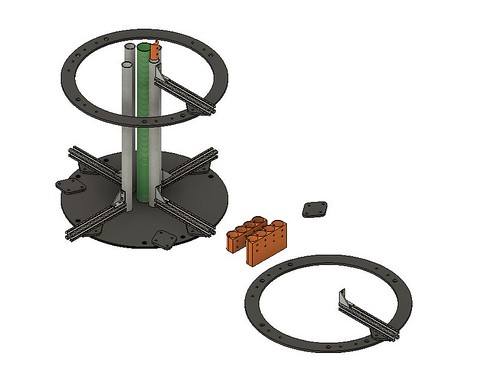
Question: Are you considering using PTFE (Teflon) wear strips on the vertical guides to reduce friction on the airframe?
 
Back
Top